Page 248 of 327

611
In case of an emergency
1 23456789
Description Fuse rating Protected component
ECU1 10A Engine control unit
STOP 15A Stop light
F/WIPER 20A Front wiper
R/FOG 10A Rear fog light
F/FOG 15A Front fog light
LO HDLP 15A Headlight (low)
HI HDLP 15A Headlight (high)
A/CON 10A Air conditioner
F/PUMP 15A Fuel pump
T/OPEN 10A Trunk lid opener
SAFTY P/WINDOW 20A Safety power window module
HORN 10A Horn
INJ 15A Injector
SNSR 10A O2 sensor
ECU2 30A Engine control unit
SPARE 10A spare fuse
SPARE 15A spare fuse
SPARE 20A spare fuse
SPARE 30A spare fuse
ABS2 30A Anti-lock brake system
ABS1 30A Anti-lock brake system
IP B+ 50A In panel B+
BLOWER 30A Blower
IGN2 30A Ignition switch
IGN1 30A Ignition switchDescription Fuse rating Protected component
RAD
30A (Gasoline)Radiator fan
40A (Diesel)
COND 20A Condenser fan
ALT
120A (Gasoline)Alternator
140A (Diesel)
ATM - Automatic transaxle control relay
WIPER - Wiper relay
F/FOG - Front fog light relay
LO HDLP - Headlight relay (low)
HI HDLP - Headlight relay (high)
A/CON - Air conditioner relay
F/PUMP - Fuel pump relay
DRL - Daytime running light relay
COND2 - Condenser fan relay
HORN - Horn relay
MAIN - Main relay
START - Start motor relay
RAD - Radiator fan relay
COND - Condenser fan relay
Engine compartment
Page 249 of 327

In case of an emergency
12
6
1 23456789
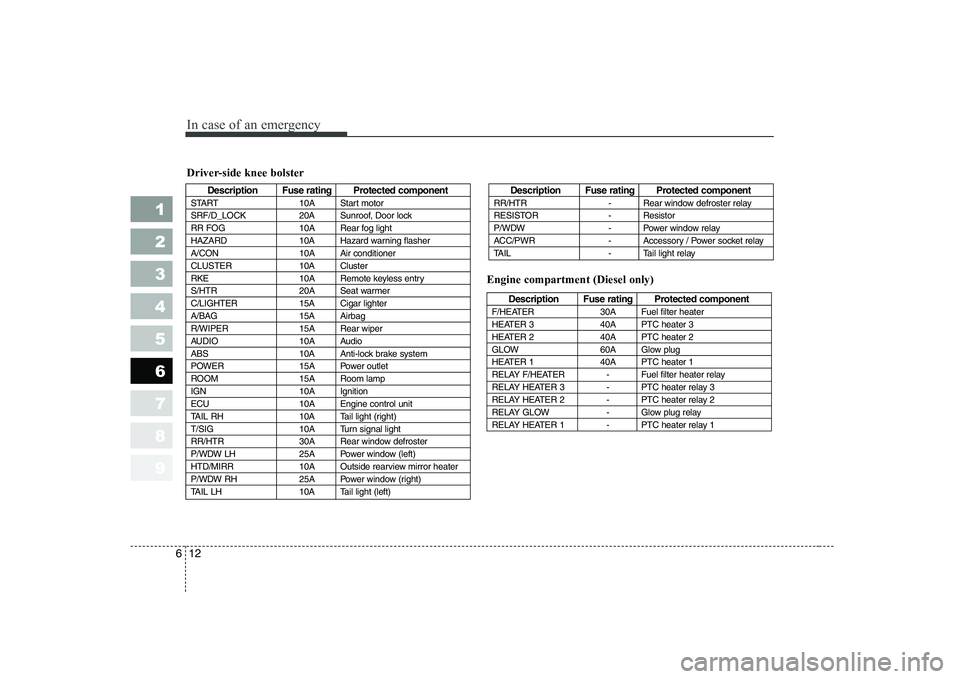
Driver-side knee bolster
Description Fuse rating Protected component
START 10A Start motor
SRF/D_LOCK 20A Sunroof, Door lock
RR FOG 10A Rear fog light
HAZARD 10A Hazard warning flasher
A/CON 10A Air conditioner
CLUSTER 10A Cluster
RKE 10A Remote keyless entry
S/HTR 20A Seat warmer
C/LIGHTER 15A Cigar lighter
A/BAG 15A Airbag
R/WIPER 15A Rear wiper
AUDIO 10A Audio
ABS 10A Anti-lock brake system
POWER 15A Power outlet
ROOM 15A Room lamp
IGN 10A Ignition
ECU 10A Engine control unit
TAIL RH 10A Tail light (right)
T/SIG 10A Turn signal light
RR/HTR 30A Rear window defroster
P/WDW LH 25A Power window (left)
HTD/MIRR 10A Outside rearview mirror heater
P/WDW RH 25A Power window (right)
TAIL LH 10A Tail light (left)Description Fuse rating Protected component
RR/HTR - Rear window defroster relay
RESISTOR - Resistor
P/WDW - Power window relay
ACC/PWR - Accessory / Power socket relay
TAIL - Tail light relay
Description Fuse rating Protected component
F/HEATER 30A Fuel filter heater
HEATER 3 40A PTC heater 3
HEATER 2 40A PTC heater 2
GLOW 60A Glow plug
HEATER 1 40A PTC heater 1
RELAY F/HEATER - Fuel filter heater relay
RELAY HEATER 3 - PTC heater relay 3
RELAY HEATER 2 - PTC heater relay 2
RELAY GLOW - Glow plug relay
RELAY HEATER 1 - PTC heater relay 1
Engine compartment (Diesel only)
Page 307 of 327

Maintenance
44
7
1 23456789
BULB REPLACEMENT
Use only the bulbs of the specified
wattage.
✽✽ NOTICE
If you don’t have necessary tools,
the correct bulbs and the expertise,
consult an Authorized Kia Dealer. In
many cases, it is difficult to replacevehicle light bulbs because other
parts of the vehicle must be removed
before you can get to the bulb. Thisis especially true if you have to
remove the front bumper to get tothe bulb(s). Removing/installing the
front bumper or bumper hardware
can result in damage to the vehicle.
✽
✽ NOTICE
After heavy, driving rain or washing, headlight and taillight lenses could
appear frosty. This condition is
caused by the temperature differencebetween the lamp inside and outside.
This is similar to the condensation on
your windows inside your vehicleduring the rain and doesn’t indicate
a problem with your vehicle. If the
water leaks into the lamp bulb cir-
cuitry, have the vehicle checked by
an Authorized Kia Dealer.
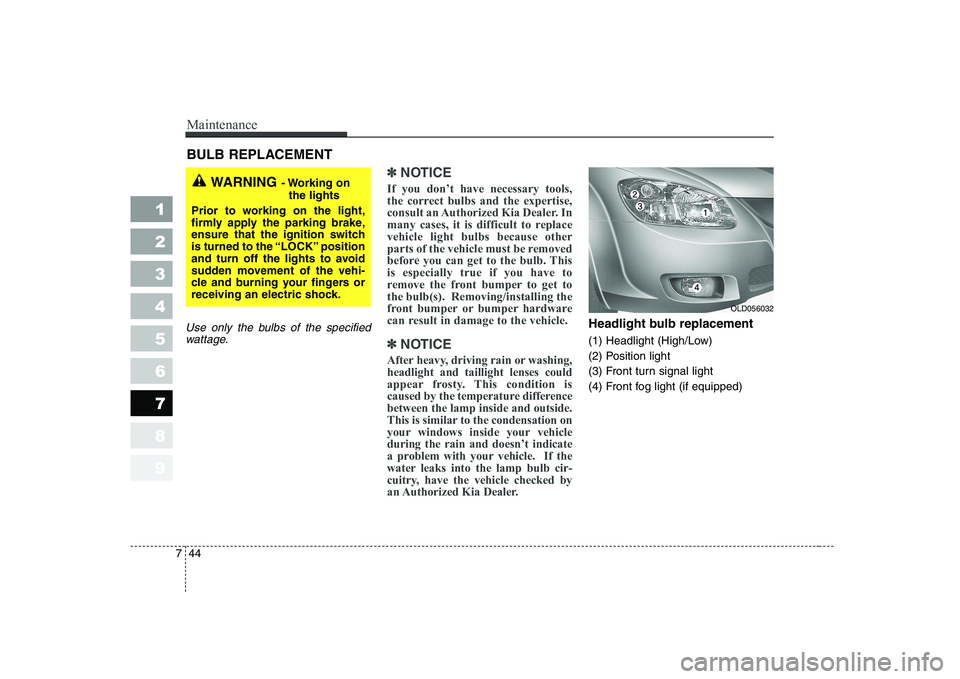
Headlight bulb replacement
(1) Headlight (High/Low)
(2) Position light
(3) Front turn signal light
(4) Front fog light (if equipped)
WARNING - Working on
the lights
Prior to working on the light,
firmly apply the parking brake,
ensure that the ignition switch
is turned to the “LOCK” position
and turn off the lights to avoid
sudden movement of the vehi-
cle and burning your fingers or
receiving an electric shock.
OLD056032
Page 309 of 327

Maintenance
46
7
1 23456789
6. Install a new headlight bulb and
snap the headlight bulb retaining
wire into position by aligning the
wire with the groove on the bulb.
7. Connect the headlight bulb socket- connector.
8. Install the headlight bulb cover by turning it clockwise.
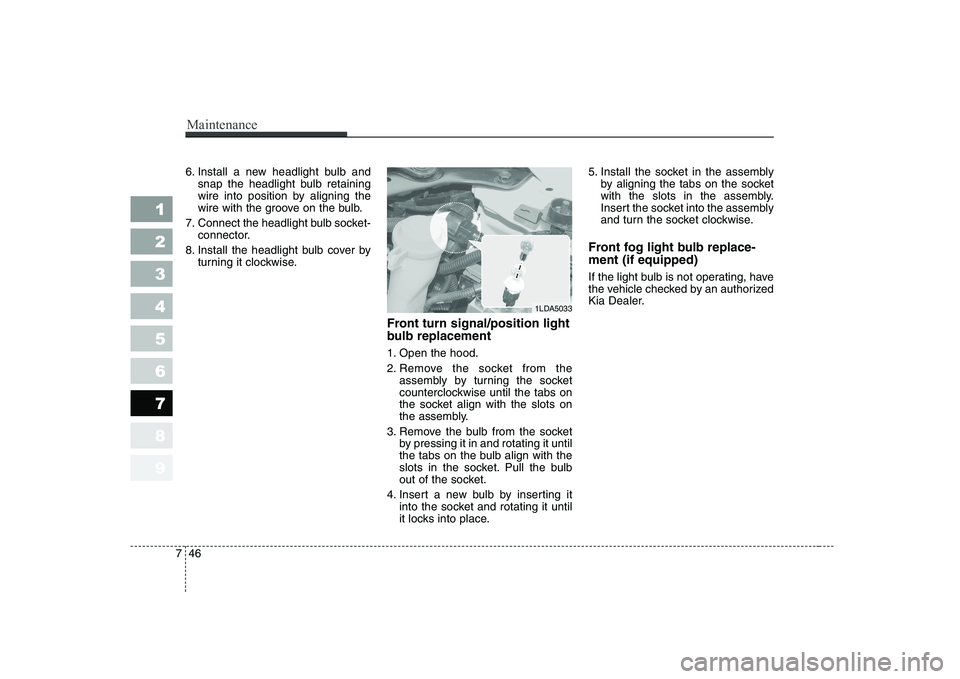
Front turn signal/position light
bulb replacement
1. Open the hood.
2. Remove the socket from theassembly by turning the socket
counterclockwise until the tabs on
the socket align with the slots on
the assembly.
3. Remove the bulb from the socket by pressing it in and rotating it until
the tabs on the bulb align with the
slots in the socket. Pull the bulb
out of the socket.
4. Insert a new bulb by inserting it into the socket and rotating it until
it locks into place. 5. Install the socket in the assembly
by aligning the tabs on the socket
with the slots in the assembly.
Insert the socket into the assembly
and turn the socket clockwise.
Front fog light bulb replace- ment (if equipped)
If the light bulb is not operating, have
the vehicle checked by an authorized
Kia Dealer.
1LDA5033
Page 313 of 327

Maintenance
50
7
1 23456789
2. Remove the socket from the hous-
ing by turning the socket counter-
clockwise until the tabs on the sock-et align with the slots on the hous-ing.
3. Remove the bulb from the socket by pressing it in and rotating it until the
tabs on the bulb align with the slots
in the socket. Pull the bulb out of the
socket.
4. Insert a new bulb by inserting it into the socket and rotating it until it
locks into place.
5. Install the socket in the housing by aligning the tabs on the socket with
the slots in the housing. Insert the
socket into the housing and turn the
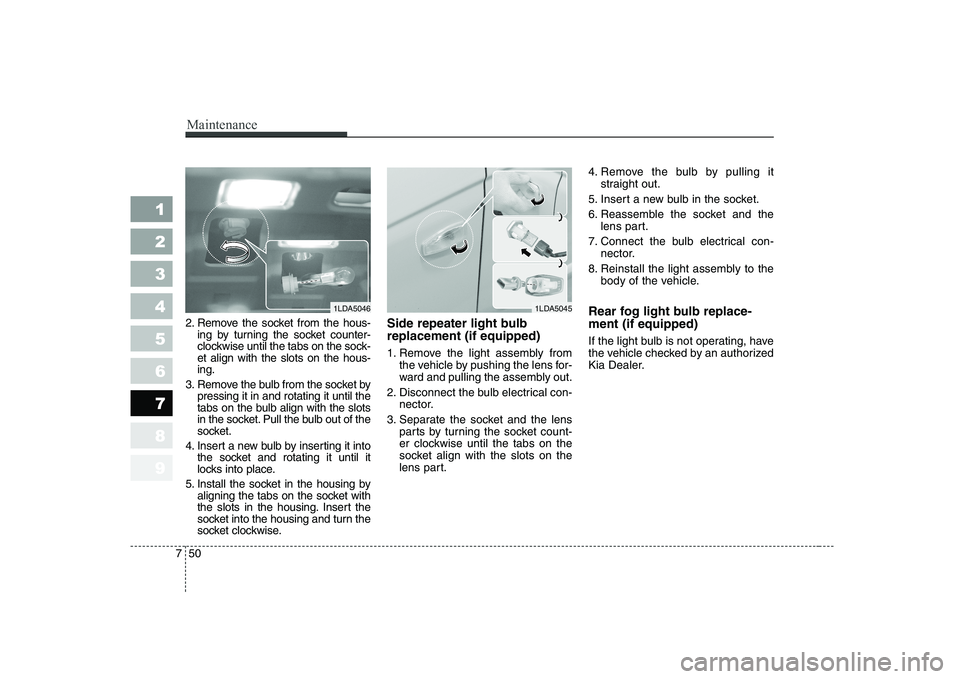
socket clockwise. Side repeater light bulb replacement (if equipped)
1. Remove the light assembly from
the vehicle by pushing the lens for-
ward and pulling the assembly out.
2. Disconnect the bulb electrical con- nector.
3. Separate the socket and the lens parts by turning the socket count-
er clockwise until the tabs on the
socket align with the slots on the
lens part. 4. Remove the bulb by pulling it
straight out.
5. Insert a new bulb in the socket.
6. Reassemble the socket and the lens part.
7. Connect the bulb electrical con- nector.
8. Reinstall the light assembly to the body of the vehicle.
Rear fog light bulb replace- ment (if equipped)
If the light bulb is not operating, have
the vehicle checked by an authorized
Kia Dealer.
1LDA50461LDA5045
Page 321 of 327
83
1
2
3
4
5
6
7
8
9
Specifications
Light Bulb Wattage
Headlights (Low/High) 55/60
Front turn signal lights 21
Position lights 5
Side repeater lights* 5
Front fog lights* 27
55 : projection type
Stop and tail lights 21/5
Rear turn signal lights 21
Back-up lights 16
Rear fog light* 21
High mounted stop light* 21 or LED
License plate lights 5
Front map lamp 10
Center dome lamp 10
Trunk room lamp 5
Light bulbs * : if equipped