Page 14 of 327
Knowing your vehicle
4
3
1 23456789
✽✽
NOTICE
Keep the transmitter away from
water or any liquid. If the keylessentry system is inoperative due to
exposure to water or liquids, it will
not be covered by your manufactur-
er vehicle warranty.
Operational distance may vary
depending upon the area the trans-
mitter is used in. For example, if the
vehicle is parked near police sta-
tions, government and public offices,
broadcasting stations, military instal-
lations, airports, or transmitting tow-
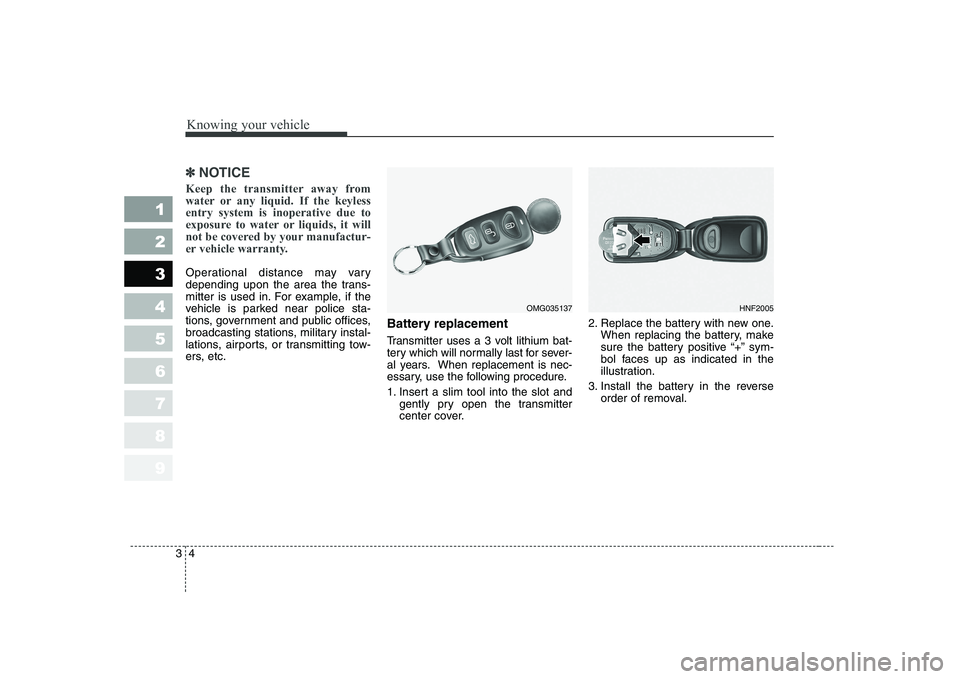
ers, etc. Battery replacement
Transmitter uses a 3 volt lithium bat-
tery which will normally last for sever-
al years. When replacement is nec-
essary, use the following procedure.
1. Insert a slim tool into the slot and
gently pry open the transmitter
center cover. 2. Replace the battery with new one.
When replacing the battery, make
sure the battery positive “+” sym-
bol faces up as indicated in the
illustration.
3. Install the battery in the reverse order of removal.
OMG035137HNF2005
Page 17 of 327
37
1 23456789
Knowing your vehicle
Operating door locks from
outside the vehicle
Turn the key toward rear of vehicleto unlock and toward front of vehi-
cle to lock.
Doors can also be locked and unlocked with the transmitter key. Once the doors are unlocked, it
may be opened by pulling the door
handle.
When closing the door, push the door by the hand. Make sure that
doors are closed securely.
If you lock/unlock the front door with a key, all vehicle doors will
lock/unlock automatically. (ifequipped)
❈ If your vehicle is equipped with the
remote keyless entry system,
there is no key lock on the front
passenger's door. To lock a door without the key, push
the inside door lock button (1) or
door lock switch (2, if equipped) to
the “LOCK” position and close thedoor (3).
✽✽
NOTICE
Always remove the ignition key, engage the parking brake, close allwindows and lock all doors when
leaving your vehicle unattended.
DOOR LOCKS
OLD026004
LockUnlock
1LDA2005
Page 50 of 327
Knowing your vehicle
40
3
1 23456789
To unfasten the lap belt:
Press the release button (
1) on buck-
le.
When using the rear center seat belt,
the buckle with the “CENTER” mark
must be used.
Stowing the rear seat belt (if equipped)
The rear seat belt buckles can be stowed in the pocket between the
rear seatback and cushion when
not in use.
The center seat belt can be stowed with the plate and webbing rolled in
the pocket between the rear seat-
back and cushion.
1LDN2045
OLD026300
WARNING - Lap belt
Be sure the lap belt is posi-
tioned snugly around the hips,
and not on the waist. Failure to
position the lap belt snugly
around the hips will increase
the chance and severity of
injury in the event of a collision.2FDA2307
1LDN3026B
1LDA2046
Lap/shoulder belt type
Lap belt type
Lap/shoulder belt type
Lap belt type
Page 53 of 327
343
1 23456789
Knowing your vehicle
Proper use and care of the
safety belt system
To ensure that the safety belts pro-
vide the maximum protection, please
follow these instructions:
Use the belts at all times - even onshort trips.
If the safety belt is twisted, straighten it prior to use.
Keep sharp edges and damaging objects away from the belts.
Periodically inspect belt webbing, anchors, buckles and all other
parts for signs of wear and dam-
age. Replace damaged, excessive-
ly worn or questionable parts
immediately. To clean the belt webbing, use a
mild soap solution recommended
for cleaning upholstery or carpets.
Follow the instructions provided
with the soap.
Do not make modifications or addi- tions to the safety belt.
After wearing a safety belt, make sure it fully retracts to the stowed
position. Do not allow the belt to
get caught in the door when youclose it. Restraint of pregnant women
Pregnant women should wear
lap/shoulder belt assemblies when-
ever possible according to specific
recommendations by their doctors.
The lap portion of the belt should be
worn AS SNUGLY AND LOW ASPOSSIBLE.
WARNING
- Pregnant
women
Pregnant women must never
place the lap portion of the safe-
ty belt over the area of the
abdomen where the fetus is
located or above the abdomenwhere the belt could crush the
fetus during an impact.
WARNING
Do not bleach or dye the web-
bing because this may weaken
the webbing fibers and allowthem to fail when loaded in acollision.
Page 59 of 327
349
1 23456789
Knowing your vehicle
4. Buckle the seat belt and allow theseat belt to take up any slack. After
installation of the child restraint
system, try to move it in all direc-
tions to be sure the child restraintsystem is securely installed.
If you need to tighten the belt, pull
more webbing toward the retractor.
When you unbuckle the seat belt and
allow it to retract, the retractor will
automatically revert back to its nor-mal seated passenger emergency
locking usage condition.
MMSA3030
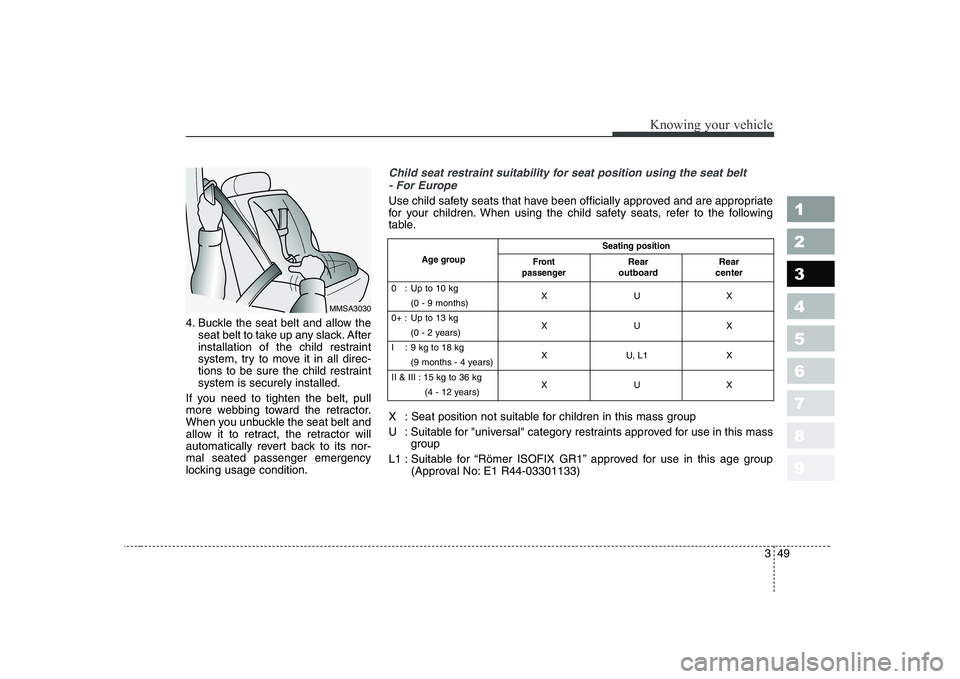
Child seat restraint suitability for seat position using the seat belt - For Europe
Use child safety seats that have been officially approved and are appropriate
for your children. When using the child safety seats, refer to the following
table.
X : Seat position not suitable for children in this mass group
U : Suitable for "universal" category restraints approved for use in this mass group
L1 : Suitable for “Römer ISOFIX GR1” approved for use in this age group (Approval No: E1 R44-03301133)
Seating position
Age group
0 : Up to 10 kg XUX
(0 - 9 months)
0+ : Up to 13 kg XUX
(0 - 2 years)
I : 9 kg to 18 kg X U, L1 X
(9 months - 4 years)
II & III : 15 kg to 36 kg XUX
(4 - 12 years)
Front
passengerRear
outboard Rear
center
Page 67 of 327
357
1 23456789
Knowing your vehicle
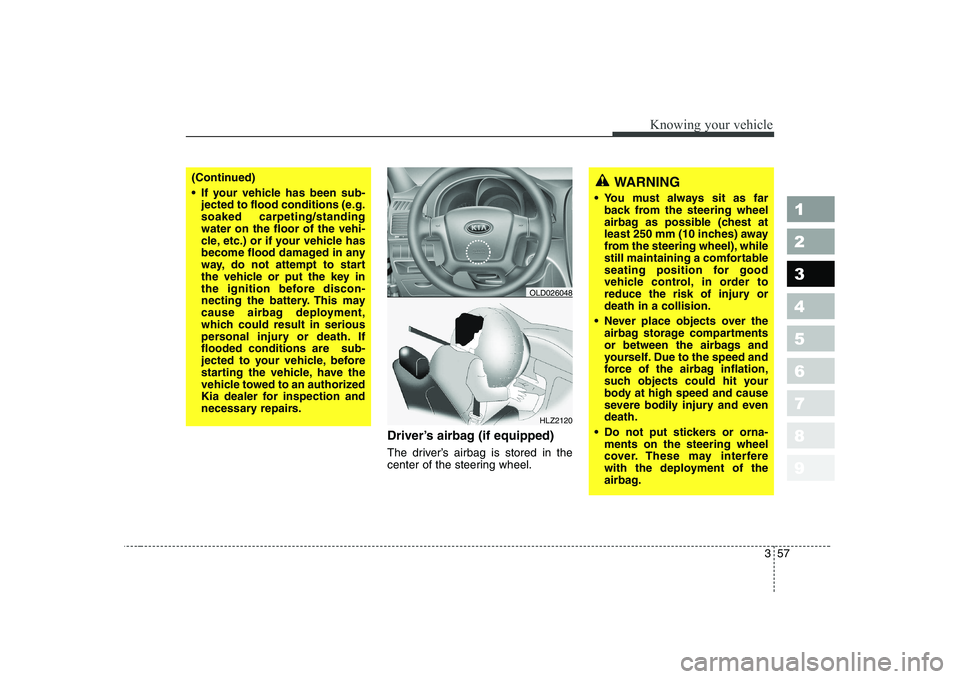
Driver’s airbag (if equipped)
The driver’s airbag is stored in the
center of the steering wheel.
HLZ2120
(Continued)
If your vehicle has been sub-jected to flood conditions (e.g. soaked carpeting/standingwater on the floor of the vehi-
cle, etc.) or if your vehicle has
become flood damaged in any
way, do not attempt to start
the vehicle or put the key in
the ignition before discon-
necting the battery. This may
cause airbag deployment,
which could result in serious
personal injury or death. Ifflooded conditions are sub-
jected to your vehicle, before
starting the vehicle, have the
vehicle towed to an authorized
Kia dealer for inspection and
necessary repairs.
OLD026048
WARNING
You must always sit as far back from the steering wheel
airbag as possible (chest at
least 250 mm (10 inches) away
from the steering wheel), while
still maintaining a comfortable
seating position for good
vehicle control, in order to
reduce the risk of injury ordeath in a collision.
Never place objects over the airbag storage compartments
or between the airbags and
yourself. Due to the speed and
force of the airbag inflation,
such objects could hit your
body at high speed and cause
severe bodily injury and evendeath.
Do not put stickers or orna- ments on the steering wheel
cover. These may interfere
with the deployment of the
airbag.
Page 94 of 327
Knowing your vehicle
84
3
1 23456789
Folding the outside rearview
mirror
Manual type
To fold outside rearview mirror, grasp
the housing of mirror and then fold it
toward the rear of the vehicle.
Outside rearview mirror heater (if equipped)
The outside rearview mirror heater is actuated in connection with the rear
window defroster. To heat the outside
rearview mirror glass, push the but-
ton for the rear window defroster.
The outside rearview mirror glass will
be heated for defrosting or defogging
and will give you improved rear
vision in inclement weather condi-
tions. Push the button again to turn
the heater off. The outside rearview
mirror heater automatically turns off
after 20 minutes. Day/night rearview mirror
Adjust the rearview mirror to center
on the view through the rear window.
Make this adjustment before you
start driving.
1LDA2083
CAUTION
Do not place objects in the rear
seat or cargo area which wouldinterfere with your vision outthe rear window.
Page 95 of 327
385
1 23456789
Knowing your vehicle
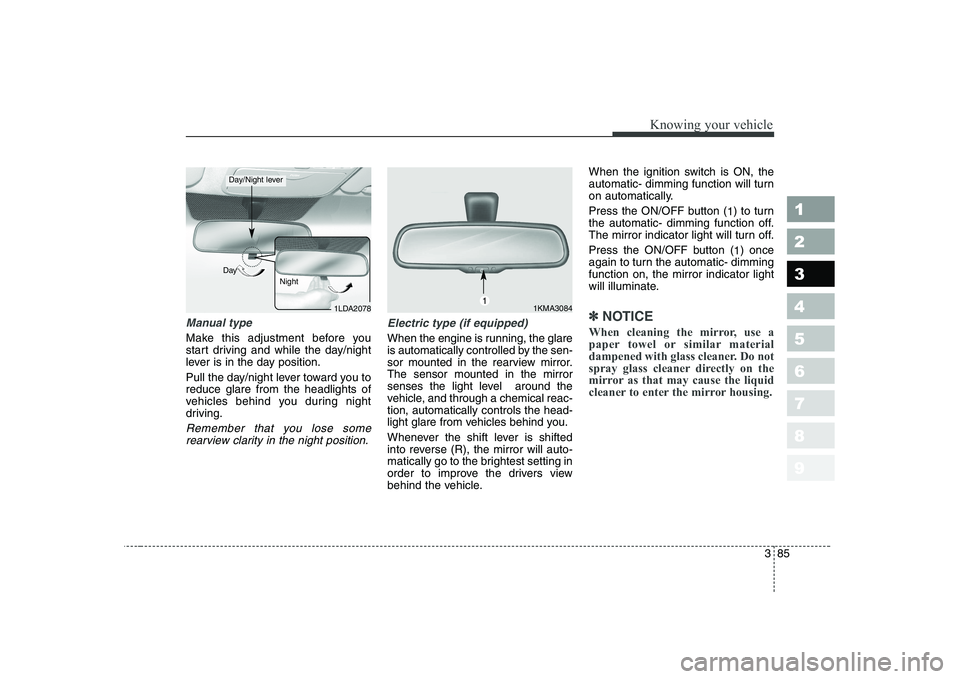
Manual type
Make this adjustment before you
start driving and while the day/night
lever is in the day position.
Pull the day/night lever toward you to reduce glare from the headlights of
vehicles behind you during night
driving.
Remember that you lose somerearview clarity in the night position.
Electric type (if equipped)
When the engine is running, the glare
is automatically controlled by the sen-
sor mounted in the rearview mirror.The sensor mounted in the mirror
senses the light level around the
vehicle, and through a chemical reac-tion, automatically controls the head-
light glare from vehicles behind you.
Whenever the shift lever is shifted
into reverse (R), the mirror will auto-
matically go to the brightest setting in
order to improve the drivers view
behind the vehicle. When the ignition switch is ON, the
automatic- dimming function will turn
on automatically.
Press the ON/OFF button (
1) to turn
the automatic- dimming function off.
The mirror indicator light will turn off.
Press the ON/OFF button ( 1) once
again to turn the automatic- dimming function on, the mirror indicator light
will illuminate.
✽✽ NOTICE
When cleaning the mirror, use a
paper towel or similar material
dampened with glass cleaner. Do not
spray glass cleaner directly on the
mirror as that may cause the liquid
cleaner to enter the mirror housing.1LDA2078
Day
Night
Day/Night lever
1KMA30841