2008 KIA CERATO reset
[x] Cancel search: resetPage 24 of 327
Knowing your vehicle
14
3
1 23456789
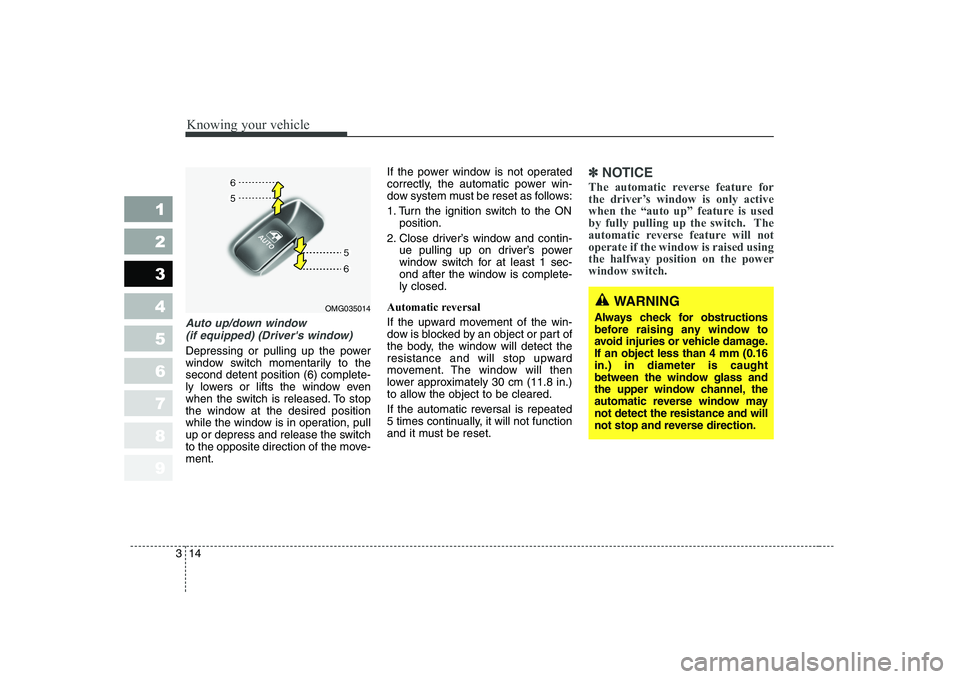
Auto up/down window
(if equipped) (Driver's window)
Depressing or pulling up the power
window switch momentarily to thesecond detent position (6) complete-
ly lowers or lifts the window even
when the switch is released. To stop
the window at the desired position
while the window is in operation, pull
up or depress and release the switch
to the opposite direction of the move-ment. If the power window is not operated
correctly, the automatic power win-
dow system must be reset as follows:
1. Turn the ignition switch to the ON
position.
2. Close driver’s window and contin- ue pulling up on driver’s power
window switch for at least 1 sec-
ond after the window is complete-ly closed.
Automatic reversal
If the upward movement of the win-
dow is blocked by an object or part of
the body, the window will detect the
resistance and will stop upward
movement. The window will then
lower approximately 30 cm (11.8 in.)
to allow the object to be cleared.
If the automatic reversal is repeated
5 times continually, it will not function
and it must be reset.
✽✽ NOTICE
The automatic reverse feature for
the driver’s window is only active
when the “auto up” feature is used
by fully pulling up the switch. The
automatic reverse feature will notoperate if the window is raised usingthe halfway position on the powerwindow switch.
WARNING
Always check for obstructions
before raising any window to
avoid injuries or vehicle damage.If an object less than 4 mm (0.16in.) in diameter is caught
between the window glass and
the upper window channel, the
automatic reverse window maynot detect the resistance and will
not stop and reverse direction.OMG035014
Page 104 of 327

Knowing your vehicle
94
3
1 23456789
Digital clock (if equipped)
Whenever the battery terminals,
ROOM fuse, or Power Connect are
disconnected, you must reset the
time.
When the ignition switch is in the
ACC or ON position, the clock but-
tons operates as follows:
HOUR:
Pressing the “H” button with your
finger, a pencil or similar object will
advance the time displayed by one
hour.
MINUTE: Pressing the “M” button with your
finger, a pencil or similar object will
advance the time displayed by one
minute.
Display conversion
To change the 12 hour format to the
24 hour format, press the “H+M” but-
ton at the same time for more than 4
seconds.
For example, if the “H+M” button is
pressed at the same time for morethan 4 seconds while the time is
10:15 p.m., the display will bechanged to 22:15.
OLD028145
Page 108 of 327
Knowing your vehicle
98
3
1 23456789
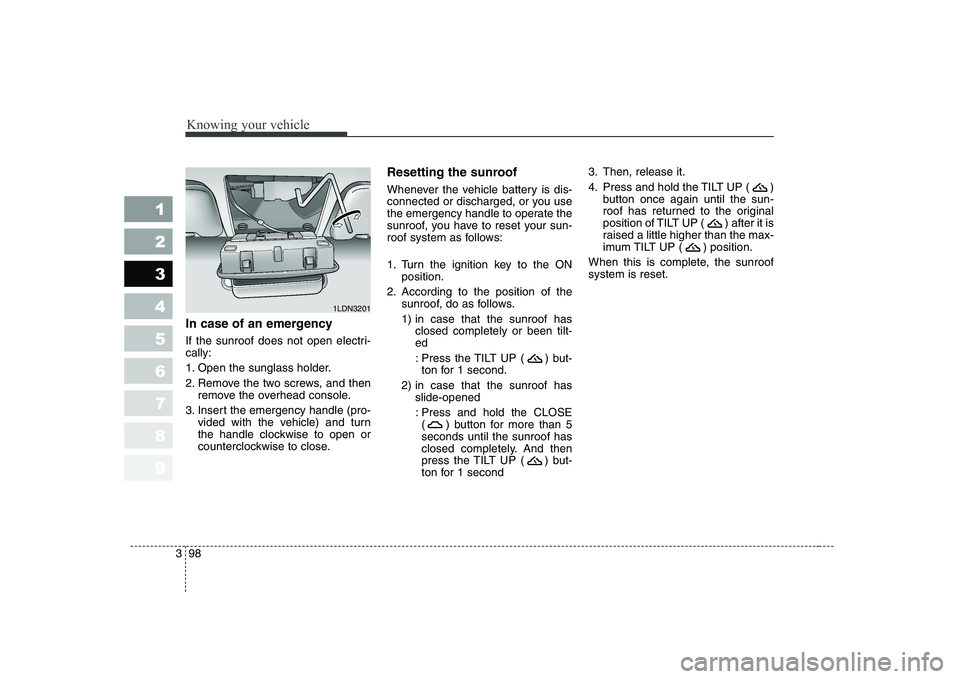
In case of an emergency
If the sunroof does not open electri- cally:
1. Open the sunglass holder.
2. Remove the two screws, and then
remove the overhead console.
3. Insert the emergency handle (pro- vided with the vehicle) and turn
the handle clockwise to open or
counterclockwise to close. Resetting the sunroof
Whenever the vehicle battery is dis-
connected or discharged, or you use
the emergency handle to operate the
sunroof, you have to reset your sun-
roof system as follows:
1. Turn the ignition key to the ON
position.
2. According to the position of the sunroof, do as follows.
1) in case that the sunroof hasclosed completely or been tilt- ed
: Press the TILT UP ( ) but- ton for 1 second.
2) in case that the sunroof has slide-opened
: Press and hold the CLOSE ( ) button for more than 5seconds until the sunroof has
closed completely. And then
press the TILT UP ( ) but-
ton for 1 second 3. Then, release it.
4. Press and hold the TILT UP ( )
button once again until the sun-
roof has returned to the original
position of TILT UP ( ) after it is
raised a little higher than the max-
imum TILT UP ( ) position.
When this is complete, the sunroofsystem is reset.
1LDN3201
Page 115 of 327
3105
Knowing your vehicle
1 23456789
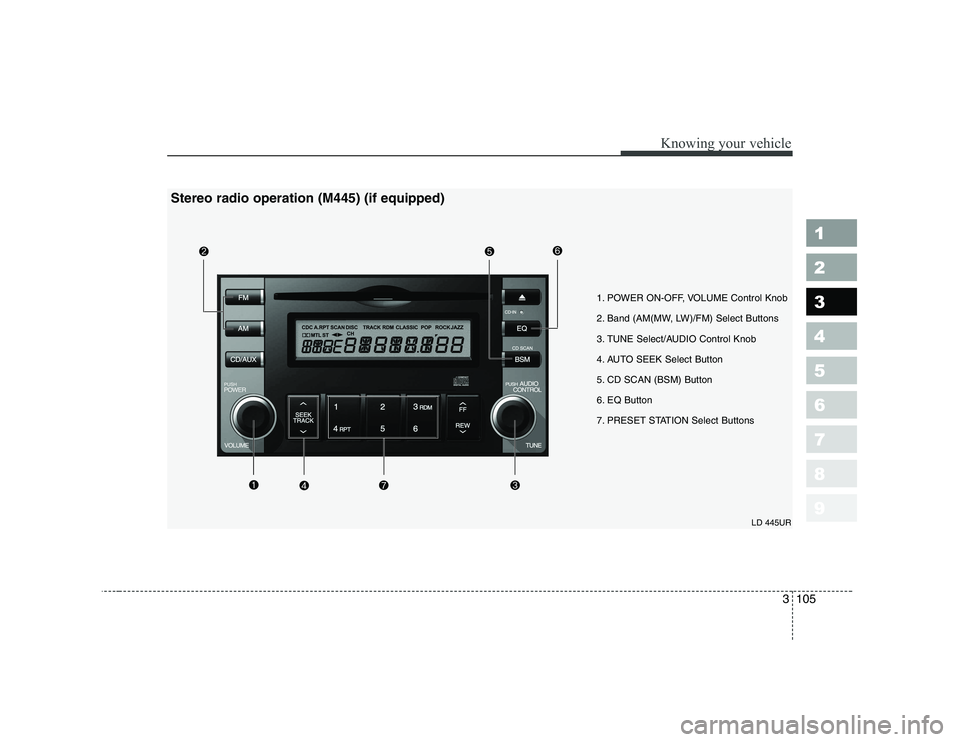
1. POWER ON-OFF, VOLUME Control Knob
2. Band (AM(MW, LW)/FM) Select Buttons
3. TUNE Select/AUDIO Control Knob
4. AUTO SEEK Select Button
5. CD SCAN (BSM) Button
6. EQ Button
7. PRESET STATION Select ButtonsLD 445UR
Stereo radio operation (M445) (if equipped)
Page 117 of 327

3107
Knowing your vehicle
1 23456789
4. AUTO SEEK Select Button(Automatic Channel Selection)
Press the AUTO SEEK select button.
When the side is pressed, theunit will automatically tune to the
next higher frequency and when the side is pressed, it will automati-
cally tune to the next lower frequen-
cy.
5. CD SCAN (BSM) Button
When the CD SCAN (BSM) button is pressed, the six channels from thehighest field intensity are selected
next and stored in memory. The sta-tions selected are stored in thesequence of frequency from the first
preset key.
6. EQ Button
Press the EQ button to select the
CLASSIC, POPS, ROCK, JAZZ and
OFF MODE for the desired tone
quality. Each press of the button
changes the display as follows;
7. PRESET STATION Select
Buttons
Six stations for AM(MW, LW), FM1
and FM2 respectively can be preset
in the electronic memory circuit.
HOW TO PRESET STATIONS
Six AM(MW, LW) and twelve FM sta-
tions may be programmed into the
memory of the radio. Then, by simply
pressing the AM(MW, LW) / FM band
select buttons and/or one of the six
station select buttons, you may recall
any of these stations instantly. To
program the stations, follow thesesteps:
Press AM(MW, LW)/FM selector toset the band for AM(MW, LW), FM1 and FM2.
Select the desired station to be stored by seek or manual tuning.
Determine the preset station select button you wish to use to accessthat station. Press and hold the station select
button for more than 0.8 seconds.
A select button indicator will show
in the display indicating which
select button you have depressed.
The frequency display will flashafter it has been stored into the
memory. You should then release
the button, and proceed to pro-
gram the next desired station. Atotal of 24 stations can be pro-
grammed by selecting one
AM(MW, LW) and two FM stations
per button.
When completed, any preset sta- tion may be recalled by selecting
AM(MW, LW), FM1 or FM2 band
and the appropriate station button.
CAUTION
• Do not place beverages close
to the audio system. The audiosystem mechanism may bedamaged if you spill them.
Do not strike or allow anything to impact the audio system,damage to the system mecha- nisms could occur.
CLASSIC ➟POPS ➟ROCK ➟JAZZ ➟OFF
Page 122 of 327
Knowing your vehicle
112
3
1 23456789
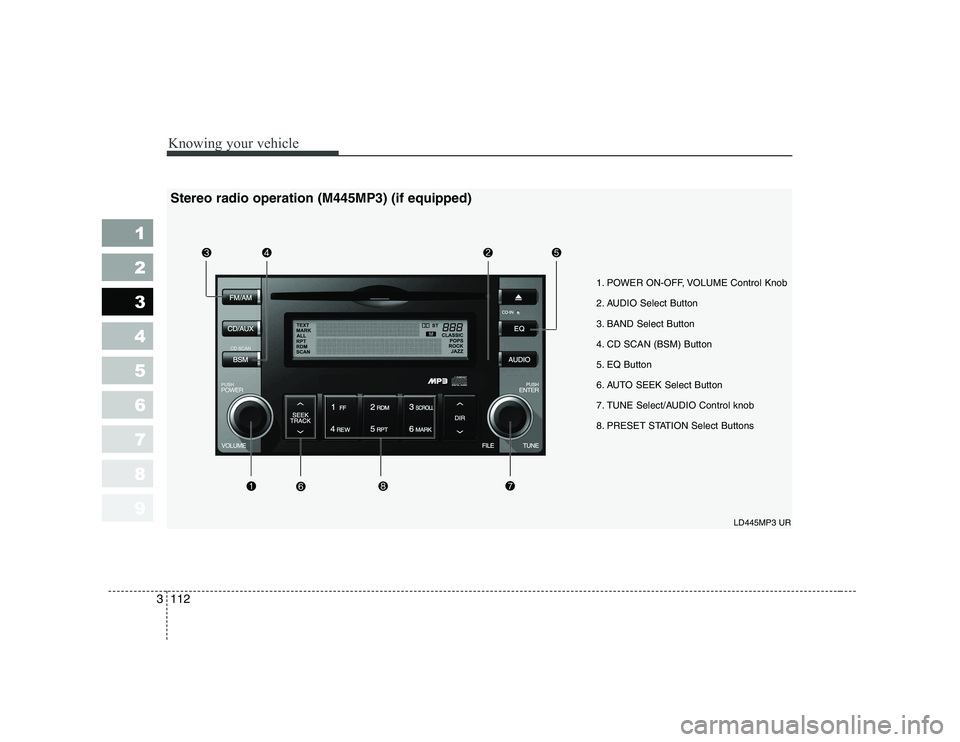
1. POWER ON-OFF, VOLUME Control Knob
2. AUDIO Select Button
3. BAND Select Button
4. CD SCAN (BSM) Button
5. EQ Button
6. AUTO SEEK Select Button
7. TUNE Select/AUDIO Control knob
8. PRESET STATION Select Buttons
LD445MP3 UR
Stereo radio operation (M445MP3) (if equipped)
Page 124 of 327

Knowing your vehicle
114
3
1 23456789
4. CD SCAN (BSM) Button
When the CD SCAN (BSM) button is pressed, the six channels from thehighest field intensity are selected
next and stored in memory. The sta-tions selected are stored in thesequence frequency from the first
preset key.
5. EQ Button
Press the EQ button to select the
CLASSIC, POPS, ROCK, JAZZ and
OFF MODE for the desired tone
quality. Each press of the button
changes the display as follows;
6. AUTO SEEK Select Button
(Automatic Channel Selection)
Press the AUTO SEEK select button.
When the side is pressed, theunit will automatically tune to the
next higher frequency and when the side is pressed, it will automati-
cally tune to the next lower frequen-
cy.
7. TUNE Select/Audio Control Knob
Rotate the knob clockwise to
increase the frequency and turn the
knob counterclockwise to reduce the
frequency.
8. PRESET STATION Select
Buttons
Six stations for AM(MW, LW), FM1
and FM2 respectively can be preset
in the electronic memory circuit.
HOW TO PRESET STATIONS
Six AM(MW, LW) and twelve FM sta-
tions may be programmed into the
memory of the radio. Then, by simply
pressing the AM(MW/LW)/FM band
select button and/or one of the six
station select buttons, you may recall
any of these stations instantly. To
program the stations, follow thesesteps:
Press AM(MW, LW)/FM selector toset the band for AM(MW, LW), FM1 and FM2.
Select the desired station to be stored by seek or manual tuning. Determine the preset station select
button you wish to use to accessthat station.
Press and hold the station select but- ton for more than 0.8 seconds. A
select button indicator will show in the
display indicating which select button
you have depressed. The frequency
display will flash after it has been
stored in to the memory. You should
then release the button, and proceed
to program the next desired station. Atotal of 24 stations can be pro-
grammed by selecting one AM(MW,
LW) and two FM stations per button.
When completed, any preset sta- tion may be recalled by selecting
AM(MW, LW), FM1 or FM2 band
and the appropriate station button.
CLASSIC ➟POPS ➟ROCK ➟JAZZ ➟OFF
CAUTION
Do not place beverages close
to the audio system. The play-back mechanism may be dam-aged if you spill them.
Do not strike or allow anything to impact the audio system,damage to the system mecha-nisms could occur.
Page 159 of 327
Driving your vehicle
24
4
1 23456789
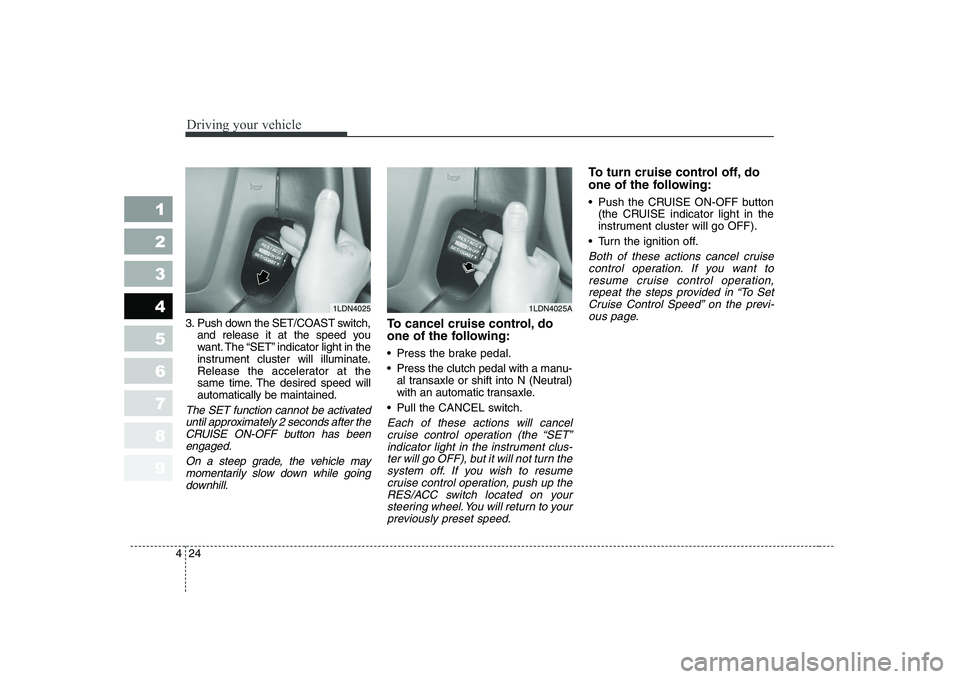
3. Push down the SET/COAST switch,
and release it at the speed you
want. The “SET” indicator light in the
instrument cluster will illuminate.
Release the accelerator at the
same time. The desired speed willautomatically be maintained.
The SET function cannot be activated
until approximately 2 seconds after theCRUISE ON-OFF button has beenengaged.
On a steep grade, the vehicle maymomentarily slow down while going downhill.
To cancel cruise control, do
one of the following:
Press the brake pedal.
Press the clutch pedal with a manu- al transaxle or shift into N (Neutral)
with an automatic transaxle.
Pull the CANCEL switch.
Each of these actions will cancel cruise control operation (the “SET”indicator light in the instrument clus-ter will go OFF), but it will not turn the system off. If you wish to resumecruise control operation, push up theRES/ACC switch located on your steering wheel. You will return to yourpreviously preset speed.
To turn cruise control off, do
one of the following:
Push the CRUISE ON-OFF button (the CRUISE indicator light in the
instrument cluster will go OFF).
Turn the ignition off.
Both of these actions cancel cruise control operation. If you want toresume cruise control operation,repeat the steps provided in “To Set Cruise Control Speed” on the previ-ous page.
1LDN40251LDN4025A