Page 2069 of 4083

EXT-16
< SERVICE INFORMATION >
REAR BUMPER
REMOVAL
1. Disconnect the negative battery terminals.
2. Remove the rear combination lamps LH and RH. Refer to EXL-124, "
Removal and Installation".
3. Remove the rear fascia assembly screws under the rear combination lamps LH and RH.
4. Remove the quarter panel trim covers LH and RH.
5. Disconnect the sonar sensor harness c onnector under the rear fascia assembly.
6. Release the retainer clips on both sides of the rear fascia assembly with a 1/4 turn and top S clips and remove the fascia assembly.
7. Detach the I-key antenna from the energy absorber.
8. Remove the energy absorber.
9. Remove the reinforcement assembly.
10. Remove the nuts and remove the retainer assembly. • Remove the S clips from the retainer assembly.
11. Disconnect the sonar sensors from the sonar sensor retainers.
12. Remove the sonar sensors and harness from the rear fascia assembly. • Disconnect the sonar sensors from the harness.
• Remove the sonar sensor retainers from the rear fascia assembly.
13. Remove the bolts on each side of the tow hitch and remove the tow hitch.
14. Remove the drafter duct from under the LH quarter panel.
INSTALLATION
Installation is in the reverse order of removal.
10. Rear fascia assembly 11. Sonar sensor retainer12. Reinforcement assembly
13. Tow hitch 14. Quarter panel trim cover RH
Revision: March 2010 2008 QX56
Page 2070 of 4083
FRONT GRILLEEXT-17
< SERVICE INFORMATION >
C
DE
F
G H
I
J
L
M A
B
EXT
N
O P
FRONT GRILLE
Removal and InstallationINFOID:0000000001609853
REMOVAL
1. Remove the bolts and nuts attaching grille.
2. Remove the front grille.
INSTALLATION
Installation is in the reverse order of removal.
1. Front grille 2. J-Clip
AWKIA0022ZZ
Revision: March 2010 2008 QX56
Page 2071 of 4083

EXT-18
< SERVICE INFORMATION >
COWL TOP
COWL TOP
Removal and InstallationINFOID:0000000001609854
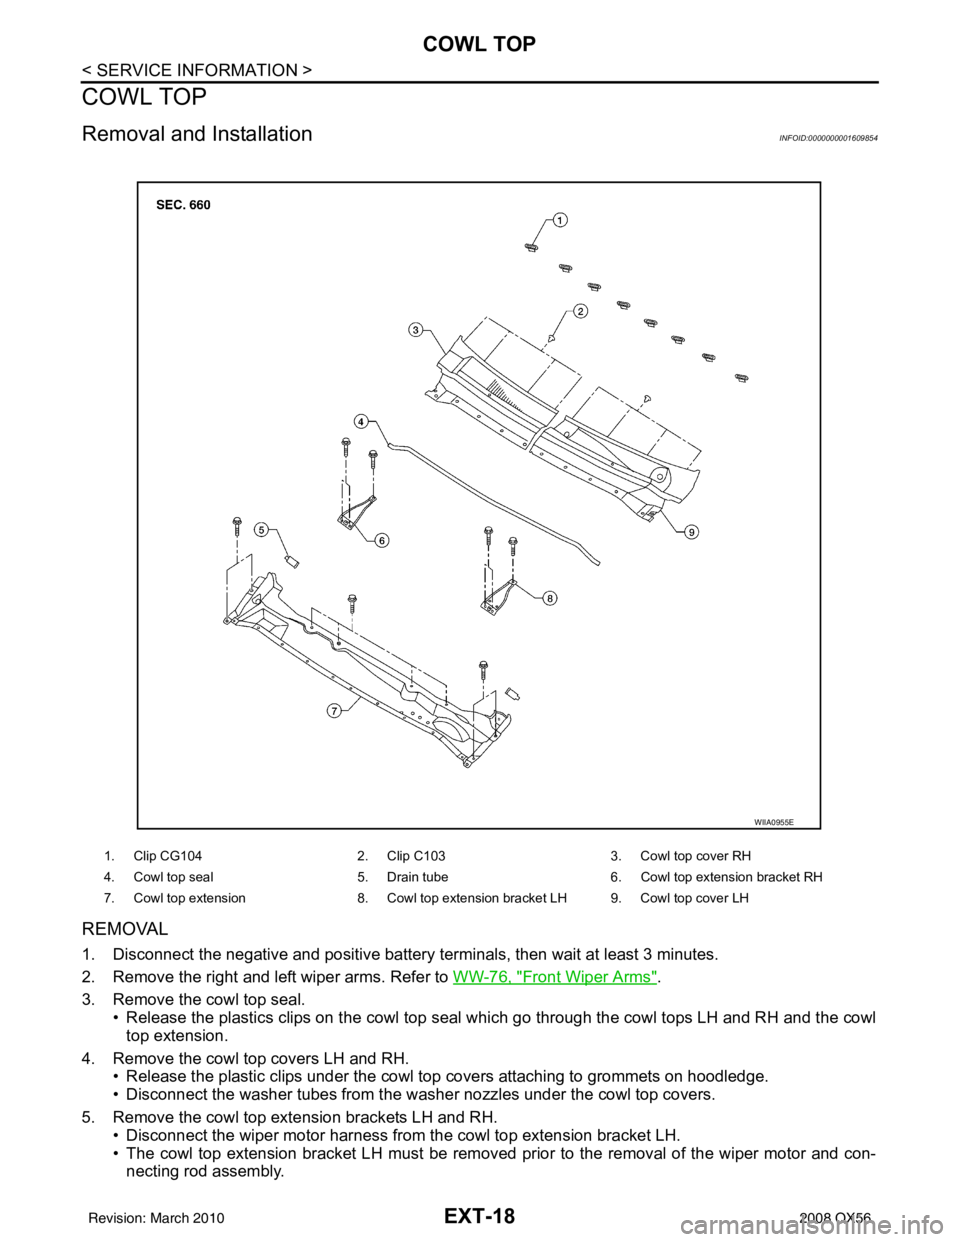
REMOVAL
1. Disconnect the negative and positive battery terminals, then wait at least 3 minutes.
2. Remove the right and left wiper arms. Refer to WW-76, "
Front Wiper Arms".
3. Remove the cowl top seal. • Release the plastics clips on the cowl top seal which go through the cowl tops LH and RH and the cowltop extension.
4. Remove the cowl top covers LH and RH. • Release the plastic clips under the cowl top covers attaching to grommets on hoodledge.
• Disconnect the washer tubes from the wa sher nozzles under the cowl top covers.
5. Remove the cowl top extension brackets LH and RH. • Disconnect the wiper motor harness from the cowl top extension bracket LH.
• The cowl top extension bracket LH must be removed prior to the removal of the wiper motor and con-
necting rod assembly.
1. Clip CG104 2. Clip C103 3. Cowl top cover RH
4. Cowl top seal 5. Drain tube6. Cowl top extension bracket RH
7. Cowl top extension 8. Cowl top extension bracket LH 9. Cowl top cover LH
WIIA0955E
Revision: March 2010 2008 QX56
Page 2072 of 4083
COWL TOPEXT-19
< SERVICE INFORMATION >
C
DE
F
G H
I
J
L
M A
B
EXT
N
O P
6. Remove the wiper motor and connecting rod linkage. Refer to WW-77, "Wiper Motor and Linkage".
7. Disconnect the windshield washer tube. Refer to WW-78, "
Washer Tube Layout".
8. Remove the water cut valve bracket from the cowl top extension. Refer to EXT-18, "
Removal and Installa-
tion".
9. Remove the A/C line bracket from the cowl top extension. Refer to EXT-18, "
Removal and Installation".
10. Remove the drain tube from each side of the cowl top extension.
11. Remove the cowl top extension.
INSTALLATION
Installation is in the reverse order of removal.
Revision: March 2010 2008 QX56
Page 2073 of 4083
EXT-20
< SERVICE INFORMATION >
FRONT FENDER
FRONT FENDER
Removal and InstallationINFOID:0000000001609855
REMOVAL
1. Remove the headlamp assembly. Refer to EXL-114, "Removal and Installation".
2. Remove the over fender. Refer to EXT-21
.
3. Remove the fender protector. Refer to EXT-23
.
4. Remove the hood stay. Refer to DLK-224, "
Removal and Installation of Hood Assembly".
5. Remove the front fender.
INSTALLATION
Installation is in the reverse order of removal.
1. Front fender 2. Over fender3. Headlamp assembly
4. Fender protector
WIIA0956E
Revision: March 2010 2008 QX56
Page 2074 of 4083

OVER FENDEREXT-21
< SERVICE INFORMATION >
C
DE
F
G H
I
J
L
M A
B
EXT
N
O P
OVER FENDER
Removal and InstallationINFOID:0000000001609856
REMOVAL
1. Remove the screws from the front and/or rear over fender.
CAUTION:
Never apply tack-paper adhesive remover to body pa nel surface finished with lacquer-based paints.
• Original over fenders are affixed to body panel with double-faced adhesive tape.
2. Heat the over fender to between 30 ° and 40 °C (86° to 104 °F) with a heat gun.
3. Raise the end of the over fender and cut away tape, release the plastic clips and remove the over fender.
Remove all traces of tape.
INSTALLATION
• On vehicles coated with Hard Clear Coat, use double-faced 3M adhesive tape Product No, 4210 or equiva- lent, after priming with 3M primer Product No. N200, C-100 or equivalent.
• The repair parts are also affixed with double-faced adhesive tape.
• To re-use existing over fender, clean all traces of double-faced tape from the over fender and apply new dou-
ble-faced tape to the over fender.
1. Clean the panel surface with isopropyl alcohol or equivalent to degrease the surface.
2. Heat the panel and double-faced tape surface to 30 ° to 40° C (86° to 104 °F).
3. Remove the backing sheet from the tape surface.
4. Align the plastic clips on the back side of the front and/or rear over fender to the mounting grommets.
5. Press the ends by hand and use a roller to apply 5 kg-f (11lbs-f) to press the over fender surface to body panel.
CAUTION:
To secure contact, do not wash vehic le for 24 hours after installation.
1. Clip CG104 2. Front over fender3. Clip CF118
4. Double-faced adhesive tape 5. J-clip 6. Rear over fender
7. Double-faced adhesive tape
WIIA0957E
Revision: March 2010 2008 QX56
Page 2075 of 4083
EXT-22
< SERVICE INFORMATION >
OVER FENDER
6. Install the front and/or rear over fender screws.
Revision: March 20102008 QX56
Page 2076 of 4083
FENDER PROTECTOREXT-23
< SERVICE INFORMATION >
C
DE
F
G H
I
J
L
M A
B
EXT
N
O P
FENDER PROTECTOR
Removal and InstallationINFOID:0000000001609857
REMOVAL
1. Remove the screws.
2. Remove the plastic clips.
3. Remove the front fender protector.
4. Remove the clips from the fender protector.
INSTALLATION
Installation is in the reverse order of removal.
1. Fender protector (LH shown) 2. Clip C205 3. J-clip
4. Clip 5. Clip CS101
WIIA0958E
Revision: March 2010 2008 QX56