Page 3391 of 4083
SIDE AIR BAG (SATELLITE) SENSORSR-15
< ON-VEHICLE REPAIR >
C
DE
F
G
I
J
K L
M A
B
SR
N
O P
SIDE AIR BAG (S ATELLITE) SENSOR
Removal and InstallationINFOID:0000000001602206
REMOVAL
CAUTION:
• Before servicing the SRS, turn the ignition switch off, disconnect both battery cables and wait at
least 3 minutes.
• Do not use old nuts after removal; replace with new nuts.
• Check side air bag (satellite) sensor to make sure it is free of deformities, dents, cracks or rust. If it
shows any visible signs of da mage, replace it with new one.
• Do not disassemble side air bag (satellite) sensor.
• Replace side air bag (satellite ) sensor if it has been dropped or sustained an impact.
1. Disconnect the negative and positive battery cable, then wait at least 3 minutes.
2. Remove seat belt retractor. Refer to SB-4, "
Removal and Installation of Front Seat Belt".
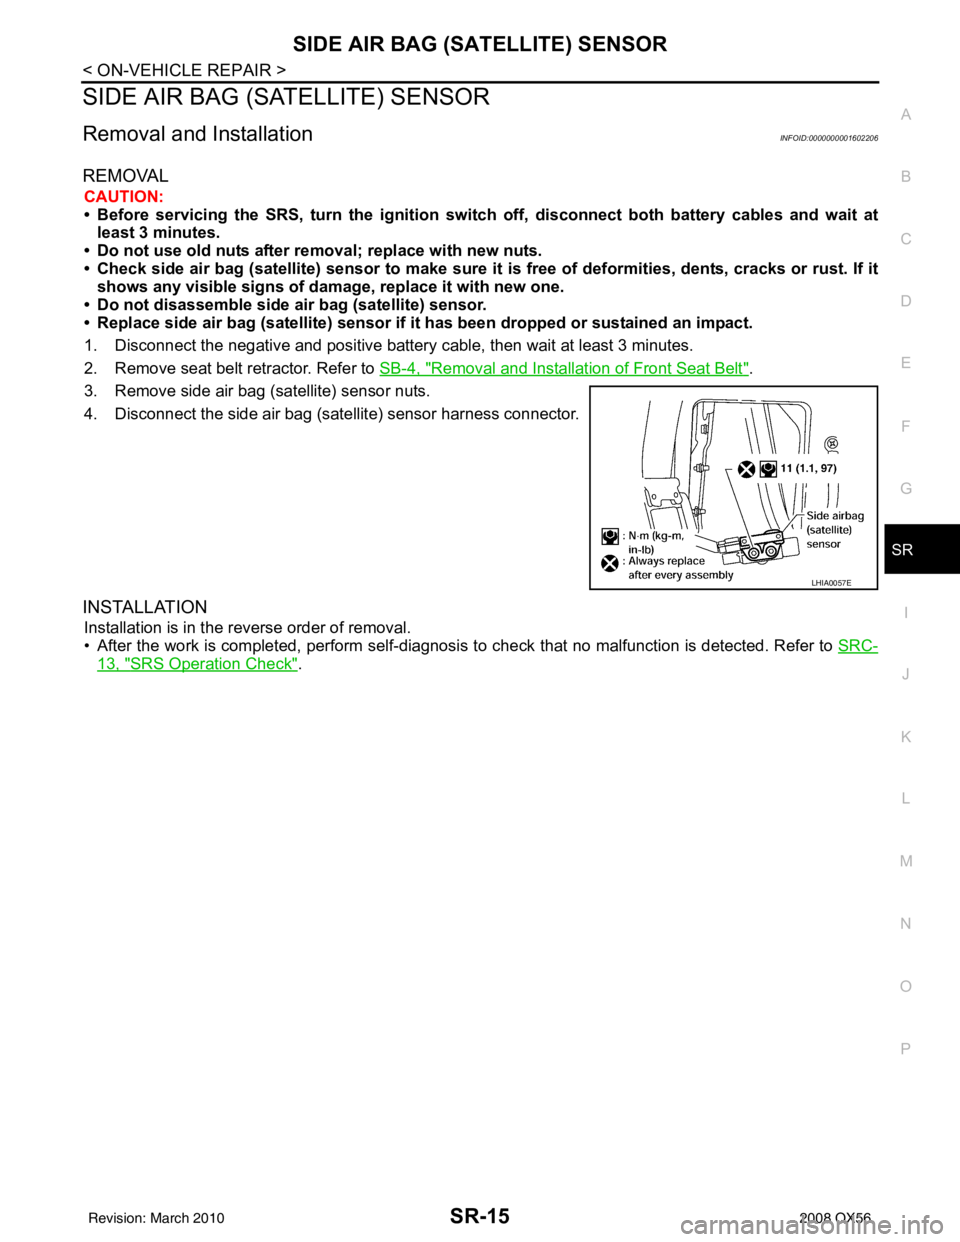
3. Remove side air bag (satellite) sensor nuts.
4. Disconnect the side air bag (satellite) sensor harness connector.
INSTALLATION
Installation is in the reverse order of removal.
• After the work is completed, perform self-diagnosis to check that no malfunction is detected. Refer to SRC-
13, "SRS Operation Check".
LHIA0057E
Revision: March 2010 2008 QX56
Page 3393 of 4083
DIAGNOSIS SENSOR UNITSR-17
< ON-VEHICLE REPAIR >
C
DE
F
G
I
J
K L
M A
B
SR
N
O P
DIAGNOSIS SENSOR UNIT
Removal and InstallationINFOID:0000000001602208
REMOVAL
CAUTION:
• Before servicing the SRS, turn the ignition switch off, disconnect both battery cables and wait at least 3 minutes.
• Do not use old bolts; replace with new bolts.
• Check diagnosis sensor unit bracket to make sure it is free of deformities, dents, cracks or rust. If it
shows any visible signs of damage, replace with new one.
• Replace diagnosis sensor unit if it has been dropped or sustained an impact.
1. Disconnect the harness connectors for the following SRS components. Refer to SR-13, "
Removal and
Installation" (Side curtain air bag module), SE-71, "Disassembly and Assembly" (Side air bag module),
SB-4, "
Removal and Installation of Front Seat Belt" (Front seat belt pre-tensioner).
2. Remove center console. Refer to IP-20, "
Removal and Installation".
3. Disconnect the diagnosis sensor unit harness connectors.
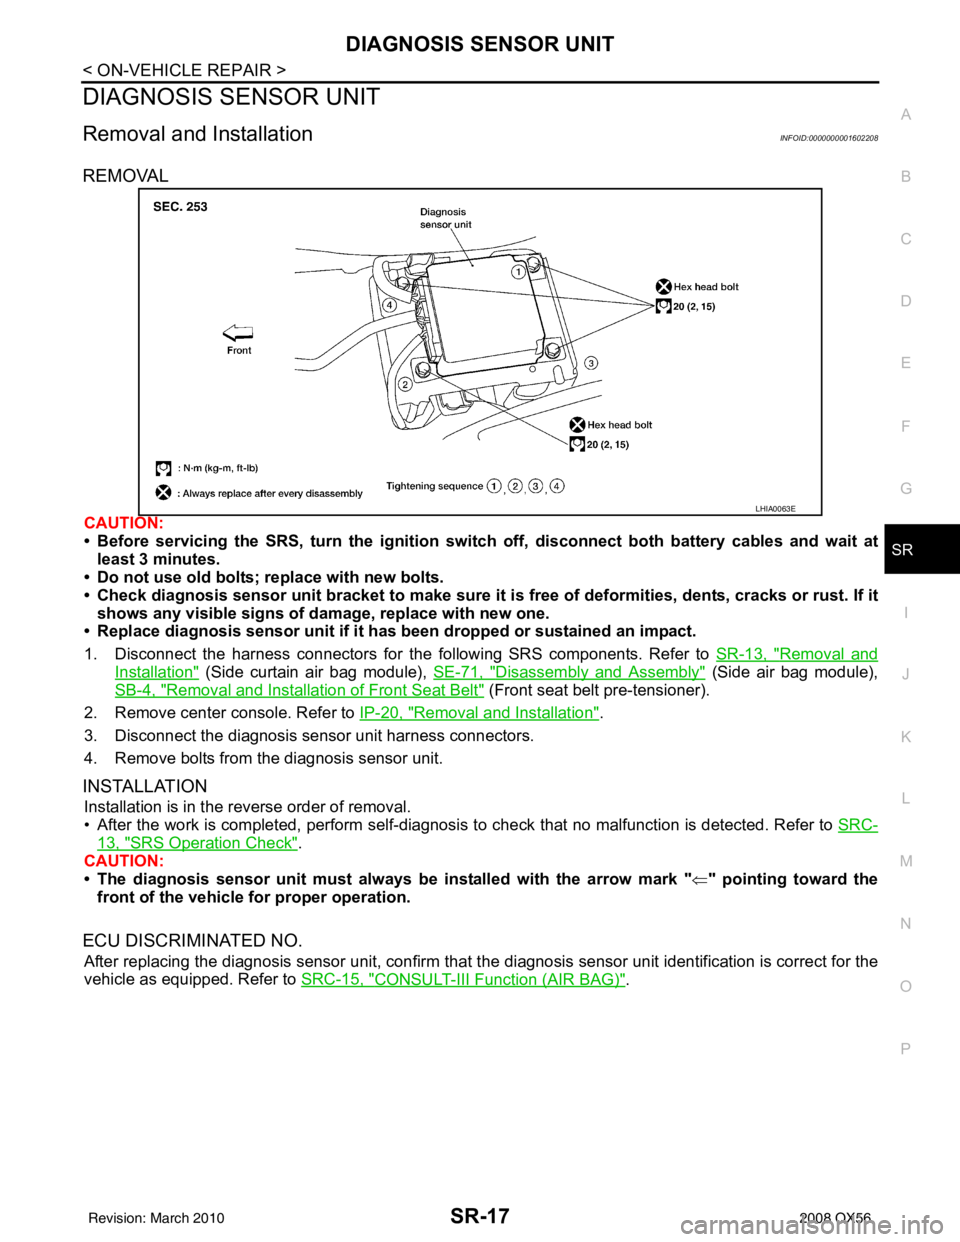
4. Remove bolts from the diagnosis sensor unit.
INSTALLATION
Installation is in the reverse order of removal.
• After the work is completed, perform self-diagnosis to check that no malfunction is detected. Refer to SRC-
13, "SRS Operation Check".
CAUTION:
• The diagnosis sensor unit must always be installed with the arrow mark " ⇐" pointing toward the
front of the vehicle for proper operation.
ECU DISCRIMINATED NO.
After replacing the diagnosis sensor unit, confirm that the diagnosis sensor unit identification is correct for the
vehicle as equipped. Refer to SRC-15, "
CONSULT-III Function (AIR BAG)".
LHIA0063E
Revision: March 2010 2008 QX56
Page 3419 of 4083
B1065 – B1068, B1070 – B1073 PASSENGER AIRBAG MODULE
SRC-21
< COMPONENT DIAGNOSIS >
C
D E
F
G
I
J
K L
M A
B
SRC
N
O P
Is the DTC detected?
YES >> Refer to SRC-21, "Diagnosis Procedure (Component Diagnosis)".
NO >> Inspection End.
DTC CONFIRMATION PROCE DURE (Without CONSULT-lll)
NOTE:
SRS will not enter diagnosis mode if no malfunction is detected in user mode.
1.IGNITION SWITCH
Turn ignition switch ON.
>> GO TO 2
2.IGNITION SWITCH
After air bag warning lamp lights for 7 seconds, turn ignition switch OFF within 1 second.
>> GO TO 3
3.WAIT TIME
Wait more than 3 seconds.
>> GO TO 4
4.REPEAT STEPS
Repeat steps 1 to 3 twice.
>> GO TO 5
5.IGNITION SWITCH
Turn ignition switch ON.
>> GO TO 6
6.DIAGNOSTIC MODE
SRS system is now in diagnostic mode and AIR BAG warning lamp flashes. Refer to SRC-85, "
Trouble Diag-
nosis without CONSULT-III".
>> END
Diagnosis Procedure (C omponent Diagnosis)INFOID:0000000001735308
Recheck SRS after each replacement.
1.HARNESS CONNECTOR
Is there any visible damage to the connector?
YES or NO
YES >> Replace the harness.
NO >> GO TO 2
2.WIRING HARNESS
Is there any visible damage to the harness?
YES or NO
YES >> Replace the harness.
NO >> GO TO 3
3.FRONT PASSENGER AIR BAG MODULE
Replace the front passenger air bag module. Refer to SR-10, "
Removal and Installation".
Revision: March 2010 2008 QX56
Page 3422 of 4083
SRC-24
< COMPONENT DIAGNOSIS >
B1134 – B1137 SIDE AIRBAG MODULE LH
Turn ignition switch ON.
>> GO TO 2
2.IGNITION SWITCH
After air bag warning lamp lights for 7 seconds, turn ignition switch OFF within 1 second.
>> GO TO 3
3.WAIT TIME
Wait more than 3 seconds.
>> GO TO 4
4.REPEAT STEPS
Repeat steps 1 to 3 twice.
>> GO TO 5
5.IGNITION SWITCH
Turn ignition switch ON.
>> GO TO 6
6.DIAGNOSTIC MODE
SRS system is now in diagnostic mode and AIR BAG warning lamp flashes. Refer to SRC-85, "
Trouble Diag-
nosis without CONSULT-III".
>> END
Diagnosis Procedure (C omponent Diagnosis)INFOID:0000000001735311
Recheck SRS after each replacement.
1.HARNESS CONNECTOR
Is there any visible damage to the connector?
YES or NO
YES >> Replace the harness.
NO >> GO TO 2
2.WIRING HARNESS
Is there any visible damage to the harness?
YES or NO
YES >> Replace the harness.
NO >> GO TO 3
3.FRONT LH SIDE AIR BAG MODULE
Replace the front LH seat back assembly. Refer to SE-49, "
Removal and Installation".
>> GO TO 4
4.AIR BAG DIAGNOSIS SENSOR UNIT
Replace the air bag diagnosis sensor unit. Refer to SR-17, "
Removal and Installation".
>> GO TO 5
5.RELATED HARNESS
Revision: March 2010 2008 QX56
Page 3425 of 4083
B1129 – B1132 SIDE AIRBAG MODULE RH
SRC-27
< COMPONENT DIAGNOSIS >
C
D E
F
G
I
J
K L
M A
B
SRC
N
O P
Turn ignition switch ON. >> GO TO 2
2.IGNITION SWITCH
After air bag warning lamp lights for 7 seconds, turn ignition switch OFF within 1 second.
>> GO TO 3
3.WAIT TIME
Wait more than 3 seconds.
>> GO TO 4
4.REPEAT STEPS
Repeat steps 1 to 3 twice.
>> GO TO 5
5.IGNITION SWITCH
Turn ignition switch ON.
>> GO TO 6
6.DIAGNOSTIC MODE
SRS system is now in diagnostic mode and AIR BAG warning lamp flashes. Refer to SRC-85, "
Trouble Diag-
nosis without CONSULT-III".
>> END
Diagnosis Procedure (C omponent Diagnosis)INFOID:0000000001735314
Recheck SRS after each replacement.
1.HARNESS CONNECTOR
Is there any visible damage to the connector?
YES or NO
YES >> Replace the harness.
NO >> GO TO 2
2.WIRING HARNESS
Is there any visible damage to the harness?
YES or NO
YES >> Replace the harness.
NO >> GO TO 3
3.FRONT RH SIDE AIR BAG MODULE
Replace the front RH seat back assembly. Refer to SE-49, "
Removal and Installation".
>> GO TO 4
4.AIR BAG DIAGNOSIS SENSOR UNIT
Replace the air bag diagnosis sensor unit. Refer to SR-17, "
Removal and Installation".
>> GO TO 5
5.RELATED HARNESS
Revision: March 2010 2008 QX56
Page 3428 of 4083
SRC-30
< COMPONENT DIAGNOSIS >
B1198 – B1201 SIDE CURTAIN AIR BAG MODULE LH (FRONT)
Turn ignition switch ON.
>> GO TO 2
2.IGNITION SWITCH
After air bag warning lamp lights for 7 seconds, turn ignition switch OFF within 1 second.
>> GO TO 3
3.WAIT TIME
Wait more than 3 seconds.
>> GO TO 4
4.REPEAT STEPS
Repeat steps 1 to 3 twice.
>> GO TO 5
5.IGNITION SWITCH
Turn ignition switch ON.
>> GO TO 6
6.DIAGNOSTIC MODE
SRS system is now in diagnostic mode and AIR BAG warning lamp flashes. Refer to SRC-85, "
Trouble Diag-
nosis without CONSULT-III".
>> END
Diagnosis Procedure (C omponent Diagnosis)INFOID:0000000001735317
Recheck SRS after each replacement.
1.HARNESS CONNECTOR
Is there any visible damage to the connector?
YES or NO
YES >> Replace the harness.
NO >> GO TO 2
2.WIRING HARNESS
Is there any visible damage to the harness?
YES or NO
YES >> Replace the harness.
NO >> GO TO 3
3.LH SIDE CURTAIN AIR BAG MODULE
Replace the LH side curtain air bag module. Refer to SR-13, "
Removal and Installation".
>> GO TO 4
4.AIR BAG DIAGNOSIS SENSOR UNIT
Replace the air bag diagnosis sensor unit. SR-17, "
Removal and Installation".
>> GO TO 5
5.RELATED HARNESS
Revision: March 2010 2008 QX56
Page 3431 of 4083
B1193 – B1196 SIDE CURTAIN AIR BAG MODULE RH (FRONT)SRC-33
< COMPONENT DIAGNOSIS >
C
DE
F
G
I
J
K L
M A
B
SRC
N
O P
Turn ignition switch ON. >> GO TO 2
2.IGNITION SWITCH
After air bag warning lamp lights for 7 seconds, turn ignition switch OFF within 1 second.
>> GO TO 3
3.WAIT TIME
Wait more than 3 seconds.
>> GO TO 4
4.REPEAT STEPS
Repeat steps 1 to 3 twice.
>> GO TO 5
5.IGNITION SWITCH
Turn ignition switch ON.
>> GO TO 6
6.DIAGNOSTIC MODE
SRS system is now in diagnostic mode and AIR BAG warning lamp flashes. Refer to SRC-85, "
Trouble Diag-
nosis without CONSULT-III".
>> END
Diagnosis Procedure (C omponent Diagnosis)INFOID:0000000001735320
Recheck SRS after each replacement.
1.HARNESS CONNECTOR
Is there any visible damage to the connector?
YES or NO
YES >> Replace the harness.
NO >> GO TO 2
2.WIRING HARNESS
Is there any visible damage to the harness?
YES or NO
YES >> Replace the harness.
NO >> GO TO 3
3.RH SIDE CURTAIN AIR BAG MODULE
Replace the RH side curtain air bag module. Refer to SR-13, "
Removal and Installation".
>> GO TO 4
4.AIR BAG DIAGNOSIS SENSOR UNIT
Replace the air bag diagnosis sensor unit. Refer to SR-17, "
Removal and Installation".
>> GO TO 5
5.RELATED HARNESS
Revision: March 2010 2008 QX56
Page 3434 of 4083
SRC-36
< COMPONENT DIAGNOSIS >
B1150 – B1153 SIDE CURTAIN AIR BAG MODULE LH (REAR)
Turn ignition switch ON.
>> GO TO 2
2.IGNITION SWITCH
After air bag warning lamp lights for 7 seconds, turn ignition switch OFF within 1 second.
>> GO TO 3
3.WAIT TIME
Wait more than 3 seconds.
>> GO TO 4
4.REPEAT STEPS
Repeat steps 1 to 3 twice.
>> GO TO 5
5.IGNITION SWITCH
Turn ignition switch ON.
>> GO TO 6
6.DIAGNOSTIC MODE
SRS system is now in diagnostic mode and AIR BAG warning lamp flashes. Refer to SRC-85, "
Trouble Diag-
nosis without CONSULT-III".
>> END
Diagnosis Procedure (C omponent Diagnosis)INFOID:0000000001735323
Recheck SRS after each replacement.
1.HARNESS CONNECTOR
Is there any visible damage to the connector?
YES or NO
YES >> Replace the harness.
NO >> GO TO 2
2.WIRING HARNESS
Is there any visible damage to the harness?
YES or NO
YES >> Replace the harness.
NO >> GO TO 3
3.LH SIDE CURTAIN AIR BAG MODULE
Replace the LH side curtain air bag module. Refer to SR-13, "
Removal and Installation".
>> GO TO 4
4.AIR BAG DIAGNOSIS SENSOR UNIT
Replace the air bag diagnosis sensor unit. Refer to SR-17, "
Removal and Installation".
>> GO TO 5
5.RELATED HARNESS
Revision: March 2010 2008 QX56