Page 3859 of 4083
HEATER COREVTL-19
< ON-VEHICLE REPAIR >
C
DE
F
G H
J
K L
M A
B
VTL
N
O P
Rear Heater and Cooling Unit Assembly
Removal and InstallationINFOID:0000000001516613
FRONT HEATER CORE
Removal
1. Remove the front heater and cooling unit assembly. Refer to VTL-16, "Removal and Installation".
2. Remove the four screws and remove the upper bracket.
3. Remove the four screws and remove the heater core cover.
4. Remove the heater core pipe bracket.
AWIIA0087ZZ
1. Front cover 2. Evaporator and heater core case 3. Evaporator
4. Side cover 5. Heater core 6. Blower motor
7. Blower motor case 8. Variable blower control
Front
Revision: March 2010 2008 QX56
Page 3860 of 4083
VTL-20
< ON-VEHICLE REPAIR >
HEATER CORE
5. Remove the heater core.NOTE:
If the in-cabin microfilters are c ontaminated from coolant leaking
from the heater core, replace the in-cabin microfilters with new
ones before installing the new heater core.
Installation
Installation is in the reverse order of removal.
REAR HEATER CORE
Removal
1. Partially drain the engine cooling system. Refer to CO-11, "Changing Engine Coolant".
2. Remove the luggage side finisher lower RH. Refer to INT-19, "
Removal and Installation".
3. Disconnect the rear heater hoses from the heater core.
4. Remove the rear heater core bracket.
5. Remove the heater core.
Installation
Installation is in the reverse order of removal.
LJIA0134E
Revision: March 2010 2008 QX56
Page 3861 of 4083
DEFROSTER DOOR MOTORVTL-21
< ON-VEHICLE REPAIR >
C
DE
F
G H
J
K L
M A
B
VTL
N
O P
DEFROSTER DOOR MOTOR
Removal and InstallationINFOID:0000000001516614
Defroster Door Motor - Front Heater and Cooling Unit Assembly
REMOVAL
1. Remove the BCM. Refer to BCS-55, "Removal and Installation".
2. Remove the Bose speaker amplifier. Refer to AV-177, "
Removal and Installation".
3. Disconnect the defroster door motor electrical connector.
4. Remove the three screws and remove the defroster door motor.
INSTALLATION
Installation is in the reverse order of removal.
LJIA0139E
1. Front heater and cooling unit assembly 2. Intake door motor 3. Air mix door motor (driver)
4. Variable blower control 5. Air mix door motor (passenger) 6. Mode door motor
7. Defroster door motor
Revision: March 2010 2008 QX56
Page 3862 of 4083
VTL-22
< ON-VEHICLE REPAIR >
INTAKE DOOR MOTOR
INTAKE DOOR MOTOR
Removal and InstallationINFOID:0000000001516615
Intake Door Motor - Front Heater and Cooling Unit Assembly
REMOVAL
1. Remove the front heater and cooling unit assembly. Refer to VTL-16, "Removal and Installation".
2. Remove the steering member from the front heater and cooling unit assembly.
3. Disconnect the intake door motor electrical connector.
4. Remove the three screws and remove the intake door motor.
INSTALLATION
Installation is in the reverse order of removal.
LJIA0139E
1. Front heater and cooling unit assembly 2. Intake door motor 3. Air mix door motor (driver)
4. Variable blower control 5. Air mix door motor (passenger) 6. Mode door motor
7. Defroster door motor
Revision: March 2010 2008 QX56
Page 3863 of 4083
MODE DOOR MOTORVTL-23
< ON-VEHICLE REPAIR >
C
DE
F
G H
J
K L
M A
B
VTL
N
O P
MODE DOOR MOTOR
ComponentsINFOID:0000000001516616
Front Mode Door Motor - Front Heater and Cooling Unit Assembly
LJIA0139E
1. Front heater and cooling unit assembly 2. Intake door motor 3. Air mix door motor (driver)
4. Variable blower control 5. Air mix door motor (passenger) 6. Mode door motor
7. Defroster door motor
Revision: March 2010 2008 QX56
Page 3864 of 4083

VTL-24
< ON-VEHICLE REPAIR >
MODE DOOR MOTOR
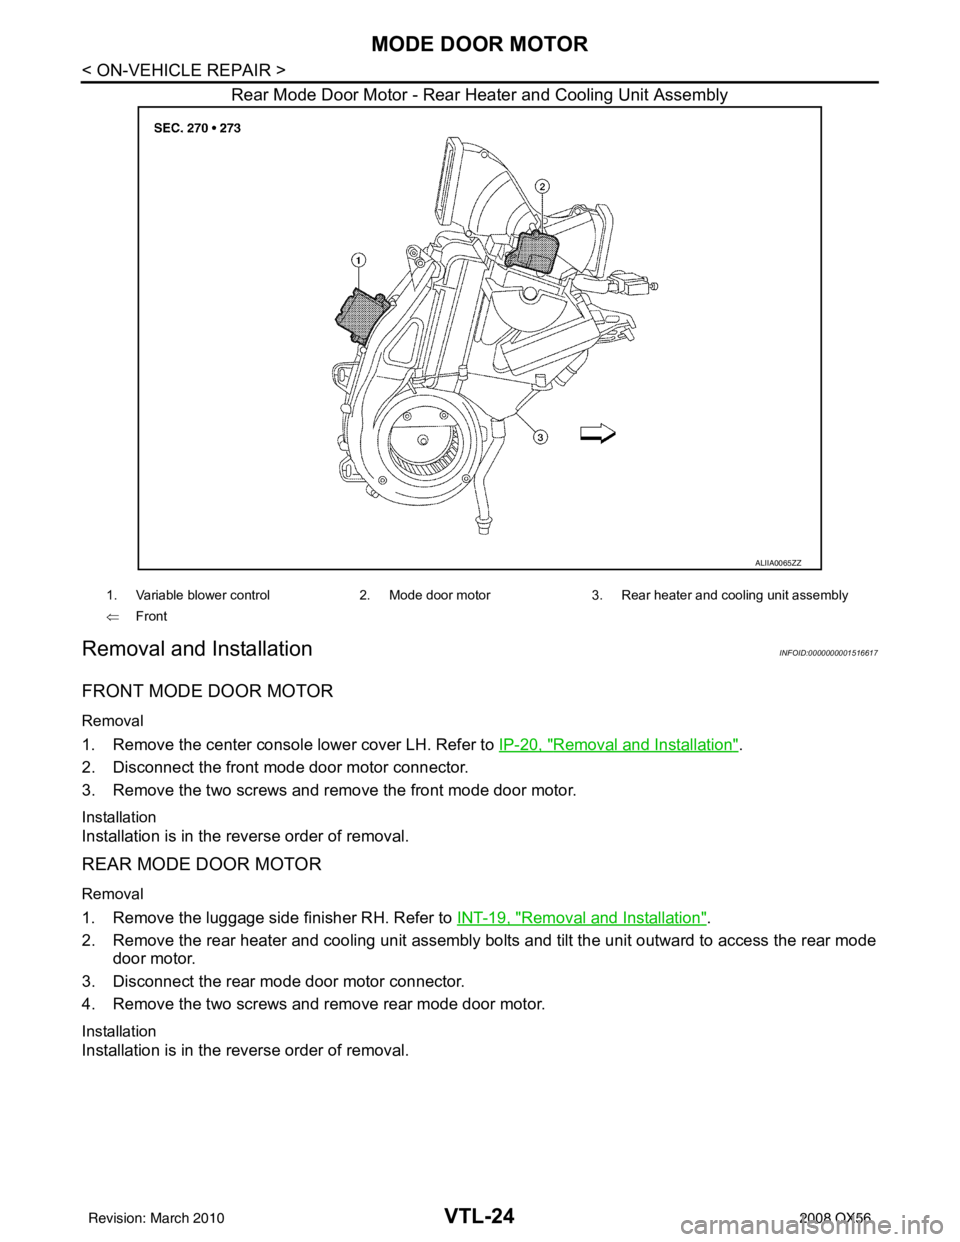
Rear Mode Door Motor - Rear Heater and Cooling Unit Assembly
Removal and InstallationINFOID:0000000001516617
FRONT MODE DOOR MOTOR
Removal
1. Remove the center console lower cover LH. Refer to IP-20, "Removal and Installation".
2. Disconnect the front mode door motor connector.
3. Remove the two screws and remove the front mode door motor.
Installation
Installation is in the reverse order of removal.
REAR MODE DOOR MOTOR
Removal
1. Remove the luggage side finisher RH. Refer to INT-19, "Removal and Installation".
2. Remove the rear heater and cooling unit assembly bolts and tilt the unit outward to access the rear mode
door motor.
3. Disconnect the rear mode door motor connector.
4. Remove the two screws and remove rear mode door motor.
Installation
Installation is in the reverse order of removal.
ALIIA0065ZZ
1. Variable blower control 2. Mode door motor3. Rear heater and cooling unit assembly
⇐ Front
Revision: March 2010 2008 QX56
Page 3865 of 4083
AIR MIX DOOR MOTORVTL-25
< ON-VEHICLE REPAIR >
C
DE
F
G H
J
K L
M A
B
VTL
N
O P
AIR MIX DOOR MOTOR
ComponentINFOID:0000000001516618
Front Air Mix Door Motors - Front Heater and Cooling Unit Assembly
LJIA0139E
1. Front heater and cooling unit assembly 2. Intake door motor 3. Air mix door motor (driver)
4. Variable blower control 5. Air mix door motor (passenger) 6. Mode door motor
7. Defroster door motor
Revision: March 2010 2008 QX56
Page 3866 of 4083

VTL-26
< ON-VEHICLE REPAIR >
AIR MIX DOOR MOTOR
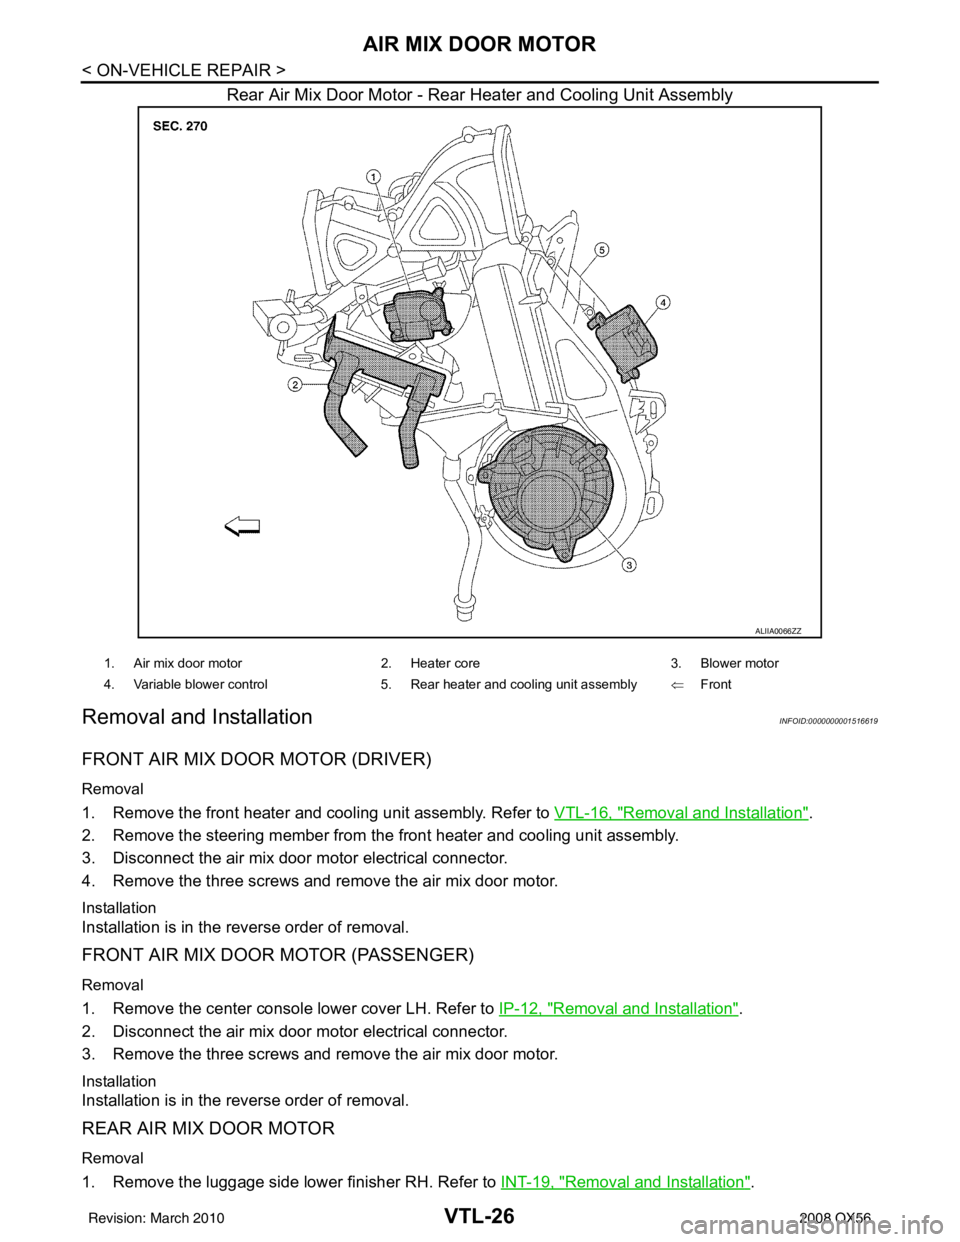
Rear Air Mix Door Motor - Rear Heater and Cooling Unit Assembly
Removal and InstallationINFOID:0000000001516619
FRONT AIR MIX DOOR MOTOR (DRIVER)
Removal
1. Remove the front heater and cooling unit assembly. Refer to VTL-16, "Removal and Installation".
2. Remove the steering member from the front heater and cooling unit assembly.
3. Disconnect the air mix door motor electrical connector.
4. Remove the three screws and remove the air mix door motor.
Installation
Installation is in the reverse order of removal.
FRONT AIR MIX DOOR MOTOR (PASSENGER)
Removal
1. Remove the center console lower cover LH. Refer to IP-12, "Removal and Installation".
2. Disconnect the air mix door motor electrical connector.
3. Remove the three screws and remove the air mix door motor.
Installation
Installation is in the reverse order of removal.
REAR AIR MIX DOOR MOTOR
Removal
1. Remove the luggage side lower finisher RH. Refer to INT-19, "Removal and Installation".
ALIIA0066ZZ
1. Air mix door motor2. Heater core 3. Blower motor
4. Variable blower control 5. Rear heater and cooling unit assembly ⇐Front
Revision: March 2010 2008 QX56