2008 INFINITI FX35 battery
[x] Cancel search: batteryPage 3692 of 3924
AUTOMATIC DRIVE POSITIONERSE-53
< SERVICE INFORMATION >
C
DE
F
G H
J
K L
M A
B
SE
N
O P
OK or NG
OK >> Replace door mirror motor (passenger side).
NG >> Check the condition of the harness and connector.
Check Sliding Sensor CircuitINFOID:0000000001328119
1.CHECK FUNCTION
With CONSULT-III
Check operation with “SLIDE PULSE” on the DATA MONITOR to make sure the pulse changes.
Without CONSULT-III
1. Turn ignition switch OFF.
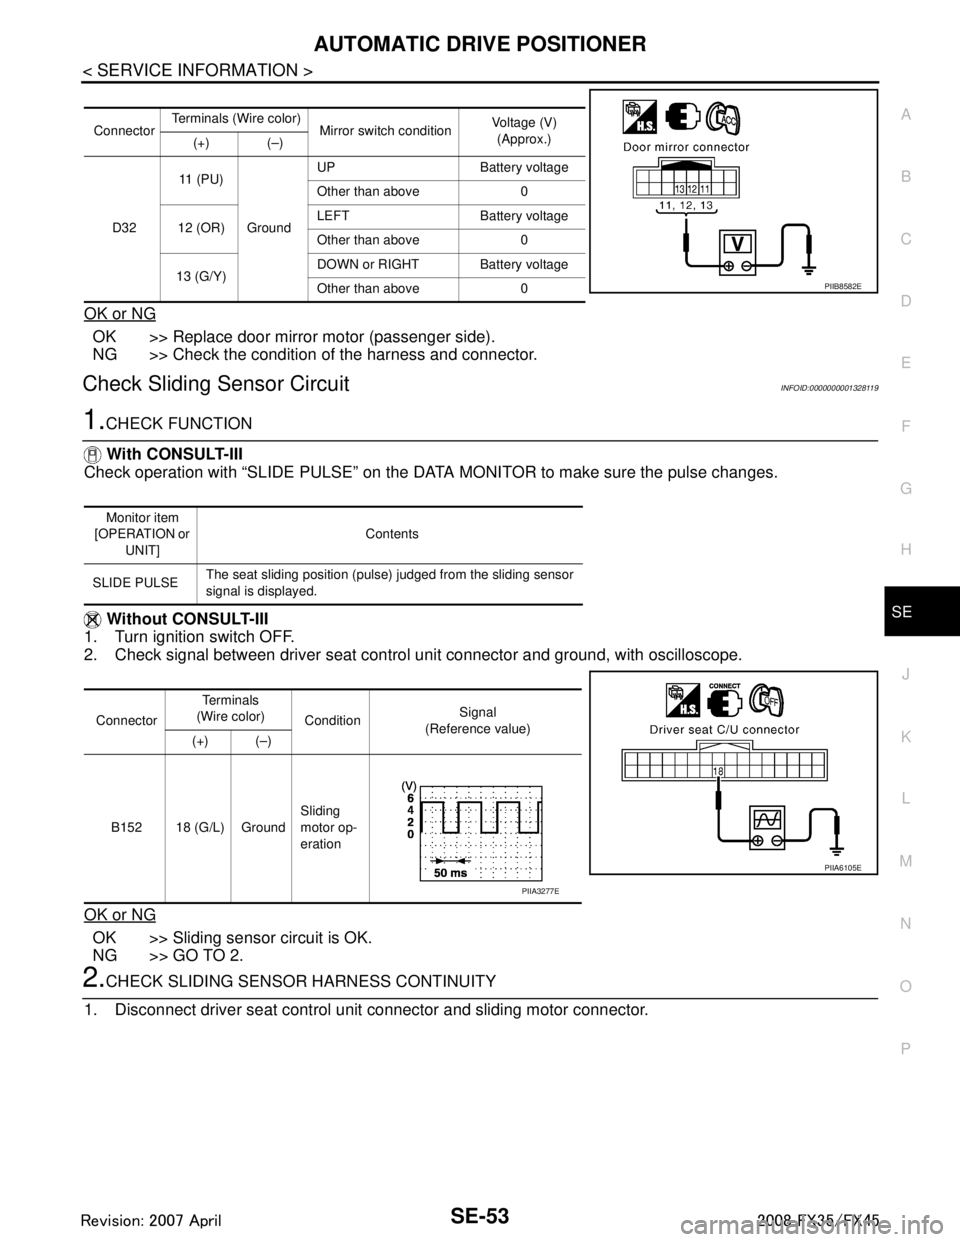
2. Check signal between driver seat control unit connector and ground, with oscilloscope.
OK or NG
OK >> Sliding sensor circuit is OK.
NG >> GO TO 2.
2.CHECK SLIDING SENSOR HARNESS CONTINUITY
1. Disconnect driver seat control unit connector and sliding motor connector.
Connector Terminals (Wire color)
Mirror switch condition Voltage (V)
(Approx.)
(+) (–)
D32 11 ( P U )
Ground UP Battery voltage
Other than above 0
12 (OR) LEFT Battery voltage
Other than above 0
13 (G/Y) DOWN or RIGHT Battery voltage
Other than above 0
PIIB8582E
Monitor item
[OPERATION or
UNIT] Contents
SLIDE PULSE The seat sliding position (pulse) judged from the sliding sensor
signal is displayed.
Connector Te r m i n a l s
(Wire color) Condition Signal
(Reference value)
(+) (–)
B152 18 (G/L) Ground Sliding
motor op-
eration
PIIA6105E
PIIA3277E
3AA93ABC3ACD3AC03ACA3AC03AC63AC53A913A773A893A873A873A8E3A773A983AC73AC93AC03AC3
3A893A873A873A8F3A773A9D3AAF3A8A3A8C3A863A9D3AAF3A8B3A8C
Page 3703 of 3924
SE-64
< SERVICE INFORMATION >
AUTOMATIC DRIVE POSITIONER
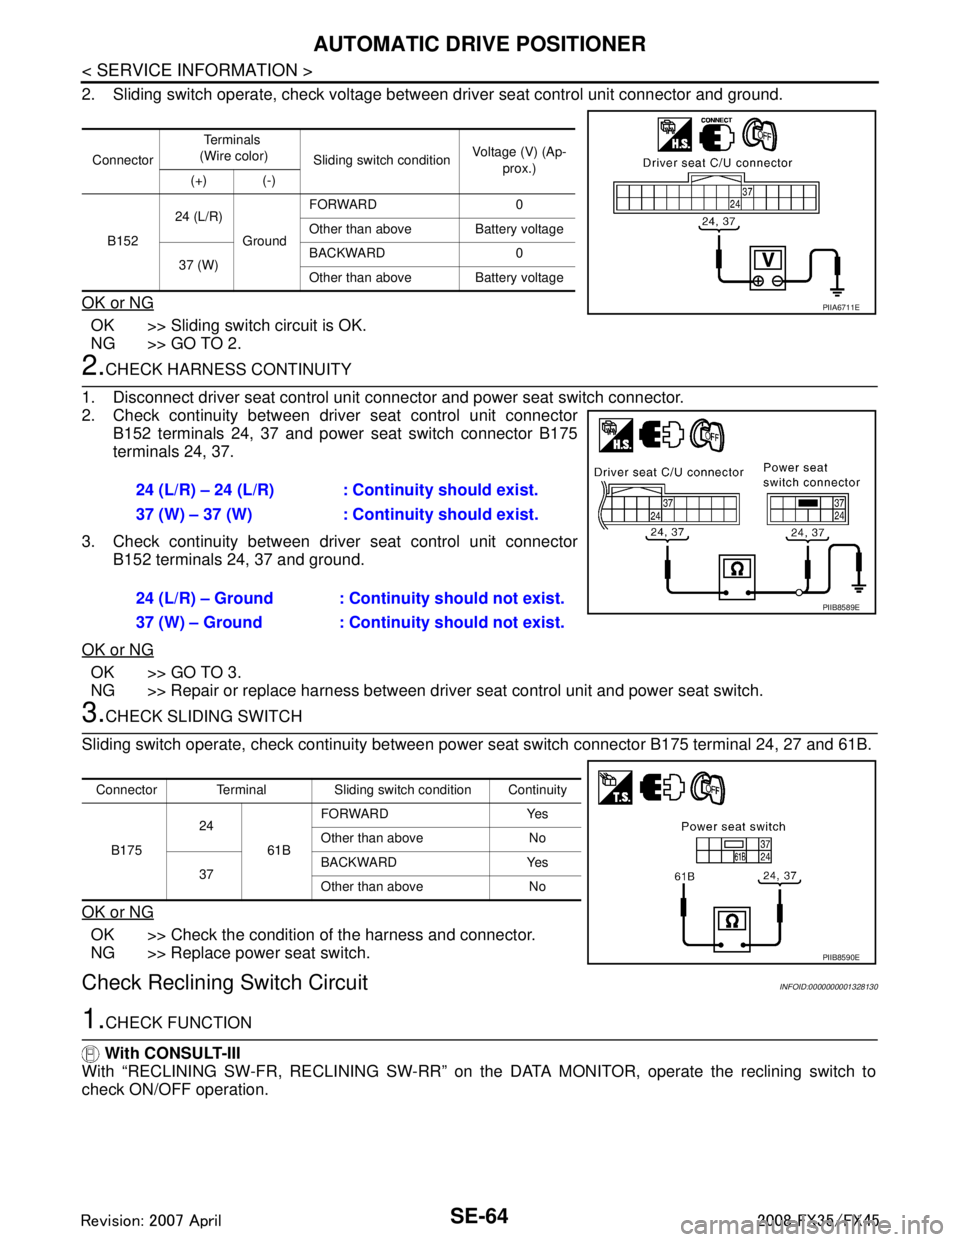
2. Sliding switch operate, check voltage between driver seat control unit connector and ground.
OK or NG
OK >> Sliding switch circuit is OK.
NG >> GO TO 2.
2.CHECK HARNESS CONTINUITY
1. Disconnect driver seat control unit c onnector and power seat switch connector.
2. Check continuity between driv er seat control unit connector
B152 terminals 24, 37 and power seat switch connector B175
terminals 24, 37.
3. Check continuity between driv er seat control unit connector
B152 terminals 24, 37 and ground.
OK or NG
OK >> GO TO 3.
NG >> Repair or replace harness between driver seat control unit and power seat switch.
3.CHECK SLIDING SWITCH
Sliding switch operate, check continuity between pow er seat switch connector B175 terminal 24, 27 and 61B.
OK or NG
OK >> Check the condition of the harness and connector.
NG >> Replace power seat switch.
Check Reclining Switch CircuitINFOID:0000000001328130
1.CHECK FUNCTION
With CONSULT-III
With “RECLINING SW-FR, RECLINING SW-RR” on t he DATA MONITOR, operate the reclining switch to
check ON/OFF operation.
Connector Te r m i n a l s
(Wire color) Sliding switch condition Voltage (V) (Ap-
prox.)
(+) (-)
B152 24 (L/R)
GroundFORWARD 0
Other than above Battery voltage
37 (W) BACKWARD 0
Other than above Battery voltage
PIIA6711E
24 (L/R) – 24 (L/R) : Continuity should exist.
37 (W) – 37 (W) : Continuity should exist.
24 (L/R) – Ground : Continuity should not exist.
37 (W) – Ground : Continuity should not exist.
PIIB8589E
Connector Terminal Sliding switch condition Continuity
B175 24
61BFORWARD Yes
Other than above No
37 BACKWARD Yes
Other than above No
PIIB8590E
3AA93ABC3ACD3AC03ACA3AC03AC63AC53A913A773A893A873A873A8E3A773A983AC73AC93AC03AC3
3A893A873A873A8F3A773A9D3AAF3A8A3A8C3A863A9D3AAF3A8B3A8C
Page 3704 of 3924
AUTOMATIC DRIVE POSITIONERSE-65
< SERVICE INFORMATION >
C
DE
F
G H
J
K L
M A
B
SE
N
O P
Without CONSULT-III
1. Turn ignition switch OFF.
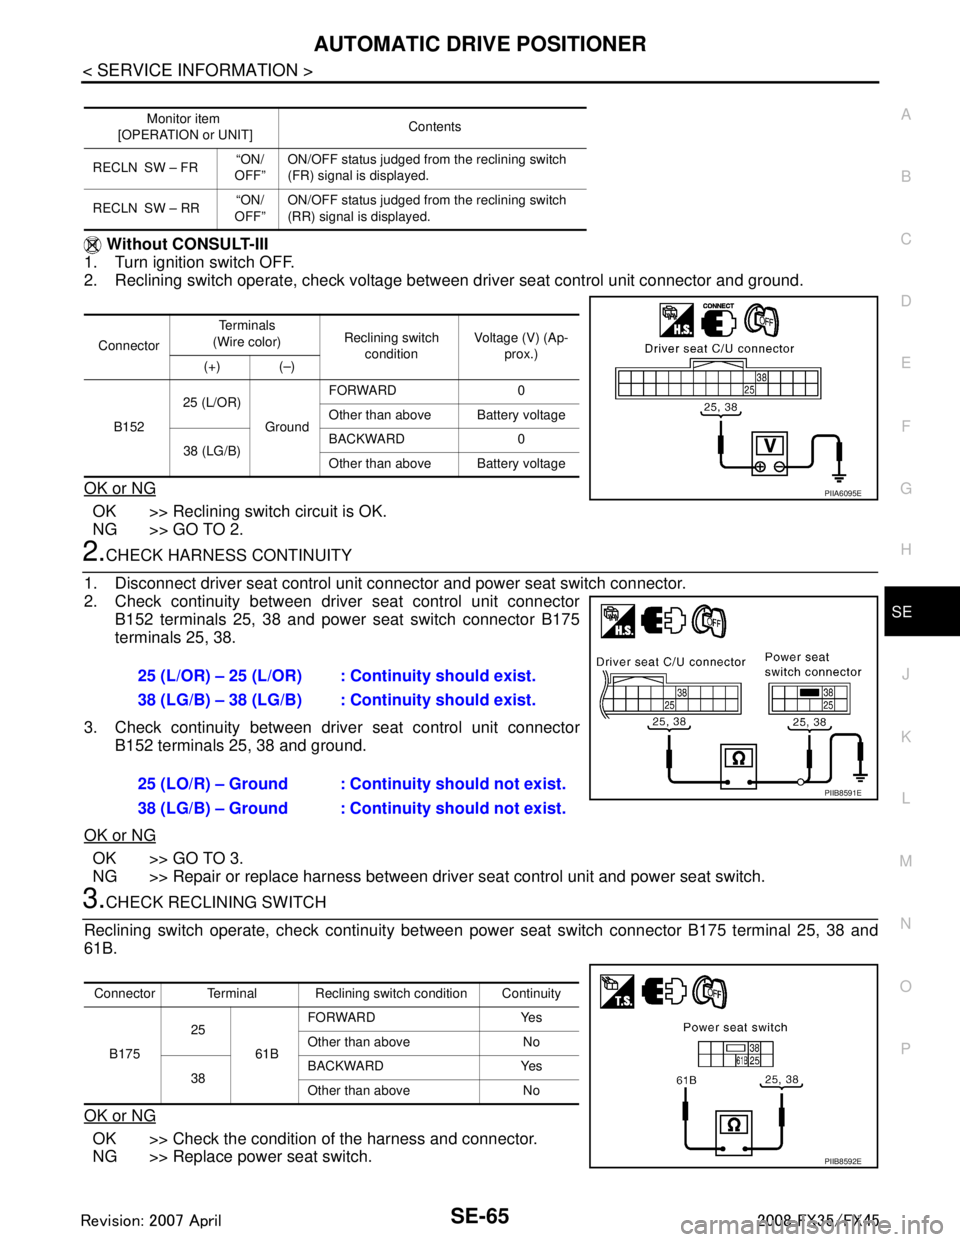
2. Reclining switch operate, check voltage betw een driver seat control unit connector and ground.
OK or NG
OK >> Reclining switch circuit is OK.
NG >> GO TO 2.
2.CHECK HARNESS CONTINUITY
1. Disconnect driver seat control unit c onnector and power seat switch connector.
2. Check continuity between driver seat control unit connector
B152 terminals 25, 38 and power seat switch connector B175
terminals 25, 38.
3. Check continuity between driver seat control unit connector B152 terminals 25, 38 and ground.
OK or NG
OK >> GO TO 3.
NG >> Repair or replace harness between driver seat control unit and power seat switch.
3.CHECK RECLINING SWITCH
Reclining switch operate, check continuity between power seat switch connector B175 terminal 25, 38 and
61B.
OK or NG
OK >> Check the condition of the harness and connector.
NG >> Replace power seat switch.
Monitor item
[OPERATION or UNIT] Contents
RECLN SW – FR “ON/
OFF” ON/OFF status judged from the reclining switch
(FR) signal is displayed.
RECLN SW – RR “ON/
OFF” ON/OFF status judged from the reclining switch
(RR) signal is displayed.
Connector Te r m i n a l s
(Wire color) Reclining switch
condition Voltage (V) (Ap-
prox.)
(+) (–)
B152 25 (L/OR)
GroundFORWARD 0
Other than above Battery voltage
38 (LG/B) BACKWARD 0
Other than above Battery voltage
PIIA6095E
25 (L/OR) – 25 (L/OR) : Continuity should exist.
38 (LG/B) – 38 (LG/B) : Continuity should exist.
25 (LO/R) – Ground : Continuity should not exist.
38 (LG/B) – Ground : Continuity should not exist.
PIIB8591E
Connector Terminal Reclining switch condition Continuity
B175 25
61BFORWARD Yes
Other than above No
38 BACKWARD Yes
Other than above No
PIIB8592E
3AA93ABC3ACD3AC03ACA3AC03AC63AC53A913A773A893A873A873A8E3A773A983AC73AC93AC03AC3
3A893A873A873A8F3A773A9D3AAF3A8A3A8C3A863A9D3AAF3A8B3A8C
Page 3705 of 3924
SE-66
< SERVICE INFORMATION >
AUTOMATIC DRIVE POSITIONER
Check Front Lifting Switch Circuit
INFOID:0000000001328131
1.CHECK FUNCTION
With CONSULT-III
With “LIFT FR SW-UP, LIFT FR SW-DN” on the DATA MO NITOR, operate the front lifting switch to check ON/
OFF operation.
Without CONSULT-III
1. Turn ignition switch OFF.
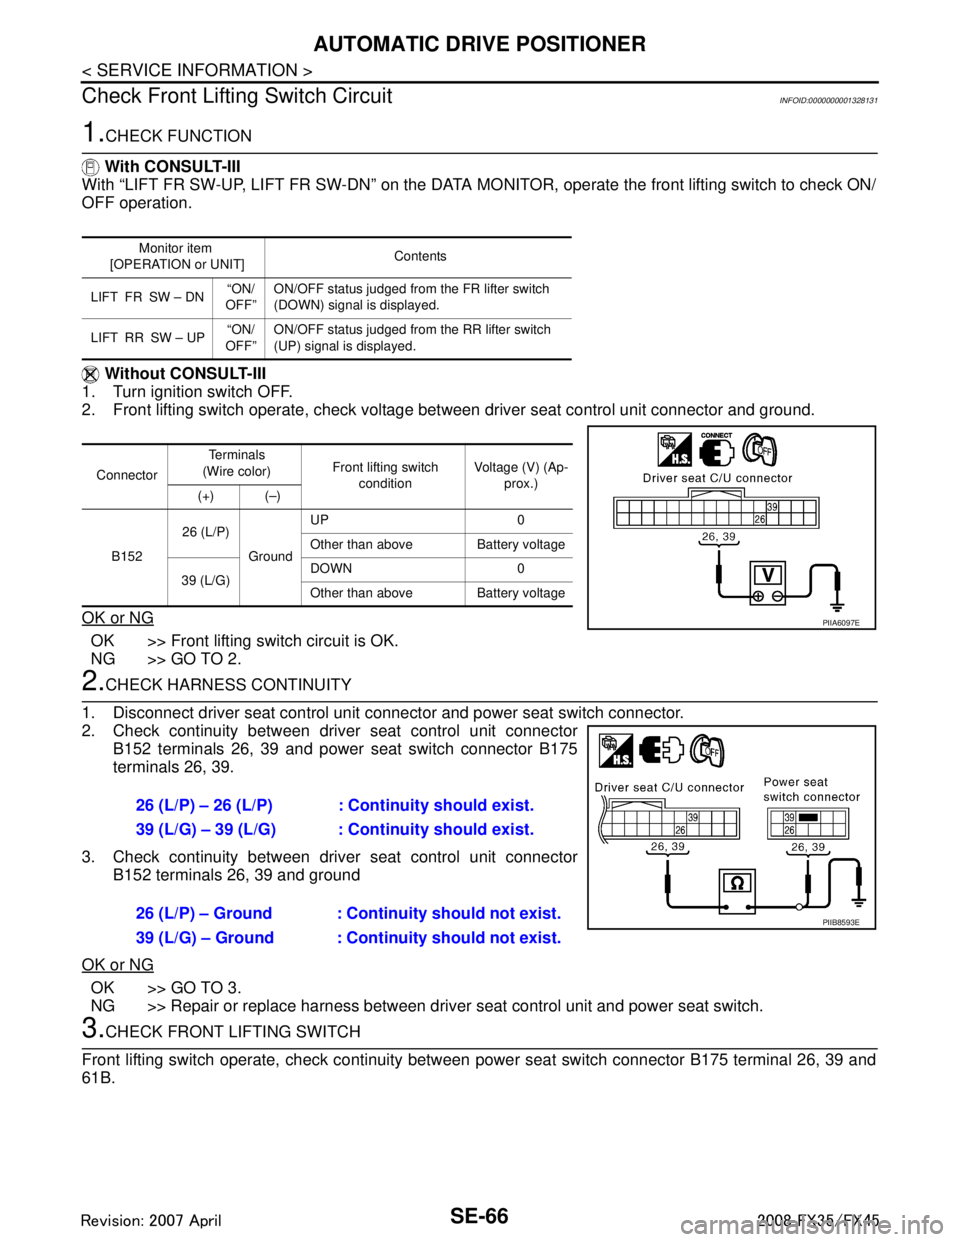
2. Front lifting switch operate, check voltage bet ween driver seat control unit connector and ground.
OK or NG
OK >> Front lifting switch circuit is OK.
NG >> GO TO 2.
2.CHECK HARNESS CONTINUITY
1. Disconnect driver seat control unit c onnector and power seat switch connector.
2. Check continuity between driv er seat control unit connector
B152 terminals 26, 39 and power seat switch connector B175
terminals 26, 39.
3. Check continuity between driv er seat control unit connector
B152 terminals 26, 39 and ground
OK or NG
OK >> GO TO 3.
NG >> Repair or replace harness between driver seat control unit and power seat switch.
3.CHECK FRONT LIFTING SWITCH
Front lifting switch operate, check continuity between power seat swit ch connector B175 terminal 26, 39 and
61B.
Monitor item
[OPERATION or UNIT] Contents
LIFT FR SW – DN “ON/
OFF” ON/OFF status judged from the FR lifter switch
(DOWN) signal is displayed.
LIFT RR SW – UP “ON/
OFF” ON/OFF status judged from the RR lifter switch
(UP) signal is displayed.
Connector Te r m i n a l s
(Wire color) Front lifting switch
condition Voltage (V) (Ap-
prox.)
(+) (–)
B152 26 (L/P)
GroundUP 0
Other than above Battery voltage
39 (L/G) DOWN 0
Other than above Battery voltage
PIIA6097E
26 (L/P) – 26 (L/P) : Co
ntinuity should exist.
39 (L/G) – 39 (L/G) : Co ntinuity should exist.
26 (L/P) – Ground : Continuity should not exist.
39 (L/G) – Ground : Continuity should not exist.
PIIB8593E
3AA93ABC3ACD3AC03ACA3AC03AC63AC53A913A773A893A873A873A8E3A773A983AC73AC93AC03AC3
3A893A873A873A8F3A773A9D3AAF3A8A3A8C3A863A9D3AAF3A8B3A8C
Page 3706 of 3924
AUTOMATIC DRIVE POSITIONERSE-67
< SERVICE INFORMATION >
C
DE
F
G H
J
K L
M A
B
SE
N
O P
OK or NG
OK >> Check the condition of the harness and connector.
NG >> Replace power seat switch.
Check Rear Lifting Switch CircuitINFOID:0000000001328132
1.CHECK FUNCTION
With CONSULT-III
With “LIFT RR SW-UP, LIFT RR SW-DN” on the DATA MO NITOR, operate the rear lifting switch to check ON/
OFF operation.
Without CONSULT-III
1. Turn ignition switch OFF.
2. Rear lifting switch operate, check voltage bet ween driver seat control unit connector and ground.
OK or NG
OK >> Rear seat lifting switch circuit is OK.
NG >> GO TO 2.
2.CHECK REAR LIFTING SWITCH HARNESS CONTINUITY
1. Disconnect driver seat control unit c onnector and power seat switch connector.
2. Check continuity between driver seat control unit connector B152 terminals 27, 40 and power seat switch connector B175
terminals 27, 40.
3. Check continuity between driver seat control unit connector B152 terminals 27, 40 and ground.
OK or NG
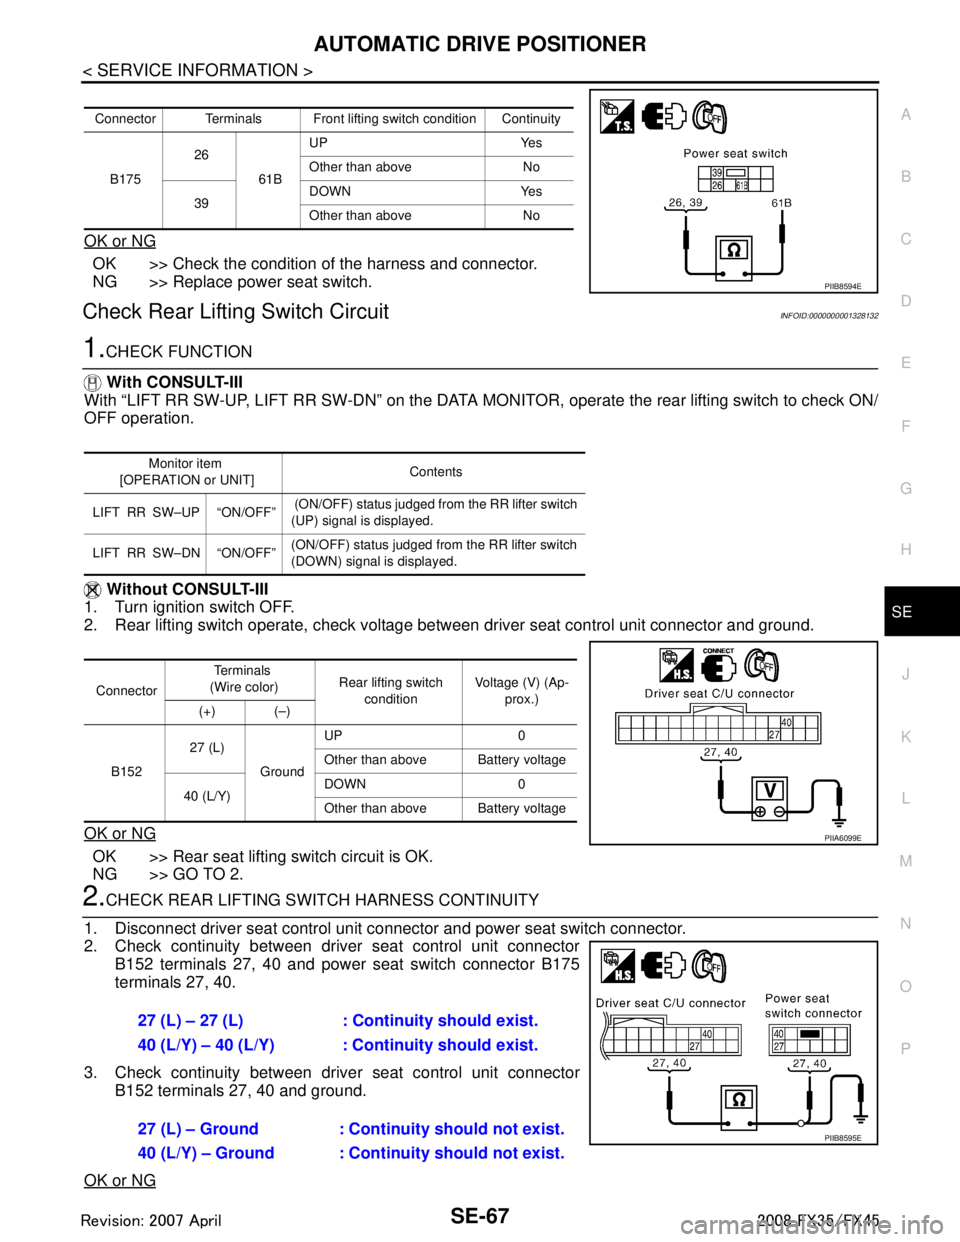
Connector Terminals Front lifting switch condition Continuity B175 26
61BUP Yes
Other than above No
39 DOWN Yes
Other than above No
PIIB8594E
Monitor item
[OPERATION or UNIT] Contents
LIFT RR SW–UP “ON/OFF” (ON/OFF) status judged from the RR lifter switch
(UP) signal is displayed.
LIFT RR SW–DN “ON/OFF” (ON/OFF) status judged from the RR lifter switch
(DOWN) signal is displayed.
Connector Te r m i n a l s
(Wire color) Rear lifting switch
condition Voltage (V) (Ap-
prox.)
(+) (–)
B152 27 (L)
GroundUP 0
Other than above Battery voltage
40 (L/Y) DOWN 0
Other than above Battery voltage
PIIA6099E
27 (L) – 27 (L) : Continuity should exist.
40 (L/Y) – 40 (L/Y) : Continuity should exist.
27 (L) – Ground : Continuity should not exist.
40 (L/Y) – Ground : Continuity should not exist.
PIIB8595E
3AA93ABC3ACD3AC03ACA3AC03AC63AC53A913A773A893A873A873A8E3A773A983AC73AC93AC03AC3
3A893A873A873A8F3A773A9D3AAF3A8A3A8C3A863A9D3AAF3A8B3A8C
Page 3714 of 3924
AUTOMATIC DRIVE POSITIONERSE-75
< SERVICE INFORMATION >
C
DE
F
G H
J
K L
M A
B
SE
N
O P
With CONSULT-III
Make sure when the A/T selector lever is in P posit ion, “P POSI SW” on the DATA MONITOR becomes ON.
Without CONSULT-III
1. Turn ignition switch OFF.
2. Check voltage between drive seat control unit connector and ground.
OK or NG
OK >> Park position switch circuit is OK.
NG >> GO TO 2.
2.CHECK PARK POSITION SWIT CH POWER SUPPLY CIRCUIT HARNESS
1. Turn ignition switch OFF.
2. Disconnect driver seat control unit connector and A/T device (park position switch) connector.
3. Check continuity between driver seat control unit connector
B152 terminal 17 and A/T device (park position switch) connec-
tor M67 terminal 3.
4. Check continuity between driver seat control unit connector B152 terminal 17 and ground.
OK or NG
OK >> GO TO 3.
NG >> Repair or replace harness between driver seat control unit and A/T device (park position switch).
3.CHECK A/T DEVICE (PARK POSITION SWITCH)
Check continuity between A/T devic e (park position switch) connec-
tor M67 terminal 2 and 3.
OK or NG
OK >> GO TO 4.
NG >> Replace A/T device (park position switch).
4.CHECK A/T DEVICE (PARK POSI TION SWITCH) GROUND HARNESS
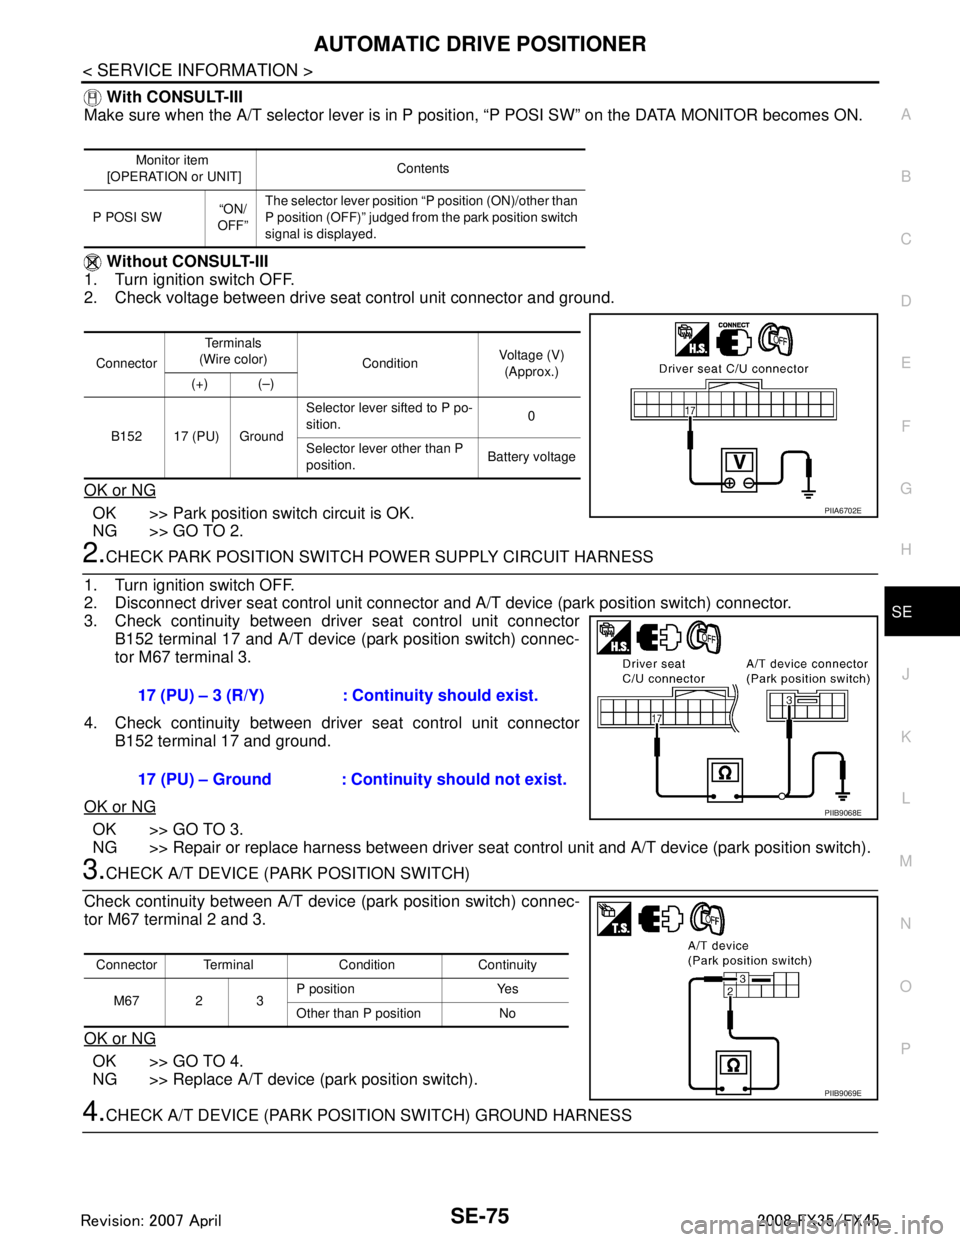
Monitor item
[OPERATION or UNIT] Contents
P POSI SW “ON/
OFF” The selector lever position “P position (ON)/other than
P position (OFF)” judged from the park position switch
signal is displayed.
Connector Te r m i n a l s
(Wire color) ConditionVoltage (V)
(Approx.)
(+) (–)
B152 17 (PU) Ground Selector lever sifted to P po-
sition.
0
Selector lever other than P
position. Battery voltage
PIIA6702E
17 (PU) – 3 (R/Y) : Continuity should exist.
17 (PU) – Ground : Continuity should not exist.
PIIB9068E
Connector Terminal Condition Continuity
M67 2 3 P position Yes
Other than P position No
PIIB9069E
3AA93ABC3ACD3AC03ACA3AC03AC63AC53A913A773A893A873A873A8E3A773A983AC73AC93AC03AC3
3A893A873A873A8F3A773A9D3AAF3A8A3A8C3A863A9D3AAF3A8B3A8C
Page 3715 of 3924
SE-76
< SERVICE INFORMATION >
AUTOMATIC DRIVE POSITIONER
Check continuity between A/T device (park position switch) connec-
tor M67 terminal 2 and ground.
OK or NG
OK >> Check the condition of the harness and connector.
NG >> Repair or replace harness between A/T device (park position switch) and ground.
Check Key Switch Circuit (With Intelligent Key)INFOID:0000000001328139
1.CHECK KEY SWITCH POWER SUPPRY CIRCUIT
With CONSULT-III
Touch “BCM”. With “IGN KEY SW” on the DATA MONITOR, Check ON/OFF operation.
*: Refer to BL-36, "
CONSULT-III Function (BCM)".
OK or NG
OK >> Key switch circuit is OK.
NG >> GO TO 2.
2.CHECK KEY SWITCH PO WER SUPPLY CIRCUIT
1. Turn ignition switch OFF.
2. Disconnect key switch and ignition knob switch connector.
3. Check voltage between key switch and ignition knob switch con- nector M22 terminal 3 and ground.
OK or NG
OK >> GO TO 3.
NG >> Check harness between key switch and fuse.
3.CHECK KEY SWITCH
Check continuity between key switch and ignition knob switch con-
nector M22 terminal 3 and 4.
OK or NG
OK >> GO TO 4.
NG >> Replace key switch and ignition knob switch.
4.CHECK HARNESS CONTINUITY
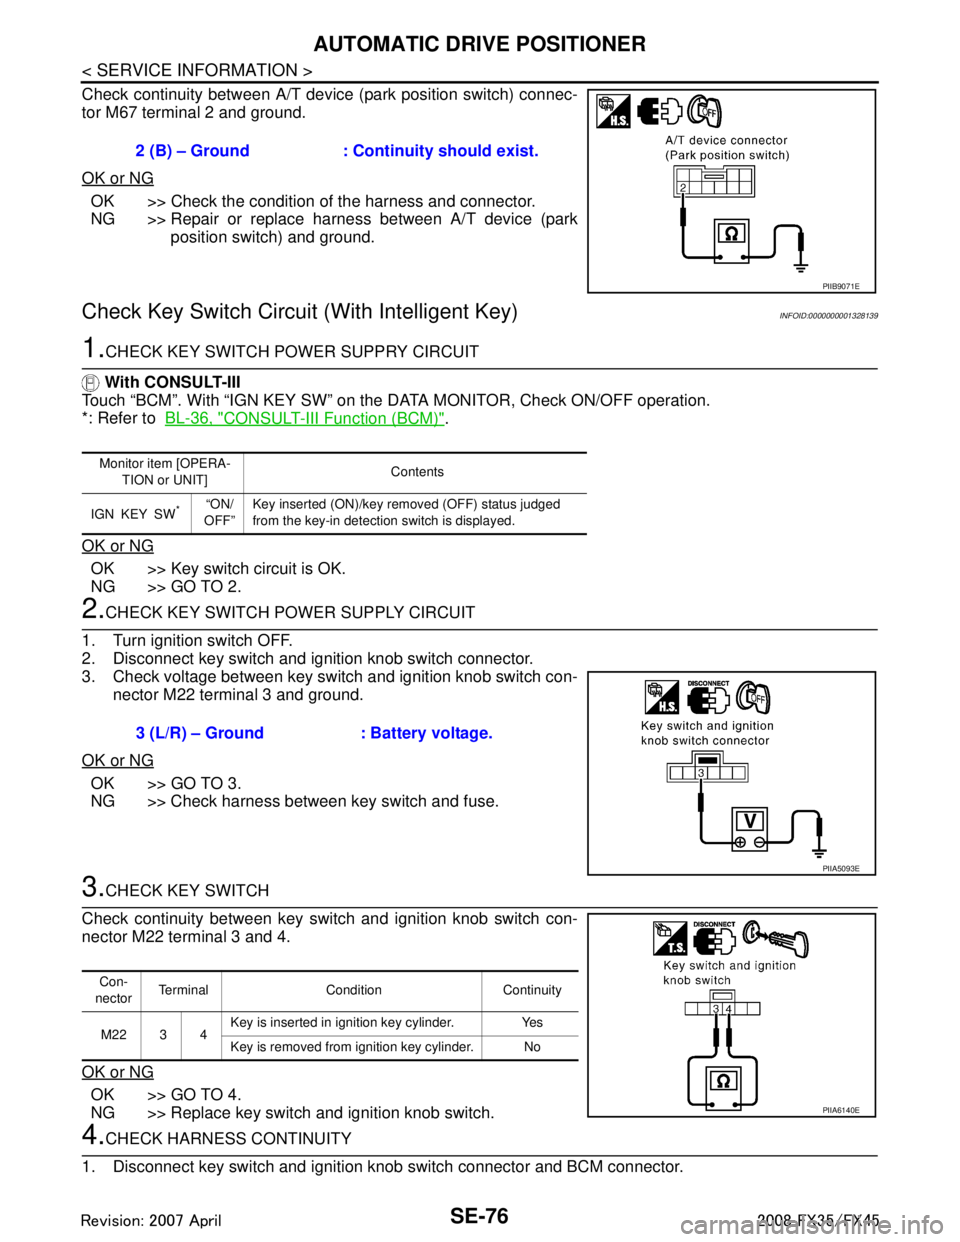
1. Disconnect key switch and ignition knob switch connector and BCM connector. 2 (B) – Ground : Continuity should exist.
PIIB9071E
Monitor item [OPERA-
TION or UNIT] Contents
IGN KEY SW
*“ON/
OFF” Key inserted (ON)/key removed (OFF) status judged
from the key-in detection switch is displayed.
3 (L/R) – Ground : Battery voltage.
PIIA5093E
Con-
nector Terminal Condition Continuity
M22 3 4 Key is inserted in ignition key cylinder. Yes
Key is removed from ignition key cylinder. No
PIIA6140E
3AA93ABC3ACD3AC03ACA3AC03AC63AC53A913A773A893A873A873A8E3A773A983AC73AC93AC03AC3
3A893A873A873A8F3A773A9D3AAF3A8A3A8C3A863A9D3AAF3A8B3A8C
Page 3716 of 3924
AUTOMATIC DRIVE POSITIONERSE-77
< SERVICE INFORMATION >
C
DE
F
G H
J
K L
M A
B
SE
N
O P
2. Check continuity between key switch and ignition knob switch connector M22 terminal 4 and BCM connector M3 terminal 37.
3. Check continuity between key switch and ignition knob switch connector M22 terminal 4 and ground.
OK or NG
OK >> Key switch circuit is OK.
NG >> Repair or replace harness between key switch and igni- tion knob switch and BCM.
Check Key Switch Circui t (Without Intelligent Key)INFOID:0000000001328140
1.CHECK KEY SWITCH
With CONSULT-III
Touch “BCM”. With “IGN KEY SW” on the DATA MONITOR, Check ON/OFF operation.
*: Refer to BL-36, "
CONSULT-III Function (BCM)"
OK or NG
OK >> Key switch circuit is OK.
NG >> GO TO 2.
2.CHECK KEY SWITCH AND KEY LOCK SOLENOID POWER SUPPLY CIRCUIT
1. Turn ignition switch OFF.
2. Disconnect key switch connector.
3. Check voltage between key switch connector M23 terminal 2 and ground.
OK or NG
OK >> GO TO 3.
NG >> Check harness between key switch and fuse.
3.CHECK KEY SWITCH
Check continuity between key switch connector M23 terminal 1 and 2.
OK or NG
OK >> GO TO 4.
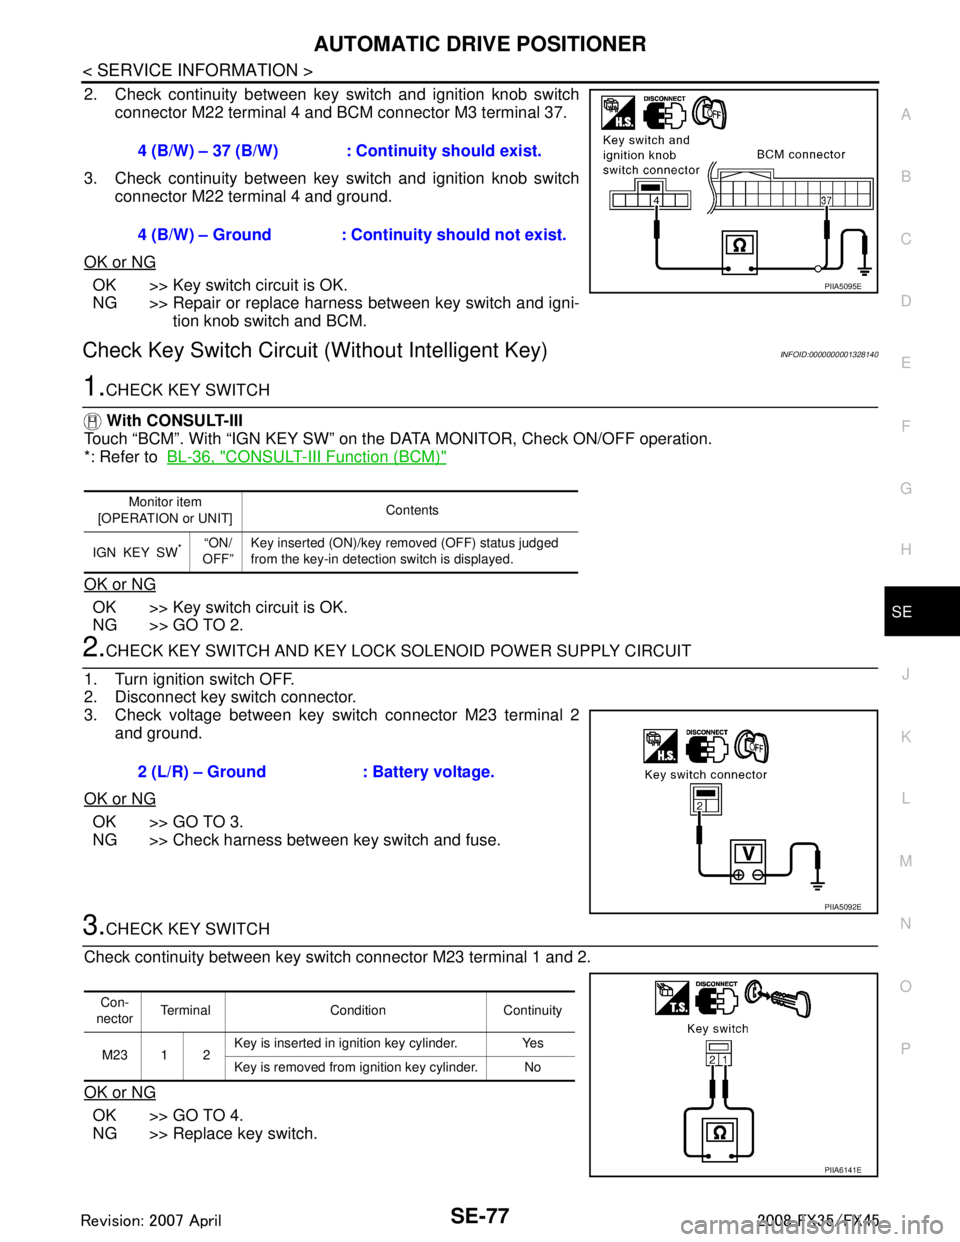
NG >> Replace key switch. 4 (B/W) – 37 (B/W) : Cont
inuity should exist.
4 (B/W) – Ground : Continuity should not exist.
PIIA5095E
Monitor item
[OPERATION or UNIT] Contents
IGN KEY SW
*“ON/
OFF” Key inserted (ON)/key removed (OFF) status judged
from the key-in detection switch is displayed.
2 (L/R) – Ground : Battery voltage.
PIIA5092E
Con-
nector Terminal Condition Continuity
M23 1 2 Key is inserted in ignition key cylinder. Yes
Key is removed from ignition key cylinder. No
PIIA6141E
3AA93ABC3ACD3AC03ACA3AC03AC63AC53A913A773A893A873A873A8E3A773A983AC73AC93AC03AC3
3A893A873A873A8F3A773A9D3AAF3A8A3A8C3A863A9D3AAF3A8B3A8C