2008 INFINITI FX35 fuse chart
[x] Cancel search: fuse chartPage 1187 of 3924
![INFINITI FX35 2008 Service Manual
WARNING CHIMEDI-61
< SERVICE INFORMATION >
C
DE
F
G H
I
J
L
M A
B
DI
N
O P
If “CAN communication [U1000]” is indicated, after prin ting the monitor item, go to “LAN system”. Refer to
LAN-43, INFINITI FX35 2008 Service Manual
WARNING CHIMEDI-61
< SERVICE INFORMATION >
C
DE
F
G H
I
J
L
M A
B
DI
N
O P
If “CAN communication [U1000]” is indicated, after prin ting the monitor item, go to “LAN system”. Refer to
LAN-43,](/manual-img/42/57017/w960_57017-1186.png)
WARNING CHIMEDI-61
< SERVICE INFORMATION >
C
DE
F
G H
I
J
L
M A
B
DI
N
O P
If “CAN communication [U1000]” is indicated, after prin ting the monitor item, go to “LAN system”. Refer to
LAN-43, "
CAN System Specification Chart".
Trouble DiagnosisINFOID:0000000001328482
HOW TO PERFORM TROUBLE DIAGNOSIS
1. Confirm the symptom or customer complaint.
2. Understand operation description and function description. Refer to DI-51, "
System Description".
3. Perform the preliminary inspection. Refer to "PRELIMINARY INSPECTION".
4. Referring to trouble diagnosis chart, make sure the cause of the malfunction and repair or replace applica-
ble parts. Refer to DI-61, "
Symptom Chart".
5. Does the warning chime operate normally? If so, GO TO 6. If not, GO TO 3.
6. INSPECTION END
PRELIMINARY INSPECTION
1.CHECK BCM (CONSULT-III)
Perform self-diagnosis of BCM. Refer to DI-60, "
CONSULT-III Function (BCM)".
Self
-diagnosis results
No malfunction detected >> GO TO 2.
Malfunction detected >> Check applicable parts, and repair or replace corresponding parts.
2.CHECK UNIFIED METER AND A/C AMP. (CONSULT-III)
Perform self-diagnosis of unified meter and A/C amp. Refer to DI-27, "
CONSULT-III Function (METER/M&A)".
Self
-diagnosis results
No malfunction detected >> INSPECTION END
Malfunction detected >> Check applicable parts, and repair or replace corresponding parts.
Symptom ChartINFOID:0000000001328483
Power Supply and Ground Circuit InspectionINFOID:0000000001328484
1.CHECK FUSE AND FUSIBLE LINK
Check for blown BCM fuses and fusible link.
Symptom Diagnoses/Service procedure
All warning chimes do not activate. Perform the following inspections.
1.
DI-62, "
Combination Meter Buzzer Circuit Inspection".
2. DI-61, "
Power Supply and Ground Circuit Inspection".
Replace BCM, found normal function in the above inspections.
Ignition key
warning chime
does not acti-
vate. Without Intelligent Key.
Perform the following inspections.
1.
DI-63, "
Front Door Switch (Drive r Side) Signal Inspection".
2. DI-64, "
Key Switch Signal Inspection (Without Intelligent Key)".
Replace BCM, found normal function in the above inspections.
With Intelligent Key, when mechan-
ical key is used. Perform the following inspections.
1.
DI-63, "
Front Door Switch (Drive r Side) Signal Inspection".
2. DI-65, "
Key Switch and Ignition Knob Switch Signal Inspection (With In-
telligent Key, When Mechanical Key Is Used)".
Replace BCM, found normal function in the above inspections.
With Intelligent Key, when Intelli-
gent Key is carried with the driver. Refer to
BL-106, "
Trouble Diagnosis Symptom Chart".
Light warning chime does not activate. Perform the following inspections.
1.
DI-63, "
Front Door Switch (Drive r Side) Signal Inspection".
2. LT- 1 0 4 , "
Combination Switch Inspection".
Replace BCM, found normal function in the above inspections.
Seat belt warning chime does not activate. Perform
DI-66, "
Seat Belt Buckle Switch (D river Side) Signal Inspection".
Replace BCM, found normal function in the above inspection.
3AA93ABC3ACD3AC03ACA3AC03AC63AC53A913A773A893A873A873A8E3A773A983AC73AC93AC03AC3
3A893A873A873A8F3A773A9D3AAF3A8A3A8C3A863A9D3AAF3A8B3A8C
Page 2879 of 3924
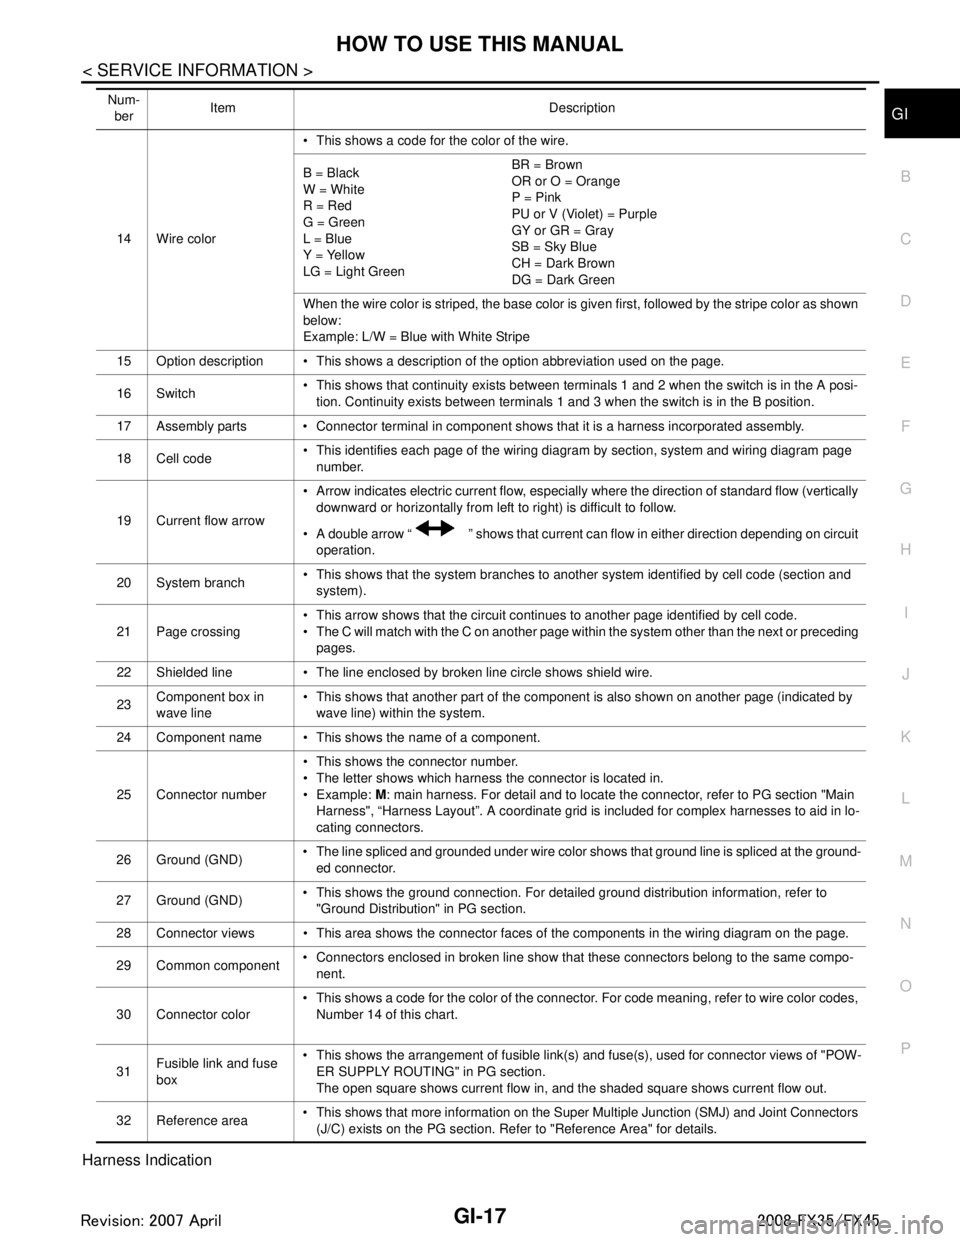
HOW TO USE THIS MANUALGI-17
< SERVICE INFORMATION >
C
DE
F
G H
I
J
K L
M B
GI
N
O P
Harness Indication
14 Wire color This shows a code for the color of the wire.
B = Black
W = White
R = Red
G = Green
L = Blue
Y = Yellow
LG = Light Green BR = Brown
OR or O = Orange
P = Pink
PU or V (Violet) = Purple
GY or GR = Gray
SB = Sky Blue
CH = Dark Brown
DG = Dark Green
When the wire color is striped, the base color is given first, followed by the stripe color as shown
below:
Example: L/W = Blue with White Stripe
15 Option description This shows a description of the option abbreviation used on the page.
16 Switch This shows that continuity exists between terminals 1 and 2 when the switch is in the A posi-
tion. Continuity exists between terminals 1 and 3 when the switch is in the B position.
17 Assembly parts Connector terminal in component shows that it is a harness incorporated assembly.
18 Cell code This identifies each page of the wiring diagram by section, system and wiring diagram page
number.
19 Current flow arrow Arrow indicates electric current flow, especially where the direction of standard flow (vertically
downward or horizontally from left to right) is difficult to follow.
A double arrow “ ” shows that current can flow in either direction depending on circuit operation.
20 System branch This shows that the system branches to another system identified by cell code (section and
system).
21 Page crossing This arrow shows that the circuit continues to another page identified by cell code.
The C will match with the C on another page within the system other than the next or preceding
pages.
22 Shielded line The line enclosed by broken line circle shows shield wire.
23 Component box in
wave line This shows that another part of the component is also shown on another page (indicated by
wave line) within the system.
24 Component name This shows the name of a component.
25 Connector number This shows the connector number.
The letter shows which harness the connector is located in.
Example:
M: main harness. For detail and to locate the connector, refer to PG section "Main
Harness", “Harness Layout”. A coordinate grid is included for complex harnesses to aid in lo-
cating connectors.
26 Ground (GND) The line spliced and grounded under wire color shows that ground line is spliced at the ground-
ed connector.
27 Ground (GND) This shows the ground connection. For detailed ground distribution information, refer to
"Ground Distribution" in PG section.
28 Connector views This area shows the connector faces of the components in the wiring diagram on the page.
29 Common component Connectors enclosed in broken line show that these connectors belong to the same compo-
nent.
30 Connector color This shows a code for the color of the connector. For code meaning, refer to wire color codes,
Number 14 of this chart.
31 Fusible link and fuse
box This shows the arrangement of fusible link(s) and fuse(s), used for connector views of "POW-
ER SUPPLY ROUTING" in PG section.
The open square shows current flow in, and the shaded square shows current flow out.
32 Reference area This shows that more information on the Super Multiple Junction (SMJ) and Joint Connectors
(J/C) exists on the PG section. Refer to "Reference Area" for details.
Num-
ber Item Description
3AA93ABC3ACD3AC03ACA3AC03AC63AC53A913A773A893A873A873A8E3A773A983AC73AC93AC03AC3
3A893A873A873A8F3A773A9D3AAF3A8A3A8C3A863A9D3AAF3A8B3A8C
Page 2974 of 3924
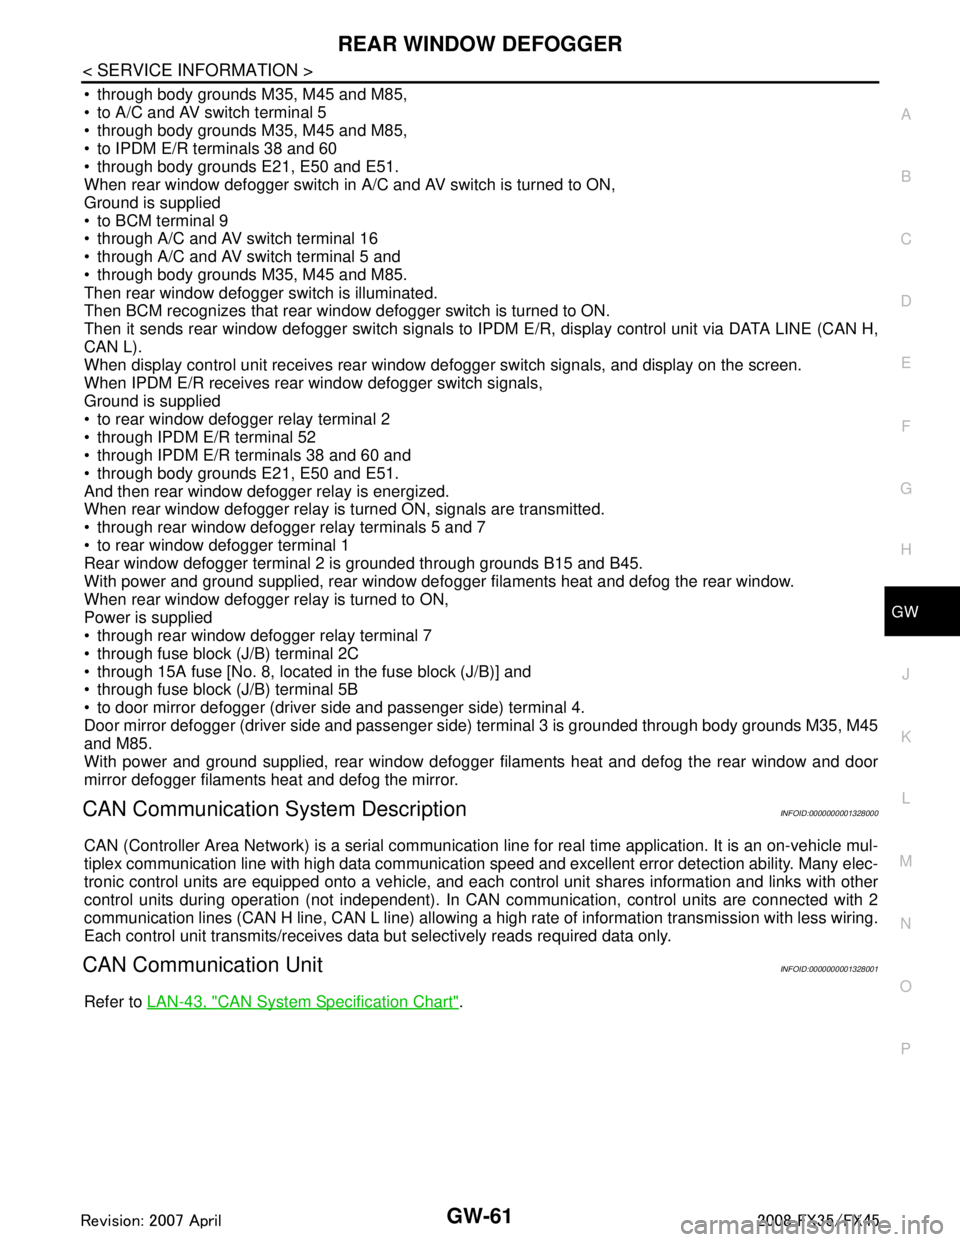
REAR WINDOW DEFOGGERGW-61
< SERVICE INFORMATION >
C
DE
F
G H
J
K L
M A
B
GW
N
O P
through body grounds M35, M45 and M85,
to A/C and AV switch terminal 5
through body grounds M35, M45 and M85,
to IPDM E/R terminals 38 and 60
through body grounds E21, E50 and E51.
When rear window defogger switch in A/C and AV switch is turned to ON,
Ground is supplied
to BCM terminal 9
through A/C and AV switch terminal 16
through A/C and AV switch terminal 5 and
through body grounds M35, M45 and M85.
Then rear window defogger switch is illuminated.
Then BCM recognizes that rear window defogger switch is turned to ON.
Then it sends rear window defogger switch signals to IPDM E/R, display control unit via DATA LINE (CAN H,
CAN L).
When display control unit receives rear window defogger switch signals, and display on the screen.
When IPDM E/R receives rear window defogger switch signals,
Ground is supplied
to rear window defogger relay terminal 2
through IPDM E/R terminal 52
through IPDM E/R terminals 38 and 60 and
through body grounds E21, E50 and E51.
And then rear window defogger relay is energized.
When rear window defogger relay is turned ON, signals are transmitted.
through rear window defogger relay terminals 5 and 7
to rear window defogger terminal 1
Rear window defogger terminal 2 is grounded through grounds B15 and B45.
With power and ground supplied, rear window def ogger filaments heat and defog the rear window.
When rear window defogger relay is turned to ON,
Power is supplied
through rear window defogger relay terminal 7
through fuse block (J/B) terminal 2C
through 15A fuse [No. 8, located in the fuse block (J/B)] and
through fuse block (J/B) terminal 5B
to door mirror defogger (driver side and passenger side) terminal 4.
Door mirror defogger (driver side and passenger side) terminal 3 is grounded through body grounds M35, M45
and M85.
With power and ground supplied, rear window defogger filaments heat and defog the rear window and door
mirror defogger filaments heat and defog the mirror.
CAN Communication System DescriptionINFOID:0000000001328000
CAN (Controller Area Network) is a serial communication li ne for real time application. It is an on-vehicle mul-
tiplex communication line with high data communication speed and excellent error detection ability. Many elec-
tronic control units are equipped onto a vehicle, and each control unit shares information and links with other
control units during operation (not independent). In CAN communication, control units are connected with 2
communication lines (CAN H line, CAN L line) allowing a high rate of information transmission with less wiring.
Each control unit transmits/receives data but selectively reads required data only.
CAN Communication UnitINFOID:0000000001328001
Refer to LAN-43, "CAN System Specification Chart".
3AA93ABC3ACD3AC03ACA3AC03AC63AC53A913A773A893A873A873A8E3A773A983AC73AC93AC03AC3
3A893A873A873A8F3A773A9D3AAF3A8A3A8C3A863A9D3AAF3A8B3A8C
Page 3128 of 3924
LT-26
< SERVICE INFORMATION >
HEADLAMP - XENON TYPE -
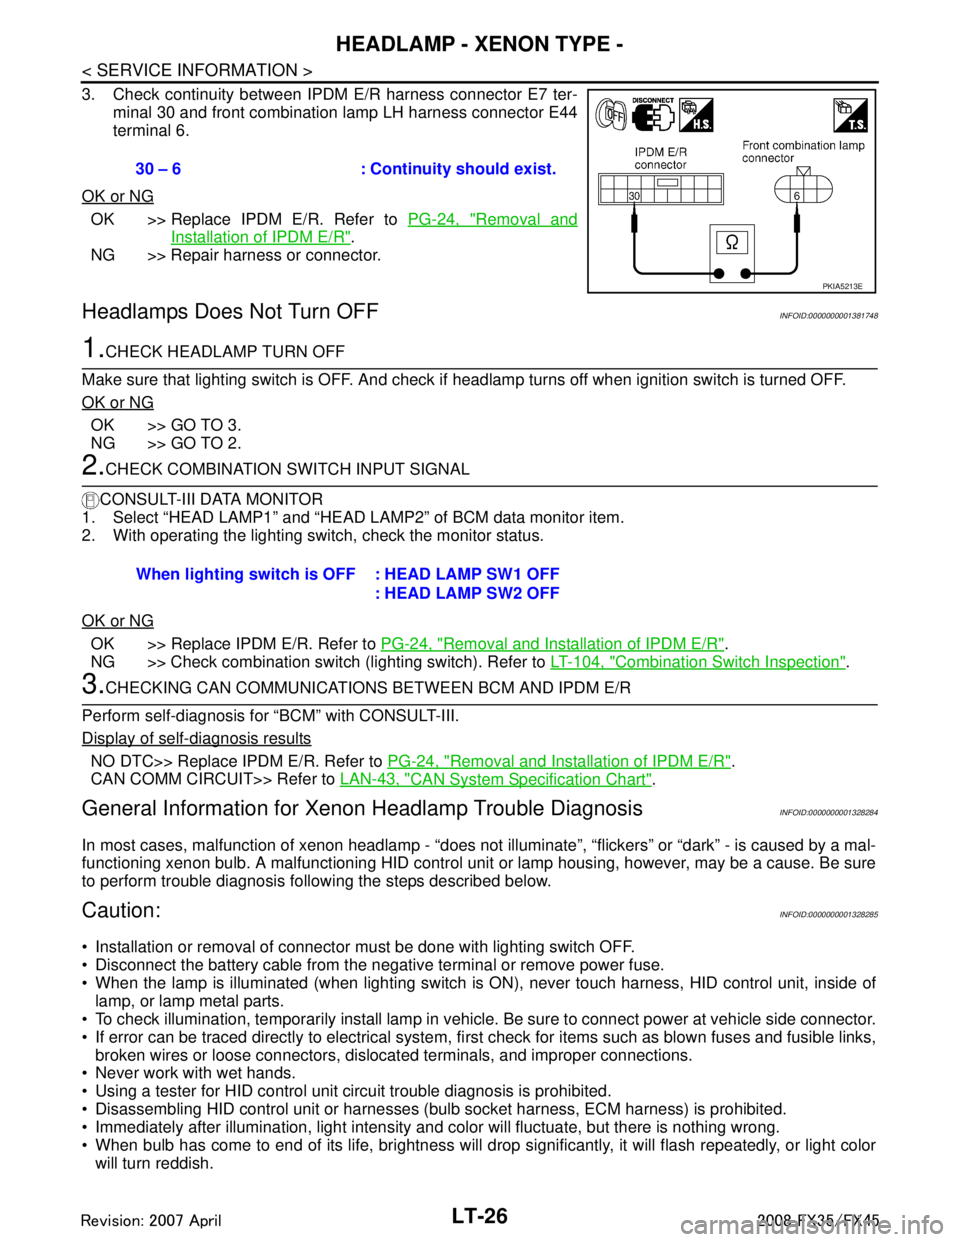
3. Check continuity between IPDM E/R harness connector E7 ter-minal 30 and front combination lamp LH harness connector E44
terminal 6.
OK or NG
OK >> Replace IPDM E/R. Refer to PG-24, "Removal and
Installation of IPDM E/R".
NG >> Repair harness or connector.
Headlamps Does Not Turn OFFINFOID:0000000001381748
1.CHECK HEADLAMP TURN OFF
Make sure that lighting switch is OFF. And check if headlamp turns off when ignition switch is turned OFF.
OK or NG
OK >> GO TO 3.
NG >> GO TO 2.
2.CHECK COMBINATION SWITCH INPUT SIGNAL
CONSULT-III DATA MONITOR
1. Select “HEAD LAMP1” and “HEAD LAMP2” of BCM data monitor item.
2. With operating the lighting switch, check the monitor status.
OK or NG
OK >> Replace IPDM E/R. Refer to PG-24, "Removal and Installation of IPDM E/R".
NG >> Check combination switch (lighting switch). Refer to LT-104, "
Combination Switch Inspection".
3.CHECKING CAN COMMUNICATIONS BETWEEN BCM AND IPDM E/R
Perform self-diagnosis for “BCM” with CONSULT-III.
Display of self-diagnosis results
NO DTC>> Replace IPDM E/R. Refer to PG-24, "Removal and Installation of IPDM E/R".
CAN COMM CIRCUIT>> Refer to LAN-43, "
CAN System Specification Chart".
General Information for Xenon Headlamp Trouble DiagnosisINFOID:0000000001328284
In most cases, malfunction of xenon headlamp - “does not ill uminate”, “flickers” or “dark” - is caused by a mal-
functioning xenon bulb. A malfunctioning HID control unit or lamp housing, however, may be a cause. Be sure
to perform trouble diagnosis following the steps described below.
Caution:INFOID:0000000001328285
Installation or removal of connector must be done with lighting switch OFF.
Disconnect the battery cable from the negative terminal or remove power fuse.
When the lamp is illuminated (when lighting switch is ON), never touch harness, HID control unit, inside of
lamp, or lamp metal parts.
To check illumination, temporarily install lamp in vehicle. Be sure to connect power at vehicle side connector.
If error can be traced directly to electrical system, fi rst check for items such as blown fuses and fusible links,
broken wires or loose connectors, dislocated terminals, and improper connections.
Never work with wet hands.
Using a tester for HID control unit circuit trouble diagnosis is prohibited.
Disassembling HID control unit or harnesses ( bulb socket harness, ECM harness) is prohibited.
Immediately after illumination, light intensity and color will fluctuate, but there is nothing wrong.
When bulb has come to end of its life, brightness will dr op significantly, it will flash repeatedly, or light color
will turn reddish. 30 – 6 : Continuity should exist.
PKIA5213E
When lighting switch is OFF : HEAD LAMP SW1 OFF
: HEAD LAMP SW2 OFF
3AA93ABC3ACD3AC03ACA3AC03AC63AC53A913A773A893A873A873A8E3A773A983AC73AC93AC03AC3
3A893A873A873A8F3A773A9D3AAF3A8A3A8C3A863A9D3AAF3A8B3A8C
Page 3135 of 3924
![INFINITI FX35 2008 Service Manual
DAYTIME LIGHT SYSTEMLT-33
< SERVICE INFORMATION >
C
DE
F
G H
I
J
L
M A
B
LT
N
O P
through 10A fuse [No. 12, located in fuse block (J/B)]
to combination meter terminal 7,
through 15A fuse [No. 1 INFINITI FX35 2008 Service Manual
DAYTIME LIGHT SYSTEMLT-33
< SERVICE INFORMATION >
C
DE
F
G H
I
J
L
M A
B
LT
N
O P
through 10A fuse [No. 12, located in fuse block (J/B)]
to combination meter terminal 7,
through 15A fuse [No. 1](/manual-img/42/57017/w960_57017-3134.png)
DAYTIME LIGHT SYSTEMLT-33
< SERVICE INFORMATION >
C
DE
F
G H
I
J
L
M A
B
LT
N
O P
through 10A fuse [No. 12, located in fuse block (J/B)]
to combination meter terminal 7,
through 15A fuse [No. 1, located in fuse block (J/B)]
to BCM terminal 38.
Ground is supplied
to combination meter terminals 5, 6 and 15
through grounds M35, M45 and M85,
to BCM terminals 49 and 52
through grounds M35, M45 and M85.
DAYTIME LIGHT OPERATION
Once the parking brake is turned OFF after ignition swit ch ON, if the lighting switch is turned OFF while engine
running, the BCM sends daytime light r equest signal (ON) through CAN communication.
When receiving daytime light request signal (ON), combi nation meter turns ON daytime light relay. And power
is supplied
through daytime light relay terminal 1
to combination meter terminal 10,
through daytime light relay terminal 3
to parking lamp RH and LH terminals 1.
Ground is supplied
to combination meter terminals 5, 6 and 15
through grounds M35, M45 and M85,
to parking lamp RH and LH terminals 3
through grounds E21, E50 and E51.
With power and grounds supplied, the daytime light lamps illuminate.
COMBINATION SWITCH READING FUNCTION
Refer to BCS-4, "System Description".
AUTO LIGHT OPERATION
Refer to LT-47, "System Description".
CAN Communication System DescriptionINFOID:0000000001328293
CAN (Controller Area Network) is a serial communication li ne for real time application. It is an on-vehicle mul-
tiplex communication line with high data communication speed and excellent error detection ability. Many elec-
tronic control units are equipped onto a vehicle, and each control unit shares information and links with other
control units during operation (not independent). In CAN communication, control units are connected with 2
communication lines (CAN-H line, CAN-L line) allowing a high rate of information transmission with less wiring.
Each control unit transmits/receives data but selectively reads required data only.
CAN Communication UnitINFOID:0000000001328294
Refer to LAN-43, "CAN System Specification Chart".
3AA93ABC3ACD3AC03ACA3AC03AC63AC53A913A773A893A873A873A8E3A773A983AC73AC93AC03AC3
3A893A873A873A8F3A773A9D3AAF3A8A3A8C3A863A9D3AAF3A8B3A8C
Page 3388 of 3924
PG-24
< SERVICE INFORMATION >
IPDM E/R (INTELLIGENT POWER DISTRIBUTION MODULE ENGINE ROOM)
OK or NG
OK >> GO TO 2.
NG >> If fuse or fusible link blown, be sure to e liminate cause of malfunction before installing new one.
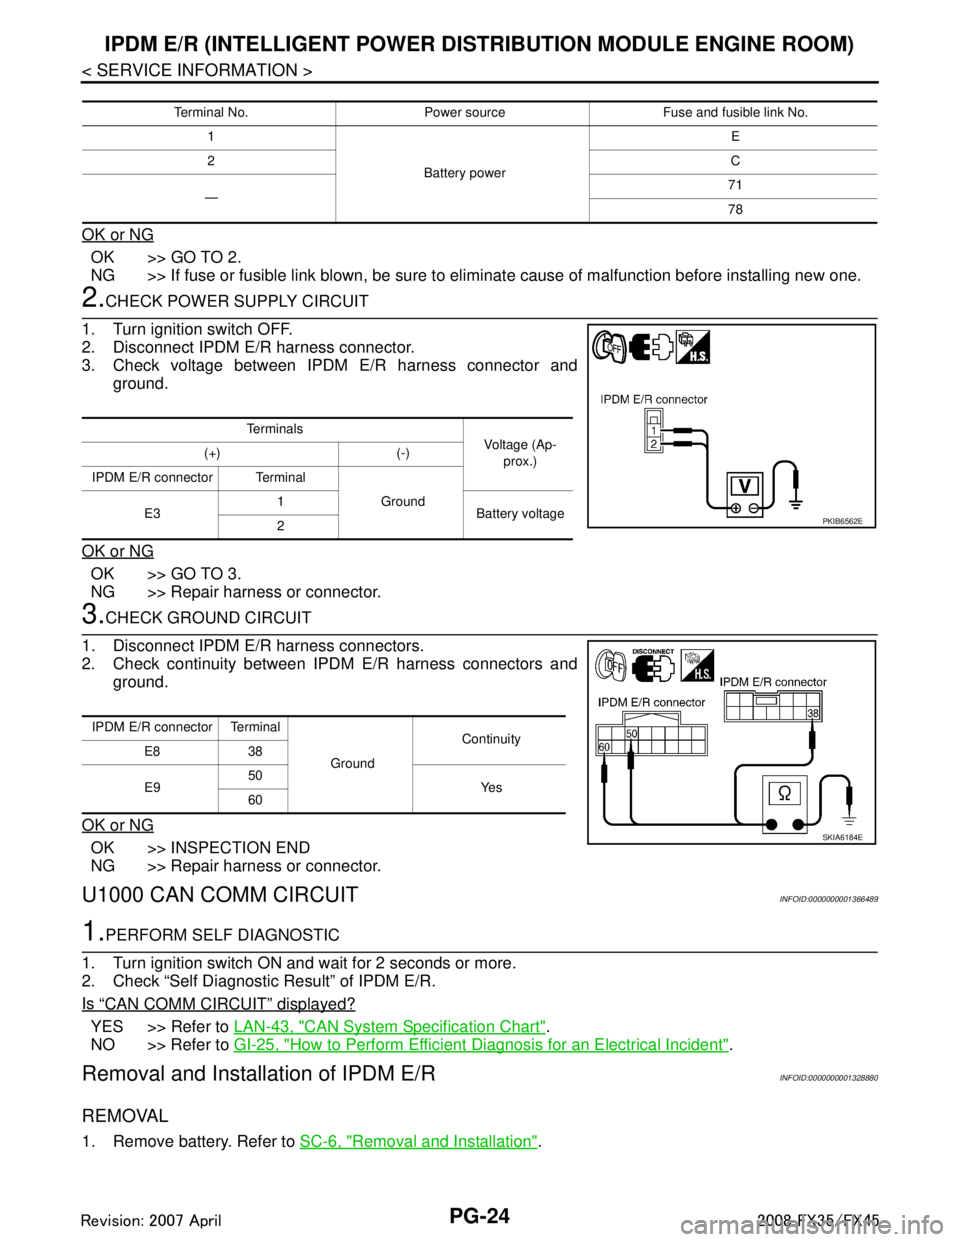
2.CHECK POWER SUPPLY CIRCUIT
1. Turn ignition switch OFF.
2. Disconnect IPDM E/R harness connector.
3. Check voltage between IPDM E/R harness connector and ground.
OK or NG
OK >> GO TO 3.
NG >> Repair harness or connector.
3.CHECK GROUND CIRCUIT
1. Disconnect IPDM E/R harness connectors.
2. Check continuity between IPDM E/R harness connectors and ground.
OK or NG
OK >> INSPECTION END
NG >> Repair harness or connector.
U1000 CAN COMM CIRCUITINFOID:0000000001366489
1.PERFORM SELF DIAGNOSTIC
1. Turn ignition switch ON and wait for 2 seconds or more.
2. Check “Self Diagnostic Result” of IPDM E/R.
Is
“CAN COMM CIRCUIT” displayed?
YES >> Refer to LAN-43, "CAN System Specification Chart".
NO >> Refer to GI-25, "
How to Perform Efficient Diagnosis for an Electrical Incident".
Removal and Installation of IPDM E/RINFOID:0000000001328880
REMOVAL
1. Remove battery. Refer to SC-6, "Removal and Installation".
Terminal No. Power source Fuse and fusible link No.
1
Battery power E
2 C
— 71
78
Te r m i n a l s
Voltage (Ap-
prox.)
(+) (-)
IPDM E/R connector Terminal Ground
E3 1
Battery voltage
2
PKIB6562E
IPDM E/R connector Terminal
GroundContinuity
E8 38
E9 50
Ye s
60
SKIA6184E
3AA93ABC3ACD3AC03ACA3AC03AC63AC53A913A773A893A873A873A8E3A773A983AC73AC93AC03AC3
3A893A873A873A8F3A773A9D3AAF3A8A3A8C3A863A9D3AAF3A8B3A8C
Page 3656 of 3924
AUTOMATIC DRIVE POSITIONERSE-17
< SERVICE INFORMATION >
C
DE
F
G H
J
K L
M A
B
SE
N
O P
CAN Communication System DescriptionINFOID:0000000001328099
CAN (Controller Area Network) is a serial communication li ne for real time application. It is an on-vehicle mul-
tiplex communication line with high data communication speed and excellent error detection ability. Many elec-
tronic control units are equipped onto a vehicle, and each control unit shares information and links with other
control units during operation (not independent). In CAN communication, control units are connected with 2
communication lines (CAN H line, CAN L line) allowing a high rate of information transmission with less wiring.
Each control unit transmits/receives data but selectively reads required data only.
CAN Communication UnitINFOID:0000000001328100
Refer to LAN-43, "CAN System Specification Chart".
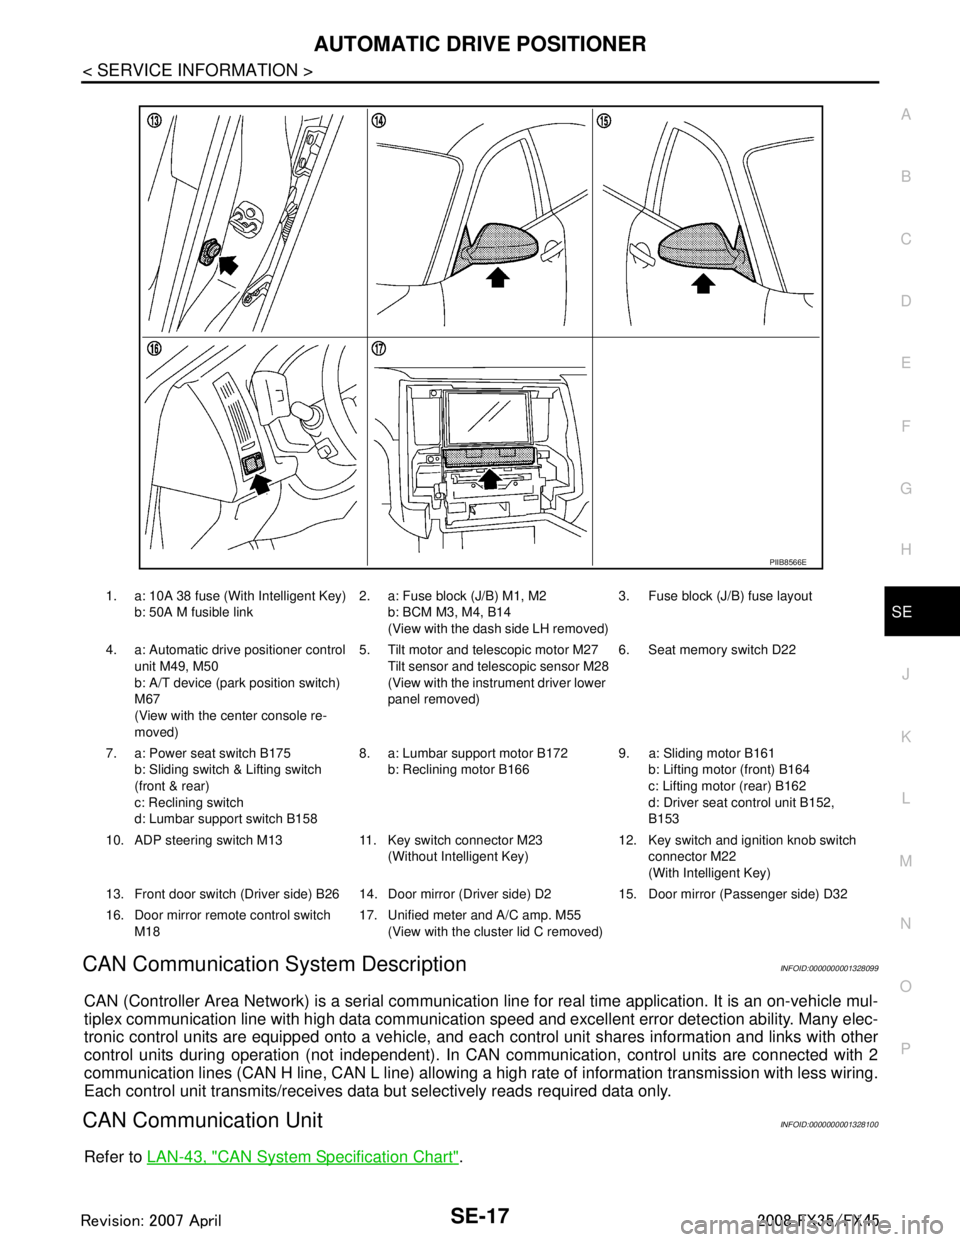
1. a: 10A 38 fuse (With Intelligent Key)
b: 50A M fusible link 2. a: Fuse block (J/B) M1, M2
b: BCM M3, M4, B14
(View with the dash side LH removed) 3. Fuse block (J/B) fuse layout
4. a: Automatic drive positioner control unit M49, M50
b: A/T device (park position switch)
M67
(View with the center console re-
moved) 5. Tilt motor and telescopic motor M27
Tilt sensor and telescopic sensor M28
(View with the instrument driver lower
panel removed) 6. Seat memory switch D22
7. a: Power seat switch B175 b: Sliding switch & Lifting switch
(front & rear)
c: Reclining switch
d: Lumbar support switch B158 8. a: Lumbar support motor B172
b: Reclining motor B166 9. a: Sliding motor B161
b: Lifting motor (front) B164
c: Lifting motor (rear) B162
d: Driver seat control unit B152,
B153
10. ADP steering switch M13 11. Key switch connector M23 (Without Intelligent Key)12. Key switch and ignition knob switch
connector M22
(With Intelligent Key)
13. Front door switch (Driver side) B26 14. Door mirro r (Driver side) D2 15. Door mirror (Passenger side) D32
16. Door mirror remote control switch M18 17. Unified meter and A/C amp. M55
(View with the clus ter lid C removed)
PIIB8566E
3AA93ABC3ACD3AC03ACA3AC03AC63AC53A913A773A893A873A873A8E3A773A983AC73AC93AC03AC3
3A893A873A873A8F3A773A9D3AAF3A8A3A8C3A863A9D3AAF3A8B3A8C
Page 3862 of 3924
WT-22
< SERVICE INFORMATION >
TROUBLE DIAGNOSES
NOTE:
If more than one wheel transmitter is NOT activated, the warning lamp blinking patterns for those wheels will combine. (Example: one
blink/OFF/three blinks = Rear LH and Rear RH transmitters are not activated.)
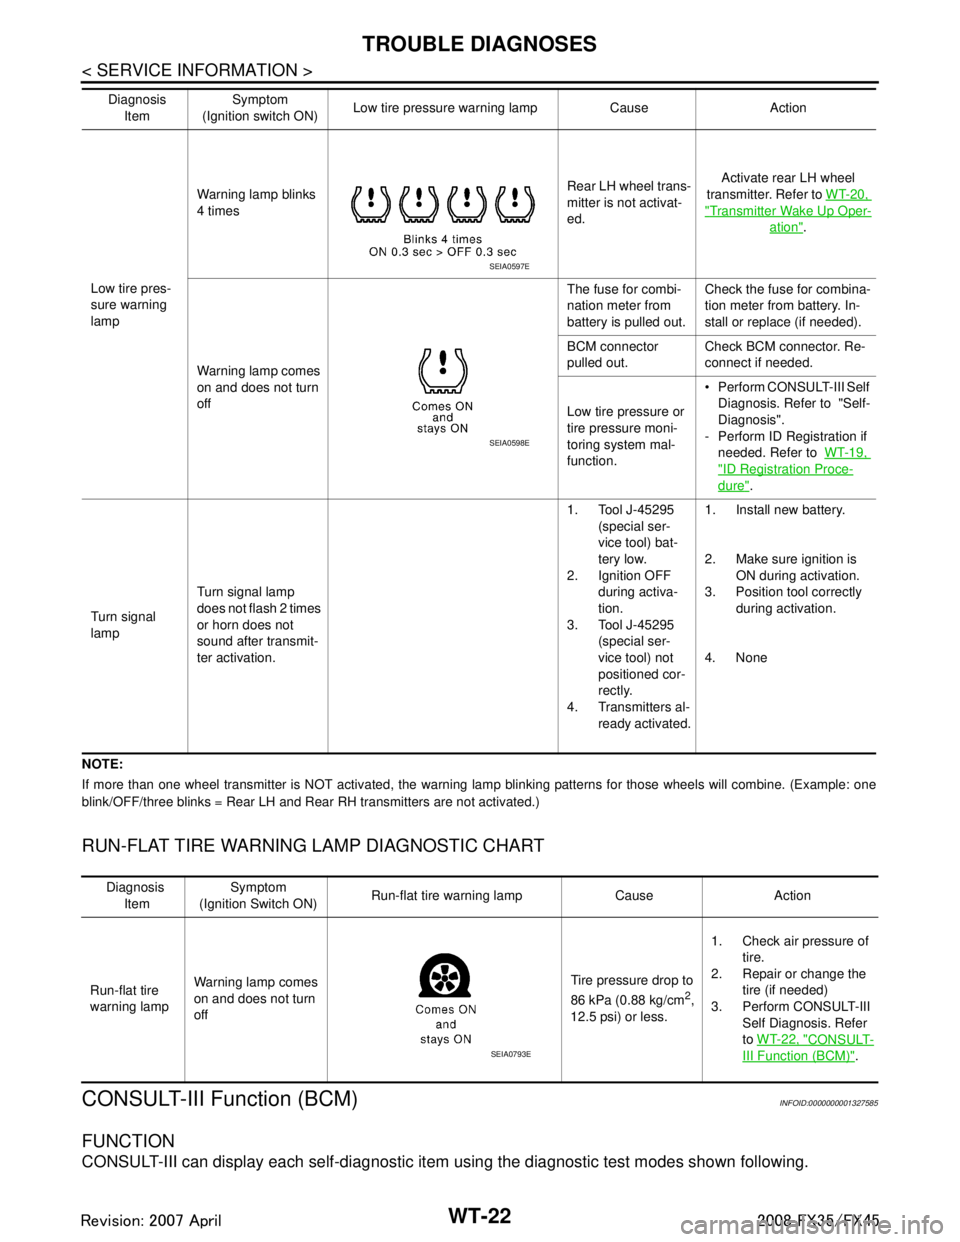
RUN-FLAT TIRE WARNING LAMP DIAGNOSTIC CHART
CONSULT-III Function (BCM)INFOID:0000000001327585
FUNCTION
CONSULT-III can display each self-diagnostic item using the diagnostic test modes shown following.
Low tire pres-
sure warning
lampWarning lamp blinks
4 times
Rear LH wheel trans-
mitter is not activat-
ed.Activate rear LH wheel
transmitter. Refer to WT-20,
"Transmitter Wake Up Oper-
ation".
Warning lamp comes
on and does not turn
off The fuse for combi-
nation meter from
battery is pulled out.
Check the fuse for combina-
tion meter from battery. In-
stall or replace (if needed).
BCM connector
pulled out. Check BCM connector. Re-
connect if needed.
Low tire pressure or
tire pressure moni-
toring system mal-
function. Perform CONSULT-III Self
Diagnosis. Refer to "Self-
Diagnosis".
- Perform ID Registration if needed. Refer to WT-19,
"ID Registration Proce-
dure".
Turn signal
lamp Turn signal lamp
does not flash 2 times
or horn does not
sound after transmit-
ter activation. 1. Tool J-45295
(special ser-
vice tool) bat-
tery low.
2. Ignition OFF
during activa-
tion.
3. Tool J-45295
(special ser-
vice tool) not
positioned cor-
rectly.
4. Transmitters al- ready activated. 1. Install new battery.
2. Make sure ignition is
ON during activation.
3. Position tool correctly during activation.
4. None
Diagnosis
Item Symptom
(Ignition switch ON) Low tire pressure wa
rning lamp Cause Action
SEIA0597E
SEIA0598E
Diagnosis
Item Symptom
(Ignition Switch ON) Run-flat tire warning lamp Cause Action
Run-flat tire
warning lamp Warning lamp comes
on and does not turn
off Tire pressure drop to
86 kPa (0.88 kg/cm
2,
12.5 psi) or less. 1. Check air pressure of
tire.
2. Repair or change the
tire (if needed)
3. Perform CONSULT-III Self Diagnosis. Refer
to WT-22, "
CONSULT-
III Function (BCM)".SEIA0793E
3AA93ABC3ACD3AC03ACA3AC03AC63AC53A913A773A893A873A873A8E3A773A983AC73AC93AC03AC3
3A893A873A873A8F3A773A9D3AAF3A8A3A8C3A863A9D3AAF3A8B3A8C