2008 INFINITI FX35 flat tire
[x] Cancel search: flat tirePage 3065 of 3924
![INFINITI FX35 2008 Service Manual
TROUBLE DIAGNOSISLAN-45
< SERVICE INFORMATION > [CAN]
C
D
E
F
G H
I
J
L
M A
B
LAN
N
O P
Current gear position signal T R
Manual mode indicator signal T R
Output shaft revolution signal R T
P range si INFINITI FX35 2008 Service Manual
TROUBLE DIAGNOSISLAN-45
< SERVICE INFORMATION > [CAN]
C
D
E
F
G H
I
J
L
M A
B
LAN
N
O P
Current gear position signal T R
Manual mode indicator signal T R
Output shaft revolution signal R T
P range si](/manual-img/42/57017/w960_57017-3064.png)
TROUBLE DIAGNOSISLAN-45
< SERVICE INFORMATION > [CAN]
C
D
E
F
G H
I
J
L
M A
B
LAN
N
O P
Current gear position signal T R
Manual mode indicator signal T R
Output shaft revolution signal R T
P range signal T R R
Shift position indicator signal T R
Turbine revolution signal R T
A/C switch signal R T
Buzzer output signal TR
TR
Blower fan motor switch signal R T
Day time running light request signal T R
Door lock/unlock status signal T R
Door switch signal R T R R R R
Front fog light request signal T R
Front wiper request signal T R
High beam request signal T R R
Horn chirp signal T R
Ignition switch signal T R R
Key fob door unlock signal T R
Key fob ID signal T R
Key switch signal T R
Low beam request signal T R
Oil pressure switch signal RT
TR
Position light request signal T R R
Rear window defogger switch signal T R
Run flat tire warning lamp signal T R
Sleep wake up signal TRRR
RT
Theft warning horn request signal T R
Tire pressure warn ing lamp signal T R
Turn indicator signal T R
Alarm request signal R T
Back door open request signal R T
Door lock/unlock request signal R T
Ignition knob switch signal R T
Key warning signal T R
Power window open request signal R T
Steering angle sensor signal T R
Distance to empty signal R T
Fuel level low warning signal R T
Fuel level sensor signal R T
Manual mode shift down signal R T Signal name/Connecting unit
ECM
DISP TCM
BCM
I-KEY
STRG
M&AABS
ADP
IPDM-E
3AA93ABC3ACD3AC03ACA3AC03AC63AC53A913A773A893A873A873A8E3A773A983AC73AC93AC03AC3
3A893A873A873A8F3A773A9D3AAF3A8A3A8C3A863A9D3AAF3A8B3A8C
Page 3067 of 3924
![INFINITI FX35 2008 Service Manual
TROUBLE DIAGNOSISLAN-47
< SERVICE INFORMATION > [CAN]
C
D
E
F
G H
I
J
L
M A
B
LAN
N
O P
ICC steering switch signal T R
Malfunctioning indicator lamp signal T R
Snow mode switch signal RT
TR
Wide open INFINITI FX35 2008 Service Manual
TROUBLE DIAGNOSISLAN-47
< SERVICE INFORMATION > [CAN]
C
D
E
F
G H
I
J
L
M A
B
LAN
N
O P
ICC steering switch signal T R
Malfunctioning indicator lamp signal T R
Snow mode switch signal RT
TR
Wide open](/manual-img/42/57017/w960_57017-3066.png)
TROUBLE DIAGNOSISLAN-47
< SERVICE INFORMATION > [CAN]
C
D
E
F
G H
I
J
L
M A
B
LAN
N
O P
ICC steering switch signal T R
Malfunctioning indicator lamp signal T R
Snow mode switch signal RT
TR
Wide open throttle position signal T R
A/C switch/indicator signal TR
RT
System setting signal TR R
RT T
Buzzer output signal TR
TR
TR
ICC OD cancel request signal T R
ICC operation signal R T
ICC system display signal T R
ICC warning lamp signal T R
A/T CHECK indicator lamp signal T R
A/T self-diagnosis signal R T
Current gear position signal R T R
Manual mode indicator signal R T R
Output shaft revolution signal R R T R
P range signal R T R R
Shift position indicator signal R T R
Turbine revolution signal R R T
A/C switch signal R T
Blower fan motor switch signal R T
Day time running light request signal T R
Door lock/unlock status signal T R
Door switch signal R T R R R R
Front fog light request signal T R
Front wiper request signal R T R
High beam request signal T R R
Horn chirp signal T R
Ignition switch signal T R R
Key fob door unlock signal T R
Key fob ID signal T R
Key switch signal T R
Low beam request signal T R
Oil pressure switch signal RT
TR
Position light request signal T R R
Rear window defogger switch signal T R
Run flat tire warning lamp signal T R Signal name/Connecting unit
ECM
DISP ICC
TCM
BCM
I-KEY
LANE
STRG M&AABS
LASER ADP
IPDM-E
3AA93ABC3ACD3AC03ACA3AC03AC63AC53A913A773A893A873A873A8E3A773A983AC73AC93AC03AC3
3A893A873A873A8F3A773A9D3AAF3A8A3A8C3A863A9D3AAF3A8B3A8C
Page 3070 of 3924
![INFINITI FX35 2008 Service Manual
LAN-50
< SERVICE INFORMATION >[CAN]
TROUBLE DIAGNOSIS
High beam request signal T R R
Horn chirp signal T R
Ignition switch signal T R R
Key fob door unlock signal T R
Key fob ID signal T R
Key switch INFINITI FX35 2008 Service Manual
LAN-50
< SERVICE INFORMATION >[CAN]
TROUBLE DIAGNOSIS
High beam request signal T R R
Horn chirp signal T R
Ignition switch signal T R R
Key fob door unlock signal T R
Key fob ID signal T R
Key switch](/manual-img/42/57017/w960_57017-3069.png)
LAN-50
< SERVICE INFORMATION >[CAN]
TROUBLE DIAGNOSIS
High beam request signal T R R
Horn chirp signal T R
Ignition switch signal T R R
Key fob door unlock signal T R
Key fob ID signal T R
Key switch signal T R
Low beam request signal T R
Oil pressure switch signalRT
TR
Position light request signal R T R R
Rear window defogger switch signal T R
Run flat tire warning lamp signal T R
Sleep wake up signal TRRR
RT
Theft warning horn request signal T R
Tire pressure warning lamp signal T R
Turn indicator signal T R
Alarm request signal R T
Back door open request signal R T
Door lock/unlock request signal R T
Ignition knob switch signal R T
Key warning signal T R
Power window open request signal R T
Steering angle sensor signal T R
Snow mode switch signal R T
Turn LED burnout status signal R T
Distance to empty signal R T
Fuel level low warning signal R T
Fuel level sensor signal R T
Manual mode shift down signal R T
Manual mode shift up signal R T
Manual mode signal R T
Not manual mode signal R T
Parking brake switch signal R R T
Stop lamp switch signal R R T
Vehicle speed signal RRT
R RRRR T R
A/T shift schedule change demand signal R T
ABS operation signal T
ABS warning lamp signal RT
Brake warning lamp signal RT
SLIP indicator lamp signal RT
TCS operation signal T
Signal name/Connecting unit
ECM
4WD
DISP TCM
BCM
I-KEY
STRG M&AABS
ADP
IPDM-E
3AA93ABC3ACD3AC03ACA3AC03AC63AC53A913A773A893A873A873A8E3A773A983AC73AC93AC03AC3
3A893A873A873A8F3A773A9D3AAF3A8A3A8C3A863A9D3AAF3A8B3A8C
Page 3072 of 3924
![INFINITI FX35 2008 Service Manual
LAN-52
< SERVICE INFORMATION >[CAN]
TROUBLE DIAGNOSIS
ICC operation signal R T
ICC system display signal T R
ICC warning lamp signal T R
A/T CHECK indicator lamp signal T R
A/T self-diagnosis signal INFINITI FX35 2008 Service Manual
LAN-52
< SERVICE INFORMATION >[CAN]
TROUBLE DIAGNOSIS
ICC operation signal R T
ICC system display signal T R
ICC warning lamp signal T R
A/T CHECK indicator lamp signal T R
A/T self-diagnosis signal](/manual-img/42/57017/w960_57017-3071.png)
LAN-52
< SERVICE INFORMATION >[CAN]
TROUBLE DIAGNOSIS
ICC operation signal R T
ICC system display signal T R
ICC warning lamp signal T R
A/T CHECK indicator lamp signal T R
A/T self-diagnosis signal R T
Current gear position signal R T R
Manual mode indicator signal R T R
Output shaft revolution signal R R T R
P range signal R T R R
Shift position indicator signal R T R
Turbine revolution signal R R T
A/C switch signal R T
Blower fan motor switch signal R T
Day time running light request signal T R
Door lock/unlock status signal T R
Door switch signal R T R R R R
Front fog light request signal T R
Front wiper request signal R T R
High beam request signal T R R
Horn chirp signal T R
Ignition switch signal T R R
Key fob door unlock signal T R
Key fob ID signal T R
Key switch signal T R
Low beam request signal T R
Oil pressure switch signalRT
TR
Position light request signal R T R R
Rear window defogger switch signal T R
Run flat tire warning lamp signal T R
Sleep wake up signal TRRR
RT
Theft warning horn request signal T R
Tire pressure warning lamp signal T R
Turn indicator signal T R R
Alarm request signal R T
Back door open request signal R T
Door lock/unlock request signal R T
Ignition knob switch signal R T
Key warning signal T R
Power window open request signal R T
Steering angle sensor signal T R
Distance to empty signal R T Signal name/Connecting unit
ECM
4WD
DISP ICC
TCM
BCM
I-KEY
LANE
STRG M&A
ABS
LASER ADP
IPDM-E
3AA93ABC3ACD3AC03ACA3AC03AC63AC53A913A773A893A873A873A8E3A773A983AC73AC93AC03AC3
3A893A873A873A8F3A773A9D3AAF3A8A3A8C3A863A9D3AAF3A8B3A8C
Page 3129 of 3924

HEADLAMP - XENON TYPE -LT-27
< SERVICE INFORMATION >
C
DE
F
G H
I
J
L
M A
B
LT
N
O P
Xenon Headlamp Trouble DiagnosisINFOID:0000000001328286
1.CHECK 1: XENON HEADLAMP LIGHTING
Install normal xenon bulb to corresponding xenon bulb headlamp, and check if lamp lights up.
OK or NG
OK >> Replace xenon bulb.
NG >> GO TO 2.
2.CHECK 2: XENON HEADLAMP LIGHTING
Install normal HID control unit to corresponding xenon headlamp, and check if lamp lights up.
OK or NG
OK >> Replace HID control unit.
NG >> GO TO 3.
3.CHECK 3: XENON HEADLAMP LIGHTING
Install normal xenon lamp housing assembly to corresponding xenon headlamp, and check if lamp lights up.
OK or NG
OK >> Replace xenon headlamp housing assembly. [Malfunction in starter (boosting circuit) in xenon headlamp housing]
NG >> INSPECTION END
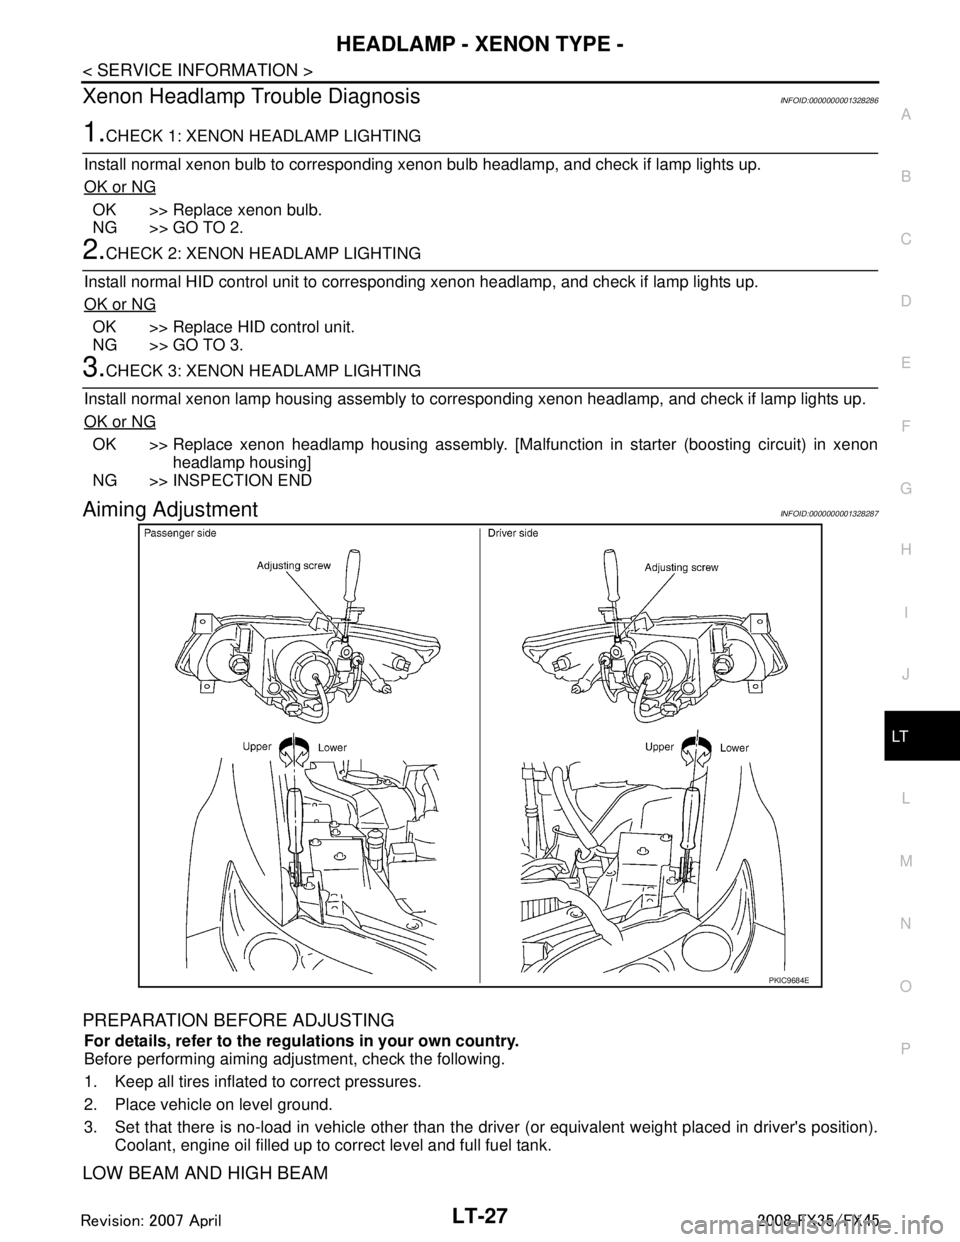
Aiming AdjustmentINFOID:0000000001328287
PREPARATION BEFORE ADJUSTING
For details, refer to the regulations in your own country.
Before performing aiming adjustment, check the following.
1. Keep all tires inflated to correct pressures.
2. Place vehicle on level ground.
3. Set that there is no-load in vehicle other than the driv er (or equivalent weight placed in driver's position).
Coolant, engine oil filled up to correct level and full fuel tank.
LOW BEAM AND HIGH BEAM
PKIC9684E
3AA93ABC3ACD3AC03ACA3AC03AC63AC53A913A773A893A873A873A8E3A773A983AC73AC93AC03AC3
3A893A873A873A8F3A773A9D3AAF3A8A3A8C3A863A9D3AAF3A8B3A8C
Page 3177 of 3924

FRONT FOG LAMPLT-75
< SERVICE INFORMATION >
C
DE
F
G H
I
J
L
M A
B
LT
N
O P
3.CHECK FRONT FOG LAMP GROUND
1. Check continuity between front fog lamp RH harness connector E102 terminal 2 and ground.
2. Check continuity between front fog lamp LH harness connector E45 terminal 2 and ground.
OK or NG
OK >> Replace IPDM E/R. Refer to PG-24, "Removal and
Installation of IPDM E/R".
NG >> Repair harness or connector.
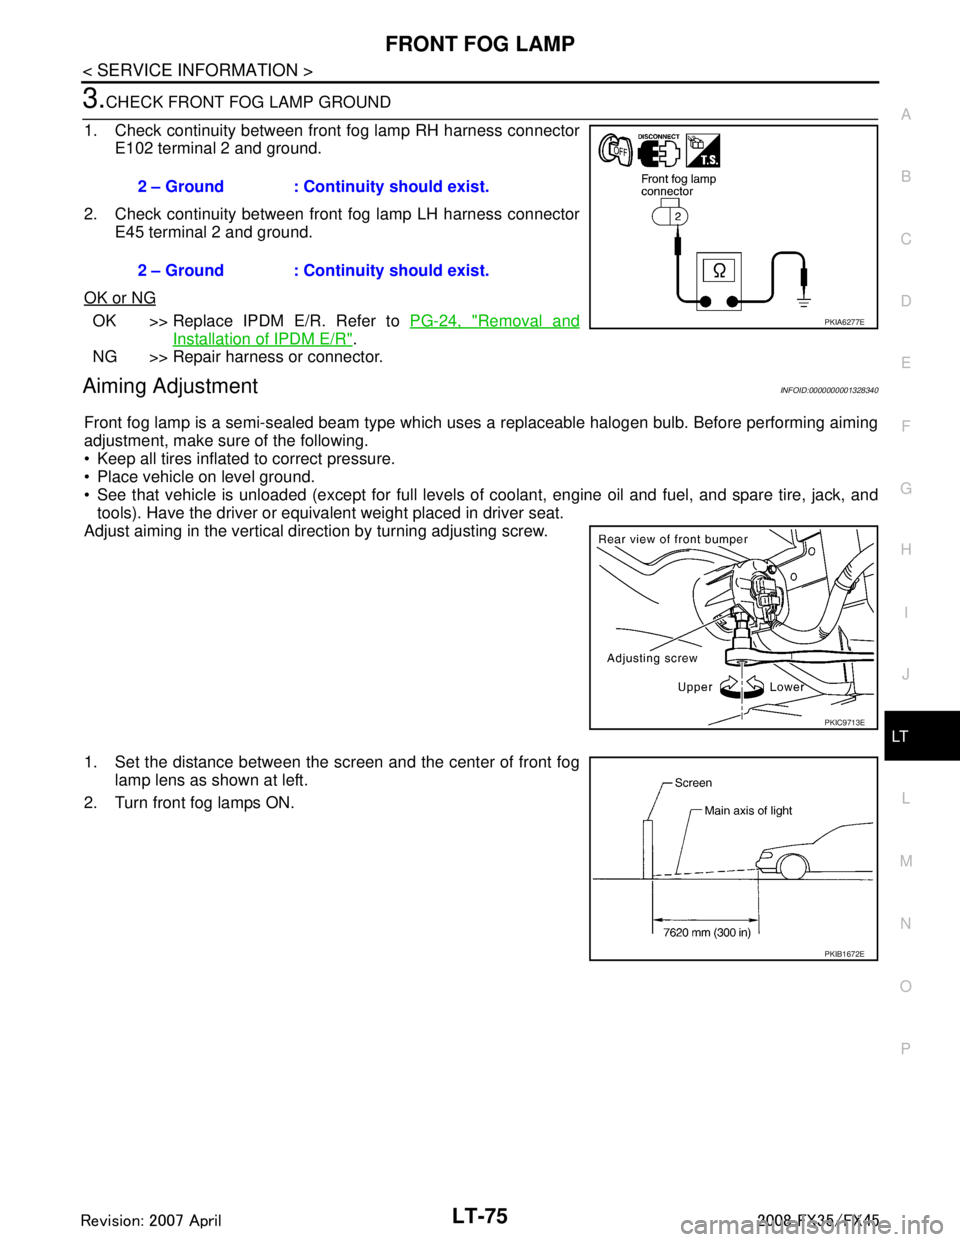
Aiming AdjustmentINFOID:0000000001328340
Front fog lamp is a semi-sealed beam type which uses a replaceable halogen bulb. Before performing aiming
adjustment, make sure of the following.
Keep all tires inflated to correct pressure.
Place vehicle on level ground.
See that vehicle is unloaded (except for full levels of coolant, engine oil and fuel, and spare tire, jack, and tools). Have the driver or equivalent weight placed in driver seat.
Adjust aiming in the vertical direction by turning adjusting screw.
1. Set the distance between the scr een and the center of front fog
lamp lens as shown at left.
2. Turn front fog lamps ON. 2 – Ground : Continuity should exist.
2 – Ground : Continuity should exist.
PKIA6277E
PKIC9713E
PKIB1672E
3AA93ABC3ACD3AC03ACA3AC03AC63AC53A913A773A893A873A873A8E3A773A983AC73AC93AC03AC3
3A893A873A873A8F3A773A9D3AAF3A8A3A8C3A863A9D3AAF3A8B3A8C
Page 3348 of 3924

CHASSIS AND BODY MAINTENANCEMA-31
< SERVICE INFORMATION >
C
DE
F
G H
I
J
K
M A
B
MA
N
O P
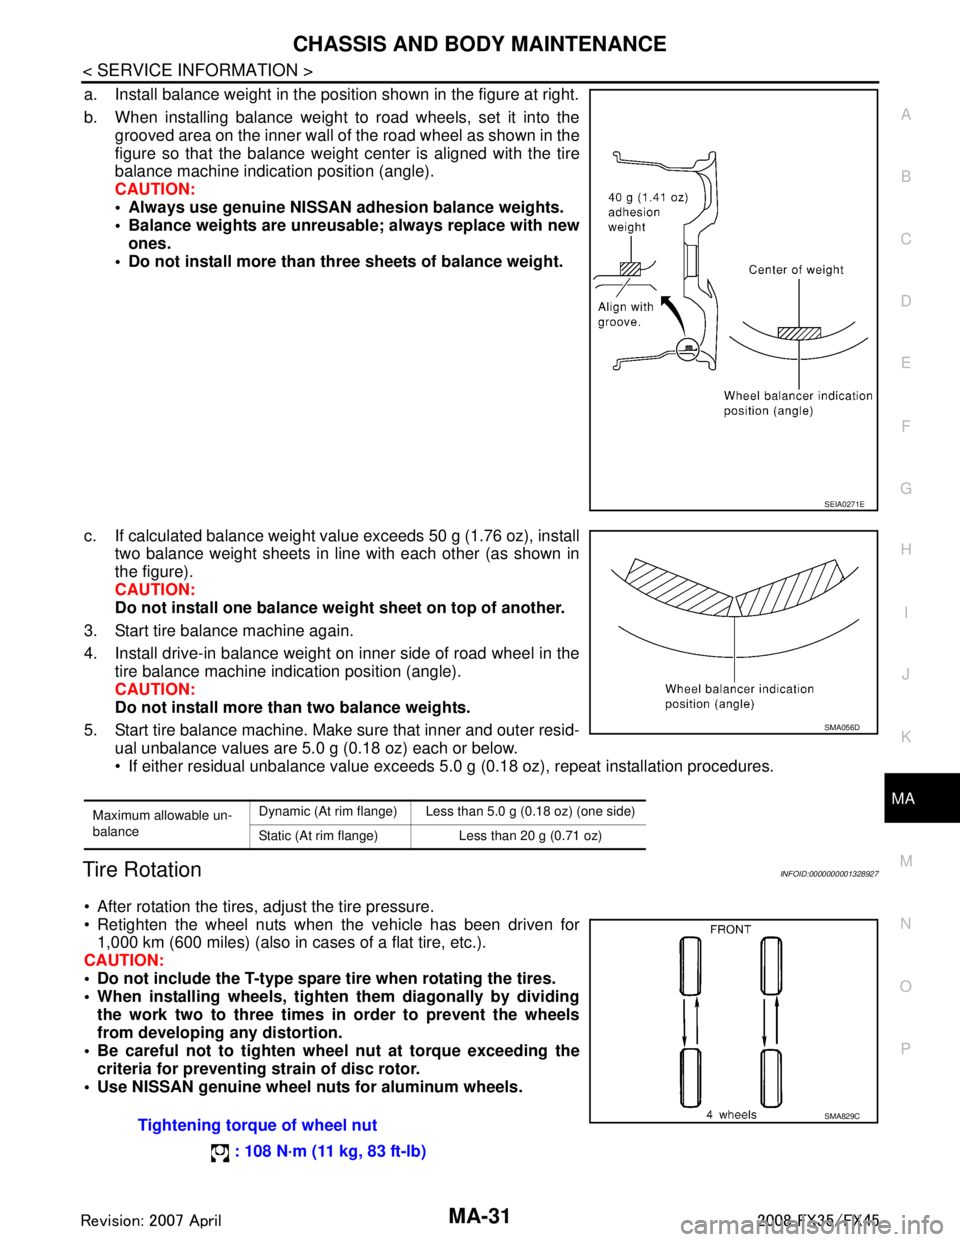
a. Install balance weight in the position shown in the figure at right.
b. When installing balance weight to road wheels, set it into the grooved area on the inner wall of the road wheel as shown in the
figure so that the balance weight center is aligned with the tire
balance machine indication position (angle).
CAUTION:
Always use genuine NISSAN adhesion balance weights.
Balance weights are unreusable; always replace with newones.
Do not install more than three sheets of balance weight.
c. If calculated balance weight value exceeds 50 g (1.76 oz), install two balance weight sheets in line with each other (as shown in
the figure).
CAUTION:
Do not install one balance weig ht sheet on top of another.
3. Start tire balance machine again.
4. Install drive-in balance weight on inner side of road wheel in the tire balance machine indication position (angle).
CAUTION:
Do not install more than two balance weights.
5. Start tire balance machine. Make sure that inner and outer resid- ual unbalance values are 5.0 g (0.18 oz) each or below.
If either residual unbalance value exceeds 5.0 g (0.18 oz), repeat installation procedures.
Tire RotationINFOID:0000000001328927
After rotation the tires, adjust the tire pressure.
Retighten the wheel nuts when the vehicle has been driven for
1,000 km (600 miles) (also in cases of a flat tire, etc.).
CAUTION:
Do not include the T-type spare tire when rotating the tires.
When installing wheels, tighte n them diagonally by dividing
the work two to three times in order to prevent the wheels
from developing any distortion.
Be careful not to tighten wh eel nut at torque exceeding the
criteria for preventing strain of disc rotor.
Use NISSAN genuine wheel nu ts for aluminum wheels.
SEIA0271E
Maximum allowable un-
balanceDynamic (At rim flange) Less than 5.0 g (0.18 oz) (one side)
Static (At rim flange) Less than 20 g (0.71 oz)
SMA056D
Tightening torque of wheel nut
: 108 N·m (11 kg, 83 ft-lb)SMA829C
3AA93ABC3ACD3AC03ACA3AC03AC63AC53A913A773A893A873A873A8E3A773A983AC73AC93AC03AC3
3A893A873A873A8F3A773A9D3AAF3A8A3A8C3A863A9D3AAF3A8B3A8C
Page 3358 of 3924

PARKING BRAKE SYSTEMPB-3
< SERVICE INFORMATION >
C
DE
G H
I
J
K L
M A
B
PB
N
O P
PARKING BRAKE SYSTEM
On-Vehicle InspectionINFOID:0000000001327646
PEDAL STROKE
• When parking brake pedal is operated with a force of 200 N (20.4 kg, 44.9 lb), make sure the parking brake
pedal stroke is within the specified number of notches . (Check it by listening and counting the ratchet clicks.)
Make sure that brake warning lamp comes on when parking brake pedal is depressed with in one notch.
INSPECT COMPONENTS
Make sure the components are installed properly (check for looseness, backlash, etc.).
Check parking brake pedal assembly for bend, damage and cracks, and replace if necessary.
Check cable for wear and damage, and replace if necessary.
Check parking brake switch for malfunction, and replace if necessary.
ADJUSTMENT
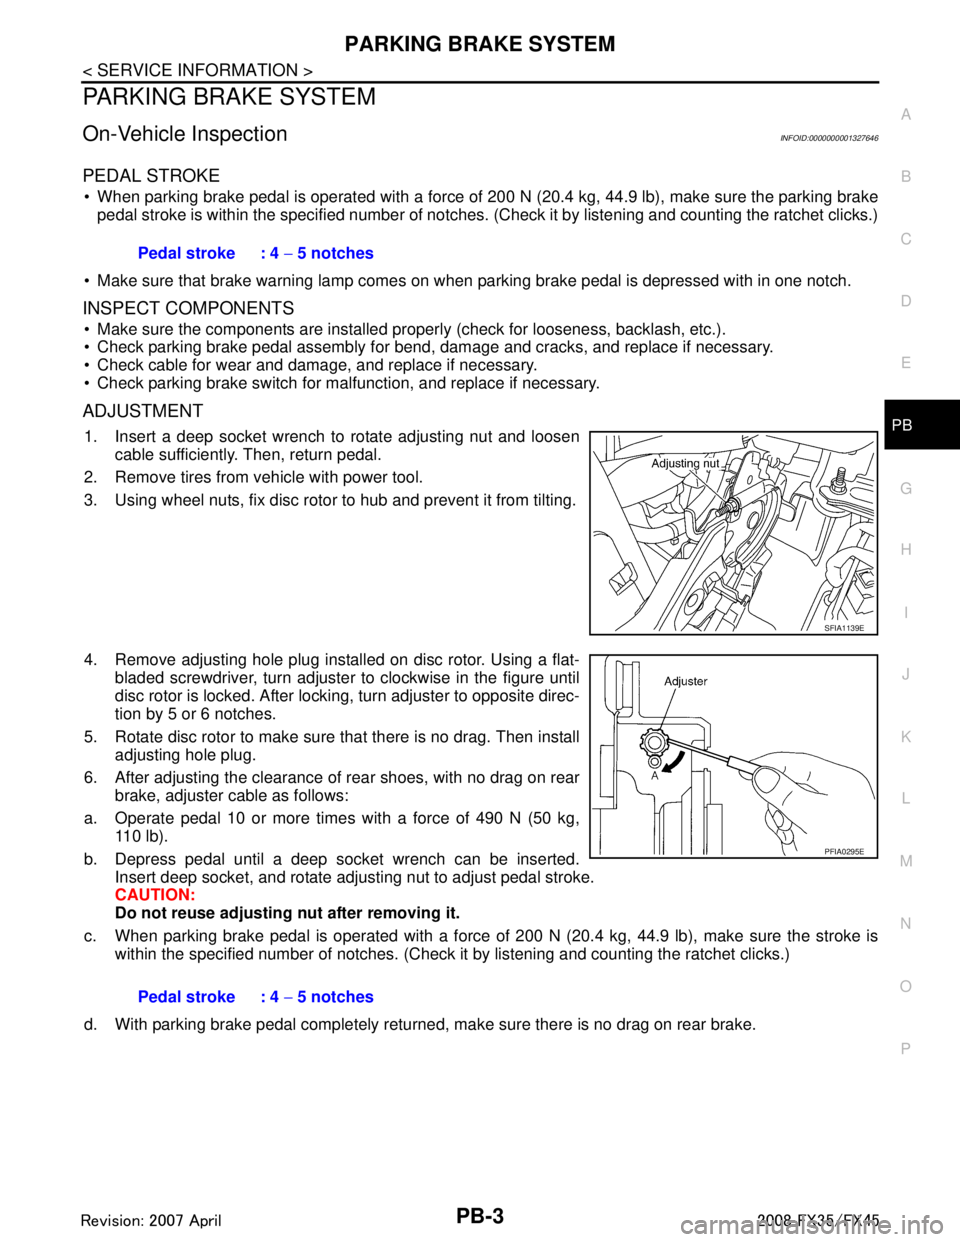
1. Insert a deep socket wrench to rotate adjusting nut and loosen cable sufficiently. Then, return pedal.
2. Remove tires from vehicle with power tool.
3. Using wheel nuts, fix disc rotor to hub and prevent it from tilting.
4. Remove adjusting hole plug installed on disc rotor. Using a flat- bladed screwdriver, turn adjuster to clockwise in the figure until
disc rotor is locked. After locking, turn adjuster to opposite direc-
tion by 5 or 6 notches.
5. Rotate disc rotor to make sure that there is no drag. Then install adjusting hole plug.
6. After adjusting the clearance of rear shoes, with no drag on rear brake, adjuster cable as follows:
a. Operate pedal 10 or more times with a force of 490 N (50 kg, 110 lb).
b. Depress pedal until a deep socket wrench can be inserted. Insert deep socket, and rotate adjusting nut to adjust pedal stroke.
CAUTION:
Do not reuse adjusting nut after removing it.
c. When parking brake pedal is operated with a force of 200 N (20.4 kg, 44.9 lb), make sure the stroke is
within the specified number of notches. (Check it by listening and counting the ratchet clicks.)
d. With parking brake pedal completely returned, make sure there is no drag on rear brake. Pedal stroke : 4
− 5 notches
SFIA1139E
Pedal stroke : 4 − 5 notches
PFIA0295E
3AA93ABC3ACD3AC03ACA3AC03AC63AC53A913A773A893A873A873A8E3A773A983AC73AC93AC03AC3
3A893A873A873A8F3A773A9D3AAF3A8A3A8C3A863A9D3AAF3A8B3A8C