2008 INFINITI FX35 fuel pump
[x] Cancel search: fuel pumpPage 2597 of 3924
![INFINITI FX35 2008 Service Manual
ENGINE ASSEMBLYEM-113
< SERVICE INFORMATION > [VQ35DE]
C
D
E
F
G H
I
J
K L
M A
EM
NP
O
At first, remove the engine and the transmission asse
mbly with front suspension member downward. Then
separate INFINITI FX35 2008 Service Manual
ENGINE ASSEMBLYEM-113
< SERVICE INFORMATION > [VQ35DE]
C
D
E
F
G H
I
J
K L
M A
EM
NP
O
At first, remove the engine and the transmission asse
mbly with front suspension member downward. Then
separate](/manual-img/42/57017/w960_57017-2596.png)
ENGINE ASSEMBLYEM-113
< SERVICE INFORMATION > [VQ35DE]
C
D
E
F
G H
I
J
K L
M A
EM
NP
O
At first, remove the engine and the transmission asse
mbly with front suspension member downward. Then
separate the engine from transmission.
Preparation
1. Release fuel pressure. Refer to EC-87, "Fuel Pressure Check".
2. Drain engine coolant from radiator. Refer to CO-10, "
Changing Engine Coolant".
CAUTION:
Perform this step when engine is cold.
Do not spill engine coolant on drive belts.
3. Disconnect both battery terminals. Refer to SC-4, "
How to Handle Battery".
4. Remove the following parts: Engine cover: Refer to EM-19, "
Component".
Front road wheel and tires
Front and rear engine undercover
Front cross bar: Refer to FSU-16, "
Removal and Installation".
Cowl top cover (right): Refer to EI-23, "
Component Parts Location".
Air duct and air cleaner case assembly: EM-17, "
Component".
5. Discharge refrigerant from A/C circuit. Refer to ATC-120, "
HFC-134a (R-134a) Service Procedure".
6. Remove radiator hoses (upper and lower). Refer to CO-13, "
Component".
Engine Room
1. Disconnect heater hose from vehicle-side, and fit a plug onto hose end to prevent engine coolant leak.
2. Disconnect grounding cable (between vehicle to left bank cylinder head).
3. Disconnect battery positive cable harness at v ehicle side and temporarily fasten it on engine.
4. Disconnect A/C piping from A/C compressor, and tem porarily fasten it on vehicle with a rope. Refer to
ATC-120, "
HFC-134a (R-134a) Service Procedure".
5. Disconnect engine room harness connectors shown in the fig- ure.
6. Disconnect two body ground cables.
7. Disconnect brake booster vacuum hose.
8. Disconnect fuel feed hose (with damper) and EVAP hose. Refer to EM-45, "
Component".
CAUTION:
Fit plugs onto disconnected hoses to prevent fuel leak.
9. Remove reservoir tank of power steering oil pump and piping from vehicle, and temporarily secure them
on engine. Refer to PS-27, "
On-Vehicle Inspection and Service".
CAUTION:
When temporarily securing, keep the reservo ir tank upright to avoid a fluid leak.
Passenger Room Side
Follow procedure below to disconnect engine room harne ss connectors at passenger room side, and tempo-
rarily secure them on engine.
1. Remove passenger-side kicking plate, dash side finisher, and glove box. Refer to EI-38, "
Component
Parts Location" and IP-10, "Component Parts Location".
SBIA0472E
3AA93ABC3ACD3AC03ACA3AC03AC63AC53A913A773A893A873A873A8E3A773A983AC73AC93AC03AC3
3A893A873A873A8F3A773A9D3AAF3A8A3A8C3A863A9D3AAF3A8B3A8C
Page 2602 of 3924
![INFINITI FX35 2008 Service Manual
EM-118
< SERVICE INFORMATION >[VQ35DE]
ENGINE ASSEMBLY
At first, remove the engine, the transmission assembly
, the transfer assembly and the front final drive assem-
bly with front suspension member INFINITI FX35 2008 Service Manual
EM-118
< SERVICE INFORMATION >[VQ35DE]
ENGINE ASSEMBLY
At first, remove the engine, the transmission assembly
, the transfer assembly and the front final drive assem-
bly with front suspension member](/manual-img/42/57017/w960_57017-2601.png)
EM-118
< SERVICE INFORMATION >[VQ35DE]
ENGINE ASSEMBLY
At first, remove the engine, the transmission assembly
, the transfer assembly and the front final drive assem-
bly with front suspension member downward. Then separa te the engine, the transmission assembly, the trans-
fer and the front final drive assembly.
Preparation
1. Release fuel pressure. Refer to EC-87, "Fuel Pressure Check".
2. Drain engine coolant from radiator. Refer to CO-10, "
Changing Engine Coolant".
CAUTION:
Perform this step when engine is cold.
Do not spill engine coolant on drive belts.
3. Disconnect both battery terminals. Refer to SC-4, "
How to Handle Battery".
4. Remove the following parts: Engine cover: Refer to EM-19, "
Component".
Front road wheel and tires
Front and rear engine undercover
Front cross bar: Refer to FSU-16, "
Removal and Installation".
Cowl top cover (right): Refer to EI-23, "
Component Parts Location".
Air duct and air cleaner case assembly: EM-17, "
Component".
5. Discharge refrigerant from A/C circuit. Refer to ATC-120, "
HFC-134a (R-134a) Service Procedure".
6. Remove radiator hoses (upper and lower). Refer to CO-13, "
Component".
Engine Room
1. Disconnect heater hose from vehicle-side, and fit a plug onto hose end to prevent engine coolant leak.
2. Disconnect grounding cable (between vehicle to left bank cylinder head).
3. Disconnect battery positive cable harness at v ehicle side and temporarily fasten it on engine.
4. Disconnect A/C piping from A/C compressor, and tem porarily fasten it on vehicle with a rope. Refer to
ATC-120, "
HFC-134a (R-134a) Service Procedure".
5. Disconnect engine room harness connectors shown in the fig- ure.
6. Disconnect two body ground cables.
7. Disconnect brake booster vacuum hose.
8. Disconnect fuel feed hose (with damper) and EVAP hose. Refer to EM-45, "
Component"
CAUTION:
Fit plugs onto disconnected hoses to prevent fuel leak.
9. Remove reservoir tank of power steering oil pump and piping from vehicle, and temporarily secure them
on engine. Refer to PS-27, "
On-Vehicle Inspection and Service".
CAUTION:
When temporarily securing, keep the reservo ir tank upright to avoid a fluid leak.
Passenger Room Side
Follow procedure below to disconnect engine room har ness connectors at passenger room side, and tempo-
rarily secure them on engine.
1. Remove passenger-side kicking plate, das h side finisher, and glove box. Refer to EI-38, "
Component
Parts Location" and IP-10, "Component Parts Location".
SBIA0472E
3AA93ABC3ACD3AC03ACA3AC03AC63AC53A913A773A893A873A873A8E3A773A983AC73AC93AC03AC3
3A893A873A873A8F3A773A9D3AAF3A8A3A8C3A863A9D3AAF3A8B3A8C
Page 2710 of 3924
![INFINITI FX35 2008 Service Manual
EM-226
< SERVICE INFORMATION >[VK45DE]
CYLINDER HEAD
CYLINDER HEAD
On-Vehicle ServiceINFOID:0000000001325796
CHECKING COMPRESSION PRESSURE
1. Warm up engine thoroughly. Then, stop it.
2. Release fuel INFINITI FX35 2008 Service Manual
EM-226
< SERVICE INFORMATION >[VK45DE]
CYLINDER HEAD
CYLINDER HEAD
On-Vehicle ServiceINFOID:0000000001325796
CHECKING COMPRESSION PRESSURE
1. Warm up engine thoroughly. Then, stop it.
2. Release fuel](/manual-img/42/57017/w960_57017-2709.png)
EM-226
< SERVICE INFORMATION >[VK45DE]
CYLINDER HEAD
CYLINDER HEAD
On-Vehicle ServiceINFOID:0000000001325796
CHECKING COMPRESSION PRESSURE
1. Warm up engine thoroughly. Then, stop it.
2. Release fuel pressure. Refer to
EC-665, "
Fuel Pressure Check".
a. Remove fuel pump fuse to avoid fuel injection during measure- ment.
3. Remove engine cover with power tool. Refer to EM-169, "
Component".
4. Remove ignition coil and spark plug from each cylinder. Refer to EM-187, "
Component" and EM-188,
"Component".
5. Connect engine tachometer (not required in use of CONSULT-III).
6. Install compression gauge with adapter (SST or commercial ser- vice tool) onto spark plug hole.
Use compression gauge adapter (SST) which is required onNo. 7 and 8 cylinders.
Use compression gauge adapter (if no SST is used) whose picking up end inserted to spark plug hole is smaller than 20
mm (0.79 in) in diameter. Otherwise, it may be caught by cylin-
der head during removal.
7. With accelerator pedal fully depressed, turn ignition switch to “START” for cranking. When the gauge pointer stabilizes, read the compression pressure and engine rpm. Perform these steps to check each cyl-
inder.
Compression pressure:
Unit: kPa (kg/cm2, psi)/rpm
CAUTION:
Always use a fully changed battery to obtain the specified engine speed.
PBIB1482E
PBIC1554E
SBIA0533E
Standard Minimum Deferential limit between cylinders
1,320 (13.5, 191)/300 1,130 (11.5, 164)/300 98 (1.0, 14)/300
3AA93ABC3ACD3AC03ACA3AC03AC63AC53A913A773A893A873A873A8E3A773A983AC73AC93AC03AC3
3A893A873A873A8F3A773A9D3AAF3A8A3A8C3A863A9D3AAF3A8B3A8C
Page 2722 of 3924
![INFINITI FX35 2008 Service Manual
EM-238
< SERVICE INFORMATION >[VK45DE]
ENGINE ASSEMBLY
1. Release fuel pressure. Refer to
EC-665, "Fuel Pressure Check".
2. Drain engine coolant from radiator. Refer to CO-37, "
Changing Engine Coo INFINITI FX35 2008 Service Manual
EM-238
< SERVICE INFORMATION >[VK45DE]
ENGINE ASSEMBLY
1. Release fuel pressure. Refer to
EC-665, "Fuel Pressure Check".
2. Drain engine coolant from radiator. Refer to CO-37, "
Changing Engine Coo](/manual-img/42/57017/w960_57017-2721.png)
EM-238
< SERVICE INFORMATION >[VK45DE]
ENGINE ASSEMBLY
1. Release fuel pressure. Refer to
EC-665, "Fuel Pressure Check".
2. Drain engine coolant from radiator. Refer to CO-37, "
Changing Engine Coolant".
CAUTION:
Perform this step when engine is cold.
Do not spill engine coolant on drive belts.
3. Disconnect both battery terminal. Refer to SC-4, "
How to Handle Battery".
4. Remove crankshaft position sensor (POS) from transmission. CAUTION:
Handle carefully to avoid dropping and shocks.
Do not disassemble.
Do not allow metal powder to adhere to magnetic part at sensor tip.
Do not place sensors in a location wh ere they are exposed to magnetism.
5. Remove the following parts: Hood assembly: Refer to BL-13, "
Fitting Adjustment".
Engine cover: Refer to EM-169
.
Front and rear engine undercover
Air duct (inlet), air duct and air cleaner case assembly: Refer to EM-173, "
Component".
Drive belts: Refer to EM-170, "
Component".
Radiator and radiator hoses (upper and lower): Refer to CO-40, "
Component".
Front road wheels and tires
Engine Room LH
1. Disconnect engine room harness from the engine side and set it aside for easier work.
2. Disconnect heater hoses, and install plugs to avoid leakage of engine coolant.
3. Disconnect ground cable from exhaust manifold cover to vehicle.
4. Disconnect vacuum hose between vehicle and engine and set it aside.
5. Discharge refrigerant from A/C circuit. Refer to ATC-120, "
HFC-134a (R-134a) Service Procedure".
6. Remove A/C piping from A/C compressor, and temporarily fasten it on vehicle with a rope. Refer to AT C -
121, "Component".
Engine Room RH
1. Disconnect fuel feed hose and EVAP hose. Refer to EM-190, "Component".
CAUTION:
Fit plugs onto disconnected hose to prevent fuel leak.
2. Disconnect engine room harness from the engine side and set it aside for easier work.
3. Disconnect ground cable from exhaust manifold cover to vehicle.
4. Disconnect vacuum hose between vehicle and engine and set it aside.
5. Disconnect reservoir tank of power steering oil pum p from engine, and move it aside for easier work.
CAUTION:
When temporarily securing, keep reservoir tank upright to avoid a fluid leak.
Vehicle Underbody
1. Remove front cross bar. Refer to FSU-5, "On-Vehicle Inspection and Service".
2. Disconnect power steering oil pump from engine. Move it from its location and secure with a rope for eas-
ier work. Refer to PS-29, "
Removal and Installation (VK45DE Models)".
3. Remove A/T fluid cooler tube. Refer to AT-241, "
Removal and Installation (2WD Models)".
4. Remove exhaust front tube and center muffler with power tool. Refer to EX-3, "
Checking Exhaust Sys-
tem".
5. Remove RH and LH transverse link mounting bolts and nuts. Refer to FSU-13, "
Removal and Installation".
6. Disconnect stabilizer connecting rod lower. Refer to FSU-5, "
On-Vehicle Inspection and Service".
7. Remove A/T control rod at control device assembly side. Then temporarily secure it on transmission, so
that it does not sag. Refer to AT-205, "
Control Device Removal and Installation".
8. Remove rear plate cover from oil pan. Then remove bolts fixing drive plate to torque converter. Refer to EM-183, "
Component" and AT-241, "Removal and Installation (2WD Models)".
9. Remove transmission joint bolts which pierce at oil pan lower rear side. Refer to AT-241, "
Removal and
Installation (2WD Models)".
3AA93ABC3ACD3AC03ACA3AC03AC63AC53A913A773A893A873A873A8E3A773A983AC73AC93AC03AC3
3A893A873A873A8F3A773A9D3AAF3A8A3A8C3A863A9D3AAF3A8B3A8C
Page 2833 of 3924

FL-1
ENGINE
C
DE
F
G H
I
J
K L
M
SECTION FL
A
FL
N
O P
CONTENTS
FUEL SYSTEM
SERVICE INFORMATION .. ..........................2
PREPARATION .............................................. .....2
Commercial Service Tool .................................... ......2
FUEL SYSTEM ....................................................3
Checking Fuel Line ............................................. ......3
General Precaution ...................................................3
FUEL LEVEL SENSOR UNIT, FUEL FILTER
AND FUEL PUMP ASSEMBLY ..........................
4
Component .......................................................... ......4
Removal and Installation ..................................... .....4
Component ...............................................................8
Disassembly and Assembly ......................................8
FUEL TANK ..................................... .................10
Component .......................................................... ....10
Removal and Installation .........................................10
SERVICE DATA AND SPECIFICATIONS
(SDS) .................................................................
12
Standard and Limit ..................................................12
3AA93ABC3ACD3AC03ACA3AC03AC63AC53A913A773A893A873A873A8E3A773A983AC73AC93AC03AC3
3A893A873A873A8F3A773A9D3AAF3A8A3A8C3A863A9D3AAF3A8B3A8C
Page 2836 of 3924

FL-4
< SERVICE INFORMATION >
FUEL LEVEL SENSOR UNIT, FUEL FILTER AND FUEL PUMP ASSEMBLY
FUEL LEVEL SENSOR UNIT, FUEL FILTER AND FUEL PUMP ASSEMBLY
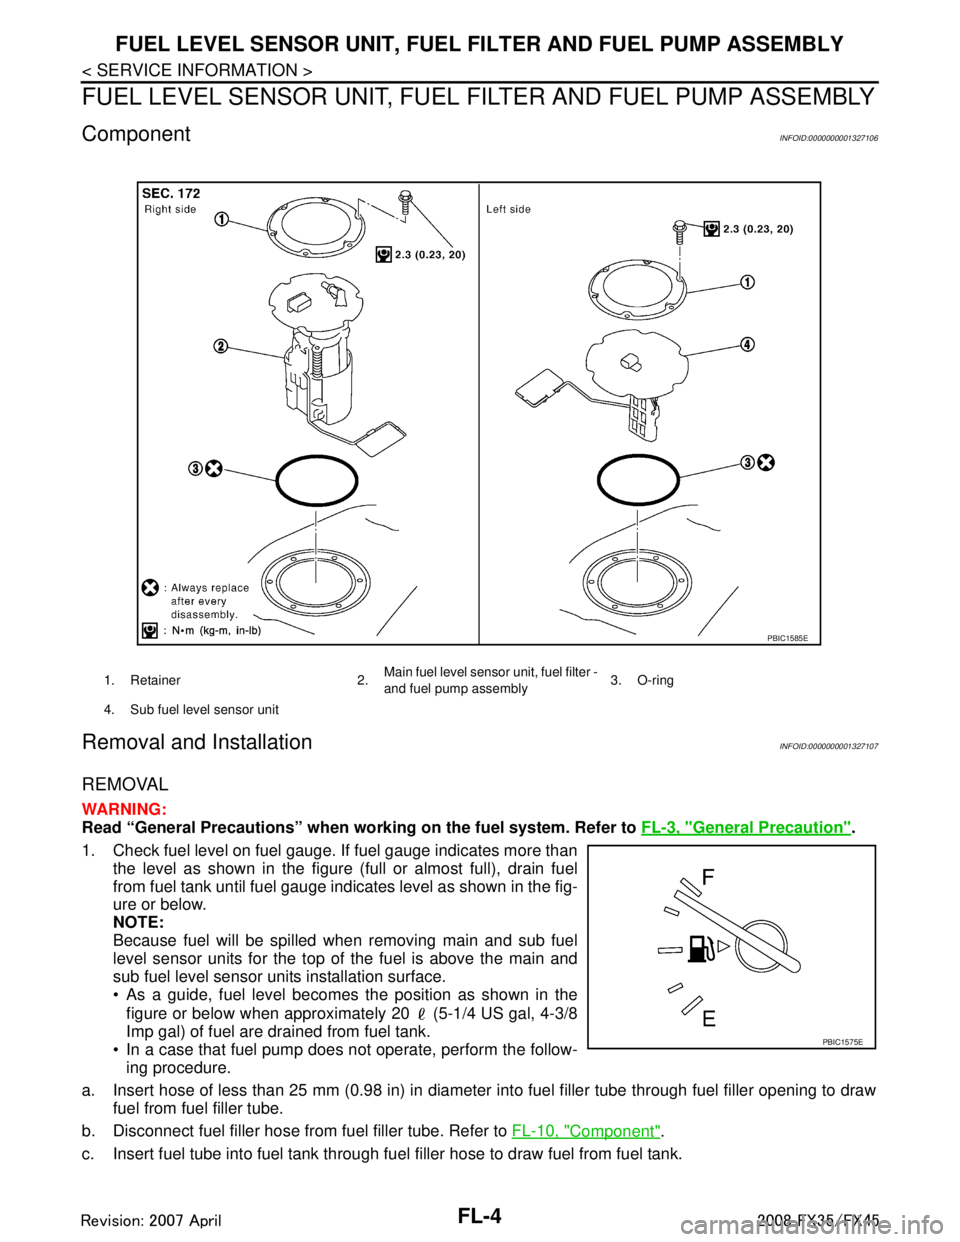
ComponentINFOID:0000000001327106
Removal and InstallationINFOID:0000000001327107
REMOVAL
WARNING:
Read “General Precautions” when wo rking on the fuel system. Refer to FL-3, "
General Precaution".
1. Check fuel level on fuel gauge. If fuel gauge indicates more than the level as shown in the figure (full or almost full), drain fuel
from fuel tank until fuel gauge indicates level as shown in the fig-
ure or below.
NOTE:
Because fuel will be spilled when removing main and sub fuel
level sensor units for the top of the fuel is above the main and
sub fuel level sensor units installation surface.
• As a guide, fuel level becomes the position as shown in the
figure or below when approximately 20 (5-1/4 US gal, 4-3/8
Imp gal) of fuel are drained from fuel tank.
In a case that fuel pump does not operate, perform the follow-
ing procedure.
a. Insert hose of less than 25 mm (0.98 in) in diameter into fuel filler tube through fuel filler opening to draw
fuel from fuel filler tube.
b. Disconnect fuel filler hose from fuel filler tube. Refer to FL-10, "
Component".
c. Insert fuel tube into fuel tank through fuel filler hose to draw fuel from fuel tank.
1. Retainer 2. Main fuel level sensor unit, fuel filter -
and fuel pump assembly
3. O-ring
4. Sub fuel level sensor unit
PBIC1585E
PBIC1575E
3AA93ABC3ACD3AC03ACA3AC03AC63AC53A913A773A893A873A873A8E3A773A983AC73AC93AC03AC3
3A893A873A873A8F3A773A9D3AAF3A8A3A8C3A863A9D3AAF3A8B3A8C
Page 2837 of 3924

FUEL LEVEL SENSOR UNIT, FUEL FILTER AND FUEL PUMP ASSEMBLY
FL-5
< SERVICE INFORMATION >
C
D E
F
G H
I
J
K L
M A
FL
NP
O
2. Release the fuel pressure from the fuel lines. Refer to
EC-87, "Fuel Pressure Check" (VQ35DE) or EC-
665, "Fuel Pressure Check" (VK45DE).
3. Open fuel filler lid.
4. Open filler cap and release the pressure inside fuel tank.
5. Remove rear seat cushion. Refer to SE-95, "
Removal and Installation".
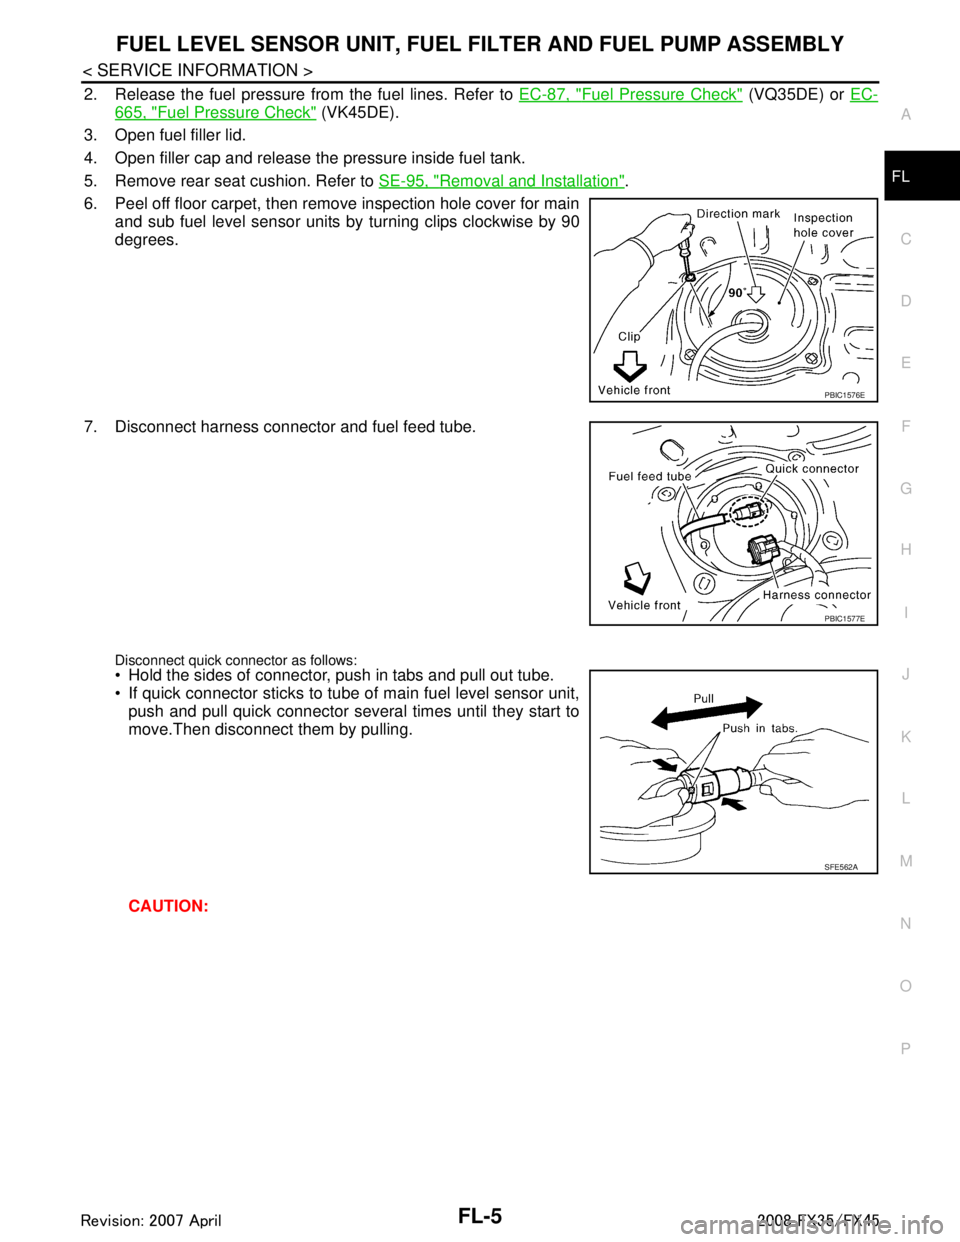
6. Peel off floor carpet, then remove inspection hole cover for main and sub fuel level sensor units by turning clips clockwise by 90
degrees.
7. Disconnect harness connector and fuel feed tube.
Disconnect quick connector as follows: Hold the sides of connector, push in tabs and pull out tube.
If quick connector sticks to tube of main fuel level sensor unit, push and pull quick connector several times until they start to
move.Then disconnect them by pulling.
CAUTION:
PBIC1576E
PBIC1577E
SFE562A
3AA93ABC3ACD3AC03ACA3AC03AC63AC53A913A773A893A873A873A8E3A773A983AC73AC93AC03AC3
3A893A873A873A8F3A773A9D3AAF3A8A3A8C3A863A9D3AAF3A8B3A8C
Page 2838 of 3924

FL-6
< SERVICE INFORMATION >
FUEL LEVEL SENSOR UNIT, FUEL FILTER AND FUEL PUMP ASSEMBLY
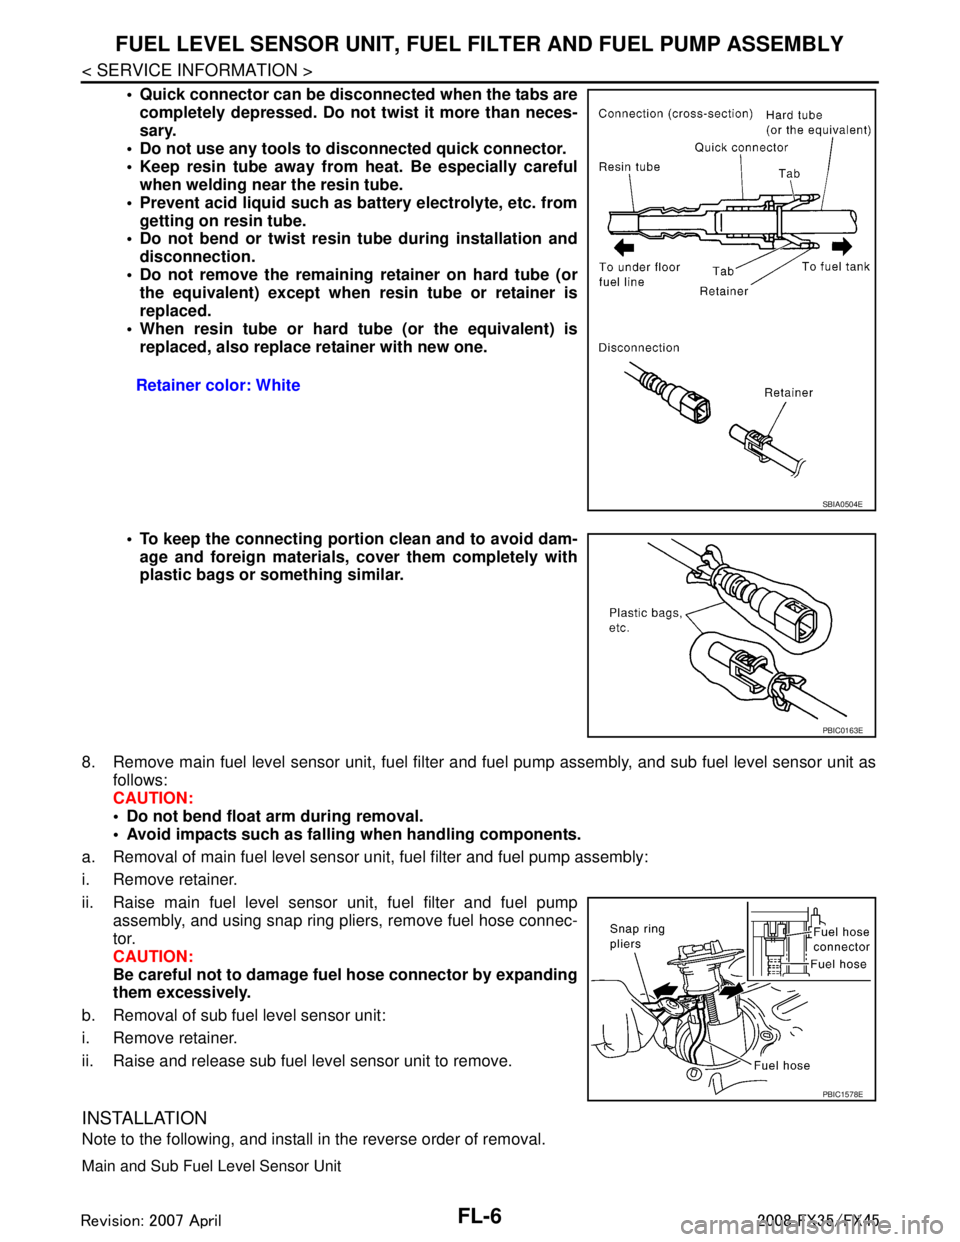
Quick connector can be disconnected when the tabs are
completely depressed. Do not twist it more than neces-
sary.
Do not use any tools to disconnected quick connector.
Keep resin tube away from heat. Be especially careful when welding near the resin tube.
Prevent acid liquid such as battery electrolyte, etc. from getting on resin tube.
Do not bend or twist resin tube during installation and
disconnection.
Do not remove the remaining retainer on hard tube (or the equivalent) except when resin tube or retainer is
replaced.
When resin tube or hard tube (or the equivalent) is replaced, also replace retainer with new one.
To keep the connecting porti on clean and to avoid dam-
age and foreign materials, cover them completely with
plastic bags or something similar.
8. Remove main fuel level sensor unit, fuel filter and fuel pump assembly, and sub fuel level sensor unit as
follows:
CAUTION:
Do not bend float arm during removal.
Avoid impacts such as fallin g when handling components.
a. Removal of main fuel level sensor uni t, fuel filter and fuel pump assembly:
i. Remove retainer.
ii. Raise main fuel level sensor unit, fuel filter and fuel pump assembly, and using snap ring pliers, remove fuel hose connec-
tor.
CAUTION:
Be careful not to damage fu el hose connector by expanding
them excessively.
b. Removal of sub fuel level sensor unit:
i. Remove retainer.
ii. Raise and release sub fuel level sensor unit to remove.
INSTALLATION
Note to the following, and install in the reverse order of removal.
Main and Sub Fuel Level Sensor Unit
Retainer color: White
SBIA0504E
PBIC0163E
PBIC1578E
3AA93ABC3ACD3AC03ACA3AC03AC63AC53A913A773A893A873A873A8E3A773A983AC73AC93AC03AC3
3A893A873A873A8F3A773A9D3AAF3A8A3A8C3A863A9D3AAF3A8B3A8C