Page 81 of 148

Navigation System81
System Set-up
Accessing the Address Book List
After selecting Address Book , the
system prompts you to select User 1 or
User 2 .
If an Address Book PIN has been set,
the system prompts you to enter your
PIN. Verify that the right user is
displayed, then enter your PIN. After
entering your PIN, say or select Done,
and the system displays your Address
Book.
If no Address Book PIN has been set,
the system displays your Address Book
after selecting User 1 or User 2 .
NOTE:
Personal information cannot be backed
up or moved to another Navigation
system.
Entering an Address Book
After you select User 1 or User 2 ,
your Address Book list appears:
Select New Address in the upper right
corner on the screen when beginning to
build your Address Book list. Edit Name
You may use the “Name” field to give
the entry a name or title that you will
recognize later, such as “Doctor Smith”
or “Broadway Theatre.” If you do not
give the address a name, the system will
assign one (Address 001, etc.).
Say or select
Edit Name. Then use the
on-screen keyboard to enter the name.
Touch Done when finished.
NOTE:
You can always re-enter, edit, or make
changes to any entry. “Address” is the
only required field.
2008 Odyssey 00X31-SHJ-8101
Page 82 of 148

82Navigation System
System Set-up
Edit Address
When you say or select Edit Address,
the display changes to:
Current Position - Allows you to use
your current position as the address.
Address - Requires you to enter the city
and address you wish to store. The
operation is the same as selecting
Address from the Enter destination
by screen (see page
24). Places - Allows you to select one of the
Point of Interest (POI) locations already
stored in the system as one of your
personal addresses. This operation is the
same as selecting Places from the
Enter destination by screen (see
page
33 ).
Previous Destinations - Allows you to
choose one of the locations in the
Previous Destinations list for your
Address Book list. Th is operation is the
same as selecting Previous
Destinations from the Enter
destination by screen (see page
42).
After you have used one of these four
options to enter the address, the initial
screen for entering the personal address
is re-displayed, with the address shown
in the “Address” field. If you have
entered the address using Places, the
phone number corresponding to the
address also appears in the “Phone
Number” field. Edit Phone Number
You can enter the telephone number of
the address. If the
address was chosen
with Places , and it has a telephone
number, that number is entered
automatically.
Say or select Edit Phone Number to
display the Enter phone number
screen. Enter the telephone number,
including the area code, by using the
voice control system (say the entire
phone number one digit at a time), or by
using the on-screen keyboard. Say or
select Done when finished.
2008 Odyssey 00X31-SHJ-8101
Page 83 of 148

Navigation System83
System Set-up
Edit Category
If desired, you can specify the category
of the address. Say or select Edit
Category to display the Select a
category screen.
Scroll the screen and select a category
by saying the number next to your
choice, or by touching the item.
If you wish to set, add, or edit a new
category, select Edit Category in the
upper right corner on the screen. The
system will show the Select a
category to edit screen. Follow the on-
screen prompts to add, change or delete
a category. If you delete a category that
was used to categorize addresses, the
category for those addresses becomes
“UNFILED.” NOTE:
You may have up to 100 categories.
These are shared between User 1 and
User 2.
The system will then display everything
that you have entered.
If all the information is correct, say or
select
Done. This will return you to the
Address Book list.
If you want to enter another address,
select New Address in the upper right
corner on the screen , then repeat the
procedures above. If not, press the
CANCEL button.Edit/Delete an Address
This feature allows you to select an
address to edit or delete. Once an
address is selected, choose the
appropriate function.
2008 Odyssey 00X31-SHJ-8101
Page 84 of 148

84Navigation System
System Set-up
Home Address
This feature lets you return “Home”
from any location simply by saying “Go
home” at the map screen. Alternatively,
you can select Go Home on the Enter
destination by screen (see By Go Home
on page
46 ).
Enter the Name, address, and phone
number in the same way as entering a
personal address, then say or select
Done . To leave the screen, press the
CANCEL button.
NOTE:
If your Home address cannot be found
in the system then, while located on the
street close to your home, select
“Current Position” when entering the
“Edit Address” field.
PIN Number
You can set a four-digit PIN (Personal
Identification Number) for accessing
and changing personal addresses and
your home address if desired. Once you
set the PIN on this screen, the system
asks you to enter the PIN when you
access a personal address or your home
address.
NOTE:
PINs are optional. If you choose to use a
PIN, make sure you remember it. If you
forget your PIN, the dealer will have to
reset it for you.
When you select PIN Number, the
display changes to:
Address Book PIN
If you choose to enter a PIN for the
personal Address Book, you will have to
enter it anytime you edit your Address
Book (see page
80), or select Address
Book on the Enter destination by
screen (see page
45).
1. Select Address Book PIN .
2. Select either User 1 or User 2 . The
display changes to:
3. Enter your four-digit PIN and select Done . If you do not wish to use a
PIN, select Do not use PIN .
NOTE:
The factory default is no PIN.
2008 Odyssey 00X31-SHJ-8101
Page 85 of 148

Navigation System85
System Set-up
4. If you have entered the PIN correctly,
the display changes to the Please re-
enter new PIN screen. Enter the
same number, then touch Done to
validate the number you have
selected.
5. If you have entered the same number both times, the display returns to the
Edit personal information screen. If
not, incorrect PIN appears in the
upper right corner of the screen. Enter
your PIN again.
NOTE:
If you wish to remove your PIN, return
to the same screen and, after entering
your PIN, touch the Do not use PIN
button.Go Home PIN
1. Select Go Home PIN , and the
system displays the Enter your new
PIN screen.
2. Enter your PIN in the same way as entering the Address Book PIN.
NOTE:
The factory default is no PIN. If you
choose to use a PIN, you will have to
enter it whenever you say “Go Home”
at the map screen, or select Go Home
on the Enter destination by screen.
User Name
You can change User 1 and User 2 to
a desired name. Choose either User 1 or
User 2 on the Select the user name to
edit screen. Enter the name, and say or
select Done to leave the screen.
Previous Destinations
Allows you to delete some or all of your
previous destinations.
1. Select this option, and the display
changes to:
2. Scroll through the list and find the address you want to delete.
3. Select the address to delete by saying the line number, using the joystick, or
touching it on the screen.
NOTE:
To cancel the deletion of Previous
Destinations, press the CANCEL
button before performing step 4.
2008 Odyssey 00X31-SHJ-8101
Page 86 of 148

86Navigation System
System Set-up
4. Say or select Done to perform the
deletion, and the display returns to
the previous screen.
Tip:
You can delete all addresses by
selecting Delete All .Routing & Guidance
From the Setup screen (second), say or
select Routing & Guidance and the
following screen appears:
Rerouting
If Rerouting is set to Automatic and
you deviate from the route, you will see
“Recalculating...” at the top of the
screen for several seconds as the system
calculates a new route. This is followed
by new routing instructions. If
Rerouting is set to Manual, you
will hear a tone when the “Off route”
message is displayed. Say “Recalculate”
or touch the Recalc. button on the
screen to make the system recalculate
your new route.
NOTE:
If you live in an area with poor mapping, you may wish to set
Rerouting to Manual to avoid
constant recalculation. However, you
will have to manually touch the
Recalc . button on the screen to have
the system plot a new route.
It is strongly recommended that you leave the system set to the factory
default (Automatic).
2008 Odyssey 00X31-SHJ-8101
Page 87 of 148
.")
Navigation System87
System Set-up
Unverified Area Routing
Allows you to receive turn-by-turn map and voice guidance in unverified areas when on route to a destination (see Map Overview
on page 6). The c hart below illustrates the rou ting differences with this setting On or Off.
Unverified Area Routing: Off (factory default) Unverified Area Routing: On
Decision:
Why choose
On or Off? The driver wishes to navi
gate manually by using the
navigation map and choosing the streets that lead to
the destination. The driver understands that unverified
roads may not be a ccurate, and can contain errors in
location, naming, and address range. The driver chooses to let the na
vigation system suggest possible
routing. The driver understands th at in some cases guidance may
not be appropriate. Unverified ro ads may not be accurate, and can
contain errors in location, naming, and address range.
What you will
see… A blue dotted vector line is
displayed on the map that
continually points to your destination. The driver
should stop and then use the ma p to select streets that
lead to the destination. A blue-pink dashed route line
highlights suggested unverified
streets on the map while traveling to your destination. This is in
sharp contrast to the normal blue route line displayed in verified
areas.
Cautionary
messages There are cautionary pop-up screens and voice
announcements, before and
during the route. These
serve as reminders that you should obey all traffic
restrictions. There are cautionary pop-up sc
reens and voice announcements,
before and during the route. These serve as reminders that you
should exercise additional ca ution, and obey all traffic
restrictions.
Guidance
(map/voice) There is no turn-by-turn map or voice guidance. Voice gu
idance commands end with the words “If possible.” This
is to remind the driver to verify all traffic restrictions before
making a maneuver.
Directions list A direction list is typicall y not available. However,
depending on your route, dire ctions are provided to
help you reach the first available verified road. A direction list is provided s
howing street names and turn
symbols in pink.
2008 Odyssey 00X31-SHJ-8101
Page 88 of 148

88Navigation System
System Set-up
Unverified Area Routing
When driving to your destination, you
have the choice of using or not using
“unverified” roads. You make this
choice in Setup screen (second). The
next few pages contain an example of a
route to a destinatio n in an unverified
area explaining the routing differences
found in unverified areas.
With Unverified Area Routing Off ,
the system tries to use verified roads
whenever possible. In this example,
since only verified streets are used, it
created a longer rout e than necessary.
With Unverified Area Routing On ,
the route is shorter, but consists of
unverified (light co lored) streets that
may not be accurate. Because the streets
are unverified, there may be errors in
street location, name, or address range.
Additional caution is recommended in
these areas. Always obey posted traffic
restrictions.
Because both routes bypass or use
unverified streets, an initial Disclaimer
screen is provided. It is recommended
that you stop and review the map. Unverified Area Routing “Off” Unverified Area Routing “On”
NOTE:
Unverified roads are shown only when
viewing the map in the 1/20, 1/8, and
1/4 mile map scales, or the 80, 200,
and 400 meter map scales.
2008 Odyssey 00X31-SHJ-8101
 1
1 2
2 3
3 4
4 5
5 6
6 7
7 8
8 9
9 10
10 11
11 12
12 13
13 14
14 15
15 16
16 17
17 18
18 19
19 20
20 21
21 22
22 23
23 24
24 25
25 26
26 27
27 28
28 29
29 30
30 31
31 32
32 33
33 34
34 35
35 36
36 37
37 38
38 39
39 40
40 41
41 42
42 43
43 44
44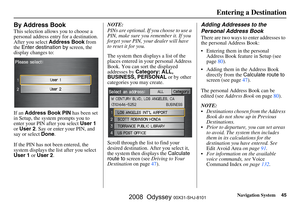 45
45 46
46 47
47 48
48 49
49 50
50 51
51 52
52 53
53 54
54 55
55 56
56 57
57 58
58 59
59 60
60 61
61 62
62 63
63 64
64 65
65 66
66 67
67 68
68 69
69 70
70 71
71 72
72 73
73 74
74 75
75 76
76 77
77 78
78 79
79 80
80 81
81 82
82 83
83 84
84 85
85 86
86 87
87 88
88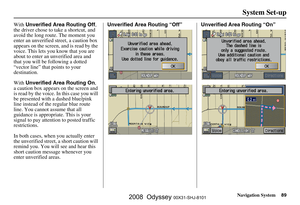 89
89 90
90 91
91 92
92 93
93 94
94 95
95 96
96 97
97 98
98 99
99 100
100 101
101 102
102 103
103 104
104 105
105 106
106 107
107 108
108 109
109 110
110 111
111 112
112 113
113 114
114 115
115 116
116 117
117 118
118 119
119 120
120 121
121 122
122 123
123 124
124 125
125 126
126 127
127 128
128 129
129 130
130 131
131 132
132 133
133 134
134 135
135 136
136 137
137 138
138 139
139 140
140 141
141 142
142 143
143 144
144 145
145 146
146 147
147