Page 3 of 413

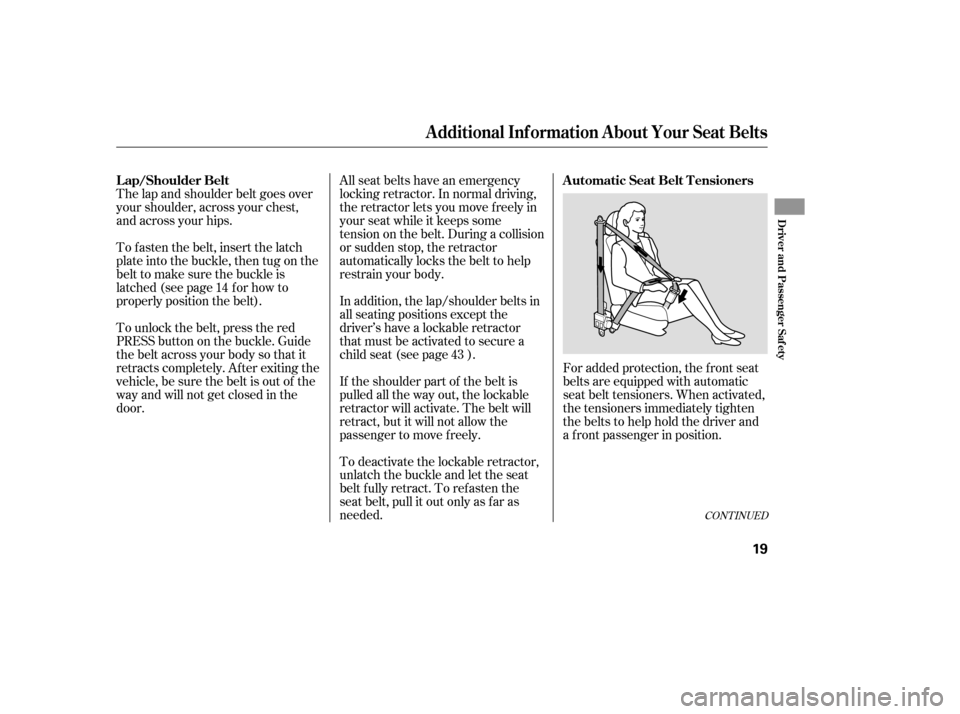
The lap and shoulder belt goes over
your shoulder, across your chest,
and across your hips.
To fasten the belt, insert the latch
plate into the buckle, then tug on the
belt to make sure the buckle is
latched (see page f or how to
properly position the belt).
To unlock the belt, press the red
PRESSbuttononthebuckle.Guide
the belt across your body so that it
retracts completely. Af ter exiting the
vehicle, be sure the belt is out of the
way and will not get closed in the
door.All seat belts have an emergency
locking retractor. In normal driving,
the retractor lets you move f reely in
your seat while it keeps some
tension on the belt. During a collision
or sudden stop, the retractor
automatically locks the belt to help
restrain your body.
If the shoulder part of the belt is
pulled all the way out, the lockable
retractor will activate. The belt will
retract, but it will not allow the
passenger to move f reely.
To deactivate the lockable retractor,
unlatch the buckle and let the seat
belt fully retract. To refasten the
seat belt, pull it out only as f ar as
needed.
For added protection, the f ront seat
belts are equipped with automatic
seat belt tensioners. When activated,
the tensioners immediately tighten
the belts to help hold the driver and
a f ront passenger in position.
In addition, the lap/shoulder belts in
all seating positions except the
driver’s have a lockable retractor
that must be activated to secure a
child seat (see page ).
14
43
CONT INUED
L ap/Shoulder Belt A utomatic Seat Belt T ensioners
Additional Inf ormation About Your Seat Belts
Driver and Passenger Saf ety
19
�����—�����—�
�
�y�
�������������y���
�(�+���������y���������y
Page 12 of 413

In seating positions and vehicles not
equipped with LATCH, a LATCH-
compatible child seat can be installed
using a seat belt.
Whatever type of seat you choose, to
provide proper protection, a child
seat should meet three
requirements:Look f or FMVSS
213 or CMVSS 213 on the box.
Rear-facing for infants, forward-
f acing f or small children.
If it is necessary to put a f orward-
f acing child seat in the f ront, move
the vehicle seat as far to the rear as
possible, and be sure the child seat is
f irmly secured to the vehicle and the
child is properly strapped in the seat.
Since LATCH-compatible child seats
are easier to install and reduce the
possibility of improper installation,
we recommend selecting this style.
Conventional child seats must be
secured to a vehicle with a seat belt,
whereas LATCH-compatible seats
are secured by attaching the seat to
hardware built into the two outer
seating positions in the back seat.
When buying a child seat, you need
to choose either a conventional child
seat, or one designed f or use with
the lower anchors and tethers for
children (LATCH) system.
CONT INUED
T he child seat should meet U.S. or
Canadian Mot or Vehicle Saf et y
St andard 213.
T he child seat should be of theproper t ype and size t o f it t he child.
1.
2.
Selecting a Child Seat
Protecting Inf ants and Small Children, Selecting a Child Seat
Driver and Passenger Saf ety
39
Placing a forward-facing child
seat in the front seat can result
in serious injury or death if the
front airbag inflates.
Ifyoumustplaceaforward-
facing child seat in front, move
the vehicle seat as far back as
possible, and properly restrain
the child.
�����—�����—�
�
�y�
����
��������y���
�(�+���������y���������y
Page 13 of 413

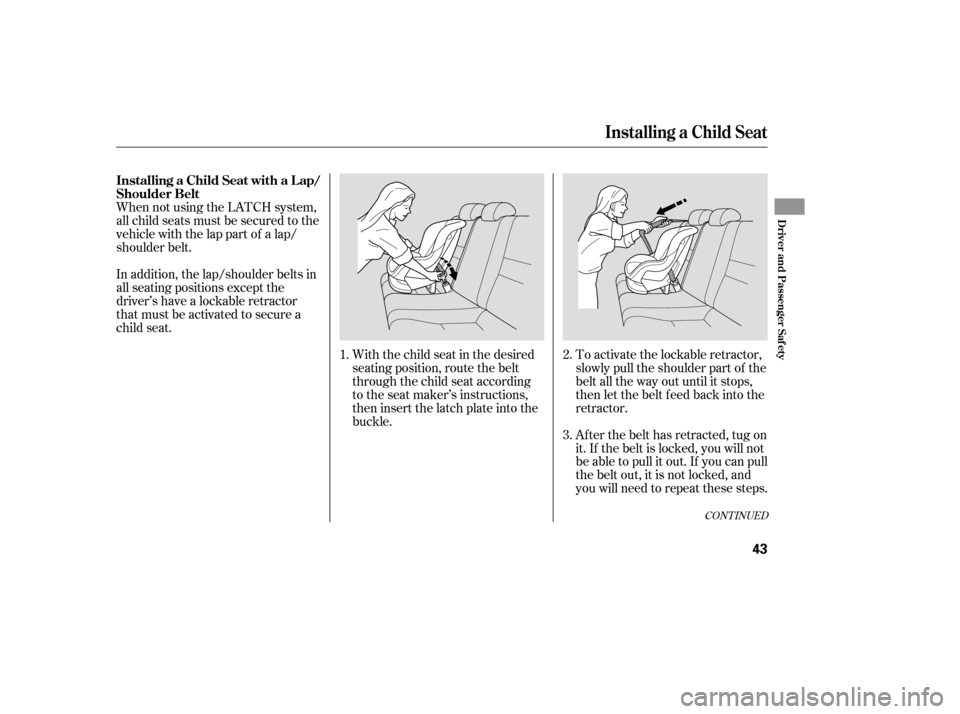
To activate the lockable retractor,
slowly pull the shoulder part of the
belt all the way out until it stops,
then let the belt f eed back into the
retractor.
Af ter the belt has retracted, tug on
it. If the belt is locked, you will not
be able to pull it out. If you can pull
thebeltout,itisnotlocked,and
you will need to repeat these steps.
When not using the LATCH system,
all child seats must be secured to the
vehicle with the lap part of a lap/
shoulder belt.
With the child seat in the desired
seating position, route the belt
through the child seat according
to the seat maker’s instructions,
then insert the latch plate into the
buckle.
In addition, the lap/shoulder belts in
all seating positions except the
driver’s have a lockable retractor
that must be activated to secure a
child seat.
1.2. 3.
CONT INUED
Installing a Child Seat
Installing a Child Seat with a L ap/
Shoulder Belt
Driver and Passenger Saf ety
43
�����—�����—�
�
�y�
����
��������y���
�(�+���������y���������y
Page 14 of 413
Af ter conf irming that the belt is
locked, grab the shoulder part of
the belt near the buckle, and pull
up to remove any slack from the
lap part of the belt. Remember, if
the lap part of the belt is not tight,
the child seat will not be secure.Push and pull the child seat
f orward and f rom side-to-side to
verif y that it is secure enough to
stay upright during normal driving
maneuvers. If the child seat is not
secure, unlatch the belt, allow it to
retract f ully, then repeat these
steps.
To remove slack, it may help to
putweightonthechildseat,or
push on the back of the seat while
pulling up on the belt. To deactivate the lockable retractor
and remove a child seat, unlatch the
buckle, unroute the seat belt, and let
the belt fully retract.
4. 5.
Installing a Child Seat
44
�����—�����—�
�
�y�
����
����
���y���
�(�+���������y���������y
Page 26 of 413
If equipped
This indicator comes on when the
security system is set. See pagef or more inf ormation on the
security system. This indicator is located in the f uel
gauge. It comes on as a reminder
that you must ref uel soon.
When the indicator comes on, there
are about 1.9 US gal (7.5
)of fuel
remaining in the tank.
When the reading reaches E, there is
a very small amount of f uel in the
tank.
181
Instrument Panel Indicators
Security System Indicator L ow Fuel Indicator
64
LOW FUEL INDICATOR
SECURITY SYSTEM INDICATOR
Except Si Si
�����—�
���—�����y�
����
��������y���
�(�+���������y���������y
Page 46 of 413
Fasten your seat belt. Check that
your passengers have f astened
their seat belts (see page ).
Make sure the doors are securely
closed and locked.
Check the steering wheel
adjustment (see page ).
Check the adjustment of the
inside and outside mirrors (see
page ).
Check that any items you may be
carrying are stored properly or
f astened down securely.
Check the seat adjustment (see
page ).
Make sure all windows, mirrors,
and outside lights are clean and
unobstructed. Remove f rost, snow,
or ice.
Youshoulddothefollowingchecks
and adjustments bef ore you drive
your vehicle.
Check that the hood is f ully closed.
Check that the trunk is f ully
closed. When you start the engine, check
the gauges and indicators in the
instrument panel (see page ).
Visually check the tires. If a tire
looks low, use a gauge to check its
pressure.
1. 2.
14
3. 4. 5. 6. 7. 8. 9.
11.
10.
55
92
104 75
Preparing to Drive
Driving
203
�����—�����—�
�
�y�
�������������y���
�(�+���������y���������y
Page 54 of 413

Oil is a major contributor to your
engine’s perf ormance and longevity.
Always use a premium-grade
detergent oil displaying the API
Certif ication Seal. This seal indicates
the oil is energy conserving, and that
it meets the American Petroleum
Institute’s latest requirements. It is
highly recommended that you use
Honda Motor Oil in your vehicle f or
optimum engine protection.
Reinstall the engine oil f ill cap, and
tighten it securely. Wait a f ew
minutes, and recheck the oil level on
the engine oil dipstick. Do not f ill
above the upper mark; you could
damage the engine.
Unscrew and remove the engine oil
fill cap on the valve cover. Pour in
the oil slowly and caref ully so you do
not spill any. Clean up any spills
immediately. Spilled oil could
damage components in the engine
compartment. Recommended Engine Oil
A dding Engine Oil
234
API CERTIFICATION SEAL
ENGINE OIL FILL CAP ENGINE OIL FILL CAP
Si
DX, Canadian DX-G, LX, EX, EX-L
�����—�����—�
�
�y�
�������������y���
�(�+���������y���������y
Page 64 of 413

(f luid capacities and tire pressures)
(main controls)
(seat belts, SRS, and child protection)
(indicators, gauges, dashboard, and steering column)
(heating and cooling, audio, steering wheel, security, and cruise contr ol)
(fuel, vehicle break-in, and cargo loading)
(engine and transmission operation)
(minder, f luid checking, minor services, and vehicle storage) (f lat tire, dead battery, overheating, and f uses)
(warranty and contact inf ormation)
(how to order)
(vehicle specif ications, tires, and emissions controls)
Contents
................................................................................................................................................
Index .I
..................................................
Service Inf ormation Summary . last page
...............................................................................................
Your Vehicle at a Glance .3
............................................................
Driver and Passenger Saf ety .5
..........................................
Instruments and Controls .55
.......................................
Features .107
.......................................................................
Bef ore Driving .179
.........................................................................................
Driving .195
.................................................
Maintenance .221
.........................................
T aking Care of the Unexpected .265
..................
Warranty and Customer Relations (U.S. and Canada only) . 305
..................................................................................
A uthorized Manuals (U.S. only) .309
..............................................
T echnical Inf ormation .289INDEX
1
�����—�����—�����y��������
��
���y���
�(�#���������y���������y