Page 52 of 413

�µ�µ�µ
�µ
�µ
�µ
�Ì Engine oil level Check every
time you fill the fuel tank. See
page .
Engine coolant level Check the
radiator reserve tank every time
you f ill the f uel tank. See page .
Automatic transmission Check
the f luid level monthly. See page
.
Brakes Check the f luid level
monthly. See page .
Tires Check the tire pressure
monthly. Examine the tread f or
wear and foreign objects. See page .
Lights Check the operation of
the headlights, parking lights,
taillights, high-mount brake light,
and license plate lights monthly.
See page .
U.S. Vehicles:
According to state and federal
regulations, f ailure to perf orm
maintenance on the items marked
with will not void your emissions
warranties. However, all
maintenance services should be
perf ormed in accordance with the
intervals indicated by the
inf ormation display.
Youshouldcheckthefollowing
items at the specif ied intervals. If
you are unsure of how to perf orm
any check, turn to the appropriate
page listed.
We recommend using Honda parts
and fluids whenever you have
maintenance done. These are
manuf actured to the same high
quality standards as the original
components, so you can be conf ident
of their perf ormance and durability. 189
191
244
246
242
255
Maintenance Minder
Maintenance,
replacement, or repair of
emissions control devices and
systems may be done by any
automotive repair establishment
or individual using parts that are
‘‘certif ied’’ to EPA standards.
Owner’s Maintenance Checks
230
�����—�����—�
�
�y�
�������������y���
�(�+���������y���������y
However, service at a dealer is not
mandatory to keep your warranties
in effect. Maintenance may be done
by any qualif ied service f acility or
person who is skilled in this type of
automotive service. Make sure to
have the service f acility or person
reset the display as previously
described. Keep all receipts as proof
of completion, and have the person
who does the work fill out your Honda Service History or Canadian Maintenance Log.
Page 53 of 413

�Î �Î
�Ì �Ì
�Î �Ì
Maintenance Minder
231
:If the message ‘‘SERVICE’’ does not appear more than 12 months after the
display is reset, change the engine oil every year.
Independent of the maintenance minder indicator in the information
display, replace the brake fluid every 3 years.
Adjust the valves during services A, B, 1, 2, or 3 only if they are noisy.
Inspect idle speed every 160,000 miles (256,000 km).
See information on maintenance and emissions warranty in the center
column on page .
NOTE: :
230
Maintenance Sub Items
Rotate tires
Replace air cleaner element If you drive in dusty conditions, replace every 15,000
miles (24,000 km).
Replace dust and pollen filter If you drive primarily in urban areas that have high
concentrations of soot in the air from industry and
from diesel-powered vehicles, replace every 15,000
miles (24,000 km).
Inspect drive belt
Replace transmission fluid
Replace spark plugs
Inspect valve clearance
Replace engine coolant
Maintenance Main Items
Replace engine oil
Replace engine oil and oil filter
Inspect front and rear brakes
Check parking brake adjustment
Visually inspect these items:
Tie rod ends, steering gear box, and boots
Suspension components
Driveshaft boots
Brake hoses and line (including ABS)
All fluid levels and condition of fluids
Exhaust system
Fuel lines and connections
AB
Symbol
Symbol
12 3 4 5
Maintenance Minder
�����—�����—�
�
�y�
�������������y���
�(�+���������y���������y
Page 54 of 413

Oil is a major contributor to your
engine’s perf ormance and longevity.
Always use a premium-grade
detergent oil displaying the API
Certif ication Seal. This seal indicates
the oil is energy conserving, and that
it meets the American Petroleum
Institute’s latest requirements. It is
highly recommended that you use
Honda Motor Oil in your vehicle f or
optimum engine protection.
Reinstall the engine oil f ill cap, and
tighten it securely. Wait a f ew
minutes, and recheck the oil level on
the engine oil dipstick. Do not f ill
above the upper mark; you could
damage the engine.
Unscrew and remove the engine oil
fill cap on the valve cover. Pour in
the oil slowly and caref ully so you do
not spill any. Clean up any spills
immediately. Spilled oil could
damage components in the engine
compartment. Recommended Engine Oil
A dding Engine Oil
234
API CERTIFICATION SEAL
ENGINE OIL FILL CAP ENGINE OIL FILL CAP
Si
DX, Canadian DX-G, LX, EX, EX-L
�����—�����—�
�
�y�
�������������y���
�(�+���������y���������y
Page 144 of 413
The inf ormation display in the
instrument panel shows you the
engine oil lif e and maintenance
service items when the ignition
switch is in the ON (II) position. This
inf ormation helps to keep you aware
of the periodic maintenance your
vehicle needs f or continued trouble-
f ree driving. Ref er to page f or
more inf ormation.
If the system still detects a leak in
your vehicle’s evaporative emissions
system, the malf unction indicator
lamp (MIL) comes on. If the f uel f ill
cap was not already tightened, turn
the engine of f , and check or
retighten the f uel f ill cap until it
clicks at least once. The MIL should
go off after several days of normal
driving once the cap is tightened or
replaced. If the MIL does not go of f ,
have your vehicle inspected by a
dealer. For more inf ormation, see
page .
278 223
Maintenance Minder
Gauges
Inst rument s and Cont rols
69
�����—�����—�����y��������
������y���
�(�#���������y���������y
Page 145 of 413
The inf ormation display in the
instrument panel shows you the
engine oil lif e and maintenance
service items when the ignition
switch is in the ON (II) position. This
inf ormation helps to keep you aware
of the periodic maintenance your
vehicle needs f or continued trouble-
f ree driving. Ref er to page f or
more inf ormation.
If the system still detects a leak in
your vehicle’s evaporative emissions
system, the malf unction indicator
lamp (MIL) comes on. If the f uel f ill
cap was not already tightened, turn
the engine of f , and check or
retighten the f uel f ill cap until it
clicks at least once. The MIL should
go off after several days of normal
driving once the cap is tightened or
replaced. If the MIL does not go of f ,
have your vehicle inspected by a
dealer. For more inf ormation, see
page .
278 223
Maintenance Minder
Gauges
Inst rument s and Cont rols
69
�����—�����—�����y��������
������y���
�(�#���������y���������y
Page 270 of 413

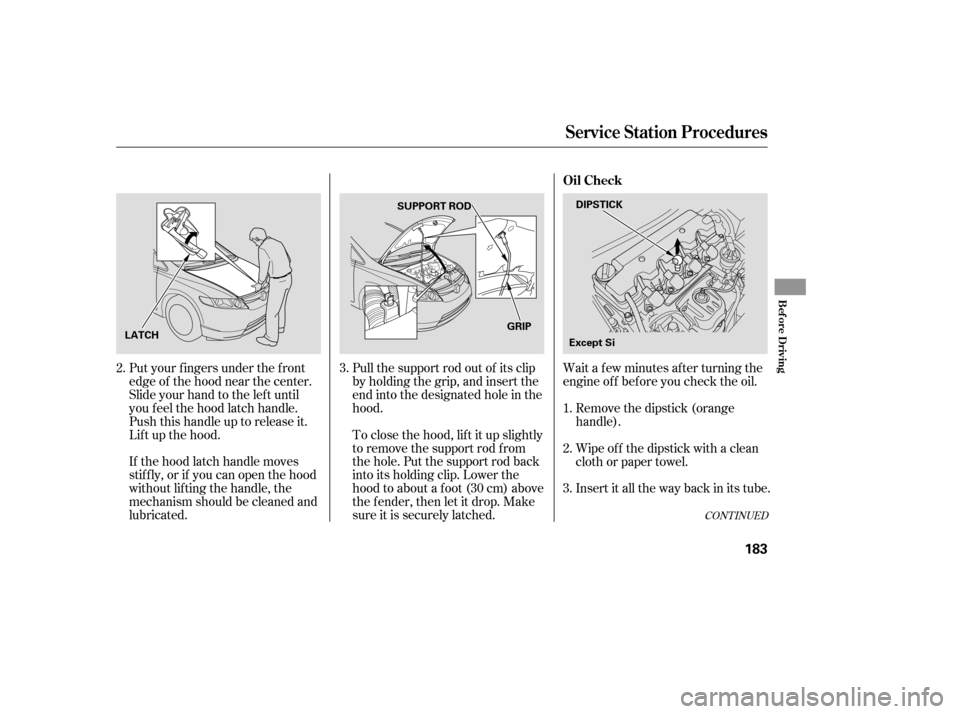
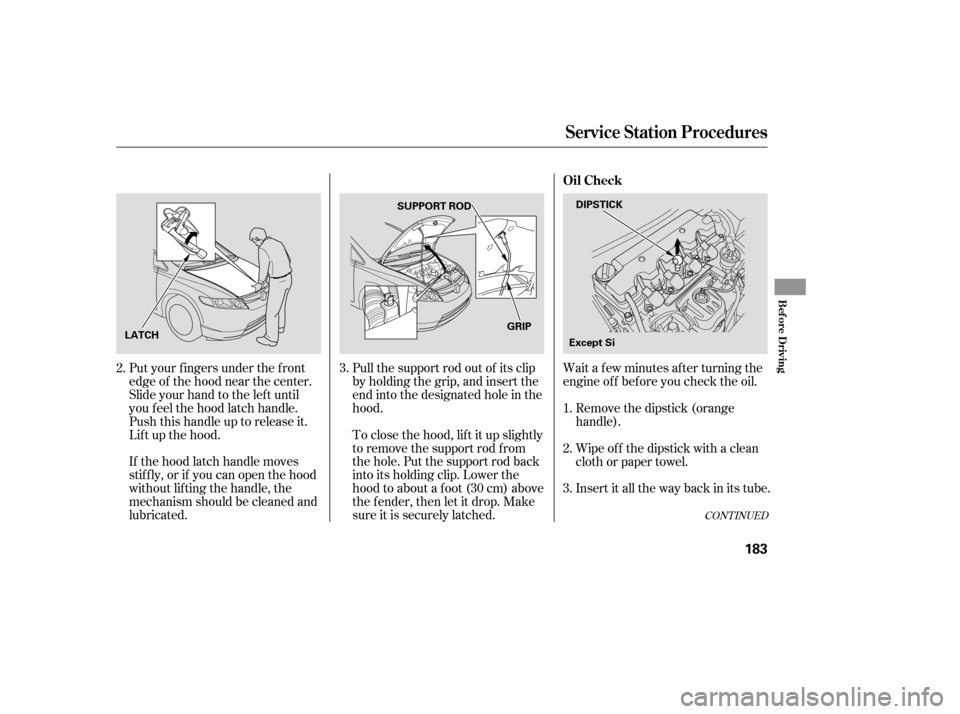
Wait a f ew minutes af ter turning the
engine of f bef ore you check the oil.
Put your f ingers under the f ront
edge of the hood near the center.
Slide your hand to the lef t until
you f eel the hood latch handle.
Push this handle up to release it.
Lif t up the hood.
If the hood latch handle moves
stif f ly, or if you can open the hood
without lifting the handle, the
mechanism should be cleaned and
lubricated. Pull the support rod out of its clip
by holding the grip, and insert the
end into the designated hole in thehood.
To close the hood, lif t it up slightly
to remove the support rod f rom
the hole. Put the support rod back
into its holding clip. Lower the
hood to about a f oot (30 cm) above
the fender, then let it drop. Make
sure it is securely latched.
Remove the dipstick (orange
handle).
Insert it all the way back in its tube.
Wipe of f the dipstick with a clean
cloth or paper towel.
3.
1. 2.
3.
2.
CONT INUED
Service Station Procedures
Oil Check
Bef ore Driving
183
DIPSTICK
SUPPORT ROD
LATCH GRIP
Except Si
�����—�����—�����y���
�����������y���
�(�#���������y���
�����y
Page 271 of 413

Wait a f ew minutes af ter turning the
engine of f bef ore you check the oil.
Put your f ingers under the f ront
edge of the hood near the center.
Slide your hand to the lef t until
you f eel the hood latch handle.
Push this handle up to release it.
Lif t up the hood.
If the hood latch handle moves
stif f ly, or if you can open the hood
without lifting the handle, the
mechanism should be cleaned and
lubricated. Pull the support rod out of its clip
by holding the grip, and insert the
end into the designated hole in thehood.
To close the hood, lif t it up slightly
to remove the support rod f rom
the hole. Put the support rod back
into its holding clip. Lower the
hood to about a f oot (30 cm) above
the fender, then let it drop. Make
sure it is securely latched.
Remove the dipstick (orange
handle).
Insert it all the way back in its tube.
Wipe of f the dipstick with a clean
cloth or paper towel.
3.
1. 2.
3.
2.
CONT INUED
Service Station Procedures
Oil Check
Bef ore Driving
183
DIPSTICK
SUPPORT ROD
LATCH GRIP
Except Si
�����—�����—�����y���
�����������y���
�(�#���������y���
�����y
Page 272 of 413
Remove the dipstick again, and
check the level. It should be
between the upper and lower
marks.If it is near or below the lower mark,
see on page .
4.
232
Service Station Procedures
A dding Engine Oil
184
LOWER MARK
DIPSTICK
UPPER MARK
Si Except Si
Si
UPPER MARK LOWER MARK
�����—�����—�����y���
���������
�y���
�(�#���������y���
�����y