Page 133 of 413
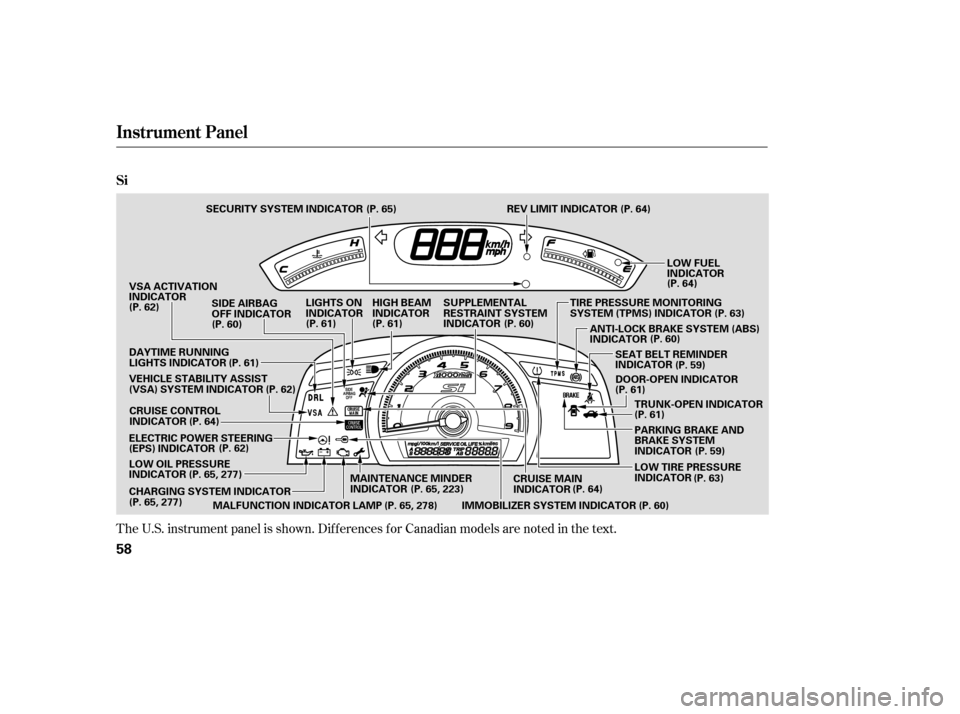
The U.S. instrument panel is shown. Dif f erences f or Canadian models are noted in the text.
Instrument Panel
Si
58
LOW FUEL
INDICATOR
(P. 64)
MAINTENANCE MINDER
INDICATOR
(P. 62)
(P. 61)(P. 62)
(P. 64)
CRUISE CONTROL
INDICATOR
(P. 60)
MALFUNCTION INDICATOR LAMP
IMMOBILIZER SYSTEM INDICATORCRUISE MAIN
INDICATOR
(P. 64)
LIGHTS ON
INDICATOR
HIGH BEAM
INDICATOR
(P. 61) (P. 60) SUPPLEMENTAL
RESTRAINT SYSTEM
INDICATOR
(P. 60)
TRUNK-OPEN INDICATOR
VSA ACTIVATION
INDICATOR
DAYTIME RUNNING
LIGHTS INDICATOR
VEHICLE STABILITY ASSIST
(VSA) SYSTEM INDICATOR
ELECTRIC POWER STEERING
(EPS) INDICATOR
LOW OIL PRESSURE
INDICATOR
CHARGING SYSTEM INDICATOR
(P. 62)
(P. 65, 277)
(P. 65, 277) (P. 65, 278)(P. 65, 223) (P. 61)
(P. 61)
(P. 63)(P. 63)
(P. 60) (P. 61)
SECURITY SYSTEM INDICATOR (P. 65) REV LIMIT INDICATOR (P. 64)
SEAT BELT REMINDER
INDICATORDOOR-OPEN INDICATOR (P. 59)
SIDE AIRBAG
OFF INDICATOR
ANTI-LOCK BRAKE SYSTEM (ABS)
INDICATOR
PARKING BRAKE AND
BRAKE SYSTEM
INDICATOR (P. 59)
TIRE PRESSURE MONITORING
SYSTEM (TPMS) INDICATOR
LOW TIRE PRESSURE
INDICATOR
�����—�����—�����y������
����
���y���
�(�#���������y���������y
Page 140 of 413

See page .
The engine can be severely damaged
if this indicator f lashes or stays on
when the engine is running. For
more inf ormation, see page .
If this indicator comes on when the
engine is running, the battery is not
being charged. For more inf ormation,
see page .
This indicator comes on when the
security system is set. See page
f or more inf ormation on the
security system.
This indicator reminds you that it is
time to take your vehicle in for
scheduled maintenance. The
maintenance main items and sub
items will be displayed in the
inf ormation display. See page f or
more inf ormation on the
maintenance minder.
This indicator goes of f when your
dealer resets it after completing the
required maintenance service.
278
277
277
223
175
If equipped
Instrument Panel Indicators
Malf unction Indicator
Lamp
L ow Oil Pressure
Indicator
Charging System
Indicator
Security System Indicator
Maintenance Minder
Indicator
Inst rument s and Cont rols
65
SECURITY SYSTEM INDICATOR Si
Except Si
�����—�����—�����y���������������y���
�(�#���������y���������y
Page 151 of 413
Make sure you have securely
locked the steering wheel in place
by trying to move it up, down, in,
and out.
Push the lever up to lock the
steering wheel in position.
Push the lever under the steering
column all the way down.
Move the steering wheel up or
down, and in or out, so it points
toward your chest, not toward
your f ace. Make sure you can see
the instrument panel gauges and
indicators.
Make any steering wheel adjustment
bef ore you start driving.
1.4.
2. 3.
Steering Wheel A djustment
Inst rument s and Cont rols
75
Adjusting the steering wheel
position while driving may
cause you to lose control of the
vehicle and be seriously injured
inacrash.
Adjust the steering wheel only
when the vehicle is stopped.
�����—�����—�����y��������
������y���
�(�#���������y���������y
Page 170 of 413
�µ�µ
�µ
�µ
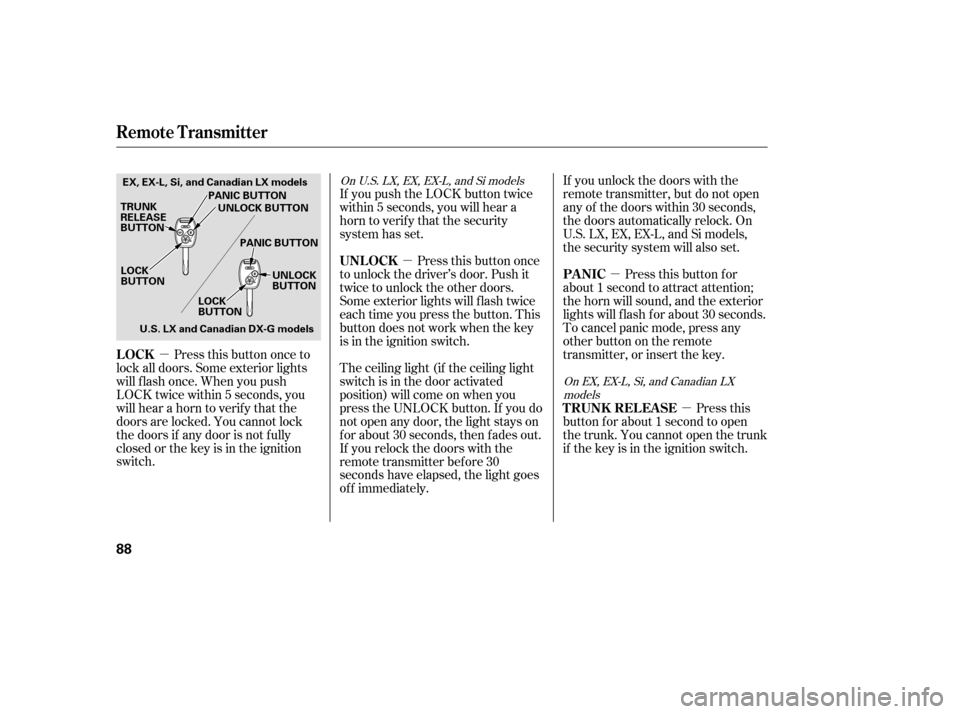
Press this button once to
lock all doors. Some exterior lights
will f lash once. When you push
LOCK twice within 5 seconds, you
will hear a horn to verif y that the
doors are locked. You cannot lock
the doors if any door is not f ully
closed or the key is in the ignition
switch. Pressthisbuttonfor
about 1 second to attract attention;
the horn will sound, and the exterior
lights will f lash f or about 30 seconds.
To cancel panic mode, press any
other button on the remote
transmitter, or insert the key.
The ceiling light (if the ceiling light
switch is in the door activated
position) will come on when you
press the UNLOCK button. If you do
not open any door, the light stays on
f or about 30 seconds, then f ades out.
If you relock the doors with the
remote transmitter before 30
seconds have elapsed, the light goes
of f immediately. Press this button once
to unlock the driver’s door. Push it
twice to unlock the other doors.
Some exterior lights will f lash twice
each time you press the button. This
button does not work when the key
is in the ignition switch.
If you push the LOCK button twice
within 5 seconds, you will hear a
horn to verify that the security
system has set.
Press this
button f or about 1 second to open
the trunk. You cannot open the trunk
if the key is in the ignition switch.
If you unlock the doors with the
remote transmitter, but do not open
any of the doors within 30 seconds,
the doors automatically relock. On
U.S. LX, EX, EX-L, and Si models,
the security system will also set.
On EX, EX-L, Si, and Canadian LX
models
On U.S. LX, EX, EX-L, and Si models
LOCK
PA NIC
UNL OCK
T RUNK REL EA SE
Remote Transmitter
88
LOCK
BUTTON
TRUNK
RELEASE
BUTTON
PANIC BUTTON
PANIC BUTTON UNLOCK
BUTTON
LOCK
BUTTON
EX, EX-L, Si, and Canadian LX models
UNLOCK BUTTON
U.S. LX and Canadian DX-G models
�����—�����—�����y�������������
�y���
�(�#���������y���������y
Page 176 of 413
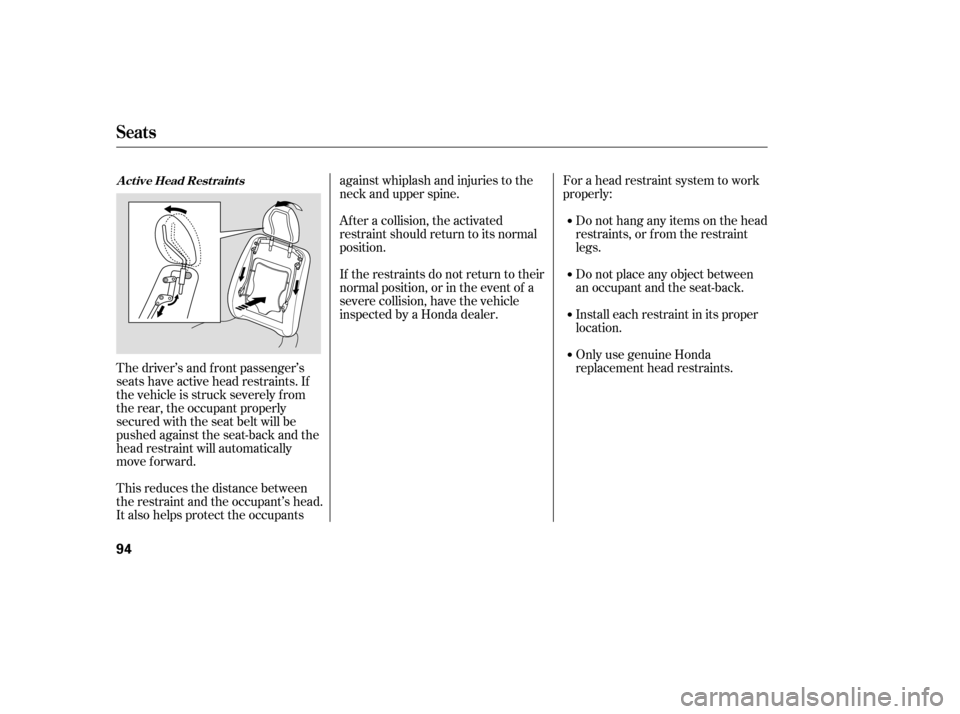
The driver’s and f ront passenger’s
seats have active head restraints. If
the vehicle is struck severely f rom
the rear, the occupant properly
secured with the seat belt will be
pushed against the seat-back and the
head restraint will automatically
move forward.
This reduces the distance between
the restraint and the occupant’s head.
It also helps protect the occupantsagainst whiplash and injuries to the
neck and upper spine.
Af ter a collision, the activated
restraint should return to its normal
position.
If the restraints do not return to their
normal position, or in the event of a
severe collision, have the vehicle
inspected by a Honda dealer.
For a head restraint system to work
properly:
Do not hang any items on the head
restraints, or f rom the restraint
legs.
Do not place any object between
an occupant and the seat-back.
Install each restraint in its proper
location.
Only use genuine Honda
replacement head restraints.
Seats
A ct ive Head Rest raint s
94
�����—�����—�����y���������������y���
�(�#���������y���������y
Page 179 of 413
Make sure all items in the trunk, or
items extending through the opening
into the back seat, are secured.
Looseitemscanflyforwardand
cause injury if you have to brake
hard. See on page.
Never drive with the seat-back
f olded down and the trunk lid open.
See on
page .
Make sure that the folded seat-back
does not press against the f ront
passenger’s seat, as this could cause
the weight sensors to work
improperly.
Make sure all rear shoulder belts are
positioned in f ront of the rear seat-
back, and the center shoulder belt is
re-positioned in the guide whenever
the seat-back is in its upright position.
Be sure there are no twists in any
shoulder belt.
Do not put any heavy items on the
seat-back when it is folded down.
51
191
Carrying Cargo
Carbon Monoxide Hazard
Seats
Inst rument s and Cont rols
97
�����—�����—�����y���������������y���
�(�#���������y���
�����y
Page 261 of 413
Once the security system is set,
opening any door, the trunk, or the
hood without using the key or the
remote transmitter will cause it to
alarm. It also alarms if the radio is
removed f rom the dashboard or the
wiring is cut.
The security system helps to protect
your vehicle and valuables f rom thef t.
The horn sounds and a combination
of headlights (low beam), parking
lights, side marker lights, and
taillights f lash if someone attempts
to break into your vehicle or remove
the radio. This alarm continues f or 2
minutes, then it stops. To reset an
alarming system bef ore the 2
minutes have elapsed, unlock the
driver’s door with the key or the
remote transmitter.
The security system automatically
sets 15 seconds after you lock the
doors, hood, and trunk. For the
system to activate, you must lock the
doors f rom the outside with the key,
driver’s lock tab, door lock master
switch, or remote transmitter. The
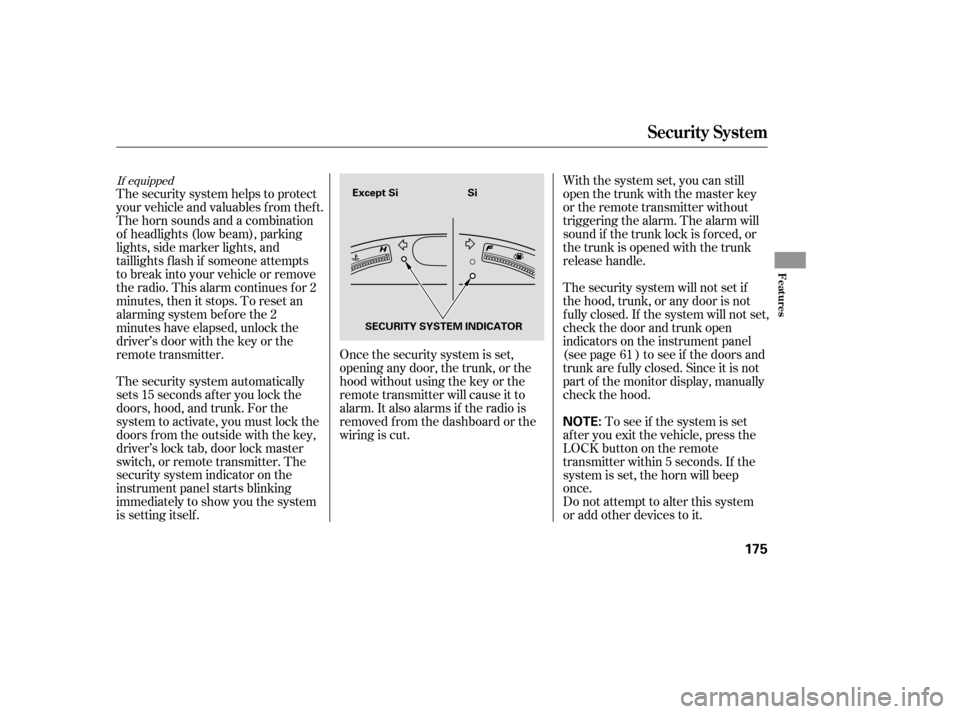
security system indicator on the
instrument panel starts blinking
immediately to show you the system
is setting itself . With the system set, you can still
open the trunk with the master key
or the remote transmitter without
triggering the alarm. The alarm will
sound if the trunk lock is f orced, or
the trunk is opened with the trunk
release handle.
The security system will not set if
the hood, trunk, or any door is not
f ully closed. If the system will not set,
check the door and trunk open
indicators on the instrument panel
(see page ) to see if the doors and
trunk are f ully closed. Since it is not
part of the monitor display, manually
check the hood.
Do not attempt to alter this system
or add other devices to it.
To see if the system is set
af ter you exit the vehicle, press the
LOCK button on the remote
transmitter within 5 seconds. If the
system is set, the horn will beep
once. 61
If equipped
Security System
Features
175
NOTE:
Except Si Si
SECURITY SYSTEM INDICATOR
�����—�����—�����y���
�����������y���
�(�#���������y���
�����y
Page 270 of 413
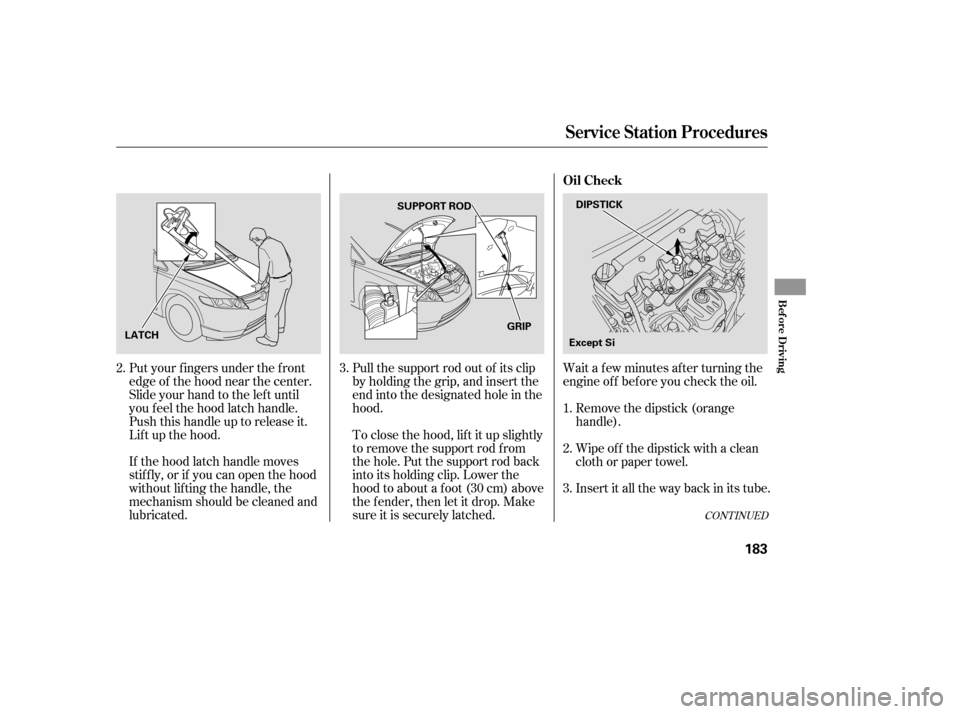
Wait a f ew minutes af ter turning the
engine of f bef ore you check the oil.
Put your f ingers under the f ront
edge of the hood near the center.
Slide your hand to the lef t until
you f eel the hood latch handle.
Push this handle up to release it.
Lif t up the hood.
If the hood latch handle moves
stif f ly, or if you can open the hood
without lifting the handle, the
mechanism should be cleaned and
lubricated. Pull the support rod out of its clip
by holding the grip, and insert the
end into the designated hole in thehood.
To close the hood, lif t it up slightly
to remove the support rod f rom
the hole. Put the support rod back
into its holding clip. Lower the
hood to about a f oot (30 cm) above
the fender, then let it drop. Make
sure it is securely latched.
Remove the dipstick (orange
handle).
Insert it all the way back in its tube.
Wipe of f the dipstick with a clean
cloth or paper towel.
3.
1. 2.
3.
2.
CONT INUED
Service Station Procedures
Oil Check
Bef ore Driving
183
DIPSTICK
SUPPORT ROD
LATCH GRIP
Except Si
�����—�����—�����y���
�����������y���
�(�#���������y���
�����y