Page 209 of 278

Downloaded from www.Manualslib.com manuals search engine CLEANING THE
EXTERIOR
WARNING
If you use a car wash with awaxing cycle, make sure thatyou remove the wax from thewindscreen.
CAUTIONS
Some car wash installations usewater at high pressure. Thiscould damage certain parts of yourvehicle.
Remove the aerial before usingan automatic car wash.
Switch the heater blower off toprevent contamination of thefresh air filter.
We recommend that you wash yourvehicle with a sponge and lukewarmwater containing a car shampoo.
Cleaning the headlamps
CAUTIONS
Do not scrape the headlamplenses or use abrasives orchemical solvents to clean them.
Do not wipe the headlampswhen they are dry.
Cleaning the rear window
CAUTION
Do not scrape the inside of therear window or use abrasives orchemical solvents to clean it.
Use a clean, lint free cloth or a dampchamois leather to clean the insideof the rear window.
Cleaning the chrome trim
CAUTION
Do not use abrasives or chemicalsolvents. Use soapy water.
Body paintworkpreservation
CAUTIONS
Do not polish your vehicle instrong sunshine.
Do not allow polish to touchplastic surfaces. It could bedifficult to remove.
Do not apply polish to thewindscreen or rear window. Thiscould cause the wipers to becomenoisy and they may not clear thewindow properly.
We recommend that you wax thepaintwork once or twice a year.
207
Vehicle care
Page 210 of 278
Downloaded from www.Manualslib.com manuals search engine CLEANING THE INTERIOR
Seat belts
WARNINGS
Do not use abrasives, orchemical solvents to cleanthem.
Do not allow moisture topenetrate the seat belt retractormechanism.
Clean the seat belts with interiorcleaner or water applied with a softsponge. Let the seat belts drynaturally, away from artificial heat.
Instrument cluster screens,LCD screens, radioscreens
WARNING
Do not use abrasives, orchemical solvents to cleanthem.
REPAIRING MINOR PAINT
DAMAGE
CAUTION
Remove apparently harmlesslooking substances from thepaintwork immediately (e.g. birddroppings, tree resins, insectremains, tar spots, road salt andindustrial fall out).
You should repair paintwork damagecaused by stones from the road orminor scratches as soon as possible.A choice of products is available fromyour Ford Dealer. Read and followthe manufacturer’s instructions.
208
Vehicle care
Page 213 of 278

Downloaded from www.Manualslib.com manuals search engine GENERAL INFORMATION
CAUTIONS
Use only approved wheel andtyre sizes. Using other sizescould damage the vehicle and willmake the National Type Approvalinvalid.
If you change the diameter of thetyres from that fitted at thefactory, the speedometer may notdisplay the correct speed. Take thevehicle to your dealer to have theengine management systemreprogrammed.
A decal with tyre pressure data islocated in the driver’s door openingat the B-pillar.
Check and set the tyre pressure atthe ambient temperature in whichyou are intending to drive the vehicleand when the tyres are cold.
CHANGING A ROAD
WHEEL
Spare wheel
Your vehicle is equipped with eithera spare wheel or a tyre repair kit(ContiMobilityKit). See Tyre repairkit (page 217).
All vehicles
WARNINGS
Use only approved wheel andtyre sizes. Using other sizescould damage the vehicle and willmake the National Type Approvalinvalid.
If you change the diameter ofthe tyres from that fitted at thefactory, the speedometer may notdisplay the correct speed. Take thevehicle to your dealer to have theengine management systemreprogrammed.
Vehicles with a temporaryspare wheel
WARNINGS
If the spare wheel differs fromthe other fitted wheels, theserules must be followed:
Do not exceed 80 km/h (50mph).
Drive the shortest possibledistances.
Do not fit more than one sparewheel on your vehicle at anyone time.
Do not use snow chains on thistype of wheel.
Do not drive through anautomatic car wash.
211
Wheels and tyres
Page 214 of 278

Downloaded from www.Manualslib.com manuals search engine Vehicles with stability control
Vehicles with ESP may exhibit someunusual driving characteristics. Switchthe ESP off. See Using stabilitycontrol (page 161).
All vehicles
Note:The spare wheel is locatedunder the floor cover in the luggagecompartment.
•Raise the rear of the floor cover inthe luggage compartment.
1.Completely unscrew the boltanticlockwise.
2.Lift out the spare wheel.
3.Remove the jack which is locatedbeneath the spare wheel.
4.Install the defective wheel in thereverse order.
Vehicle jack
WARNINGS
The vehicle jack supplied withyour vehicle should only be usedwhen changing a wheel inemergency situations.
Before using the vehicle jack,check that it is not damaged ordeformed and that the thread islubricated and free from foreignmatter.
Never place anything betweenthe jack and the ground, or thejack and the vehicle.
Note:The vehicle jack is located inthe underfloor storage compartmentunder the spare wheel.
Note:Vehicles with a tyre repair kitor run flat tyres are not equipped witha vehicle jack or a wheel brace.
It is recommended to use aworkshop type hydraulic jack forchanging between summer andwinter tyres.
Note:Use a jack with a minimumlifting capacity of 1.5 tonnes and alifting plate with a minimum diameterof 80 millimetres (3.1 inches).
212
Wheels and tyresE72563 E72564
Page 217 of 278

Downloaded from www.Manualslib.com manuals search engine Removing a wheel
All vehicles
WARNINGS
Park your vehicle in such aposition that neither the trafficnor you are hindered or endangered.
Set up a warning triangle.
Make sure that the vehicle is onfirm, level ground with thewheels pointing straight ahead.
WARNINGS
Switch off the ignition and applythe parking brake.
If your vehicle has a manualtransmission, select first orreverse gear. If it has an automatictransmission, select park.
Have the passengers leave thevehicle.
Secure the diagonally oppositewheel with an appropriate blockor wheel chock.
Make sure that the arrows ondirectional tyres point in thedirection of rotation when the vehicleis moving forwards. If you have to fita spare wheel with the arrowspointing in the opposite direction,have the tyre refitted in the correctdirection by a properly trainedtechnician.
Do not work underneath thevehicle when it is supported onlyby a jack.
Make sure that the jack isvertical to the jacking point andthe base is flat on the ground.
CAUTION
Do not lay alloy wheels facedown on the ground, this willdamage the paint.
215
Wheels and tyresE92932 E93020
Page 219 of 278

Downloaded from www.Manualslib.com manuals search engine All vehicles
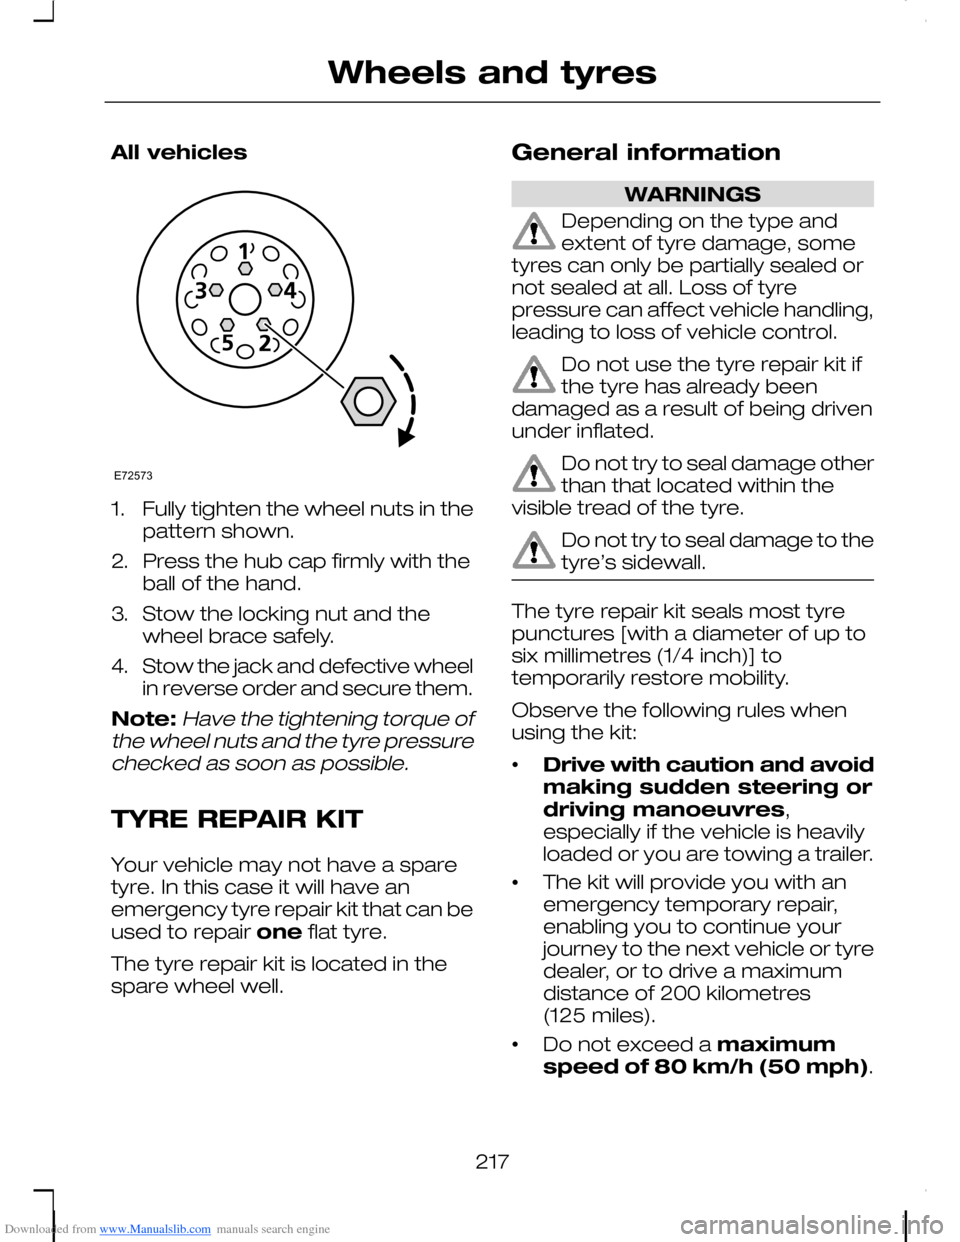
1.Fully tighten the wheel nuts in thepattern shown.
2.Press the hub cap firmly with theball of the hand.
3.Stow the locking nut and thewheel brace safely.
4.Stow the jack and defective wheelin reverse order and secure them.
Note:Have the tightening torque ofthe wheel nuts and the tyre pressurechecked as soon as possible.
TYRE REPAIR KIT
Your vehicle may not have a sparetyre. In this case it will have anemergency tyre repair kit that can beused to repair one flat tyre.
The tyre repair kit is located in thespare wheel well.
General information
WARNINGS
Depending on the type andextent of tyre damage, sometyres can only be partially sealed ornot sealed at all. Loss of tyrepressure can affect vehicle handling,leading to loss of vehicle control.
Do not use the tyre repair kit ifthe tyre has already beendamaged as a result of being drivenunder inflated.
Do not try to seal damage otherthan that located within thevisible tread of the tyre.
Do not try to seal damage to thetyre’s sidewall.
The tyre repair kit seals most tyrepunctures [with a diameter of up tosix millimetres (1/4 inch)] totemporarily restore mobility.
Observe the following rules whenusing the kit:
•Drive with caution and avoidmaking sudden steering ordriving manoeuvres,especially if the vehicle is heavilyloaded or you are towing a trailer.
•The kit will provide you with anemergency temporary repair,enabling you to continue yourjourney to the next vehicle or tyredealer, or to drive a maximumdistance of 200 kilometres(125 miles).
•Do not exceed a maximumspeed of 80 km/h (50 mph).
217
Wheels and tyresE72573
Page 220 of 278

Downloaded from www.Manualslib.com manuals search engine •Keep the kit out of the reach ofchildren.
•Only use the kit when the ambienttemperature is between –30°C(-22°F) and +70°C (+158°F).
Using the tyre repair kit
WARNINGS
Compressed air can act as anexplosive or propellant.
Never leave the tyre repair kitunattended while in use.
CAUTION
Do not keep the compressoroperating for more than 10minutes.
Note:Use the tyre repair kit only forthe vehicle with which it was supplied.
•Park your vehicle at the roadsideso that you do not obstruct theflow of traffic and so that you areable to use the kit without beingin danger.
•Apply the parking brake, even ifyou have parked on a level road,to make sure that the vehicle willnot move.
•Do not attempt to remove foreignobjects like nails or screwspenetrating the tyre.
•Leave the engine running whilethe kit is in use, but not if thevehicle is in an enclosed or poorlyventilated area (for example,inside a building). In thesecircumstances, switch thecompressor on with the engineturned off.
•Replace the sealant bottle with anew one before the expiry date(see top of bottle) is reached.
•Inform all other users of thevehicle that the tyre has beentemporarily sealed with the tyrerepair kit and make them awareof the special driving conditions tobe observed.
Inflating the tyre
WARNINGS
Check the sidewall of the tyreprior to inflation. If there are anycracks, bumps or similar damage, donot attempt to inflate the tyre.
Do not stand directly beside thetyre while the compressor ispumping.
Watch the sidewall of the tyre.If any cracks, bumps or similardamage appear, turn off thecompressor and let the air out bymeans of the pressure relief valve B.Do not continue driving with this tyre.
The sealant contains naturalrubber latex. Avoid contact withskin and clothing. If this happens,rinse the affected areas immediatelywith plenty of water and contact yourdoctor.
218
Wheels and tyres
Page 221 of 278
Downloaded from www.Manualslib.com manuals search engine WARNINGS
If the tyre inflation pressure doesnot reach 1.8 bar (26 psi) withinseven minutes, the tyre may havesuffered excessive damage, makinga temporary repair impossible. In thiscase, do not continue driving with thistyre.
CAUTION
Screwing the bottle onto thebottle holder will pierce the sealof the bottle. Do not unscrew thebottle from the holder as the sealantwill escape.
219
Wheels and tyres