Page 9 of 46

MOITOR -
REMOTE
CONTROL -
HEADPHONES
8
BASIC
OPERATIONS -
REGULATIONS
PLAYABLE DISCS -
OPERATIONS
WITH DISC
FUNCTIONS
DVD SETTING
MENU
MAINTENANCE - LANGUAGE CODES - INFORMATION
MONITOR
TROUBLESHOOTING -
SPECIFICATIONS
PRESENTATION -
IMPORTANT
REMARKS AND
PRECAUTIONS
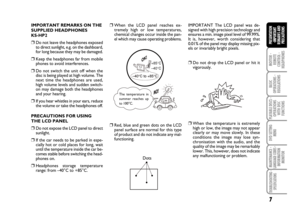
❒Operating temperature range:
from –20°C to +60°CFORCED DISC EJECTION
If the disc is not acknowledged by the
monitor or cannot be ejected, hold the
“eject” button pressed for approx. 5 sec-
onds with the unit on.
IMPORTANT Be careful and do not drop
the disc when it is released.
READING THIS MANUAL
For easier understanding, the instructions
are provided as follows.
❒Suggestions and related remarks are il-
lustrated in “Additional information on
the monitor” (see pages 37 to 40).
❒Button/key operation is illustrated ex-
clusively in figures as follows:
–20°C or lower
60°C or higher
Monitor only
The disc comes out
Press slightly.
Press several
times.
Press either of
the two buttons.
Hold the button
pressed until
reaching the
desired effect.
Press the two
buttons simultane-
ously and hold
them pressed.
604_39_712 DVD Croma GB 3-06-2008 16:27 Pagina 8
Page 10 of 46

9
BASIC
OPERATIONS -
REGULATIONS
PLAYABLE DISCS -
OPERATIONS
WITH DISC
FUNCTIONS
DVD SETTING
MENU
MAINTENANCE - LANGUAGE CODES - INFORMATION
MONITOR
TROUBLESHOOTING -
SPECIFICATIONS
PRESENTATION
-IMPORTANT
REMARKS AND
PRECAUTIONS
W W W W
I I I I
D D D D
E E E E
S S S S
C C C C
R R R R
E E E E
E E E E
N N N N
M M M M
O O O O
N N N N
I I I I
T T T T
O O O O
R R R R
COMPONENT
IDENTIFICATION
1Infrared transmitter
2Disc tray
3Dome lights
4Screen box
5Screen (LCD panel)
6Button
˚(eject)7Button
¸(play/pause)
8Button
I¯¯(jump back)
9Button
˙˙I(jump fwd)
10MODE button
11Button
g(standby)
• When pressed, this button switches
the unit on.
• When held pressed, this button
switches the unit off.12Remote control sensor
13“Open” button
14Dome light switch
• Refer to section “Enabling the door
sensor” on page 14.
15AV1 INPUT terminals
IMPORTANT If you watch the screen
from an angle and not directly, the image
may not appear clear. This does not in-
dicate any malfunctioning. The watcher
perceives the best image quality when s/he
sits opposite the screen.
MOITOR -
REMOTE
CONTROL -
HEADPHONES
604_39_712 DVD Croma GB 3-06-2008 16:27 Pagina 9
Page 11 of 46

BASIC
OPERATIONS -
REGULATIONS
PRESENTATION -
IMPORTANT
REMARKS AND
PRECAUTIONS
MOITOR -
REMOTE
CONTROL -
HEADPHONES
10
PLAYABLE DISCS -
OPERATIONS
WITH DISC
FUNCTIONS
DVD SETTING
MENU
MAINTENANCE - LANGUAGE CODES - INFORMATION
MONITOR
TROUBLESHOOTING -
SPECIFICATIONS
R R R R
E E E E
M M M M
O O O O
T T T T
E E E E
C C C C
O O O O
N N N N
T T T T
R R R R
O O O O
L L L L
- - - -
R R R R
M M M M
- - - -
R R R R
K K K K
2 2 2 2
3 3 3 3
1 1 1 1
INSTALLING THE LITHIUM
BATTERY (CR2025)
OPERATIONS PRIOR TO
REMOTE CONTROL USE
❒Direct the remote control towards the
monitor control sensor. Make sure that
the infrared ray is not hindered by any
obstacle.
❒Do not expose the remote control sen-
sor to intense direct sunlight or artifi-
cial lights.IMPORTANT REMARKS
❒Store the battery away from children.
Immediately go to a doctor if a child
swallows the battery.
❒Do not recharge, remove, heat the bat-
tery and do not place it close to free
flames. In these cases the battery may
produce heat, break down or go on fire.
❒Do not place the battery with other
metals. In this case the battery may pro-
duce heat, break down or go on fire.
❒When disposing of/storing the battery,
wrap it in insulating film. If it is not
wrapped, the battery may produce heat,
break down or go on fire.
❒Do not punch the battery with metal
nails or similar tools.MAIN COMPONENTS AND
FEATURES
Monitor
1MODE button
• Enables selection of the source of
signal to be played.
2ASPECT button
• Enables changing the aspect ratio of
the image.
Remote control
sensor
604_39_712 DVD Croma GB 3-06-2008 16:27 Pagina 10
Page 12 of 46

BASIC
OPERATIONS -
REGULATIONS
PRESENTATION
-IMPORTANT
REMARKS AND
PRECAUTIONS
11
MOITOR -
REMOTE
CONTROL -
HEADPHONES
PLAYABLE DISCS -
OPERATIONS
WITH DISC
FUNCTIONS
DVD SETTING
MENU
MAINTENANCE - LANGUAGE CODES - INFORMATION
MONITOR
TROUBLESHOOTING -
SPECIFICATIONS
3MENU button
• Enables calling up the menu and se-
lecting the menu settable items.
4Buttons
2/3
• Enable setting the level of the se-
lected item or selecting the correct
setting for the selected item.
DVD
5Buttons for disc basic operations
■(stop), ˙(play), ❙❙(pause)
• Button
˙(play): is also used as a
ZOOM when pressed simultane-
ously with SHIFT.
6Buttons for advanced disc functions
• /TITLE
N/ O
Is used to select the titles (for DVD)
or folders (for MP3/ WMA /WAV/
JPEG/ MPEG-1/ MPEG-2/ DivX)*
1.
•
I¯¯/ ˙˙I(jump back/fwd)*2
• I¯¯/ ˙˙I(search back/search
fwd)*3
7TOP M button (menu)*4
• Is used to view the DVD and DivX
disc menu.
• Is used to reset disc playing in PBC
mode (for VCD).
8SETUP button*
4
9SHIFT button
10OSD button
• Is used to view the on-screen bar.
• Is also used as a button /TITLE
when pressed simultaneously with
SHIFT.
Use the numerical keys (see right-hand
column) to directly select the titles
(for DVD) or folders (for MP3/
WMA/WAV/ JPEG/ MPEG-1/ MPEG-
2/ DivX).
11MENU*
4button
• Is used to view the DVD and DivX
disc menu.
• Is used to reset disc playing in PBC
mode (for VCD).
12Buttons for menu*
4
• Cursor and ENTER
button
13RETURN button*
4
14Special function keys
• DVD/VCD/DivX: (audio)
• DVD/DivX: (subtitles)*
4
• DVD: (tilting)
*1These buttons work as numerical keys +10/– 10
when pressed simultaneously with SHIFT.
*
2These buttons work as numerical keys +100/–100
when pressed simultaneously with SHIFT button.
*
3They are not used for operations with JPEG files.
*4These buttons work as numerical keys when pressed
simultaneously with SHIFT button.
Selecting a number
❒Selecting a number ranging between 0
and 9:
❒Selecting a number above 9:
❒The buttons +100/–100 are used to run
a search of track numbers above 99
(this function is not supplied for
CD/DVD/VCD discs).
604_39_712 DVD Croma GB 3-06-2008 16:27 Pagina 11
Page 13 of 46

BASIC
OPERATIONS -
REGULATIONS
PRESENTATION -
IMPORTANT
REMARKS AND
PRECAUTIONS
MOITOR -
REMOTE
CONTROL -
HEADPHONES
12
PLAYABLE DISCS -
OPERATIONS
WITH DISC
FUNCTIONS
DVD SETTING
MENU
MAINTENANCE - LANGUAGE CODES - INFORMATION
MONITOR
TROUBLESHOOTING -
SPECIFICATIONS
Played sounds can be listened to wearing
wireless headphones KS-HP2.
BATTERY INSTALLATION
H H H H
E E E E
A A A A
D D D D
P P P P
H H H H
O O O O
N N N N
E E E E
S S S S
- - - -
K K K K
S S S S
- - - -
H H H H
P P P P
2 2 2 2
Batteries
(R03/AAA)
- Supplied for initial
setup only.
IMPORTANT REMARKS
❒The batteries supplied are not
rechargeable. DO NOT attempt to
recharge them: acid may leak out or ex-
plosions take place.
❒Acid leaking and explosions are pre-
vented by installing the batteries so that
their poles, “+” and “–”, are in the cor-
rect direction.OPERATIONS PRIOR TO USING
THE WIRELESS HEADPHONES
The best performance is obtained from
the headphones when they are used at ap-
prox. 1.8 m from IR transmitters. These
headphones were designed to receive in-
frared rays (IR) from the IR transmitter
of the monitor. This means that, when the
headphones are used in positions where
the signal does not arrive, noise is heard.
Infrared transmitter
MAIN COMPONENTS AND
FEATURES
Left-hand sideRight-hand side
1Infrared sensors
• Do not cover the infrared sensors:
this prevents reception.
2ON/OFF button
• Is used to switch the headphones on
or off.
• The unit is disabled automatically in
the following cases:
when the headphones are not used for
approx. 4 hours;
when no signal is received for approx.
4 minutes.
3POWER indicator
4VOL (volume) test
Audio is conveyed to the wireless head-
phones by an infrared transmitter.
To enable headphones operation select
HEADPHONES or HEADPHONES/AUX
in the AUDIO option of the monitor
menu (see page 16).
IMPORTANT Do not wear the head-
phones while driving. It prevents hearing
external sounds, which poses risks and
causes serious accidents.
604_39_712 DVD Croma GB 3-06-2008 16:27 Pagina 12
Page 14 of 46
PLAYABLE DISCS -
OPERATIONS
WITH DISC
FUNCTIONS
MOITOR -
REMOTE
CONTROL -
HEADPHONES
13
BASIC
OPERATIONS -
REGULATIONS
DVD SETTING
MENU
MAINTENANCE - LANGUAGE CODES - INFORMATION
MONITOR
TROUBLESHOOTING -
SPECIFICATIONS
PRESENTATION
-IMPORTANT
REMARKS AND
PRECAUTIONS1 - Opening the LCD panel
Press the open button to release the LCD panel and open it using both hands.
B B B B
A A A A
S S S S
I I I I
C C C C
O O O O
P P P P
E E E E
R R R R
A A A A
T T T T
I I I I
O O O O
N N N N
S S S S
IMPORTANT REMARKS
❒When the system is not in use, close the LCD panel and store it in the screen box
in order to have good visibility of the driving mirror.
❒Do not touch the surface of the LCD panel with your fingers.
❒When the LCD panel is closed, store it in its box pushing it until it blocks.2 - Switching the apparatus on
Monitor only
604_39_712 DVD Croma GB 3-06-2008 16:27 Pagina 13
Page 15 of 46

PLAYABLE DISCS -
OPERATIONS
WITH DISC
FUNCTIONS
MOITOR -
REMOTE
CONTROL -
HEADPHONES
14
BASIC
OPERATIONS -
REGULATIONS
DVD SETTING
MENU
MAINTENANCE - LANGUAGE CODES - INFORMATION
MONITOR
TROUBLESHOOTING -
SPECIFICATIONS
PRESENTATION -
IMPORTANT
REMARKS AND
PRECAUTIONS
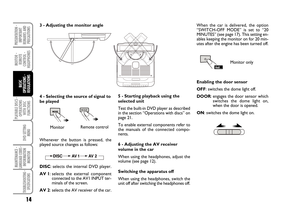
3 - Adjusting the monitor angle
4 - Selecting the source of signal to
be played
MonitorRemote control
Whenever the button is pressed, the
played source changes as follows:
DISC: selects the internal DVD player.
AV 1: selects the external component
connected to the AV1 INPUT ter-
minals of the screen.
AV 2: selects the AV receiver of the car.5 - Starting playback using the
selected unit
Test the built-in DVD player as described
in the section “Operations with discs” on
page 21.
To enable external components refer to
the manuals of the connected compo-
nents.
6 - Adjusting the AV receiver
volume in the car
When using the headphones, adjust the
volume (see page 12).
Switching the apparatus off
When using the headphones, switch the
unit off after switching the headphones off. When the car is delivered, the option
“SWITCH-OFF MODE” is set to “20
MINUTES” (see page 17). This setting en-
ables keeping the monitor on for 20 min-
utes after the engine has been turned off.
Monitor only
Enabling the door sensor
OFF: switches the dome light off.
DOOR: engages the door sensor which
switches the dome light on,
when the door is opened.
ON: switches the dome light on.
604_39_712 DVD Croma GB 3-06-2008 16:27 Pagina 14
Page 16 of 46

PLAYABLE DISCS -
OPERATIONS
WITH DISC
FUNCTIONS
15
MOITOR -
REMOTE
CONTROL -
HEADPHONES
BASIC
OPERATIONS -
REGULATIONS
DVD SETTING
MENU
MAINTENANCE - LANGUAGE CODES - INFORMATION
MONITOR
TROUBLESHOOTING -
SPECIFICATIONS
PRESENTATION
-IMPORTANT
REMARKS AND
PRECAUTIONS
R R R R
E E E E
G G G G
U U U U
L L L L
A A A A
T T T T
I I I I
O O O O
N N N N
S S S S
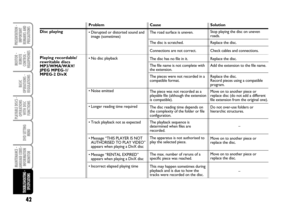
USING THE MONITOR MENU
Indications and sound can be adjusted as desired from the rele-
vant menu.
Refer to the table on page 16 for the list of adjustable values.
When the car is delivered, the language selected for the moni-
tor menu is English.
The LANGUAGE option must be set again to change the mon-
itor language.
Two MENU buttons are supplied on the remote control
RM-RK231.
Use the MENU button of the remote control MONITOR area.
IMPORTANT To browse the monitor menu use the remote con-
trol only.Basic procedure
1 - View the menu.
Current
menu item
As soon as another operation is performed, or if no operation
at all is performed for approx. 5 seconds, the menu disappears.
2 - Select the element to be set.
3 - Set the level of the selected element
(or select the correct setting for the selected element).
❒The figure shows the menu appearing when “ITALIAN” is set
in the LANGUAGE menu.
604_39_712 DVD Croma GB 3-06-2008 16:27 Pagina 15