2008 DODGE AVENGER cooling
[x] Cancel search: coolingPage 81 of 467

Do not run the engine in a closed garage or in confined
areas any longer than needed to move your vehicle in or
out of the area.
If it is necessary to sit in a parked vehicle with the engine
running, adjust your heating or cooling controls to force
outside air into the vehicle. Set the blower at high speed.
WARNING!If you are required to drive with the deck lid open,
make sure that all windows are closed, and the
climate control blower switch is set at high speed.
DO NOT use the recirculation mode. Safety Checks You Should Make Inside The
Vehicle
Seat Belts
Inspect the belt system periodically, checking for cuts,
frays and loose parts. Damaged parts must be replaced
immediately. Do not disassemble or modify the system.
Front seat belt assemblies must be replaced after a
collision. Rear seat belt assemblies must be replaced after
a collision if they have been damaged (bent retractor, torn
webbing, etc.). If there is any question regarding belt or
retractor condition, replace the belt.
Airbag Light
The light should come on and remain on for six to eight
seconds as a bulb check when the ignition switch is first
turned ON. If the LED is not lit during starting, have it
checked. If the light stays on or comes on while driving,
have the system checked by an authorized dealer. THINGS TO KNOW BEFORE STARTING YOUR VEHICLE 79
2
Page 164 of 467

The cooling bin will hold up to four, standing, 12 ounce,
beverage cans. The cooler bin is also equipped with a soft
molded liner that is removable for easy cleaning.
Inside the bin is a vent which, when opened, allows
either air conditioned or fresh air to flow into the storage
bin. Depending on ambient temperature and A/C set-
ting, the bin can keep beverages cool.
For the Cooler Storage Bin to operate properly, door must
remain closed while vehicle is in operation.
Shut off the beverage cooler when not in use, by closing
the vent inside. This will prevent cool air from entering
the passenger compartment when in heat mode.
NOTE: The use of the Beverage Cooler Storage Bin is for
non-perishable beverages only. The Glove Compartment is located beneath the beverage
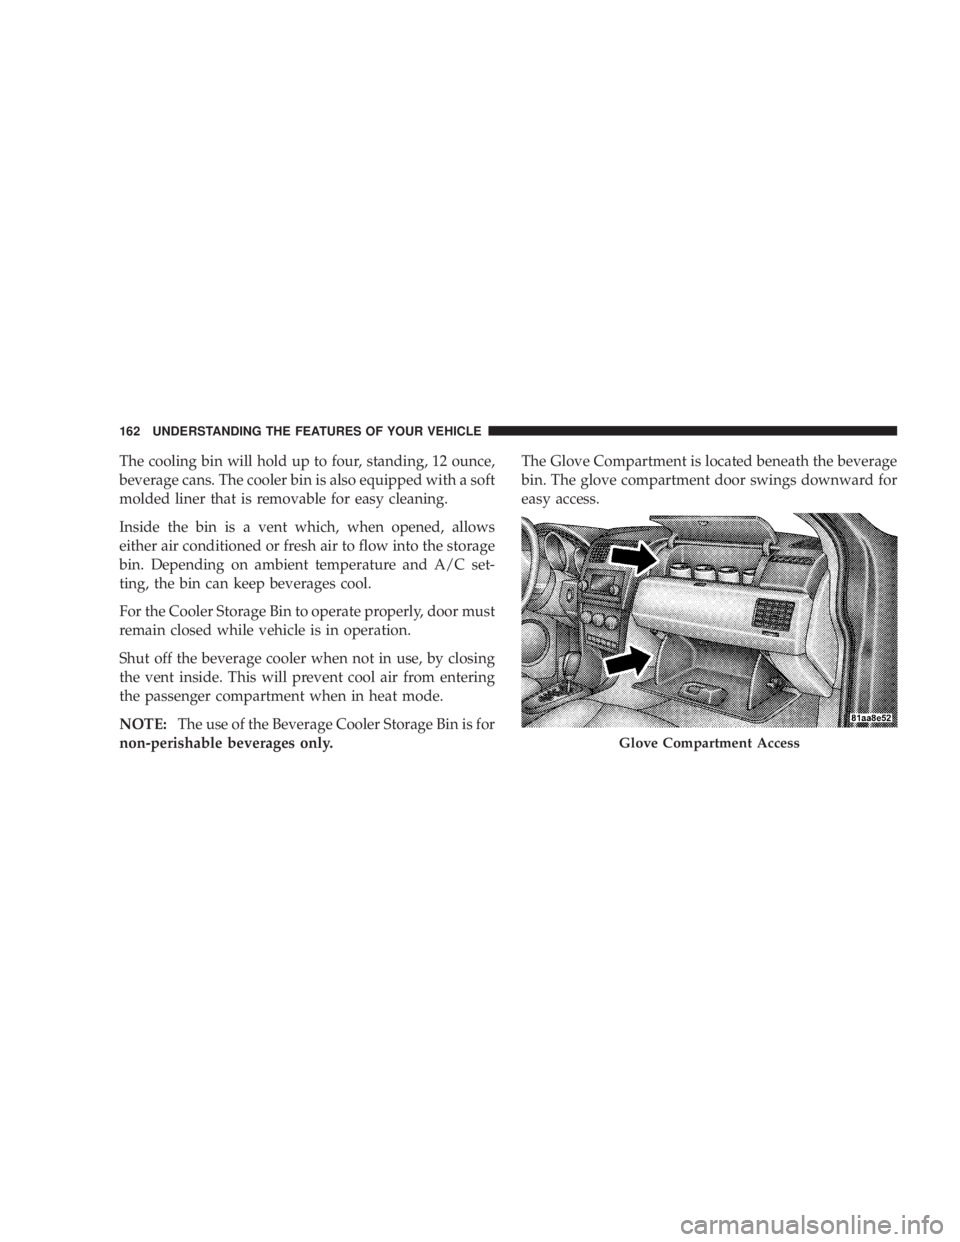
bin. The glove compartment door swings downward for
easy access.
Glove Compartment Access162 UNDERSTANDING THE FEATURES OF YOUR VEHICLE
Page 172 of 467

INSTRUMENT CLUSTER DESCRIPTIONS
1. Fuel Gauge
When the ignition switch is in the ON position, the
pointer will show the level of fuel remaining in the
fuel tank.
2. Fuel Door Reminder
This is a reminder that the Fuel Filler Door is
located on the left side of the vehicle.
3. Temperature Gauge
The temperature gauge shows engine coolant tem-
perature. Any reading below the red area of the
gauge shows that the engine cooling system is
operating properly. The gauge pointer may show a
higher than normal temperature when driving in hot
weather, up mountain grades, in heavy stop and go
traffic, or when towing a trailer. If the pointer rises to the H (red) mark, the instrument
cluster will sound a chime. Pull over and stop the vehicle.
Idle the vehicle with the air conditioner turned off until
the pointer drops back into the normal range. If the
pointer remains on the H (red) mark, turn the engine off
immediately and call for service.
There are steps that you can take to slow down an
impending overheat condition. If your air conditioning is
on, turn it off. The air conditioning system adds heat to
the engine cooling system and turning off the A/C
removes this heat. You can also turn the Temperature
control to maximum heat, the Mode control to Floor and
the Fan control to High. This allows the heater core to act
as a supplement to the radiator and aids in removing heat
from the engine cooling system.
4. Speedometer
Indicates vehicle speed in miles per hour Ð MPH.170 UNDERSTANDING YOUR INSTRUMENT PANEL
Page 248 of 467

² MAX A/C
For maximum cooling use the A/C and recirculation
buttons at the same time.
² Economy Mode
If economy mode is desired, press the A/C button to turn
off the indicator light and the A/C compressor. Then,
move the temperature control to the desired temperature. Automatic Temperature Control (ATC) Ð If
Equipped
Automatic Operation
The Infrared Climate Control System automatically
maintains the climate in the cabin of the vehicle at the
comfort levels desired by the driver and passenger. To
accomplish this, the system gathers information from the246 UNDERSTANDING YOUR INSTRUMENT PANEL
Page 249 of 467

cabin infrared sensor mounted between the sun-visors
and from various sensors located throughout the vehicle.
The controls on the climate control provide the system
with operator input. Other sensors take account of ve-
hicle speed, A/C pressure, outside temperature, and
engine cooling temperature. Using all of these inputs, the
system automatically adjusts airflow temperature, air-
flow distribution, airflow volume, and the amount of
outside air recirculation. This maintains a comfortable
temperature even under changing conditions.
Operation of the system is quite simple.
1. Turn the Mode Control knob (on the right) and the
Blower Control knob (on the left) to AUTO.
NOTE: The AUTO position performs best for front seat
occupants only. 2. Dial in the temperature you would
like the system to maintain by rotating
the Temperature Control knob.
Once the comfort level is selected, the system will main-
tain that level automatically using the heating system.
Should the desired comfort level require air conditioning,
the system will automatically make the adjustment.
You will experience the greatest efficiency by simply
allowing the system to function automatically. Selecting
the ªOº (Off) position on the blower control stops the
system completely and closes the outside air intake.
72ÉF (22ÉC) is the recommended setting for maximum
comfort for the average person; however, this may vary. UNDERSTANDING YOUR INSTRUMENT PANEL 247
4
Page 254 of 467

² Extended use of recirculation may cause the windows
to fog. If the interior of the windows begins to fog,
press the RECIRCULATION button to return to out-
side air. Some temp/humidity conditions will cause
captured interior air to condense on windows and
hamper visibility. For this reason, the system will not
allow Recirculation to be selected while in floor, de-
frost, or defrost/floor mode. Attempting to use the
Recirculation while in these modes will cause the LED
in the CONTROL button to blink and then turn off.
² Most of the time, when in Automatic Operation, you
can temporarily put the system into Recirculation
mode by pressing the RECIRCULATION button.
However, under certain conditions, while in Auto-
matic Mode, the system is blowing air out the defrost
vents. When these conditions are present, and the
RECIRCULATION button is pressed, the indicator will
flash and then turn off. This tells you that you are
unable to go into recirculation mode at this time. If you would like the system to go into Recirculation mode,
you must first move the Mode Knob to Panel, Panel/
Floor and then press the RECIRCULATION button.
This feature reduces the possibility of window fog-
ging.
Operating Tips
NOTE: Refer to the chart at the end of this section for
suggested control settings for various weather condi-
tions.
Summer Operation
The engine cooling system in air-conditioned vehicles
must be protected with a high-quality antifreeze coolant
to provide proper corrosion protection and to protect
against engine overheating. A 50% solution of ethylene
glycol antifreeze coolant in water is recommended. Refer
to ªMaintenance Proceduresº in Section 7 of this manual
for proper coolant selection.252 UNDERSTANDING YOUR INSTRUMENT PANEL
Page 346 of 467

Automatic Transaxle
The DRIVE range can be selected when towing. How-
ever, if frequent shifting occurs while in this range, third
gear for a four-speed automatic and the fifth gear for a
six-speed AutoStick t should be selected.
NOTE: Using third or fifth instead of DRIVE while
operating the vehicle under heavy operating conditions,
will improve performance and extend transaxle life by
reducing excessive shifting and heat build-up. This ac-
tion will also provide better engine braking.
If you REGULARLY TOW a trailer for more than 45
minutes of continuous operation, then change the auto-
matic transaxle fluid and filter according to the interval
specified for ªpolice, taxi, fleet, or frequent trailer tow-
ingº in the ªMaintenance Scheduleº in this manual.
NOTE: Check the four-speed automatic transaxle fluid
level before towing. AutoStick t sixÐspeed transmission is sealed and the fluid level cannot be checked. See your
authorized dealership service center for assistance.
Electronic Speed Control Ð (If Equipped)
² Don't use in hilly terrain or with heavy loads.
² When using the speed control, if you experience speed
drops greater than 10 mph (16 km/h), disengage until
you can get back to cruising speed.
² Use speed control in flat terrain and with light loads to
maximize fuel efficiency.
Cooling System
To reduce potential for engine and transaxle overheating,
take the following actions:
² City Driving
When stopped for short periods of time, put transaxle in
neutral and increase engine idle speed.344 STARTING AND OPERATING
Page 347 of 467

² Highway Driving
Reduce speed.
² Air Conditioning
Turn off temporarily.
² Refer to Cooling System Operating information in the
Maintenance section of this manual for more informa-
tion.
If you have any questions or concerns after reviewing
this section, please consult your authorized dealer to for
full details on the towing capabilities of the vehicle. RECREATIONAL TOWING (BEHIND
MOTORHOME, ETC.)
Towing This Vehicle Behind Another Vehicle (Flat
towing with all four wheels on the ground)
CAUTION!DO NOT flat tow this vehicle. Damage to the driv-
etrain will result.
NOTE: If the vehicle requires towing make sure all four
wheels are off the ground. STARTING AND OPERATING 345
5