Page 253 of 531
Sound Horn with Remote Key Lock
When ON is selected, a short horn sound will occur when
the remote keyless entry LOCK button is pressed. This
feature may be selected with or without the flash lights
on lock/unlock feature. To make your selection, press
and release the RESET button until ON or OFF appears.
Flash Lights with Remote Key Lock
When ON is selected, the front and rear turn signals will
flash when the doors are locked or unlocked with the
remote keyless entry transmitter. This feature may be
selected with or without the sound horn on lock feature
selected. To make your selection, press and release the
RESET button until ON or OFF appears.
Automatic High Beams Ð If Equipped
When this feature is selected, the high beam headlights
will deactivate automatically under certain conditions. To
make your selection, press and release the FUNCTIONSELECT button until YES (Y) or NO (N) appears. Refer to
ªLights/SmartBeams Ð If Equippedº in Section 3 of this
manual for more information.
Headlights On with Wipers (Available with Auto
Headlights Only)
When YES (Y) is selected, and the headlight switch is in
the AUTO position, the headlights will turn on approxi-
mately 10 seconds after the wipers are turned on. The
headlights will also turn off when the wipers are turned
off if they were turned on by this feature. To make your
selection, press and release the FUNCTION SELECT
button until YES (Y) or NO (N) appears.
NOTE:Turning the headlights on during the daytime
causes the instrument panel lights to dim. To increase the
brightness, refer to ªLightsº in Section 3 of this manual.
Delay Turning Headlights Off
When this feature is selected, the driver can choose to
have the headlights remain on for 0, 30, 60, or 90 seconds
UNDERSTANDING YOUR INSTRUMENT PANEL 251
4
Page 254 of 531

when exiting the vehicle. To make your selection, press
and release the RESET button until 0, 30, 60, or 90
appears.
Turn Headlights On with Remote Key Unlock
When this feature is selected, the headlights will activate
and remain on for up to 90 seconds when the doors are
unlocked with the remote keyless entry transmitter. To
make your selection, press and release the RESET button
until OFF, 30 sec., 60 sec., or 90 sec. appears.
Delay Power Off to Accessories Until Exit
When this feature is selected, the power window
switches, radio, hands±free system (if equipped), DVD
video system (if equipped), power sunroof (if equipped),
and power outlets will remain active for up to 10 minutes
after the ignition switch is turned off. Opening a vehicle
door will cancel this feature. To make your selection,
press and release the RESET button until Off, 45 sec., 5
min., or 10 min. appears.
Rear Park Assist System Ð If Equipped
When ENABLE is selected, the Rear Park Assist System is
activated. When DISABLE is selected, the System is
deactivated and, the instrument cluster will display the
9PARK ASSIST DISABLED9message.
Display Units of Measure in
The EVIC, odometer, and navigation system (if
equipped) can be changed between English and Metric
units of measure. To make your selection, press and
release the RESET button until US or METRIC appears.
RADIO GENERAL INFORMATION
RADIO BROADCAST SIGNALS
Your radio will provide excellent reception under most
operating conditions. Like any system, however, car
radios have performance limitations, due to mobile op-
eration and natural phenomena, which might lead you to
believe your sound system is malfunctioning. To help
252 UNDERSTANDING YOUR INSTRUMENT PANEL
Page 311 of 531
Rear Blower Control
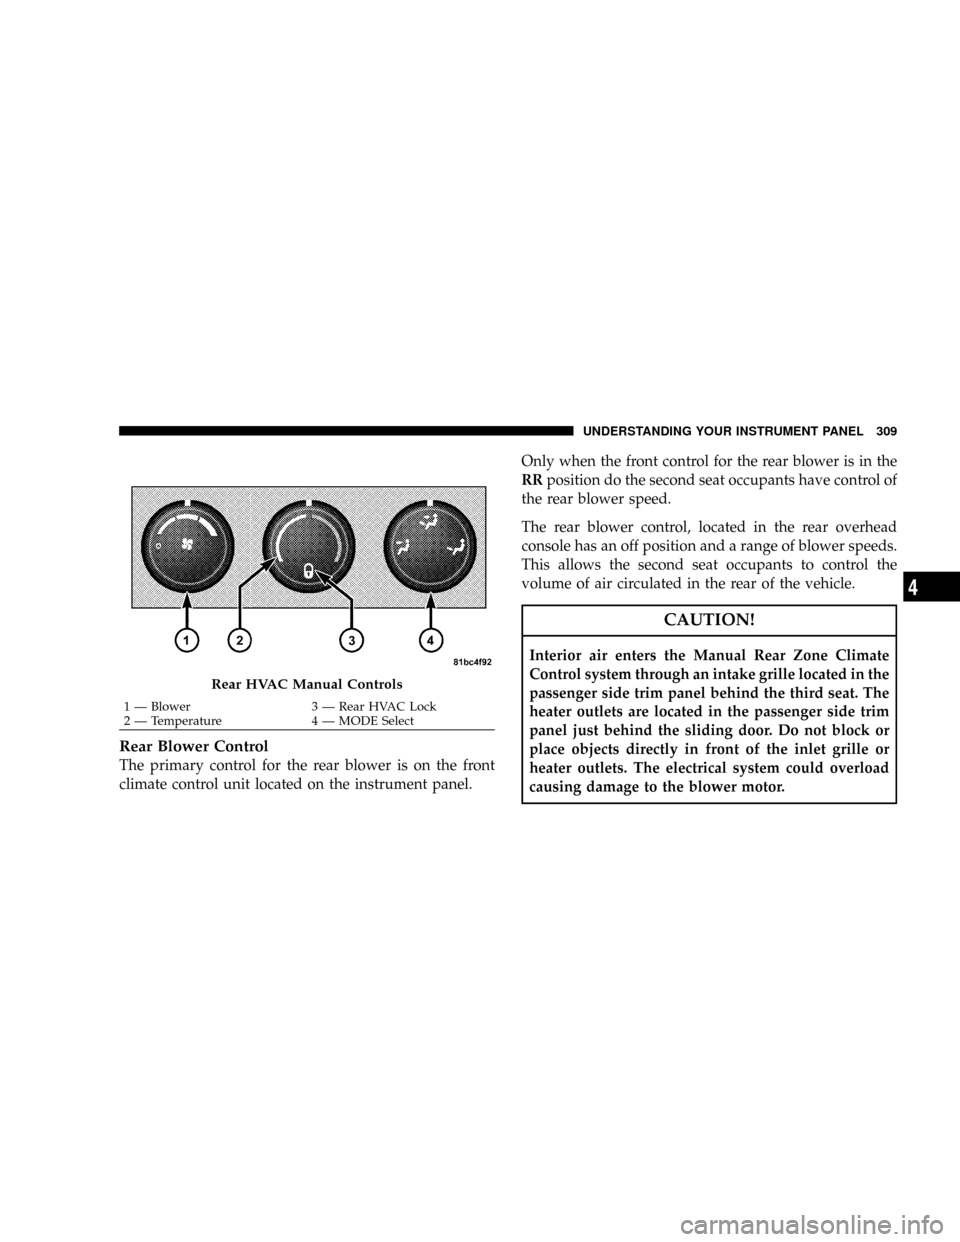
The primary control for the rear blower is on the front
climate control unit located on the instrument panel.Only when the front control for the rear blower is in the
RRposition do the second seat occupants have control of
the rear blower speed.
The rear blower control, located in the rear overhead
console has an off position and a range of blower speeds.
This allows the second seat occupants to control the
volume of air circulated in the rear of the vehicle.
CAUTION!
Interior air enters the Manual Rear Zone Climate
Control system through an intake grille located in the
passenger side trim panel behind the third seat. The
heater outlets are located in the passenger side trim
panel just behind the sliding door. Do not block or
place objects directly in front of the inlet grille or
heater outlets. The electrical system could overload
causing damage to the blower motor.
Rear HVAC Manual Controls
1 Ð Blower 3 Ð Rear HVAC Lock
2 Ð Temperature 4 Ð MODE SelectUNDERSTANDING YOUR INSTRUMENT PANEL 309
4
Page 318 of 531
a second time to turn off the RECIRCULATION mode
LED and allow outside air into the vehicle.
NOTE:In cold weather, use of the RECIRCULATION
mode may lead to excessive window fogging. The RE-
CIRCULATION mode is not allowed in the FLOOR, MIX
and DEFROST modes to improve window clearing op-
eration. Recirculation will be disabled automatically if
these modes are selected. Recirculation will be disabled
automatically if these modes are selected.
Rear Automatic Temperature Control (ATC) Ð If
Equipped
The Rear ATC System has floor air outlets at the rear of
the right side sliding door and overhead outlets at each
outboard rear seating positions. The system provides
heated air through the floor outlets or cool, dehumidified
air through the headliner outlets.The REAR SYSTEM control for the Rear ATC System is
on the front ATC control unit located on the instrument
panel.
Pressing the REAR LOCK button for the Rear ATC
System from the front ATC control unit, illuminates a
LOCK symbol in the rear display. The rear temperature
and air source are controlled from the front ATC control
unit.
Rear second row occupants can only adjust the rear ATC
control when the REAR LOCK button is turned off.
The Rear ATC System is located in the headliner near the
center of the vehicle.
316 UNDERSTANDING YOUR INSTRUMENT PANEL
Page 320 of 531
NOTE:
²It is not necessary to move the temperature settings for
cold or hot vehicles. The system automatically adjusts
the temperature, mode and fan speed to provide
comfort as quickly as possible.
²The temperature can be displayed in U.S. or Metric by
selecting the US/M customer programmable feature.
Refer to ELECTRONIC VEHICLE INFORMATION
CENTER (EVIC) Ð IF EQUIPPED, Personal Settings
(Customer Programmable Features) in Section 4 of this
manual.
Rear Blower Control
The rear blower control knob can be manually set to off
or any fixed blower speed by rotating the knob from low
to high. This allows the rear seat occupants to control the
volume of air circulated in the rear of the vehicle.
CAUTION!
Interior air enters the Rear Automatic Temperature
Control System through an intake grille located in
the passenger side trim panel behind the third seat.
The heater outlets are located in the passenger side
trim panel just behind the sliding door. Do not block
or place objects directly in front of the inlet grille or
heater outlets. The electrical system could overload
causing damage to the blower motor.
Rear Temperature Control
To change the temperature in the rear of the vehicle,
rotate the temperature knob counterclockwise to lower
the temperature and clockwise to increase the tempera-
ture. The REAR temperature settings are displayed in the
front ATC control.
318 UNDERSTANDING YOUR INSTRUMENT PANEL
Page 454 of 531
DRIVE SHAFT UNIVERSAL JOINTS
Your vehicle has constant velocity universal joints. Peri-
odic lubrication of these joints is not required. However,
the joint boots should be inspected for external leakage or
damage when other maintenance is performed. If leakage
or damage is evident, the universal joint boot and grease
should be replaced immediately.
Continued operation could result in failure of the univer-
sal joint due to water and dirt contamination of the
grease. This would require complete replacement of the
joint assembly.
BODY LUBRICATION
Locks and all body pivot points, including such items as
seat tracks, doors, liftgate, sliding doors and hood hinges,
should be lubricated periodically to assure quiet, easy
operation and to protect against rust and wear. Prior to
the application of any lubricant, the parts concerned
should be wiped clean to remove dust and grit; afterlubricating excess oil and grease should be removed.
Particular attention should also be given to hood latching
components to ensure proper function. When performing
other underhood services, the hood latch, release mecha-
nism and safety catch should be cleaned and lubricated.
The external lock cylinders should be lubricated twice a
year, preferably in the Fall and Spring. Apply a small
amount of a high quality lubricant such as MopartLock
Cylinder Lubricant directly into the lock cylinder.
WINDSHIELD WIPER BLADES
The rubber edges of the wiper blades and the windshield
should be cleaned periodically with a sponge or soft cloth
and a mild nonabrasive cleaner. This will remove accu-
mulations of salt or road film.
Operation of the wipers on dry glass for long periods
may cause deterioration of the wiper blades. Always use
washer fluid when using the wipers to remove salt or dirt
from a dry windshield.
452 MAINTAINING YOUR VEHICLE
Page 475 of 531
The numbers inside the TIPM cover correspond to the
following table.
FUSES/TIPM
CavityCartridge
FuseMini
FuseDescription
J1 40 Amp
GreenÐ Power Folding Seat
J2 30 Amp
PinkÐ Power Liftgate Module
J3 40 Amp
GreenÐ Rear Door Module (RR
Door Node)
J4 25 Amp
NaturalÐ Driver Door Node
J5 25 Amp
NaturalÐ Passenger Door Node
J6 40 Amp
GreenÐ Anti-Lock Brake System
(ABS) Pump/ESP
J7 30 Amp
PinkÐ Anti-Lock Brake System
(ABS) Valve
FUSES/TIPM
CavityCartridge
FuseMini
FuseDescription
J8 40 Amp
GreenÐ Power Memory Seat (If
Equipped)
J9 40 Amp
GreenÐ PZEV Motor/Flex Fuel
J10 30 Amp
PinkÐ Headlamp Wash Relay/
Manual Tuning Valve
J11 30 Amp
PinkÐ Power Sliding Door Mod-
ule
J13 60 Amp
YellowÐ Ignition Off Draw (IOD)
Ð Main
J14 40 Amp
GreenÐ Rear Window Defogger
J15 30 Amp
PinkÐ Rear Blower
J17 40 Amp
GreenÐ Starter Solenoid
MAINTAINING YOUR VEHICLE 473
7
Page 477 of 531
FUSES/TIPM
CavityCartridge
FuseMini
FuseDescription
M10 Ð 20 Amp
YellowIgnition Off Draw Ð Ve-
hicle Entertainment Sys-
tem (IOD-VES), Satellite
Digital Audio Receiver
(SDARS), DVD, Hands-
Free Module (HFM), Uni-
versal Garage Door
Opener (UGDO), Vanity
Lamp (VANITY LP)
M11 Ð 10 Amp
Red(Ignition Off Draw) IOD-
HVAC/ATC, MW SENSR,
Underhood Lamp (UH
LMP)
M12 Ð 30 Amp
GreenAmplifier (AMP)FUSES/TIPM
CavityCartridge
FuseMini
FuseDescription
M13 Ð 20 Amp
YellowIgnition Off DrawÐ
Cabin Compartment Node
(IOD-CCN), Wireless Con-
trol Module (WCM), SI-
REN, Clock Module (CLK
MOD), Multi-Function
Control Switch (MULTI-
FCTN SW)
M14 Ð 20 Amp
YellowTrailer Tow (Export Only)
MAINTAINING YOUR VEHICLE 475
7