Page 158 of 531

To Disable A RKE Transmitter Linked to Memory
1. Turn the ignition switch to the OFF position and
remove the key.
2. Press and release Memory Button 1. The system will
recall any memory settings stored in position 1. Wait for
the system to complete the memory recall before continu-
ing to step 3.
3. Press and release the memory SET(S) button located
on the driver's door. A chime will sound signaling that
you are in the memory set mode.
4. Within five seconds, press and release Memory Button
1 on the driver's door. A chime will sound signaling to
you that the driver memory has been set.
5. Within five seconds, press and release the UNLOCK
button on the Remote Keyless Entry transmitter. A chime
will sound signaling to you that the transmitter link has
been successfully disabled.To disable another transmitter linked to either Memory
Position, repeat steps 1 to 5 for each transmitter.
NOTE:Once programmed, all transmitters linked to
memory can be easily enabled or disabled at one time.
Refer to the Remote Linked to Memory9Customer Pro-
grammable Features9in the Electronic Vehicle Informa-
tion Center (EVIC) for more information.
TO OPEN AND CLOSE THE HOOD
To open the hood, two latches must be released.
1. Pull the hood release lever located on the instrument
panel, below the steering column.
2. Move to the front of the vehicle and look inside the
center of the hood opening. Locate then push the safety
catch lever to the right while raising the hood at the same
time.
156 UNDERSTANDING THE FEATURES OF YOUR VEHICLE
Page 166 of 531

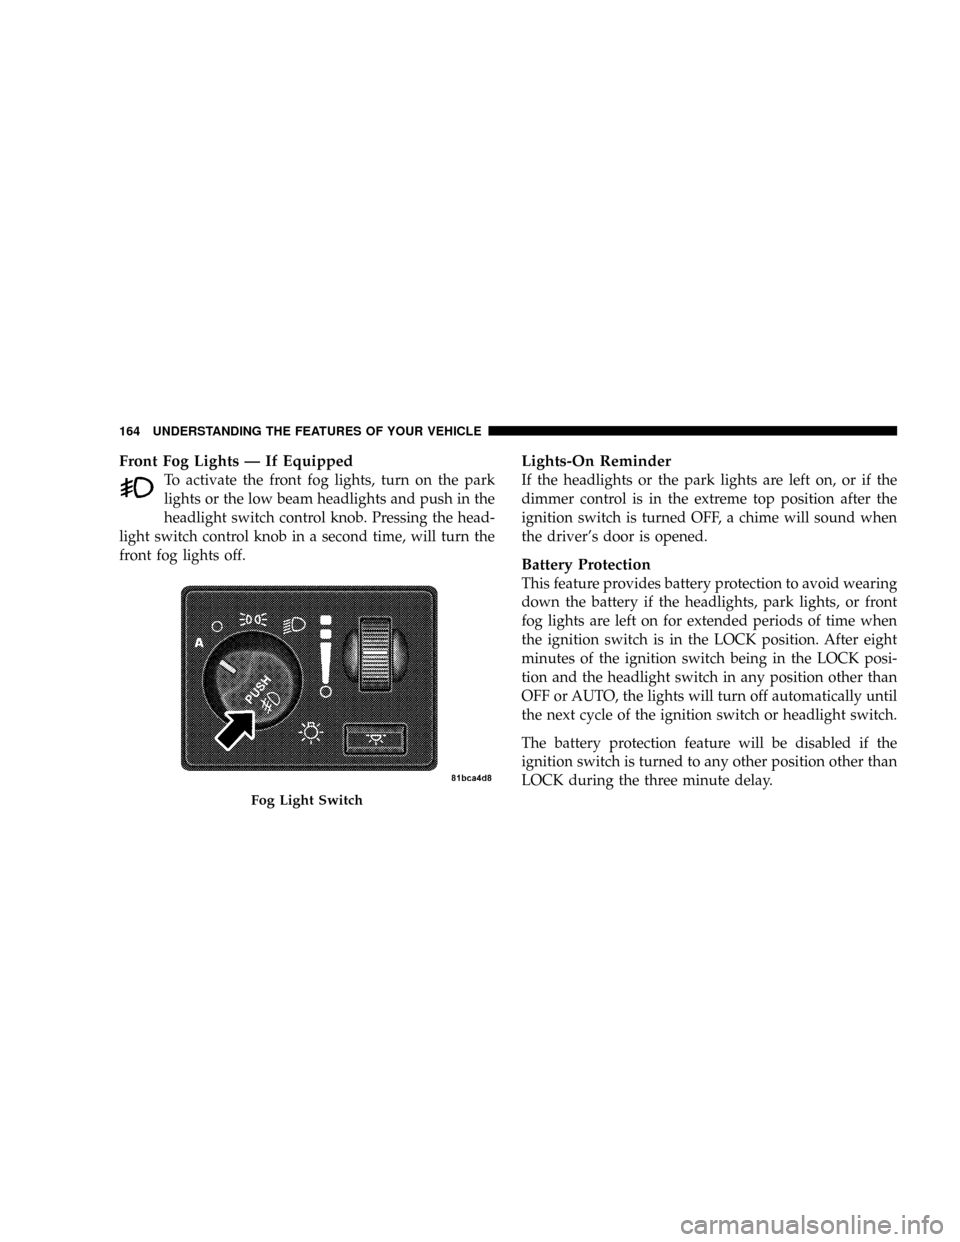
Front Fog Lights Ð If Equipped
To activate the front fog lights, turn on the park
lights or the low beam headlights and push in the
headlight switch control knob. Pressing the head-
light switch control knob in a second time, will turn the
front fog lights off.
Lights-On Reminder
If the headlights or the park lights are left on, or if the
dimmer control is in the extreme top position after the
ignition switch is turned OFF, a chime will sound when
the driver's door is opened.
Battery Protection
This feature provides battery protection to avoid wearing
down the battery if the headlights, park lights, or front
fog lights are left on for extended periods of time when
the ignition switch is in the LOCK position. After eight
minutes of the ignition switch being in the LOCK posi-
tion and the headlight switch in any position other than
OFF or AUTO, the lights will turn off automatically until
the next cycle of the ignition switch or headlight switch.
The battery protection feature will be disabled if the
ignition switch is turned to any other position other than
LOCK during the three minute delay.
Fog Light Switch
164 UNDERSTANDING THE FEATURES OF YOUR VEHICLE
Page 183 of 531

Courtesy/Interior Lighting
At the forward end of the console are two courtesy lights
(standard dome light has two buttons). The lights turn on
when a front door, a sliding door or the liftgate is opened.
If your vehicle is equipped with Remote Keyless Entry,
the lights will also turn on when the unlock button on the
transmitter is pressed.
The courtesy lights also function as reading lights. Press
in on each lens to turn these lights on while inside the
vehicle. Press a second time to turn the each light off. You
may adjust the direction of these lights by pressing the
outside ring which is identified with four directional
arrows.
The area around the instrument panel cupholders is also
illuminated from a light in the overhead console. This
light is turned on when the headlight switch is on and
will adjust in brightness when the dimmer control is
rotated up or down.
Sunglass Storage
At the rear of the front overhead console, a compartment
is provided for the storage of two pairs of sunglasses.
Press the door latch to open the compartment. The door
will slowly rotate to an open position.
NOTE:The front overhead console used with factory
sunroof incorporates a sunroof switch.
Rear Overhead Consoles Ð If Equipped
The rear overhead storage system is available in two
versions: with or without sunroof.
An additional LED at the front of the rear console shines
down on the second row footwell area while in courtesy
mode, for added convenience.
UNDERSTANDING THE FEATURES OF YOUR VEHICLE 181
3
Page 184 of 531

Rear Courtesy/Reading Lights Ð If Equipped
The overhead console had two sets of courtesy lights. The
lights turn on when a front door, a sliding door or the
liftgate is opened. If your vehicle is equipped with
Remote Keyless Entry, the lights will also turn on when
the unlock button on the transmitter is pressed.
The courtesy lights also function as reading lights. Press
in on each lens to turn these lights on while inside the
vehicle. Press a second time to turn the each light off. You
may adjust the direction of these lights by pressing the
outside ring which is identified with four directional
arrows.
Rear Console Halo Lighting Ð If Equipped
The rear overhead console features recessed halo lighting
around the perimeter of the console base. This feature
provides additional lighting options while traveling and
is controlled by the headlight switch. Refer to ªHalo
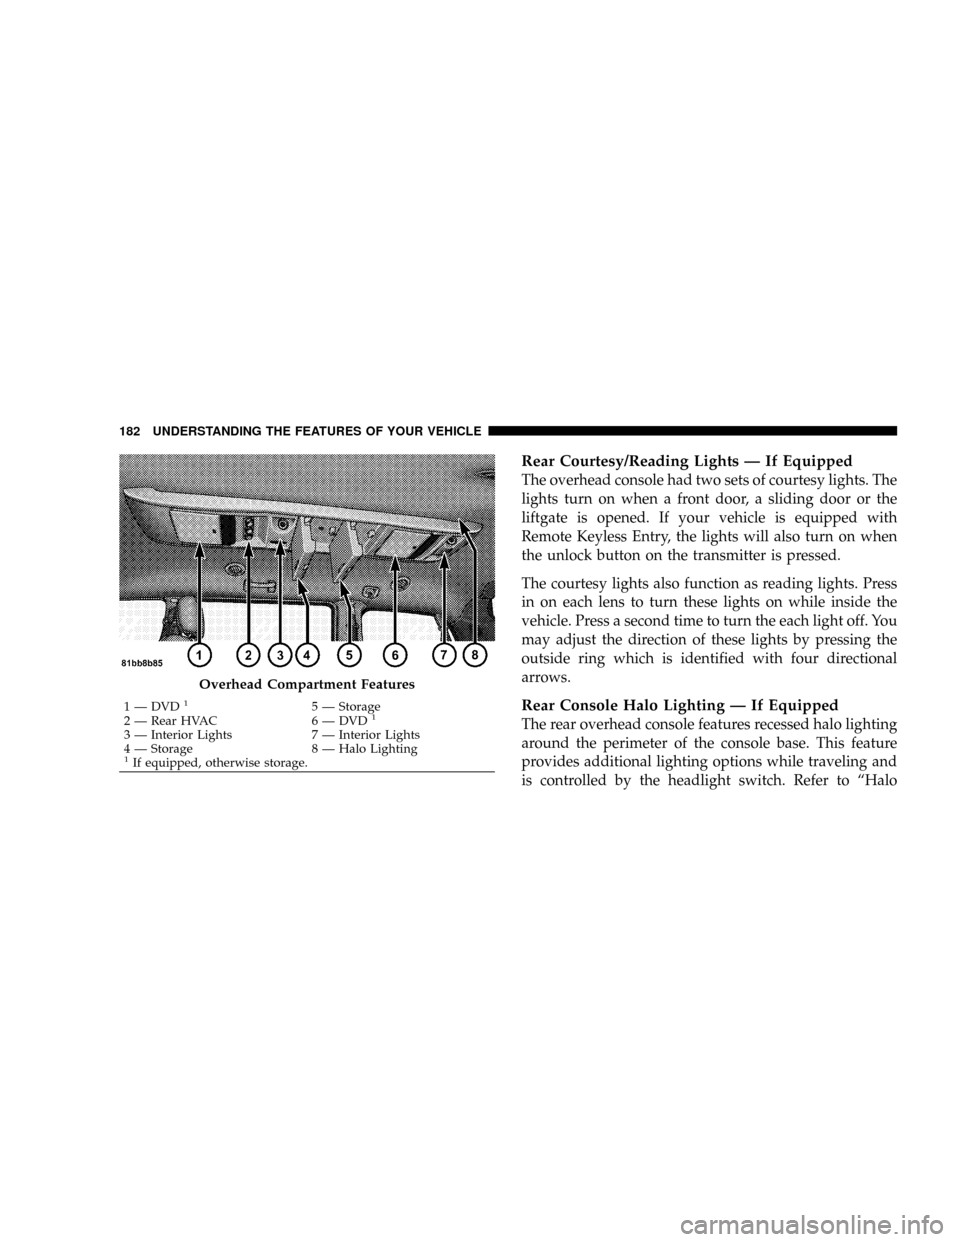
Overhead Compartment Features
1 Ð DVD15 Ð Storage
2 Ð Rear HVAC 6 Ð DVD1
3 Ð Interior Lights 7 Ð Interior Lights
4 Ð Storage 8 Ð Halo Lighting
1If equipped, otherwise storage. 182 UNDERSTANDING THE FEATURES OF YOUR VEHICLE
Page 189 of 531

6. Firmly press and release the ªLearnº or ªTrainingº
button. The name and color of the button may vary by
manufacturer.
NOTE:There are 30 seconds in which to initiate the next
step after the ªLearnº button has been pressed.
7. Return to the vehicle and press the programmed
HomeLinktbutton twice (holding the button for two
seconds each time). If the device is plugged in and
activates, programming is complete.
If the device does not activate, press the button a third
time (for two seconds) to complete the training.
If you have any problems, or require assistance, please
call toll-free 1±800±355±3515 or, on the Internet at
www.HomeLink.com for information or assistance.
To program the remaining two HomeLinktbuttons,
repeat each step for each remaining button. DO NOT
erase the channels.Using HomeLinkt
To operate, simply press and release the programmed
HomeLinktbutton. Activation will now occur for the
trained device (i.e., garage door opener, gate operator,
security system, entry door lock, home/office lighting,
etc. The hand-held transmitter of the device may also be
used at any time.
Reprogramming a Single HomelinktButton
To reprogram a channel that has been previously trained,
follow these steps:
1. Turn the ignition switch to the ON/RUN position.
2. Press and hold the desired HomeLinktbutton until
the indicator light begins to flash after 20 seconds.Do not
release the button.
3.Without releasing the button,proceed with Program-
ming HomelinktStep 2 and follow all remaining steps.
UNDERSTANDING THE FEATURES OF YOUR VEHICLE 187
3
Page 208 of 531
STORAGE
Glove Compartments
There are both upper and lower glove compartments.
Upper Glove Compartment
To open the upper compartment (1), press inward on the
release button (2). The door will spring open about one in
(2.54 cm). Manually lift the front edge of the door
upward, until fully opened, and the detent is engaged.
To close the compartment door, push firmly downward
on the door's surface to release the detent and latch the
door closed.
Glove Compartment Features
1 - Upper Compartment 3 - Lower Latch/Lock
2 - Upper Latch 4 - Lower Compartment 206 UNDERSTANDING THE FEATURES OF YOUR VEHICLE
Page 209 of 531
Lower Glove Compartment
To open the lower compartment (4) pull out on the
release handle (3). The lower compartment handle is also
equipped with a lock.
Door Trim Panel Storage
Front Door Storage
Both interior front door panels have multiple pockets for
storage.
Front Door Storage
1 - Storage Pocket 3 - Bottle Holder
2 - Rear Map Pocket 4 - Front Map PocketUNDERSTANDING THE FEATURES OF YOUR VEHICLE 207
3
Page 252 of 531

Press and release the MENU button until Personal Set-
tings displays in the EVIC.
Use the Step button to display one of the following
choices:
Language
When in this display you may select one of five lan-
guages for all display nomenclature, including the trip
functions and the navigation system (if equipped). Press
the reset button while in this display to select English,
Spanish (EspaÞol), French (FranÕais), Italian (Italiano),
German (Deutsch), and Dutch (Nederlands). Then, as
you continue, the information will display in the selected
language.
Lock Doors Automatically at 15 mph (24 km/h)
When ON is selected, all doors will lock automatically
when the vehicle reaches a speed of 15 mph (24 km/h).
To make your selection, press and release the RESET
button until ON or OFF appears.
Unlock Doors Automatically on Exit
When ON is selected, all doors will unlock when the
vehicle is stopped and the transmission is in the PARK or
NEUTRAL position and the driver's door is opened. To
make your selection, press and release the RESET button
until ON or OFF appears.
Remote Key Unlock
WhenDriver Door 1st Pressis selected, only the driver's
door will unlock on the first press of the remote keyless
entry unlock button. When Driver Door 1st Press is
selected, you must press of the remote keyless entry
unlock button twice to unlock the passenger's doors.
WhenAll Doors 1st Pressis selected, all of the doors will
unlock on the first press of the remote keyless entry
unlock button. To make your selection, press and release
the RESET button until ªDriver Door 1st Pressº or ªAll
Doors 1st Pressº appears.
250 UNDERSTANDING YOUR INSTRUMENT PANEL