2008 CHRYSLER PACIFICA fold seats
[x] Cancel search: fold seatsPage 72 of 457

Six passenger vehicles are equipped with second row
fold & tumble seats with lower anchorages that can
accommodate rigid mount or flexible webbing-mounted
LATCH-compatible child seats. The third row seating
positions are not equipped with lower anchorages. How-
ever, the third row driver side seating position is
equipped with a tether anchor. If you are installing
LATCH-compatible child restraints in any third row
seating position, you must use the vehicle's seat belt.
Five passenger vehicles are equipped with a second row
bench seat only. The two outboard seating positions have
lower anchorages that can accommodate rigid mount or
flexible webbing-mounted LATCH-compatible child
seats. The center seating position of the bench seat can
LATCH ANCHORS
72 THINGS TO KNOW BEFORE STARTING YOUR VEHICLE
Page 82 of 457

NThings You Should Know About Your
UConnectŸ System....................106
NGeneral Information...................114
mSeats................................115
N10±Way Driver's Power Seat Ð If Equipped . . 115
N8±Way Driver's Power Seat Ð If Equipped . . . 116
N4±Way Passenger's Power Seat............116
NAdjustable Head Restraints..............117
NHeated Seats Ð If Equipped.............118
NSecond Row Manual Seat Recliner Ð
If Equipped.........................120
NSecond Row Manual Seat Adjuster Ð
If Equipped.........................121NSecond Row Bench Seating Ð
If Equipped.........................122
NSecond Row Fold & Tumble Seats Ð
If Equipped.........................123
NThird Row Easy Exit Ð If Equipped........124
NThird Row Seating Ð If Equipped.........126
NLoad Floor Ð If Equipped...............127
NPlastic Grocery Bag Retainer.............128
mDriver Memory Seat Ð If Equipped.........129
NEasy Exit Seat (Available With Memory Seat
Only)..............................132
NTilt Mirrors In Reverse (Available With
Memory Seat Only) Ð If Equipped.........133
mTo Open And Close The Hood.............133
82 UNDERSTANDING THE FEATURES OF YOUR VEHICLE
Page 122 of 457
WARNING!
Adjust the seat only while the vehicle is parked.
Adjusting a seat while the vehicle is moving is
dangerous. The seat belt might not be properly
adjusted and you could be injured.
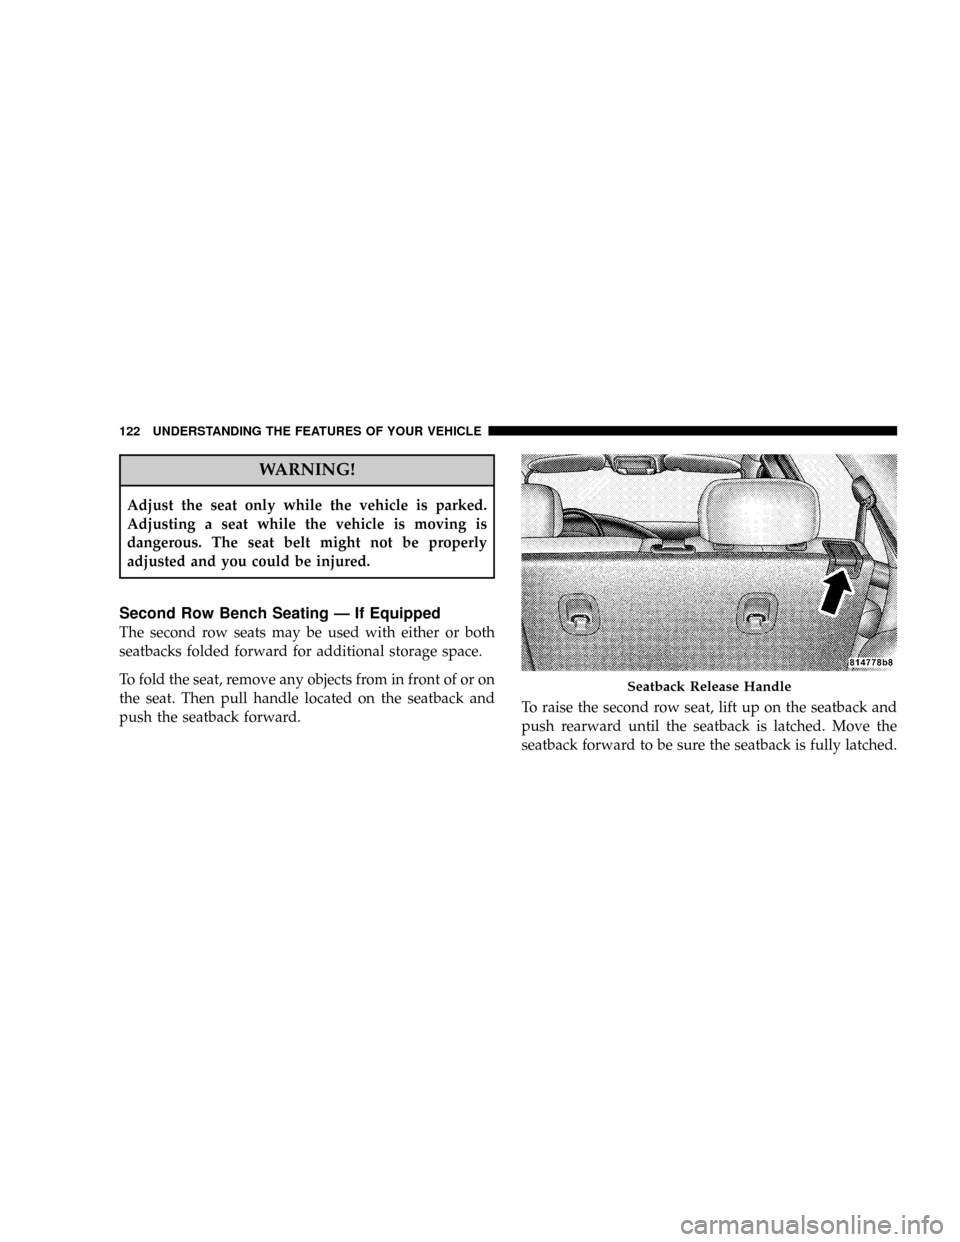
Second Row Bench Seating Ð If Equipped
The second row seats may be used with either or both
seatbacks folded forward for additional storage space.
To fold the seat, remove any objects from in front of or on
the seat. Then pull handle located on the seatback and
push the seatback forward.To raise the second row seat, lift up on the seatback and
push rearward until the seatback is latched. Move the
seatback forward to be sure the seatback is fully latched.
Seatback Release Handle
122 UNDERSTANDING THE FEATURES OF YOUR VEHICLE
Page 123 of 457
CAUTION!
Be sure there is nothing in front of the second row
seat cushion before folding it down. Damage to the
seat may occur.
Second Row Fold & Tumble Seats Ð If Equipped
The second row seats can be folded and tumbled forward
for easy access to the third seat or rear cargo area.
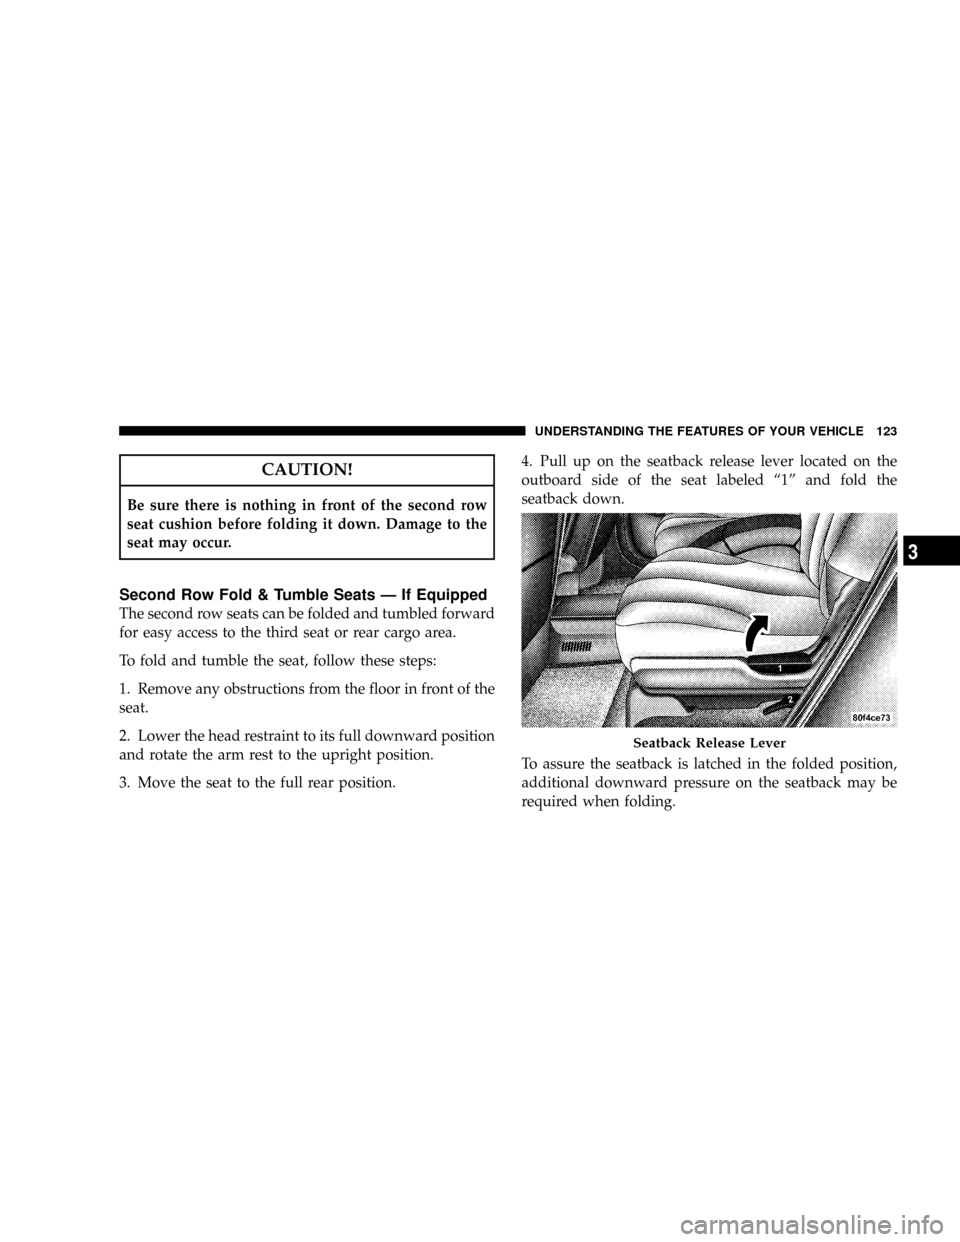
To fold and tumble the seat, follow these steps:
1. Remove any obstructions from the floor in front of the
seat.
2. Lower the head restraint to its full downward position
and rotate the arm rest to the upright position.
3. Move the seat to the full rear position.4. Pull up on the seatback release lever located on the
outboard side of the seat labeled ª1º and fold the
seatback down.
To assure the seatback is latched in the folded position,
additional downward pressure on the seatback may be
required when folding.
Seatback Release Lever
UNDERSTANDING THE FEATURES OF YOUR VEHICLE 123
3
Page 124 of 457
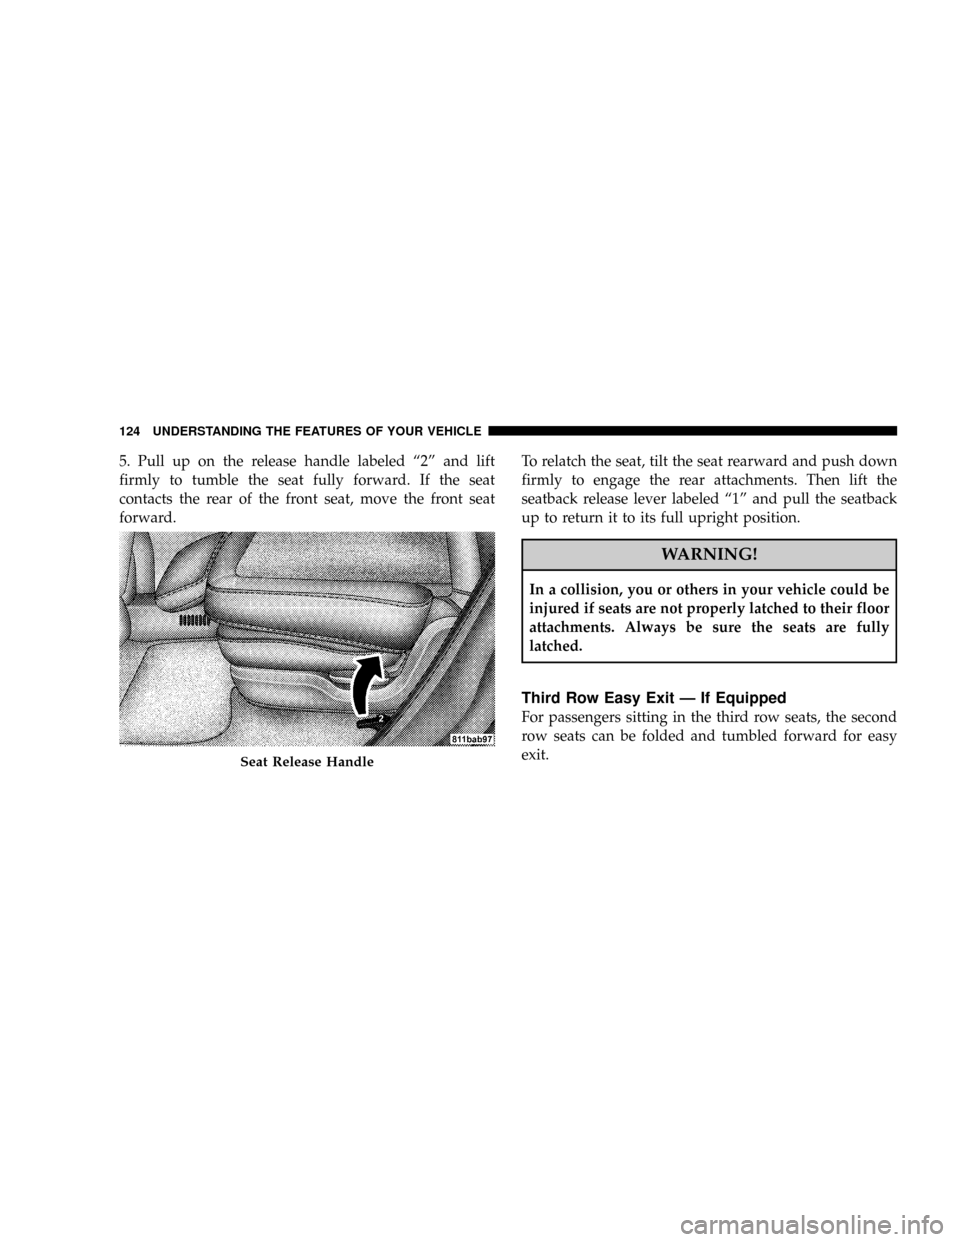
5. Pull up on the release handle labeled ª2º and lift
firmly to tumble the seat fully forward. If the seat
contacts the rear of the front seat, move the front seat
forward.To relatch the seat, tilt the seat rearward and push down
firmly to engage the rear attachments. Then lift the
seatback release lever labeled ª1º and pull the seatback
up to return it to its full upright position.
WARNING!
In a collision, you or others in your vehicle could be
injured if seats are not properly latched to their floor
attachments. Always be sure the seats are fully
latched.
Third Row Easy Exit Ð If Equipped
For passengers sitting in the third row seats, the second
row seats can be folded and tumbled forward for easy
exit.
Seat Release Handle
124 UNDERSTANDING THE FEATURES OF YOUR VEHICLE
Page 126 of 457
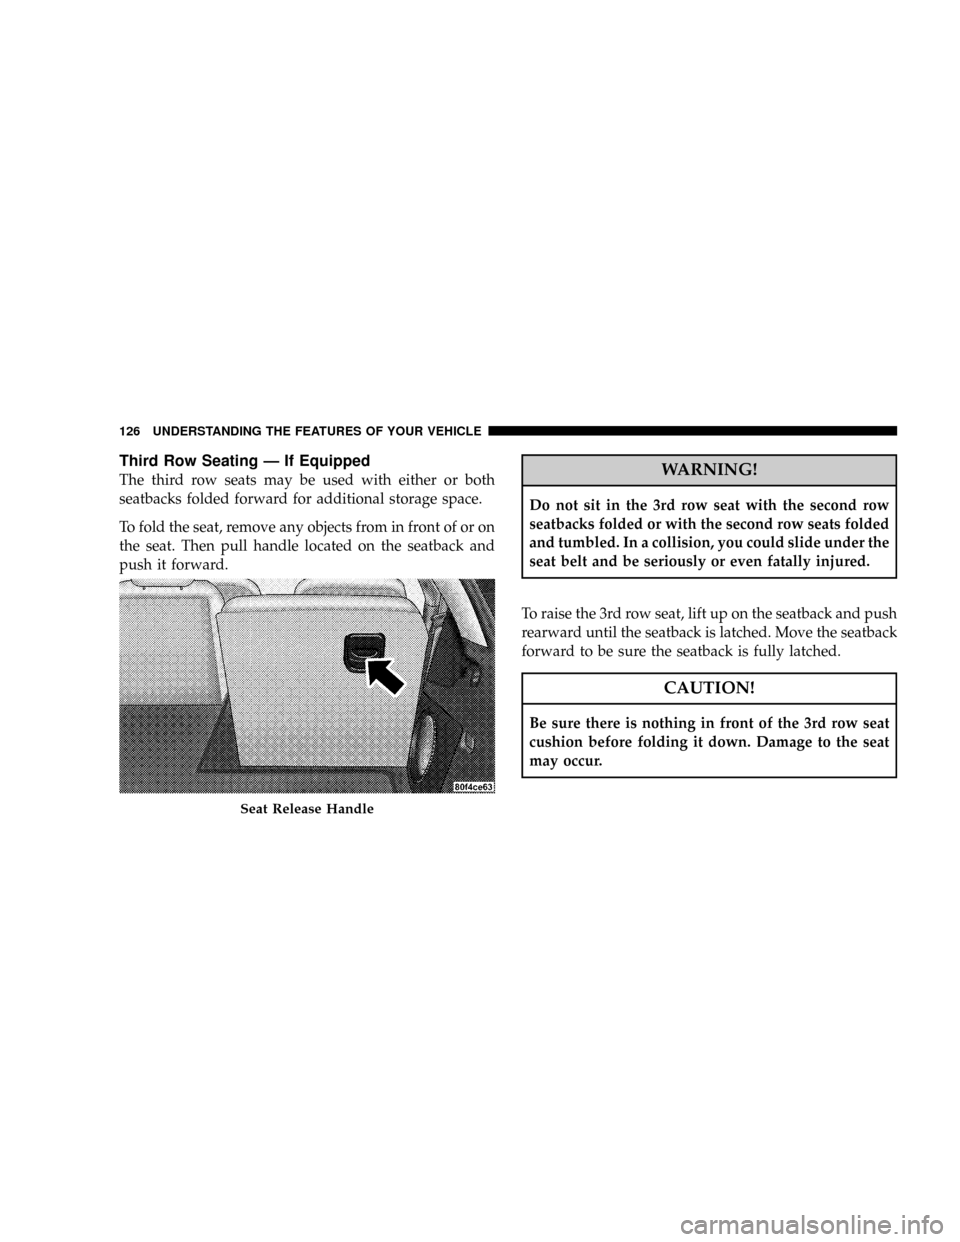
Third Row Seating Ð If Equipped
The third row seats may be used with either or both
seatbacks folded forward for additional storage space.
To fold the seat, remove any objects from in front of or on
the seat. Then pull handle located on the seatback and
push it forward.WARNING!
Do not sit in the 3rd row seat with the second row
seatbacks folded or with the second row seats folded
and tumbled. In a collision, you could slide under the
seat belt and be seriously or even fatally injured.
To raise the 3rd row seat, lift up on the seatback and push
rearward until the seatback is latched. Move the seatback
forward to be sure the seatback is fully latched.
CAUTION!
Be sure there is nothing in front of the 3rd row seat
cushion before folding it down. Damage to the seat
may occur.
Seat Release Handle
126 UNDERSTANDING THE FEATURES OF YOUR VEHICLE
Page 127 of 457
WARNING!
²Not all head restraints in this vehicle are the same.
Head restraints from one seating position should
not be removed and installed in any other seating
position. In a collision, serious injury or death may
result if the proper head restraint is not installed on
each seat.
²The cargo area in the rear of the vehicle should not
be used as a play area by children. They could be
seriously injured in a collision. Children should be
seated and using the proper restraint system.
²It is extremely dangerous to ride in a cargo area,
inside or outside of a vehicle. In a collision, people
riding in these areas are more likely to be seriously
injured or killed.
²Do not allow people to ride in any area of your
vehicle that is not equipped with seats and seat
belts.
²Be sure everyone in your vehicle is in a seat and
using a seat belt properly.
Load Floor Ð If Equipped
For additional cargo space, the second and third row
seatbacks may be folded forward and the load floor
extended to cover the center console.
To extend the load floor, follow these steps:
1. Move the second row seats to the full rear position.
2. Fold the second and third row seatbacks down.
UNDERSTANDING THE FEATURES OF YOUR VEHICLE 127
3
Page 457 of 457

INTRODUCTION INTRODUCTION HOW TO USE THIS MANUAL WARNINGS AND CAUTIONS VEHICLE IDENTIFICATION NUMBER VEHICLE MODIFICATIONS/ALTERATIONS THINGS TO KNOW BEFORE STARTING YOUR VEHICLE A WORD ABOUT YOUR KEYS
Ignition Key RemovalKey-In-Ignition ReminderLocking Doors With The KeySTEERING WHEEL LOCK - IF EQUIPPED If You Wish To Manually Lock The Steering WheelTo Release The Steering Wheel LockAutomatic Transaxle Ignition Interlock SystemSENTRY KEY - IF
EQUIPPED Replacement KeysCustomer Key ProgrammingGeneral InformationSECURITY ALARM SYSTEM - IF EQUIPPED Rearming of the System - If EquippedTo Arm the SystemTo Disarm the SystemSecurity System Manual OverrideILLUMINATED ENTRY SYSTEM
REMOTE KEYLESS ENTRY To unlock the doors and liftgateTo lock the doors and liftgateTo Open/Close Power Liftgate - If EquippedFlash Lights On Lock/UnlockUsing The Panic AlarmProgramming Additional TransmittersBattery ReplacementDOOR LOCKS Manual Door
LocksPower Door LocksChild Protection Door LockWINDOWS Power WindowsLIFTGATE Power Liftgate - If EquippedOCCUPANT RESTRAINTS Lap/Shoulder BeltsLap/Shoulder Belt Untwisting ProcedureSeat Belt PretensionersEnhanced Seat Belt Use Reminder System
(BeltAlert)Seat Belts and Pregnant WomenAutomatic-Locking Retractor (ALR)Seat Belts and Pregnant WomenSeat Belt ExtenderDriver and Front Passenger Supplemental Restraint System - AirbagEvent Data Recorder (EDR)Child RestraintENGINE BREAK-IN
RECOMMENDATIONS SAFETY TIPS Exhaust GasSafety Checks You Should Make Inside The VehiclePeriodic Safety Checks You Should Make Outside The VehicleUNDERSTANDING THE FEATURES OF YOUR VEHICLE MIRRORS Inside Day / Night MirrorAutomatic
Dimming Mirror - If EquippedDrivers Side Outside Mirror Auto Dimmer - If EquippedExterior Mirrors Folding FeatureOutside Mirror - Drivers SideOutside Mirror - Passengers SidePower Remote-Control MirrorsHeated Remote Control Mirrors - If EquippedIlluminated Vanity
MirrorsHANDS-FREE COMMUNICATION (UConnect) - IF EQUIPPED OperationsPhone Call FeaturesUConnect System FeaturesAdvanced Phone ConnectivityThings You Should Know About Your UConnect SystemGeneral InformationSEATS 10-Way Drivers Power Seat
- If Equipped8-Way Drivers Power Seat - If Equipped4-Way Passengers Power SeatAdjustable Head RestraintsHeated Seats - If EquippedSecond Row Manual Seat Recliner - If EquippedSecond Row Manual Seat Adjuster - If EquippedSecond Row Bench Seating - If
EquippedSecond Row Fold and Tumble Seats - If EquippedThird Row Easy Exit - If EquippedThird Row Seating - If EquippedLoad Floor - If EquippedPlastic Grocery Bag RetainerDRIVER MEMORY SEAT - IF EQUIPPED Easy Exit Seat (Available with Memory Seat Only)
Tilt Mirrors in Reverse (Available with Memory Seat Only) - If EquippedTO OPEN AND CLOSE THE HOOD LIGHTS Overhead Console Map/Reading LightsInteriorLightsMulti-Function LeverHeadlights, Parking Lights, Instrument Panel LightsAutomatic HeadlightsDaytime
Running Lights (Canada Only)Lights-on ReminderHeadlight Time DelayFog Lights - If EquippedTurn SignalsHighbeam/Lowbeam Select SwitchPassing LightWINDSHIELD WIPERS AND WASHERS Windshield WashersMist FeatureWindshield Wiper OperationIntermittent
Wiper SystemRear Window Wiper/WasherTILT STEERING COLUMN ELECTRONIC SPEED CONTROL To ActivateTo Set a Desired SpeedTo DeactivateTo Resume SpeedTo Vary the Speed SettingTo Accelerate For PassingGARAGE DOOR OPENER - IF EQUIPPED
Programming HomeLinkCanadian Programming/Gate ProgrammingUsing HomeLinkReprogramming a Single HomeLink ButtonsSecurityTroubleshooting TipsGeneral InformationANTI-LOCK BRAKE SYSTEM (ABS) ELECTRONIC BRAKE CONTROL SYSTEM -
ABS/TCS/BAS/ESP Traction Control System (TCS)Brake Assist System (BAS)ESP (Electronic Stability Program)ADJUSTABLE PEDALS - IF EQUIPPED REAR PARK SENSE SYSTEM - IF EQUIPPED Rear Park Assist SensorsRear Park Assist Warning Display
Enable/Disable the Rear Park Assist System - If EquippedService the Rear Park Assist SystemCleaning the Rear Park Assist SystemREAR CAMERA - IF EQUIPPED OVERHEAD CONSOLE - IF EQUIPPED Courtesy/Reading LightsSunglasses StoragePOWER SUNROOF
- IF EQUIPPED Express Open FeatureWind BuffetingSunroof Comfort Position - If EquippedSunroof MaintenanceELECTRICAL POWER OUTLETS Electrical Outlet Use With Engine OffCUPHOLDERS Front Seat CupholdersSecond Row Seat CupholdersThird Row Seat Cupholders - If EquippedSTORAGE Console FeaturesRear Cargo Storage Bin - If EquippedRetractable Cargo Area Cover - If EquippedCargo Tie-Down HooksROOF LUGGAGE RACK - IF EQUIPPED LOAD LEVELING SYSTEM UNDERSTANDING YOUR INSTRUMENT
PANEL INSTRUMENT PANEL AND CONTROLS BASE INSTRUMENT CLUSTER PREMIUM INSTRUMENT CLUSTER INSTRUMENT CLUSTER DESCRIPTIONS ELECTRONIC VEHICLE INFORMATION CENTER (EVIC) - IF EQUIPPED Oil Change RequiredCustomer
Programmable Features - If EquippedCompass Display - If EquippedMini-Trip Functions - If EquippedSETTING THE ANALOG CLOCK ELECTRONIC DIGITAL CLOCK Clock Setting ProcedureRADIO GENERAL INFORMATION Radio Broadcast SignalsTwo Types of Signals
Electrical DisturbancesAM ReceptionFM ReceptionSALES CODE RAH - AM AND FM STEREO RADIO WITH CD PLAYER AND CD/DVD CHANGER CONTROLS Radio OperationCDPlayer OperationCD/DVD Changer OperationNotes On Playing MP3 FilesOperation
Instructions - (CD Mode For MP3 Audio Play)SALES CODE REV - AM AND FM STEREO RADIO WITH CD PLAYER AND CD/DVD CHANGER CONTROLS Radio OperationCD Player OperationCD/DVD Changer OperationNotes On Playing MP3 FilesOperation Instructions
- (CD Mode For MP3 Audio Play)Operating Instructions - MP3 Player, Portable WalkmanOperating Instructions - Video Games/Camcorders6 DISC CD/DVD CHANGER (RDV) - IF EQUIPPED Operating Instructions - CD/DVD ChangerEJECT (EJT) ButtonOperating
Instructions - Remote ControlOperating Instructions - Video ScreenOperating Instructions - Headphones Operating Instructions - Auxiliary InputNAVIGATION SYSTEM - IF EQUIPPED SATELLITE RADIO - IF EQUIPPED System ActivationElectronic Serial Number/Sirius
Identification Number (ENS/SID)Selecting Satellite Mode in RBB, RAH, REV and RBK RadiosSelecting Satellite Mode in RBP, RBU, RAZ, RB1 and RBQ RadiosSelecting a ChannelStoring and Selecting Pre-Set ChannelsUsing the PTY (Program Type) Button (If Equipped)
PTY Button SCANPTY Button SEEKSatellite AntennaReception QualityREMOTE SOUND SYSTEM CONTROLS Radio OperationCD PlayerCD/DVD DISC MAINTENANCE RADIO OPERATION AND CELLULAR PHONES CLIMATE CONTROLS Manual Air Conditioning
and Heating System Mode ControlManual Air Conditioning OperationDual-Zone Automatic Temperature ControlElectric Rear Window DefrosterSTARTING AND OPERATING STARTING PROCEDURES Automatic TransmissionNormal Starting (Above 32 degreesF/0
degrees C)Extremely Cold Weather Starting (Below -20 degrees F / -29 degrees C)High Altitude Starting (Above 4,000 ft. / 1 219 m)If Engine Fails To StartAfter StartingENGINE BLOCK HEATER - IF EQUIPPED AUTOMATIC TRANSMISSION Brake/Transmission Interlock
SystemAutomatic Transmission Ignition Interlock SystemReset Mode - Electronic TransmissionAUTOSTICK AutoStick OperationAutoStick General InformationALL WHEEL DRIVE - IF EQUIPPED PARKING BRAKE BRAKE SYSTEM Anti-Lock Brake SystemPOWER
STEERING DRIVING ON SLIPPERY SURFACES AccelerationTractionDRIVING THROUGH WATER Flowing/Rising WaterShallow Standing WaterTIRE SAFETY INFORMATION Tire Markings Tire Identification Number (TIN)Tire Loading and Tire PressureTIRES - GENERAL
INFORMATION Tire PressureTire Inflation PressuresRadial-Ply TiresCompact Spare Tire - If EquippedLimited Use Spare - If EquippedTire SpinningTread Wear IndicatorsLife of TireReplacement TiresAlignment And BalanceTIRE CHAINS SNOW TIRES TIRE ROTATION
TIRE PRESSURE MONITOR SYSTEM (TPMS) Basic TPMS without EVIC - If EquippedBasic TPMS with EVIC - If EquippedPremium TPMS - If EquippedTire Pressure Monitoring Low Pressure WarningsService Tire System SoonGeneral InformationFUEL REQUIREMENTS
3.8L GASOLINE ENGINES4.0L GASOLINE ENGINESReformulated GasolineGasoline/Oxygenate BlendsMMT In GasolineMaterials Added to FuelFuel System CautionsCarbon Monoxide WarningsADDING FUEL Fuel Filler Cap (Gas Cap)Loose Fuel Filler Cap Message
VEHICLE LOADING Vehicle Certification LabelGross Vehicle Weight Rating (GVWR)Gross Axle Weight Rating (GAWR)OverloadingLoadingTRAILER TOWINGCommon Towing DefinitionsTrailer Hitch ClassificationTrailer Towing Weights (Maximum Trailer Weight Ratings)
Trailer and Tongue WeightTowing RequirementsTowing TipsRECREATIONAL TOWING (BEHIND MOTORHOME, ETC.) TOWING THIS VEHICLE BEHIND ANOTHER VEHICLE(Flat towing with all four wheels on the ground)WHAT TO DO IN EMERGENCIES HAZARD
WARNING FLASHER IF YOUR ENGINE OVERHEATS JACKING AND TIRE CHANGING Jack LocationSpare Tire StowagePreparations For JackingJacking InstructionsJUMP-STARTING PROCEDURE FREEING A STUCK VEHICLE TOWING A DISABLED VEHICLE With Ignition KeyWithout The Ignition KeyTOWING THIS VEHICLE BEHIND ANOTHER VEHICLE (Flat towing with all four wheels on the ground)TOWING THIS VEHICLE BEHIND ANOTHER VEHICLE WITH A TOW DOLLYMAINTAINING YOUR VEHICLE 3.8L ENGINES 4.0L
ENGINES ONBOARD DIAGNOSTIC SYSTEM - OBD II Loose Fuel Filler Cap MessageEMISSIONS INSPECTION AND MAINTENANCE PROGRAMS REPLACEMENT PARTS DEALER SERVICE MAINTENANCE PROCEDURES Engine OilEngine Oil FilterDrive BeltSpark
PlugsEngine Air Cleaner FilterCatalytic ConverterMaintenance-Free BatteryAir Conditioner MaintenancePower Steering - Fluid CheckFront and Rear Suspension Ball JointsSteering Shaft SealSteering LinkageDrive Shaft Universal JointsBody LubricationWindshield Wiper
BladesWindshield and Rear Window WashersExhaust SystemCooling SystemHoses And Vacuum/Vapor HarnessesBrakesMaster Cylinder - Brake Fluid LevelCheckFuel System HosesAutomatic TransmissionAll Wheel Drive (AWD) - If EquippedFront And Rear Wheel
BearingsAppearance Care and Protection from CorrosionCleaning The Center Console Cup HoldersFUSES (INTEGRATED POWER MODULE) VEHICLE STORAGE REPLACEMENT LIGHT BULBS BULB REPLACEMENT HeadlightsHigh Intensity Discharge Headlights
(HID) - If EquippedFront Park/Turn Signal and Sidemarker LightsFront Fog LightRear Tail, Stop, Turn Signal, Side Marker and Back-up LightsLicense LightFLUIDS AND CAPACITIES FLUIDS, LUBRICANTS AND GENUINE PARTS EngineChassisMAINTENANCE
SCHEDULES EMISSION CONTROL SYSTEM MAINTENANCE MAINTENANCE SCHEDULE Required Maintenance IntervalsIF YOU NEED CONSUMER ASSISTANCE SUGGESTIONS FOR OBTAINING SERVICE FOR YOUR VEHICLE Prepare For The Appointment
Prepare A ListBe Reasonable With RequestsIF YOU NEED ASSISTANCE WARRANTY INFORMATION (U.S. Vehicles Only) MOPAR PARTS REPORTING SAFETY DEFECTS In CanadaPUBLICATION ORDER FORMS DEPARTMENT OF TRANSPORTATION UNIFORM
TIRE QUALITY GRADES TreadwearTraction GradesTemperature GradesINDEX