2008 CHEVROLET TRAIL BLAZER change time
[x] Cancel search: change timePage 157 of 472
#A/C (Air Conditioning):Press this button to
manually turn the air conditioning system on or off.
When the system is on, the system will automatically
begin to cool and dehumidify the air inside of your
vehicle. The air conditioning symbol will appear on the
display when the air conditioning is on and will turn
off when the air conditioning is off.
If you turn the air conditioning off while in front defrost
or defog mode, the air conditioning symbol will turn
off, however, the A/C compressor will remain on to help
de-humidify the air inside the vehicle. If one of the
other modes is selected the compressor will then turn
the A/C off until it is selected again or the AUTO button
is pressed.
To avoid fogging the inside glass on rainy and humid
days at a temperature above freezing, press the
air conditioning button to run the A/C compressor.
Also it is best to avoid the use of the recirculation mode
except when maximum air conditioning performance
is needed or for short times to avoid exterior odors.
You may notice a slight change in engine performance
when the air-conditioning compressor shuts off and
turns on again. This is normal.Defogging and Defrosting
Fog on the inside of the windows is a result of moisture
condensing on the cool window glass. This can be
reduced if the climate control system is used properly.
You can use either defog or front defrost to clear
fog or frost from your windshield.
-(Defog):Use this setting to clear the windows of
fog or moisture. This setting will deliver air to the
�oor and windshield outlets.
0(Front Defrost):Press the front defrost button to
clear the windshield and side windows of frost or
fog quickly. The system will automatically control the fan
speed if you select defrost from AUTO mode. If the
outside temperature is 40°F (4°C) or warmer, your air
conditioning compressor will automatically run to help
dehumidify the air and dry the windshield. Do not drive
the vehicle until all the windows are clear.
3-27
Page 182 of 472
Fuel Information Button
t
(Fuel Information):Press the fuel information
button to scroll through the range, fuel used, average
fuel economy, and the engine oil life system.
Fuel Range:Press the fuel information button until
RANGE appears on the display. This mode shows the
remaining distance you can drive without refueling.
It is based on fuel economy and the fuel remaining in
the fuel tank. The display will show LOW if the fuel level
is low.
The fuel economy data used to determine fuel range is
an average of recent driving conditions. As your driving
conditions change, this data is gradually updated.
Fuel range cannot be reset.
Fuel Used:Press the fuel information button until
FUEL USED appears on the display. This mode shows
the number of gallons or liters of fuel used since the
last reset of this menu item. To reset the fuel used
information, press and hold the select button for
one second while FUEL USED is displayed.
Average Fuel Economy:Press the fuel information
button until AVG. ECON appears on the display.
This mode shows how many miles per gallon (MPG),
liters per 100 kilometers (L/100 km), or kilometers
per liter (km/L) your vehicle is getting based on current
and past driving conditions.Press and hold the select button for one second while
AVG. ECON is displayed to reset the average fuel
economy. Average fuel economy will then be calculated
starting from that point. If the average fuel economy
is not reset, it will be continually updated each time
you drive.
Engine Oil Life System:Press the fuel information
button until ENGINE OIL LIFE appears on the display.
The engine oil life system shows an estimate of the
oil’s remaining useful life. It will show 100% when the
system is reset after an oil change. It will alert you
to change the oil on a schedule consistent with your
driving conditions.
Always reset the engine oil life system after an oil
change. To reset the engine oil life system, seeEngine
Oil Life System on page 5-22.
In addition to the engine oil life system monitoring the oil
life, additional maintenance is recommended in the
Maintenance Schedule in this manual. SeeEngine Oil on
page 5-17andScheduled Maintenance on page 6-4.
Customization Button
4
(Customization):Press the customization button to
access the VEHICLE SETTINGS menu and customize
the settings to your vehicle. SeeDIC Vehicle
Customization on page 3-58for more information.
3-52
Page 198 of 472
Radio Data System (RDS)
The audio system has a Radio Data System (RDS).
RDS features are available for use only on FM stations
that broadcast RDS information.
With RDS, the radio can do the following:
Seek to stations broadcasting the selected type of
programming.
Receive announcements concerning local and
national emergencies.
Display messages from radio stations.
This system relies upon receiving speci�c information
from these stations and only works when the information
is available. In rare cases, a radio station can broadcast
incorrect information that causes the radio features
to work improperly. If this happens, contact the radio
station.
While the radio is tuned to an RDS station, the station
name or call letters display instead of the frequency.
RDS stations can also provide the time of day, a
program type (PTY) for current programming, and the
name of the program being broadcast.
Playing the Radio
PWR (Power):Push to turn the system on and off.
opVOL or VOLUME:Turn clockwise or
counterclockwise to increase or to decrease the volume.
DISPL (Display) or INFO (Information):While the
ignition is off, press the DISPL or INFO knob to display
the time.
For RDS, press the DISPL or INFO knob to change
what displays while using RDS. The display options are
station name, RDS station frequency, PTY (program
type), and the name of the program (if available).
For XM™ (if equipped), press the DISPL or INFO knob
while in XM™ mode to retrieve four different categories
of information related to the current song or channel:
Artist, Song Title, Category or PTY, Channel Number/
Channel Name.
To change the default on the display, press the DISPL
or INFO knob until you see the desired display, then
brie�y press and hold the knob until a beep is heard.
The selected display becomes the default.
3-68
Page 210 of 472
oTUNEp(MP3 Radio):Turning this knob fast
tracks reverse or advances through tracks. The track
number displays for each track.
DISPL (Display) or INFO (Information):Press to see
how long the current track has been playing. ET and/or
the elapsed time displays. To change the default on
the display, track, or elapsed time, press until the
desired display appears, then press and hold brie�y
until a beep sounds. The selected display becomes
the default.
BAND:Press to listen to the radio when a CD is playing.
The inactive CD(s) remains inside the radio for future
listening.
CD AUX (Auxiliary):Press to play a CD while listening
to the radio, or to listen to an auxiliary source (such as
rear seat entertainment, if equipped).Using Song List Mode
The six-disc CD changer has a feature called song list.
This feature is capable of saving 20 track selections.
To save tracks into the song list feature, perform
the following steps:
1. Turn the CD player on and load it with at least one
CD. See “LOAD CD” listed previously in this section
for more information.
2. Check to see that the CD changer is not in song list
mode. S-LIST should not appear on the display.
If S-LIST displays, press the SONG LIST button to
turn it off.
3. Select the desired CD by pressing the numbered
pushbutton and then use the right SEEK or TYPE
arrow to locate the track to be saved. The track
begins to play.
4. Press and hold the SONG LIST button to save the
track into memory. When SONG LIST is pressed,
one beep sounds. After two seconds of continuously
pressing the SONG LIST button, two beeps
sound to con�rm the track has been saved.
5. Repeat Steps 3 and 4 for saving other selections.
S-LIST FULL displays if more than 20 selections
are saved.
3-80
Page 221 of 472
When using the wired headphones, if the front seat
passengers play a CD in the Radio with Six-Disc CD
(if equipped) or use XM™ Satellite Radio Service
(if equipped), you will hear the audio for these sources,
instead of the DVD or CD that is currently playing
through the RSE.
Notice:Do not store the headphones in heat or
direct sunlight. This could damage the headphones
and repairs will not be covered by your warranty.
Storage in extreme cold can weaken the batteries.
Keep the headphones stored in a cool, dry place.
Both sets of rear seat headphones may include foam
ear pads.
The foam ear pads can become worn or damaged if
they are not handled or stored properly. They can
be replaced separately from the headphone set.
The headphone replacement foam ear pads can be
ordered in pairs. See your dealer/retailer for more
information.Battery Replacement
To change the batteries on the headphones:
1. Loosen the screw to the battery door on the left
side of the headphones and slide open.
2. Replace the two batteries in the compartment.
Install correctly using the diagram on the inside
of the battery compartment.
3. Replace the battery door and tighten the door
screw.
If the headphones are to be stored for a long period of
time, remove the batteries and keep them in a cool,
dry place.
3-91
Page 225 of 472
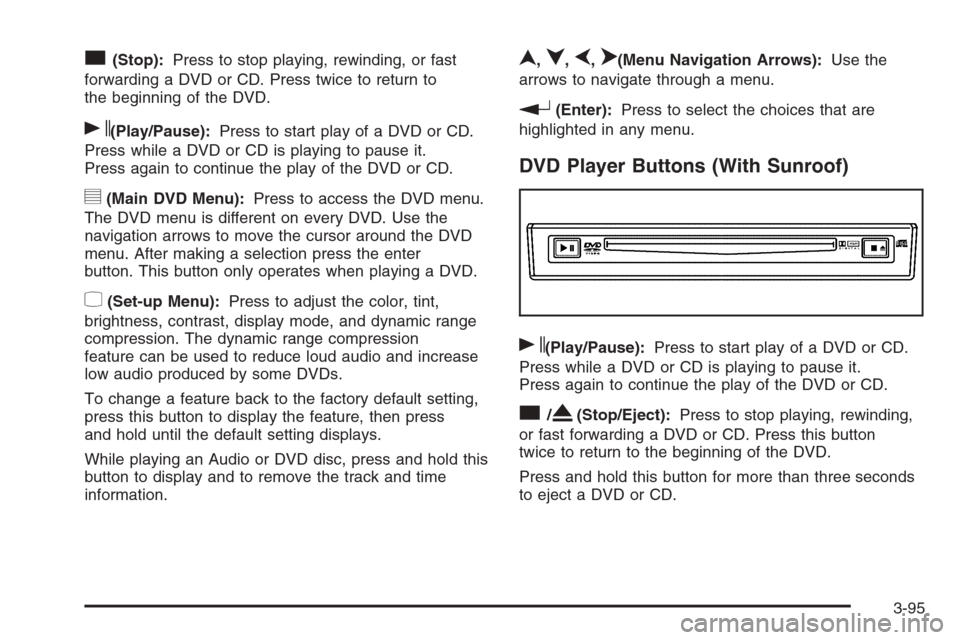
c(Stop):Press to stop playing, rewinding, or fast
forwarding a DVD or CD. Press twice to return to
the beginning of the DVD.
s(Play/Pause):Press to start play of a DVD or CD.
Press while a DVD or CD is playing to pause it.
Press again to continue the play of the DVD or CD.
y(Main DVD Menu):Press to access the DVD menu.
The DVD menu is different on every DVD. Use the
navigation arrows to move the cursor around the DVD
menu. After making a selection press the enter
button. This button only operates when playing a DVD.
z(Set-up Menu):Press to adjust the color, tint,
brightness, contrast, display mode, and dynamic range
compression. The dynamic range compression
feature can be used to reduce loud audio and increase
low audio produced by some DVDs.
To change a feature back to the factory default setting,
press this button to display the feature, then press
and hold until the default setting displays.
While playing an Audio or DVD disc, press and hold this
button to display and to remove the track and time
information.
n,q,p,o(Menu Navigation Arrows):Use the
arrows to navigate through a menu.
r(Enter):Press to select the choices that are
highlighted in any menu.
DVD Player Buttons (With Sunroof)
s(Play/Pause):Press to start play of a DVD or CD.
Press while a DVD or CD is playing to pause it.
Press again to continue the play of the DVD or CD.
c/X(Stop/Eject):Press to stop playing, rewinding,
or fast forwarding a DVD or CD. Press this button
twice to return to the beginning of the DVD.
Press and hold this button for more than three seconds
to eject a DVD or CD.
3-95
Page 229 of 472
|(Camera Angle):Press to change camera angles
on DVDs that have this feature when a DVD is playing.
The format and content of this function will vary for
each disc.
{(Subtitle):Press to turn on subtitles and to move
through subtitle options when a DVD is playing.
The format and content of this function will vary for
each disc.
[(Fast Forward):Press to fast forward the DVD or
CD. To stop fast forwarding, press again. This button
might not work while the DVD is playing the copyright
information or the previews.
s(Play/Pause):Press to start play of a DVD or CD.
Press while a DVD or CD is playing to pause it.
Press again to continue the play of the DVD or CD.
When the DVD is playing, press this button then press
the fast forward button. The DVD continues playing
in a slow play mode. To cancel slow play mode, press
this button.
u(Next Track/Chapter):Press to advance to the
beginning of the next track or chapter. This button
might not work when the DVD is playing the copyright
information or the previews.
Battery Replacement
To change the remote control batteries, do the following:
1. Remove the battery compartment door located on
the bottom of the remote control.
2. Replace the two batteries in the compartment.
Make sure that they are installed correctly, using
the diagram on the inside of the battery
compartment.
3. Close the battery door securely.
If the remote control is to be stored for a long period of
time, remove the batteries and keep them in a cool,
dry place.
Problem Recommended Action
No power. The ignition might not
be in ON/RUN or
ACC/ACCESSORY.
The parental control
button might have been
turned on. The power
indicator light �ashes.
3-99
Page 242 of 472
Avoid needless heavy braking. Some people drive
in spurts — heavy acceleration followed by heavy
braking — rather than keeping pace with traffic. This
is a mistake. The brakes might not have time to cool
between hard stops. The brakes will wear out much faster
if you do a lot of heavy braking. If you keep pace with the
traffic and allow realistic following distances, you will
eliminate a lot of unnecessary braking. That means better
braking and longer brake life.
If your vehicle’s engine ever stops while you are driving,
brake normally but do not pump the brakes. If you do,
the pedal could get harder to push down. If the
engine stops, you will still have some power brake
assist. But you will use it when you brake. Once the
power assist is used up, it can take longer to stop and
the brake pedal will be harder to push.
Adding non-dealer/non-retailer accessories can affect
your vehicle’s performance. SeeAccessories and
Modifications on page 5-3.
Antilock Brake System (ABS)
Your vehicle has the Antilock Brake System (ABS), an
advanced electronic braking system that will help
prevent a braking skid.
When you start the engine and begin to drive away, ABS
will check itself. You might hear a momentary motor or
clicking noise while this test is going on. This is normal.If there is a problem with
ABS, this warning light will
stay on. SeeAnti-lock
Brake System (ABS)
Warning Light on
page 3-39.
Along with ABS, your vehicle has a Dynamic Rear
Proportioning (DRP) system. If there is a DRP problem,
both the brake and ABS warning lights come on
accompanied by a 10-second chime. The lights and
chime will come on each time the ignition is turned on
until the problem is repaired. See your dealer/retailer for
service.
Let us say the road is wet and you are driving safely.
Suddenly, an animal jumps out in front of you. You slam
on the brakes and continue braking. Here is what
happens with ABS:
A computer senses that wheels are slowing down. If
one of the wheels is about to stop rolling, the computer
will separately work the brakes at each front wheel
and at both rear wheels.
ABS can change the brake pressure faster than any
driver could. The computer is programmed to make the
most of available tire and road conditions. This can
help you steer around the obstacle while braking hard.
4-4