2008 CHEVROLET TRAIL BLAZER seat memory
[x] Cancel search: seat memoryPage 5 of 472
Front Seats......................................................1-2
Manual Seats................................................1-2
Power Seats..................................................1-3
Manual Lumbar..............................................1-3
Power Lumbar ...............................................1-3
Heated Seats.................................................1-4
Memory Seat and Pedals................................1-4
Reclining Seatbacks........................................1-6
Head Restraints.............................................1-9
Rear Seats.....................................................1-10
Rear Seat Operation.....................................1-10
Safety Belts...................................................1-12
Safety Belts: They Are for Everyone................1-12
How to Wear Safety Belts Properly.................1-17
Lap-Shoulder Belt.........................................1-25
Safety Belt Use During Pregnancy..................1-29
Safety Belt Extender.....................................1-29
Child Restraints.............................................1-30
Older Children..............................................1-30
Infants and Young Children............................1-32
Child Restraint Systems.................................1-36
Where to Put the Restraint.............................1-38Lower Anchors and Tethers for Children
(LATCH)..................................................1-39
Securing a Child Restraint in a
Rear Outside Seat Position.........................1-45
Securing a Child Restraint in the Center
Rear Seat Position....................................1-48
Securing a Child Restraint in the Right
Front Seat Position....................................1-48
Airbag System...............................................1-51
Where Are the Airbags?................................1-54
When Should an Airbag In�ate?.....................1-56
What Makes an Airbag In�ate?.......................1-57
How Does an Airbag Restrain?.......................1-58
What Will You See After an Airbag In�ates?.....1-58
Passenger Sensing System............................1-60
Servicing Your Airbag-Equipped Vehicle...........1-64
Adding Equipment to Your Airbag-Equipped
Vehicle....................................................1-65
Restraint System Check..................................1-66
Checking the Restraint Systems......................1-66
Replacing Restraint System Parts After
a Crash...................................................1-67
Section 1 Seats and Restraint Systems
1-1
Page 8 of 472
Heated Seats
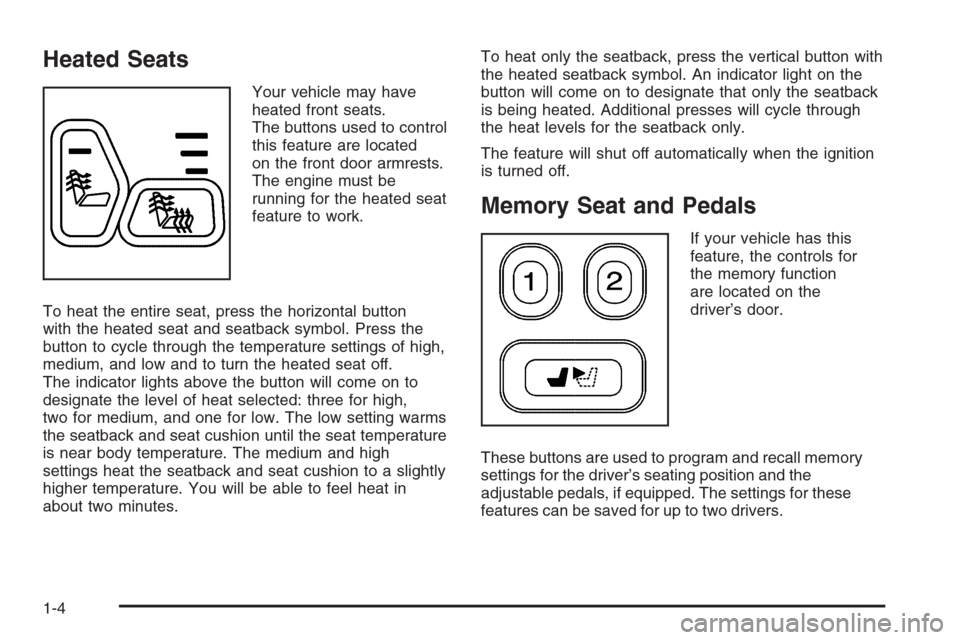
Your vehicle may have
heated front seats.
The buttons used to control
this feature are located
on the front door armrests.
The engine must be
running for the heated seat
feature to work.
To heat the entire seat, press the horizontal button
with the heated seat and seatback symbol. Press the
button to cycle through the temperature settings of high,
medium, and low and to turn the heated seat off.
The indicator lights above the button will come on to
designate the level of heat selected: three for high,
two for medium, and one for low. The low setting warms
the seatback and seat cushion until the seat temperature
is near body temperature. The medium and high
settings heat the seatback and seat cushion to a slightly
higher temperature. You will be able to feel heat in
about two minutes.To heat only the seatback, press the vertical button with
the heated seatback symbol. An indicator light on the
button will come on to designate that only the seatback
is being heated. Additional presses will cycle through
the heat levels for the seatback only.
The feature will shut off automatically when the ignition
is turned off.
Memory Seat and Pedals
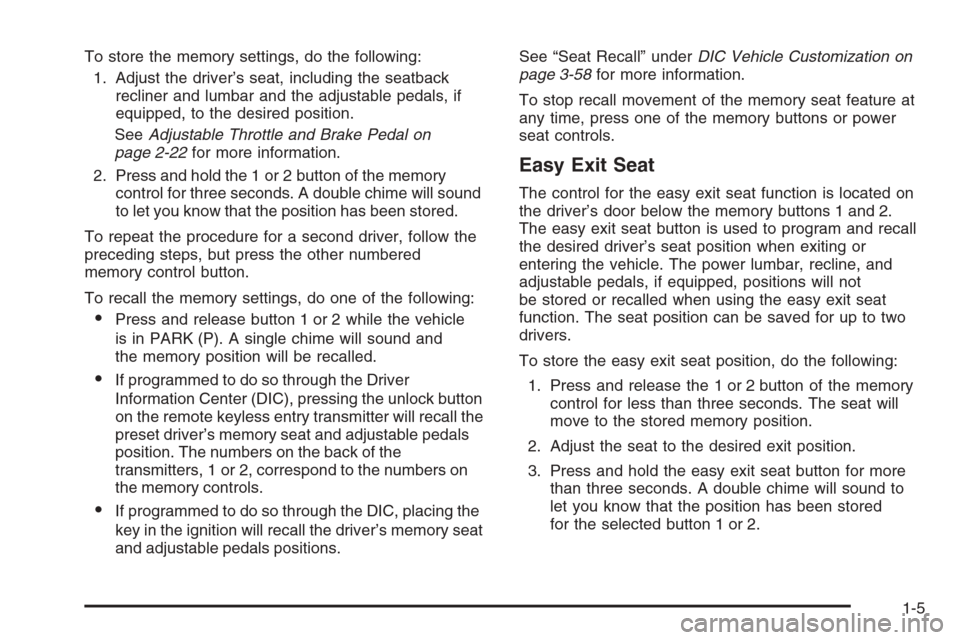
If your vehicle has this
feature, the controls for
the memory function
are located on the
driver’s door.
These buttons are used to program and recall memory
settings for the driver’s seating position and the
adjustable pedals, if equipped. The settings for these
features can be saved for up to two drivers.
1-4
Page 9 of 472
To store the memory settings, do the following:
1. Adjust the driver’s seat, including the seatback
recliner and lumbar and the adjustable pedals, if
equipped, to the desired position.
SeeAdjustable Throttle and Brake Pedal on
page 2-22for more information.
2. Press and hold the 1 or 2 button of the memory
control for three seconds. A double chime will sound
to let you know that the position has been stored.
To repeat the procedure for a second driver, follow the
preceding steps, but press the other numbered
memory control button.
To recall the memory settings, do one of the following:
Press and release button 1 or 2 while the vehicle
is in PARK (P). A single chime will sound and
the memory position will be recalled.
If programmed to do so through the Driver
Information Center (DIC), pressing the unlock button
on the remote keyless entry transmitter will recall the
preset driver’s memory seat and adjustable pedals
position. The numbers on the back of the
transmitters, 1 or 2, correspond to the numbers on
the memory controls.
If programmed to do so through the DIC, placing the
key in the ignition will recall the driver’s memory seat
and adjustable pedals positions.See “Seat Recall” underDIC Vehicle Customization on
page 3-58for more information.
To stop recall movement of the memory seat feature at
any time, press one of the memory buttons or power
seat controls.
Easy Exit Seat
The control for the easy exit seat function is located on
the driver’s door below the memory buttons 1 and 2.
The easy exit seat button is used to program and recall
the desired driver’s seat position when exiting or
entering the vehicle. The power lumbar, recline, and
adjustable pedals, if equipped, positions will not
be stored or recalled when using the easy exit seat
function. The seat position can be saved for up to two
drivers.
To store the easy exit seat position, do the following:
1. Press and release the 1 or 2 button of the memory
control for less than three seconds. The seat will
move to the stored memory position.
2. Adjust the seat to the desired exit position.
3. Press and hold the easy exit seat button for more
than three seconds. A double chime will sound to
let you know that the position has been stored
for the selected button 1 or 2.
1-5
Page 10 of 472
To repeat the procedure for a second driver, follow the
preceding steps, but press the other numbered memory
control button.
To recall the easy exit seat position, do one of the
following:
Press the easy exit seat button on the memory
control while the vehicle is in PARK (P).
The seat will move to the stored exit position.
Or, if the easy exit seat feature is activated in the
Driver Information Center (DIC), removing the key
from the ignition will move the seat to the exit
position. See “Easy Exit Seat” underDIC Vehicle
Customization on page 3-58for more information
on activating this feature in the DIC.
If an easy exit seat position has not been stored,
the default position is all the way rearward.
Reclining Seatbacks
Manual Reclining Seatbacks
{CAUTION:
You can lose control of the vehicle if you try to
adjust a manual driver’s seat while the vehicle
is moving. The sudden movement could startle
and confuse you, or make you push a pedal
when you do not want to. Adjust the driver’s
seat only when the vehicle is not moving.
{CAUTION:
If the seatback is not locked, it could move
forward in a sudden stop or crash. That could
cause injury to the person sitting there. Always
push and pull on the seatback to be sure it is
locked.
1-6
Page 191 of 472
Perimeter Lights
Press the customization button until PERIMETER
LIGHTS: ON appears in the display. To select your
preference for perimeter lighting, press the select button
while PERIMETER LIGHTS: ON is displayed on the
DIC. Pressing the select button will scroll through
the following settings:
PERIMETER LIGHTS: ON (default):The headlamps
and back-up lamps will come on for 40 seconds,
if it is dark enough outside, when you unlock the vehicle
with the Remote Keyless Entry (RKE) transmitter.
PERIMETER LIGHTS: OFF:The perimeter lights will
not come on when you unlock the vehicle with the
RKE transmitter.
To select a setting and move on to the next feature,
press the customization button while the desired setting
is displayed on the DIC.
Easy Exit Seat
Press the customization button until EASY EXIT SEAT:
OFF appears in the display. To select your preference
for seat position exit, press the select button while EASY
EXIT SEAT: OFF is displayed on the DIC. Pressing
the select button will scroll through the following settings:
EASY EXIT SEAT: OFF (default):No seat exit recall
will occur.
EASY EXIT SEAT: ON:The driver’s seat will move to
the exit position when the key is removed from the
ignition.
To select a setting and move on to the next feature,
press the customization button while the desired setting
is displayed on the DIC.
See “Easy Exit Seat” underMemory Seat, Mirrors, and
Pedals on page 1-4for more information.
3-61
Page 192 of 472
Seat Recall
Press the customization button until SEAT RECALL:
OFF appears in the display. To select your preference
for recall of the driver’s memory seat and adjustable
pedals, if your vehicle has this feature, press the select
button while SEAT RECALL: OFF is displayed on
the DIC. Pressing the select button will scroll through
the following settings:
SEAT RECALL: OFF (default):The driver’s memory
seat and adjustable pedals position you saved will
only be recalled when the memory button 1 or 2
is pressed.
SEAT RECALL: AT KEY IN:The driver’s memory seat
and adjustable pedals position you saved will be
recalled when you put the key in the ignition.
SEAT RECALL: ON REMOTE:The driver’s memory
seat and adjustable pedals position you saved will
be recalled when you unlock the vehicle with the
Remote Keyless Entry (RKE) transmitter.
To select a setting and move on to the next feature,
press the customization button while the desired setting
is displayed on the DIC.
SeeMemory Seat, Mirrors, and Pedals on page 1-4
for more information.
Curb View
Press the customization button until CURB VIEW: OFF
appears in the display. To select your preference for
curb view, press the select button while CURB VIEW:
OFF is displayed on the DIC. Pressing the select button
will scroll through the following settings:
CURB VIEW: OFF (default):The passenger’s outside
mirror will not be tilted down when the vehicle is
shifted into REVERSE (R).
CURB VIEW: PASSENGER:The passenger’s outside
mirror will be tilted down when the vehicle is shifted
into REVERSE (R).
When the vehicle is placed in PARK (P) or in any
forward gear, the mirror will return to the normal driving
position, following a short delay.
To select a setting and move on to the next feature,
press the customization button while the desired setting
is displayed on the DIC.
SeeOutside Curb View Assist Mirror on page 2-46
for more information.
3-62
Page 210 of 472
oTUNEp(MP3 Radio):Turning this knob fast
tracks reverse or advances through tracks. The track
number displays for each track.
DISPL (Display) or INFO (Information):Press to see
how long the current track has been playing. ET and/or
the elapsed time displays. To change the default on
the display, track, or elapsed time, press until the
desired display appears, then press and hold brie�y
until a beep sounds. The selected display becomes
the default.
BAND:Press to listen to the radio when a CD is playing.
The inactive CD(s) remains inside the radio for future
listening.
CD AUX (Auxiliary):Press to play a CD while listening
to the radio, or to listen to an auxiliary source (such as
rear seat entertainment, if equipped).Using Song List Mode
The six-disc CD changer has a feature called song list.
This feature is capable of saving 20 track selections.
To save tracks into the song list feature, perform
the following steps:
1. Turn the CD player on and load it with at least one
CD. See “LOAD CD” listed previously in this section
for more information.
2. Check to see that the CD changer is not in song list
mode. S-LIST should not appear on the display.
If S-LIST displays, press the SONG LIST button to
turn it off.
3. Select the desired CD by pressing the numbered
pushbutton and then use the right SEEK or TYPE
arrow to locate the track to be saved. The track
begins to play.
4. Press and hold the SONG LIST button to save the
track into memory. When SONG LIST is pressed,
one beep sounds. After two seconds of continuously
pressing the SONG LIST button, two beeps
sound to con�rm the track has been saved.
5. Repeat Steps 3 and 4 for saving other selections.
S-LIST FULL displays if more than 20 selections
are saved.
3-80
Page 466 of 472
Locks (cont.)
Programmable Automatic Door Locks............... 2-8
Rear Door Security Locks.............................2-10
Loss of Control...............................................4-12
Low Fuel Warning Light...................................3-48
Luggage Carrier..............................................2-56
Lumbar
Manual Controls............................................ 1-3
Power Controls............................................. 1-3
M
Maintenance Schedule
Additional Required Services........................... 6-6
At Each Fuel Fill........................................... 6-9
At Least Once a Month.................................. 6-9
At Least Once a Year..................................6-10
Introduction.................................................. 6-2
Maintenance Footnotes.................................. 6-7
Maintenance Record....................................6-17
Maintenance Replacement Parts....................6-15
Maintenance Requirements............................. 6-2
Owner Checks and Services........................... 6-9
Recommended Fluids and Lubricants.............6-12
Scheduled Maintenance................................. 6-4
Using.......................................................... 6-2
Your Vehicle and the Environment................... 6-2
Malfunction Indicator Light................................3-41
Manual Lumbar Controls.................................... 1-3Manual Seats................................................... 1-2
Manual, Using.................................................... iii
Memory Seat and Pedals.................................. 1-4
Message
DIC Warnings and Messages........................3-53
Mirrors
Automatic Dimming Rearview with
Compass and Temperature Display.............2-42
Automatic Dimming Rearview with
OnStar
®and Compass..............................2-38
Automatic Dimming Rearview with OnStar®,
Compass and Temperature Display.............2-40
Manual Rearview Mirror................................2-37
Manual Rearview Mirror with OnStar
®.............2-38
Outside Convex Mirror.................................2-46
Outside Curb View Assist Mirror....................2-46
Outside Heated Mirrors................................2-46
Outside Manual Mirrors................................2-45
Outside Power Mirrors..................................2-45
MP3 .............................................................3-83
MyGMLink.com................................................ 7-4
N
Navigation System, Privacy..............................7-18
Navigation/Radio System, see
Navigation Manual.......................................3-89
New Vehicle Break-In......................................2-19
8