2008 CHEVROLET TRAIL BLAZER oil dipstick
[x] Cancel search: oil dipstickPage 251 of 472
Skidding
In a skid, a driver can lose control of the vehicle.
Defensive drivers avoid most skids by taking reasonable
care suited to existing conditions, and by not overdriving
those conditions. But skids are always possible.
The three types of skids correspond to your vehicle’s
three control systems. In the braking skid, the wheels are
not rolling. In the steering or cornering skid, too much
speed or steering in a curve causes tires to slip and lose
cornering force. And in the acceleration skid, too much
throttle causes the driving wheels to spin.
A cornering skid is best handled by easing your foot off
the accelerator pedal.
If your vehicle starts to slide, ease your foot off the
accelerator pedal and quickly steer the way you want
the vehicle to go. If you start steering quickly enough,
your vehicle may straighten out. Always be ready
for a second skid if it occurs.
Of course, traction is reduced when water, snow, ice,
gravel, or other material is on the road. For safety, you
want to slow down and adjust your driving to these
conditions. It is important to slow down on slippery
surfaces because stopping distance is longer and
vehicle control more limited.While driving on a surface with reduced traction, try your
best to avoid sudden steering, acceleration, or braking,
including reducing vehicle speed by shifting to a lower
gear. Any sudden changes could cause the tires to
slide. You might not realize the surface is slippery until
your vehicle is skidding. Learn to recognize warning
clues — such as enough water, ice, or packed snow on
the road to make a mirrored surface — and slow down
when you have any doubt.
Remember: Any Antilock Brake System (ABS) helps
avoid only the braking skid.
Competitive Driving
See your warranty book before using your vehicle for
competitive driving. After reviewing your warranty book,
please see the GM Performance Parts website or catalog
for parts and equipment required for competitive driving.
Notice:If you use your vehicle for competitive
driving, the engine may use more oil than it would
with normal use. Low oil levels can damage the
engine. Be sure to check the oil level often during
competitive driving and keep the level at or near the
upper mark that shows the proper operating range
on the engine oil dipstick. For information on how to
add oil, seeEngine Oil on page 5-17.
4-13
Page 311 of 472
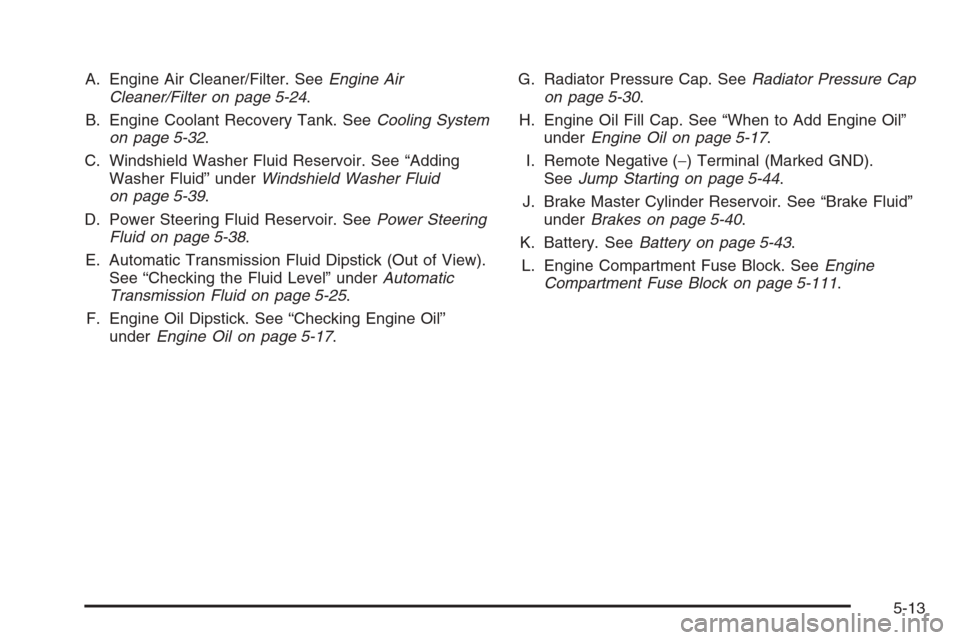
A. Engine Air Cleaner/Filter. SeeEngine Air
Cleaner/Filter on page 5-24.
B. Engine Coolant Recovery Tank. SeeCooling System
on page 5-32.
C. Windshield Washer Fluid Reservoir. See “Adding
Washer Fluid” underWindshield Washer Fluid
on page 5-39.
D. Power Steering Fluid Reservoir. SeePower Steering
Fluid on page 5-38.
E. Automatic Transmission Fluid Dipstick (Out of View).
See “Checking the Fluid Level” underAutomatic
Transmission Fluid on page 5-25.
F. Engine Oil Dipstick. See “Checking Engine Oil”
underEngine Oil on page 5-17.G. Radiator Pressure Cap. SeeRadiator Pressure Cap
on page 5-30.
H. Engine Oil Fill Cap. See “When to Add Engine Oil”
underEngine Oil on page 5-17.
I. Remote Negative (−) Terminal (Marked GND).
SeeJump Starting on page 5-44.
J. Brake Master Cylinder Reservoir. See “Brake Fluid”
underBrakes on page 5-40.
K. Battery. SeeBattery on page 5-43.
L. Engine Compartment Fuse Block. SeeEngine
Compartment Fuse Block on page 5-111.
5-13
Page 313 of 472
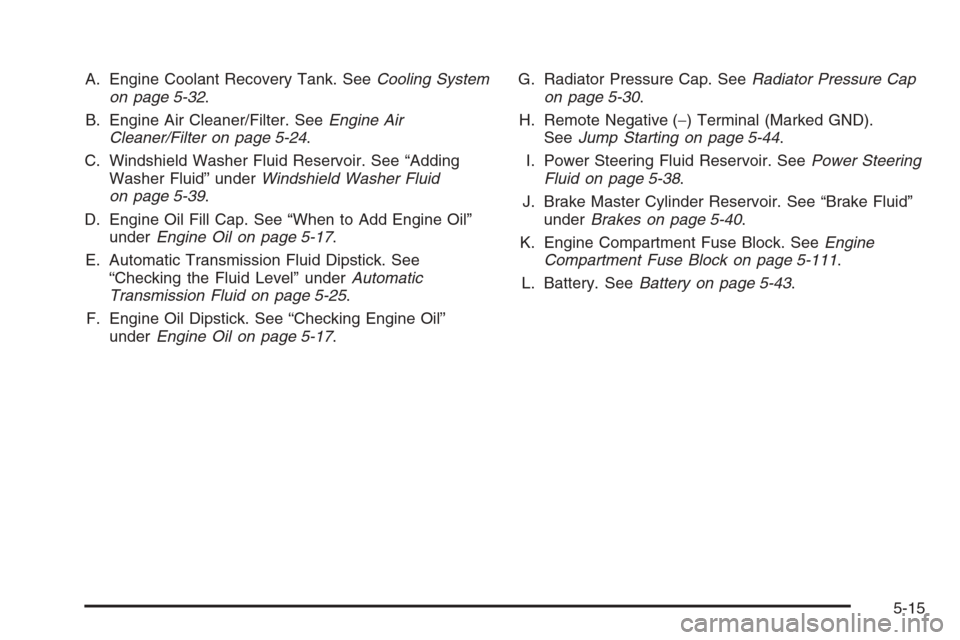
A. Engine Coolant Recovery Tank. SeeCooling System
on page 5-32.
B. Engine Air Cleaner/Filter. SeeEngine Air
Cleaner/Filter on page 5-24.
C. Windshield Washer Fluid Reservoir. See “Adding
Washer Fluid” underWindshield Washer Fluid
on page 5-39.
D. Engine Oil Fill Cap. See “When to Add Engine Oil”
underEngine Oil on page 5-17.
E. Automatic Transmission Fluid Dipstick. See
“Checking the Fluid Level” underAutomatic
Transmission Fluid on page 5-25.
F. Engine Oil Dipstick. See “Checking Engine Oil”
underEngine Oil on page 5-17.G. Radiator Pressure Cap. SeeRadiator Pressure Cap
on page 5-30.
H. Remote Negative (−) Terminal (Marked GND).
SeeJump Starting on page 5-44.
I. Power Steering Fluid Reservoir. SeePower Steering
Fluid on page 5-38.
J. Brake Master Cylinder Reservoir. See “Brake Fluid”
underBrakes on page 5-40.
K. Engine Compartment Fuse Block. SeeEngine
Compartment Fuse Block on page 5-111.
L. Battery. SeeBattery on page 5-43.
5-15
Page 315 of 472
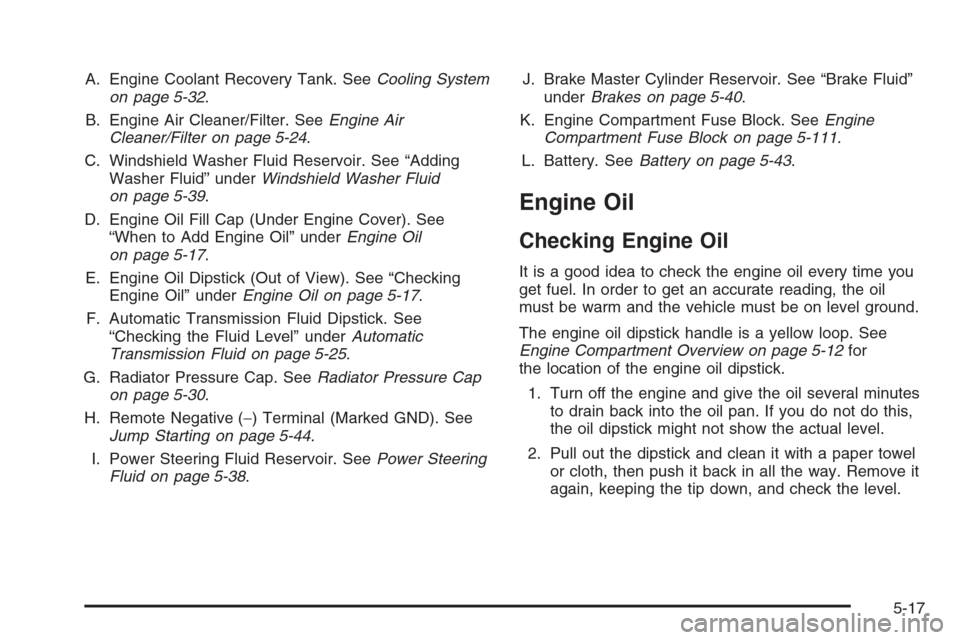
A. Engine Coolant Recovery Tank. SeeCooling System
on page 5-32.
B. Engine Air Cleaner/Filter. SeeEngine Air
Cleaner/Filter on page 5-24.
C. Windshield Washer Fluid Reservoir. See “Adding
Washer Fluid” underWindshield Washer Fluid
on page 5-39.
D. Engine Oil Fill Cap (Under Engine Cover). See
“When to Add Engine Oil” underEngine Oil
on page 5-17.
E. Engine Oil Dipstick (Out of View). See “Checking
Engine Oil” underEngine Oil on page 5-17.
F. Automatic Transmission Fluid Dipstick. See
“Checking the Fluid Level” underAutomatic
Transmission Fluid on page 5-25.
G. Radiator Pressure Cap. SeeRadiator Pressure Cap
on page 5-30.
H. Remote Negative (−) Terminal (Marked GND). See
Jump Starting on page 5-44.
I. Power Steering Fluid Reservoir. SeePower Steering
Fluid on page 5-38.J. Brake Master Cylinder Reservoir. See “Brake Fluid”
underBrakes on page 5-40.
K. Engine Compartment Fuse Block. SeeEngine
Compartment Fuse Block on page 5-111.
L. Battery. SeeBattery on page 5-43.
Engine Oil
Checking Engine Oil
It is a good idea to check the engine oil every time you
get fuel. In order to get an accurate reading, the oil
must be warm and the vehicle must be on level ground.
The engine oil dipstick handle is a yellow loop. See
Engine Compartment Overview on page 5-12for
the location of the engine oil dipstick.
1. Turn off the engine and give the oil several minutes
to drain back into the oil pan. If you do not do this,
the oil dipstick might not show the actual level.
2. Pull out the dipstick and clean it with a paper towel
or cloth, then push it back in all the way. Remove it
again, keeping the tip down, and check the level.
5-17
Page 316 of 472

When to Add Engine OilIf the oil is below the L mark for the L6 engine or the
cross-hatched area at the tip of the dipstick for the
V8 engine, add at least one quart/liter of the
recommended oil. This section explains what kind of oil to
use. For engine oil crankcase capacity, seeCapacities
and Specifications on page 5-121.
Notice:Do not add too much oil. If the engine has so
much oil that the oil level gets above the
cross-hatched area (F) that shows the proper
operating range for the L6 engine or above the
cross-hatched area for the V8 engine, the engine
could be damaged.
L6 Engine
V8 Engine
5-18
Page 317 of 472

SeeEngine Compartment Overview on page 5-12for
the location of the engine oil ll cap.
Be sure to add enough oil to put the level somewhere in
the proper operating range. Push the dipstick all the way
back in when you are through.
6.0L V8 (VIN Code H) Engine Only
Remove the engine cover to access the engine oil
ll cap:
1. Remove the screw in the center of the cover.
2. Remove the cover from the stud on the driver side.
3. Pull the cover up and off the bracket.
4. Reverse the steps to reinstall.
Except 6.0L V8 (VIN
Code H) Engine
6.0L V8 (VIN Code H)
Engine
5-19
Page 323 of 472

{CAUTION:
Operating the engine with the air cleaner/lter
off can cause you or others to be burned.
The air cleaner not only cleans the air; it helps
to stop ames if the engine backres. If it is
not there and the engine backres, you could
be burned. Do not drive with it off, and be
careful working on the engine with the air
cleaner/lter off.
Notice:If the air cleaner/lter is off, a backre can
cause a damaging engine re. And, dirt can easily get
into your engine, which will damage it. Always have
the air cleaner/lter in place when you are driving.
Automatic Transmission Fluid
When to Check and Change Automatic
Transmission Fluid
A good time to check your automatic transmission uid
level is when the engine oil is changed.
Change the uid and lter at the intervals listed in
Additional Required Services on page 6-6, and be sure
to use the transmission uid listed inRecommended
Fluids and Lubricants on page 6-12.
How to Check Automatic Transmission
Fluid
Because this operation can be a little difficult, you may
choose to have this done at the dealer/retailer service
department.
If you do it yourself, be sure to follow all the instructions
here, or you could get a false reading on the dipstick.
Notice:Too much or too little uid can damage your
transmission. Too much can mean that some of the
uid could come out and fall on hot engine parts or
exhaust system parts, starting a re. Too little uid
could cause the transmission to overheat. Be sure
to get an accurate reading if you check your
transmission uid.
5-25
Page 326 of 472
How to Add Automatic Transmission
Fluid
Refer to the Maintenance Schedule to determine what
kind of transmission uid to use. SeeRecommended
Fluids and Lubricants on page 6-12.
Add uid only after checking the transmission uid while it
is hot. A cold check is used only as a reference. If the
uid level is low, add only enough of the proper uid to
bring the level up to the HOT area for a hot check. It does
not take much uid, generally less than one pint (0.5 L).
Do not overll.
Notice:Use of the incorrect automatic transmission
uid may damage your vehicle, and the damages
may not be covered by your warranty. Always
use the automatic transmission uid listed in
Recommended Fluids and Lubricants on page 6-12.
After adding uid, recheck the uid level as
described under “How to Check Automatic
Transmission Fluid,” earlier in this section.
When the correct uid level is obtained, push the
dipstick back in all the way; then ip the handle
down to lock the dipstick in place.
Engine Coolant
The cooling system in your vehicle is lled with
DEX-COOL®engine coolant. This coolant is designed to
remain in your vehicle for ve years or 150,000 miles
(240 000 km), whichever occurs rst, if you add only
DEX-COOL
®extended life coolant.
The following explains your cooling system and how to
add coolant when it is low. If you have a problem with
engine overheating, seeEngine Overheating on
page 5-30.
A 50/50 mixture of clean, drinkable water and
DEX-COOL
®coolant will:
Give freezing protection down to−34°F (−37°C).
Give boiling protection up to 265°F (129°C).
Protect against rust and corrosion.
Help keep the proper engine temperature.
Let the warning lights and gages work as they
should.
Notice:Using coolant other than DEX-COOL
®may
cause premature engine, heater core, or radiator
corrosion. In addition, the engine coolant may
require changing sooner, at the rst maintenance
service after each 30,000 miles (50 000 km) or
24 months, whichever occurs rst. Any repairs would
not be covered by your warranty. Always use
DEX-COOL
®(silicate-free) coolant in your vehicle.
5-28