11. Turn the wheel wrench counterclockwise to lower
the vehicle. Lower the jack completely.
{CAUTION:
Incorrect or improperly tightened wheel nuts
can cause the wheel to come loose and
even come off. This could lead to a crash.
If you have to replace them, be sure to
get new original equipment wheel nuts.
Stop somewhere as soon as you can and have
the nuts tightened with a torque wrench to the
proper torque specication. SeeCapacities
and Specifications on page 5-133for wheel nut
torque specication.
Notice:Improperly tightened wheel nuts can lead
to brake pulsation and rotor damage. To avoid
expensive brake repairs, evenly tighten the wheel
nuts in the proper sequence and to the proper
torque specication. SeeCapacities and
Specifications on page 5-133for the wheel nut
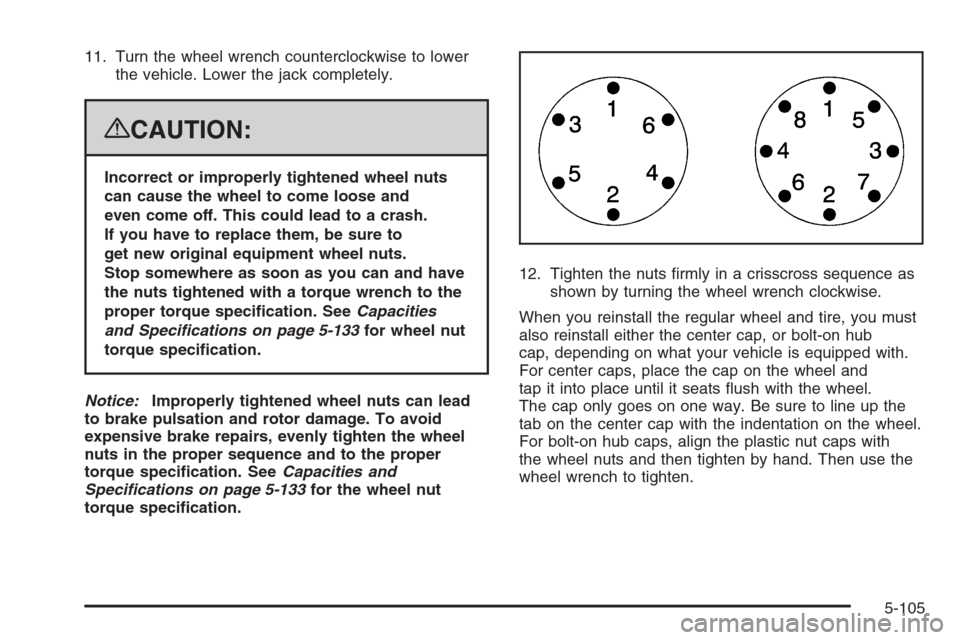
torque specication.12. Tighten the nuts rmly in a crisscross sequence as
shown by turning the wheel wrench clockwise.
When you reinstall the regular wheel and tire, you must
also reinstall either the center cap, or bolt-on hub
cap, depending on what your vehicle is equipped with.
For center caps, place the cap on the wheel and
tap it into place until it seats ush with the wheel.
The cap only goes on one way. Be sure to line up the
tab on the center cap with the indentation on the wheel.
For bolt-on hub caps, align the plastic nut caps with
the wheel nuts and then tighten by hand. Then use the
wheel wrench to tighten.
5-105
Maintenance Footnotes (Gasoline
Engine)
This maintenance section applies to vehicles with a
gasoline engine. If your vehicle has a diesel engine, see
the maintenance schedule section in the DURAMAX
®
Diesel manual.
†The U.S. Environmental Protection Agency or the
California Air Resources Board has determined that the
failure to perform this maintenance item will not nullify the
emission warranty or limit recall liability prior to the
completion of the vehicle’s useful life. We, however, urge
that all recommended maintenance services be
performed at the indicated intervals and the maintenance
be recorded.
#Lubricate the front suspension, steering linkage, and
parking brake cable guides. Control arm ball joints on
2500/3500 series vehicles require lubrication but should
not be lubricated unless their temperature is 10°F
(−12°C) or higher, or they could be damaged. Control arm
ball joints on 1500 series vehicles are maintenance-free.
Vehicles used under severe commercial operating
conditions require lubrication on a regular basis every
3,000 miles (5 000 km).(a)Visually inspect brake lines and hoses for proper
hook-up, binding, leaks, cracks, chafing, etc. Inspect disc
brake pads for wear and rotors for surface condition.
Inspect drum brake linings/shoes for wear or cracks.
Inspect other brake parts, including drums, wheel
cylinders, calipers, parking brake, etc.
(b)Visually inspect front and rear suspension and
steering system for damaged, loose or missing parts,
signs of wear or lack of lubrication. Inspect power
steering lines and hoses for proper hook-up, binding,
leaks, cracks, chafing, etc. Visually check constant
velocity joints, rubber boots, and axle seals for leaks.
(c)Visually inspect hoses and have them replaced if they
are cracked, swollen, or deteriorated. Inspect all pipes,
fittings and clamps; replace with genuine parts as
needed. To help ensure proper operation, a pressure test
of the cooling system and pressure cap and cleaning the
outside of the radiator and air conditioning condenser is
recommended at least once a year.
(d)Inspect wiper blades for wear, cracking, or
contamination. Clean the windshield and wiper blades, if
contaminated. Replace wiper blades that are worn or
damaged. See Windshield Wiper Blade Replacement on
page 5-67 and Windshield and Wiper Blades on
page 5-120 for more information.
6-8