Page 500 of 596

Changing a Flat Tire
If a tire goes �at, avoid further tire and wheel damage
by driving slowly to a level place. Turn on your hazard
warning �ashers. SeeHazard Warning Flashers on
page 3-8for more information.
{CAUTION:
Changing a tire can be dangerous. The vehicle
can slip off the jack and roll over or fall on you
or other people. You and they could be badly
injured or even killed. Find a level place to
change your tire. To help prevent the vehicle
from moving:
1. Set the parking brake �rmly.
2. Put the shift lever in PARK (P).
3. If you have a four-wheel-drive vehicle,
be sure the transfer case is in a
drive gear – not in NEUTRAL.
4. Turn off the engine and do not restart
while the vehicle is raised.
5. Do not allow passengers to remain in
the vehicle.
CAUTION: (Continued)
CAUTION: (Continued)
To be even more certain the vehicle will not
move, put blocks at the front and rear of the
tire farthest away from the one being changed.
That would be the tire on the other side, at the
opposite end of the vehicle.
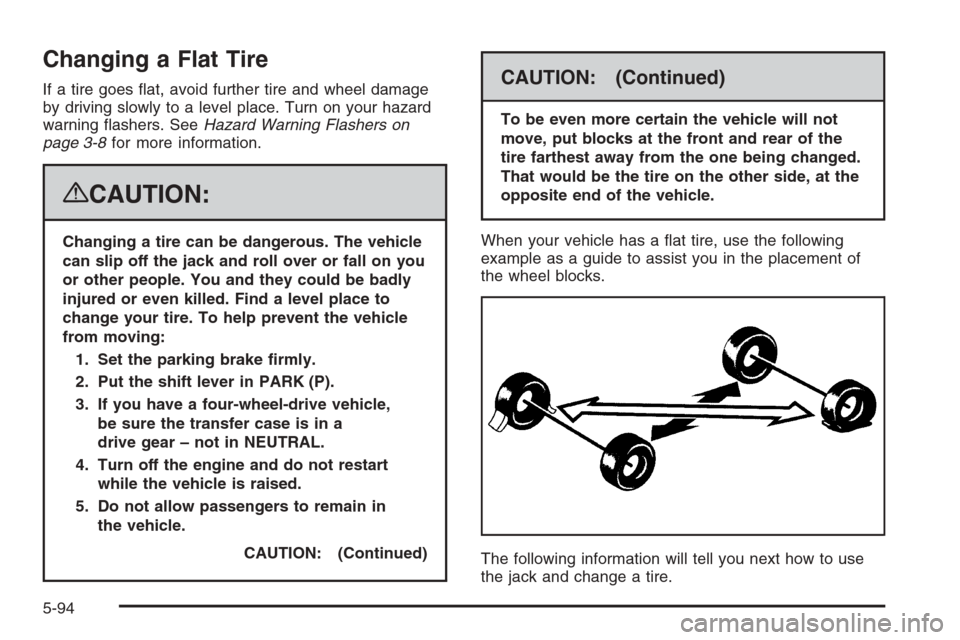
When your vehicle has a �at tire, use the following
example as a guide to assist you in the placement of
the wheel blocks.
The following information will tell you next how to use
the jack and change a tire.
5-94
Page 501 of 596
Removing the Spare Tire and Tools
A. Wing Nut
Retaining Tool Kit
B. Tool Kit
C. Wheel BlocksD. Jack
E. Wing Nut Retaining
Wheel BlocksA. Wing Nut Retaining
Wheel Blocks
B. Wheel Blocks
C. Wing Nut Retaining
Tool KitD. Tool Kit
E. Jack
F. Knob Crew Cab
Regular Cab
5-95
Page 502 of 596
A. Wing Nut
Retaining Tool Kit
B. Tool KitC. Wheel Blocks
D. Jack
E. KnobFor regular cab models, the equipment you will need is
behind the passenger’s seat. For extended and crew
cab models, the equipment is on the shelf behind the
passenger’s side second row seat.
1. Turn the knob on the jack counterclockwise to
lower the jack head to release the jack from its
holder.
2. Remove the wheel blocks and the wheel block
retainer by turning the wing nut counterclockwise.
3. Remove the wing nut used to retain the storage
bag and tools by turning it counterclockwise.
Extended Cab
5-96
Page 503 of 596
You will use the jack handle extensions and the wheel
wrench to remove the underbody-mounted spare tire.
A. Spare Tire (Valve
Stem Pointed Down)
B. Hoist Assembly
C. Hoist CableD. Tire/Wheel
Retainer
E. Hoist Shaft
F. Hoist End of
Extension ToolG. Hoist Shaft
Access Hole
H. Wheel WrenchI. Jack Handle
Extensions
J. Spare Tire Lock
(If equipped)
1. Open the spare tire lock cover on the bumper
and use the ignition key to remove the spare
tire lock (J). To remove the spare tire lock,
insert the ignition key turn and pull straight out.
2. Assemble the wheel wrench (H) and the two jack
handle extensions (I) as shown.
5-97
Page 504 of 596
3. Insert the hoist end
(open end) (F) of the
extension through
the hole (G) in the
rear bumper.
Do not use the
chiseled end of the
wheel wrench.
Be sure the hoist end of the extension (F) connects
to the hoist shaft (E). The ribbed square end of
the extension is used to lower the spare tire.4. Turn the wheel wrench (H) counterclockwise to
lower the spare tire to the ground. Continue to
turn the wheel wrench until the spare tire can be
pulled out from under the vehicle.
If the spare tire does not lower to the ground, the
secondary latch is engaged causing the tire
not to lower. SeeSecondary Latch System on
page 5-106.
5. Use the wheel wrench
hook which allows
you to pull the hoist
cable towards you
to assist in reaching the
spare tire.
5-98
Page 505 of 596
6. Tilt the tire toward the vehicle with some slack
in the cable to access the tire/wheel retainer.
Separate the retainer from the guide pin by sliding
the retainer up the pin while pressing down on
the latch.Once the retainer is separated from the guide pin,
tilt the retainer and pull it through the center of
the wheel along with the cable and guide latch.
7. Put the spare tire near the �at tire.
5-99
Page 506 of 596
Removing the Flat Tire and
Installing the Spare Tire
Use the following pictures and instructions to remove
the �at tire and raise the vehicle.
The tools you will be using include the jack (A), the
wheel blocks (B), the jack handle (C), the jack handle
extensions (D), and the wheel wrench (E).
1. Do a safety check before proceeding.
SeeChanging a Flat Tire on page 5-94
for more information.2. If your vehicle has
wheel nut caps, loosen
them by turning the
wheel wrench
counterclockwise.
If the vehicle has a center cap with wheel nut caps,
the wheel nut caps are designed to stay with the
center cap after they are loosened. Remove
the entire center cap.
5-100
Page 507 of 596
If the wheel has a smooth center cap, place the
chisel end of the wheel wrench in the slot on
the wheel, and gently pry it out.3. Use the wheel wrench and turn it counterclockwise
to loosen the wheel nuts. Do not remove the wheel
nuts yet.
5-101