Page 517 of 596
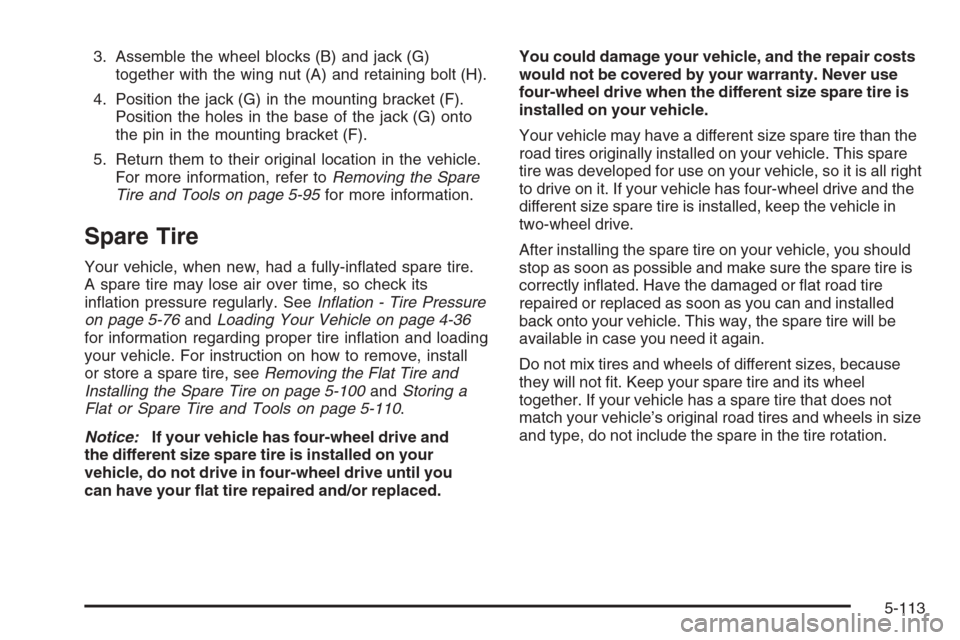
G. Hoist Shaft
Access Hole
H. Wheel WrenchI. Jack Handle
Extensions
J. Spare Tire Lock
(If Equipped)
1. Put the tire on the ground at the rear of the vehicle
with the valve stem pointed down, and to the rear.
2. Separate the tire/wheel retainer (D) from the guide
pin. Pull the pin through the center of the wheel.
Tilt the retainer down and through the center
wheel opening.
Make sure the retainer is fully seated across
the underside of the wheel.3. Attach the wheel wrench (H) and extensions (I)
together, as shown.
4. Insert the hoist end (F)
through the hole (G) in
the rear bumper and
onto the hoist shaft.
Do not use the
chiseled end of the
wheel wrench.
5-111
Page 518 of 596
5. Raise the tire part way upward. Make sure the
retainer is seated in the wheel opening.
6. Raise the tire fully against the underside of the
vehicle by turning the wheel wrench clockwise
until you hear two clicks or feel it skip twice.
You cannot overtighten the cable.
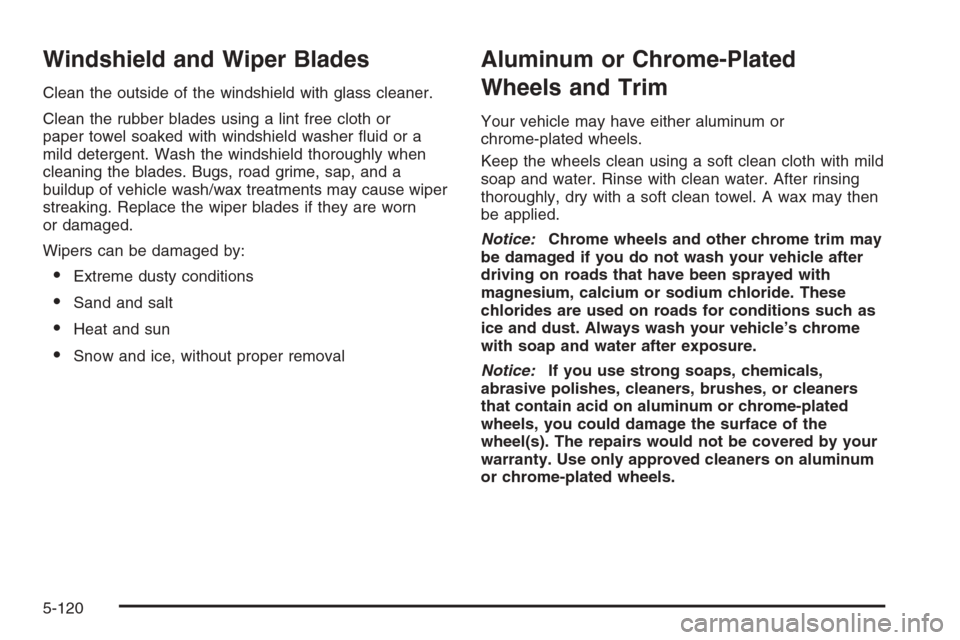
7. Make sure the tire is stored securely. Push, pull (A),
and then try to turn (B) the tire. If the tire moves,
use the wheel wrench to tighten the cable.
8. Reinstall the spare tire lock, if the vehicle has one.To store the jack and jack tools:
A. Wing Nut
B. Wheel Blocks
C. Retaining Bracket
and Wing Nut
D. Wheel Wrench and
ExtensionsE. Tool Bag
F. Jack Mounting Bracket
G. Jack
H. Retaining Bolt
1. Put the tools (D) in the tool bag (E) and place them
in the retaining bracket (C).
2. Tighten down the wing nut (C).
5-112
Page 519 of 596

3. Assemble the wheel blocks (B) and jack (G)
together with the wing nut (A) and retaining bolt (H).
4. Position the jack (G) in the mounting bracket (F).
Position the holes in the base of the jack (G) onto
the pin in the mounting bracket (F).
5. Return them to their original location in the vehicle.
For more information, refer toRemoving the Spare
Tire and Tools on page 5-95for more information.
Spare Tire
Your vehicle, when new, had a fully-in�ated spare tire.
A spare tire may lose air over time, so check its
in�ation pressure regularly. SeeInflation - Tire Pressure
on page 5-76andLoading Your Vehicle on page 4-36
for information regarding proper tire in�ation and loading
your vehicle. For instruction on how to remove, install
or store a spare tire, seeRemoving the Flat Tire and
Installing the Spare Tire on page 5-100andStoring a
Flat or Spare Tire and Tools on page 5-110.
Notice:If your vehicle has four-wheel drive and
the different size spare tire is installed on your
vehicle, do not drive in four-wheel drive until you
can have your �at tire repaired and/or replaced.You could damage your vehicle, and the repair costs
would not be covered by your warranty. Never use
four-wheel drive when the different size spare tire is
installed on your vehicle.
Your vehicle may have a different size spare tire than the
road tires originally installed on your vehicle. This spare
tire was developed for use on your vehicle, so it is all right
to drive on it. If your vehicle has four-wheel drive and the
different size spare tire is installed, keep the vehicle in
two-wheel drive.
After installing the spare tire on your vehicle, you should
stop as soon as possible and make sure the spare tire is
correctly in�ated. Have the damaged or �at road tire
repaired or replaced as soon as you can and installed
back onto your vehicle. This way, the spare tire will be
available in case you need it again.
Do not mix tires and wheels of different sizes, because
they will not �t. Keep your spare tire and its wheel
together. If your vehicle has a spare tire that does not
match your vehicle’s original road tires and wheels in size
and type, do not include the spare in the tire rotation.
5-113
Page 526 of 596

Windshield and Wiper Blades
Clean the outside of the windshield with glass cleaner.
Clean the rubber blades using a lint free cloth or
paper towel soaked with windshield washer �uid or a
mild detergent. Wash the windshield thoroughly when
cleaning the blades. Bugs, road grime, sap, and a
buildup of vehicle wash/wax treatments may cause wiper
streaking. Replace the wiper blades if they are worn
or damaged.
Wipers can be damaged by:
Extreme dusty conditions
Sand and salt
Heat and sun
Snow and ice, without proper removal
Aluminum or Chrome-Plated
Wheels and Trim
Your vehicle may have either aluminum or
chrome-plated wheels.
Keep the wheels clean using a soft clean cloth with mild
soap and water. Rinse with clean water. After rinsing
thoroughly, dry with a soft clean towel. A wax may then
be applied.
Notice:Chrome wheels and other chrome trim may
be damaged if you do not wash your vehicle after
driving on roads that have been sprayed with
magnesium, calcium or sodium chloride. These
chlorides are used on roads for conditions such as
ice and dust. Always wash your vehicle’s chrome
with soap and water after exposure.
Notice:If you use strong soaps, chemicals,
abrasive polishes, cleaners, brushes, or cleaners
that contain acid on aluminum or chrome-plated
wheels, you could damage the surface of the
wheel(s). The repairs would not be covered by your
warranty. Use only approved cleaners on aluminum
or chrome-plated wheels.
5-120
Page 527 of 596

The surface of these wheels is similar to the painted
surface of your vehicle. Do not use strong soaps,
chemicals, abrasive polishes, abrasive cleaners,
cleaners with acid, or abrasive cleaning brushes on
them because you could damage the surface. Do not
use chrome polish on aluminum wheels.
Notice:Using chrome polish on aluminum wheels
could damage the wheels. The repairs would not
be covered by your warranty. Use chrome polish on
chrome wheels only.
Use chrome polish only on chrome-plated wheels, but
avoid any painted surface of the wheel, and buff off
immediately after application.
Notice:If you drive your vehicle through an
automatic car wash that has silicone carbide tire
cleaning brushes, you could damage the aluminum
or chrome-plated wheels. The repairs would not
be covered by your warranty. Never drive a vehicle
equipped with aluminum or chrome-plated wheels
through an automatic car wash that uses silicone
carbide tire cleaning brushes.Tires
To clean the tires, use a stiff brush with tire cleaner.
Notice:Using petroleum-based tire dressing
products on your vehicle may damage the paint
�nish and/or tires. When applying a tire dressing,
always wipe off any overspray from all painted
surfaces on your vehicle.
Sheet Metal Damage
If the vehicle is damaged and requires sheet metal
repair or replacement, make sure the body repair shop
applies anti-corrosion material to parts repaired or
replaced to restore corrosion protection.
Original manufacturer replacement parts will provide the
corrosion protection while maintaining the warranty.
5-121
Page 529 of 596

Vehicle Care/Appearance Materials
Description Usage
Polishing ClothInterior and exterior
polishing cloth.
Tar and Road
Oil RemoverRemoves tar, road oil,
and asphalt.
Chrome Cleaner
and PolishUse on chrome or
stainless steel.
White Sidewall
Tire CleanerRemoves soil and black
marks from whitewalls
and raised white lettering.
Vinyl Cleaner Cleans vinyl.
Glass CleanerRemoves dirt, grime,
smoke and �ngerprints.
Chrome Wheel CleanerRemoves dirt and grime
from chrome wheels.
Finish EnhancerRemoves dust,
�ngerprints, and surface
contaminants. Spray on
and wipe off.
Description Usage
Swirl Remover PolishRemoves swirl marks, �ne
scratches, and other light
surface contamination.
Cleaner WaxRemoves light scratches
and protects �nish.
Foaming Tire Shine
Low GlossCleans, shines, and
protects tires. No wiping
necessary.
Wash Wax ConcentrateMedium foaming
shampoo. Cleans and
lightly waxes.
Biodegradable and
phosphate free.
Spot LifterQuickly removes spots
and stains from carpets,
vinyl, and cloth upholstery.
Odor EliminatorOdorless spray odor
eliminator used on fabrics,
vinyl, leather and carpet.
5-123
Page 532 of 596
Instrument Panel Fuse Block
The instrument panel fuse
block access door is
located on the driver side
edge of the instrument
panel.
Pull off the cover to access the fuse block.
Fuses Usage
1 Rear Seats
2 Rear Accessory Power Outlet
3 Steering Wheel Controls Backlight
4 Driver Door Module
5Dome Lamps, Driver Side
Turn Signal
6 Driver Side Turn Signal, Stoplamp
5-126
Page 538 of 596
J-Case Fuses Usage
66 Heated Windshield Washer System
67 Four-Wheel Drive System
68Stud 1 (Trailer Connector Battery
Power) (Optional - 40A Fuse
Required)
69 Mid-Bussed Electrical Center 1
70 Climate Control Blower
72 Not Used
73 Left Bussed Electrical Center 2Relays Usage
FAN HI Cooling Fan High Speed
FAN LO Cooling Fan Low Speed
FAN CNTRL Cooling Fan Control
HDLP LO/HID Low-Beam Headlamp
FOG LAMP Front Fog Lamps
A/C CMPRSR Air Conditioning Compressor
STRTR Starter
PWR/TRN Powertrain
FUEL PMP Fuel Pump
PRK LAMP Parking Lamps
REAR DEFOG Rear Defogger
RUN/CRANK Switched Power
5-132