2008 CHEVROLET EQUINOX remote start
[x] Cancel search: remote startPage 315 of 436
2. Get the vehicles close enough so the jumper cables
can reach, but be sure the vehicles are not touching
each other. If they are, it could cause a ground
connection you do not want. You would not be able
to start your vehicle, and the bad grounding could
damage the electrical systems.
To avoid the possibility of the vehicles rolling, set
the parking brake �rmly on both vehicles involved
in the jump start procedure. Put an automatic
transmission in PARK (P) or a manual transmission
in NEUTRAL before setting the parking brake.
Notice:If you leave your radio or other accessories
on during the jump starting procedure, they could
be damaged. The repairs would not be covered
by your warranty. Always turn off your radio and
other accessories when jump starting your vehicle.
3. Turn off the ignition on both vehicles. Unplug
unnecessary accessories plugged into the cigarette
lighter or the accessory power outlet. Turn off the
radio and all lamps that are not needed. This will
avoid sparks and help save both batteries. And it
could save your radio!
4. Open the hoods and locate the positive (+) and
negative (−) terminal locations on each vehicle.
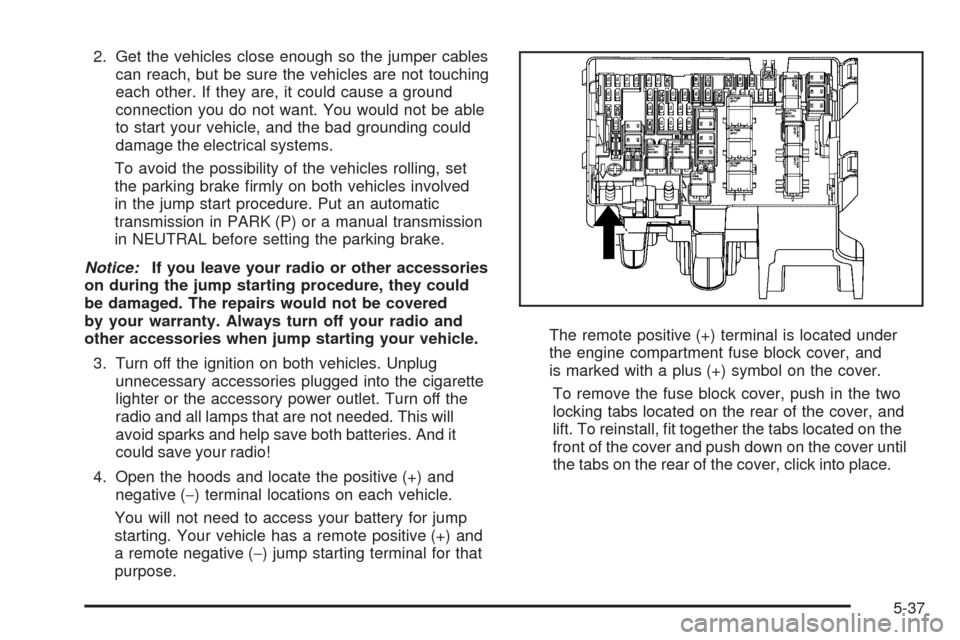
You will not need to access your battery for jump
starting. Your vehicle has a remote positive (+) and
a remote negative (−) jump starting terminal for that
purpose.The remote positive (+) terminal is located under
the engine compartment fuse block cover, and
is marked with a plus (+) symbol on the cover.
To remove the fuse block cover, push in the two
locking tabs located on the rear of the cover, and
lift. To reinstall, �t together the tabs located on the
front of the cover and push down on the cover until
the tabs on the rear of the cover, click into place.
5-37
Page 318 of 436
5. Check that the jumper cables do not have loose or
missing insulation. If they do, you could get a
shock. The vehicles could be damaged, too.
Before you connect the cables, here are some
basic things you should know. Positive (+) will go to
positive (+) or to a remote positive (+) terminal if
the vehicle has one. Negative (−) will go to a heavy,
unpainted metal engine part or to a remote
negative (−) terminal if the vehicle has one.
Do not connect positive (+) to negative (−)oryou
will get a short that would damage the battery and
maybe other parts, too. And do not connect the
negative (−) cable to the negative (−) terminal on the
dead battery because this can cause sparks.
6. Connect the red positive (+) cable to the positive (+)
terminal of the dead battery. Use a remote
positive (+) terminal if the vehicle has one.
7. Do not let the other end touch metal. Connect it to
the positive (+) terminal of the good battery. Use a
remote positive (+) terminal if the vehicle has one.
8. Now connect the black negative (−) cable to the
negative (−) terminal of the good battery. Use a
remote negative (−) terminal if the vehicle has one.Do not let the other end touch anything until the
next step. The other end of the negative (−) cable
does not go to the dead battery. It goes to a heavy,
unpainted metal engine part or to a remote
negative (−) terminal on the vehicle with the dead
battery.
9. Connect the other end of the negative (−) cable at
least 18 inches (45 cm) away from the dead battery,
but not near engine parts that move. The electrical
connection is just as good there, and the chance
of sparks getting back to the battery is much less.
Your vehicle has a remote negative (−) terminal
for this purpose.
10. Now start the vehicle with the good battery and run
the engine for a while.
11. Press the unlock button on the remote keyless
entry transmitter to disarm your content
theft-deterrent system.
12. Try to start the vehicle that had the dead battery.
If it will not start after a few tries, it probably needs
service.
5-40
Page 344 of 436
The TPMS sensor matching process is outlined below:
1. Set the parking brake.
2. Turn the ignition switch to ON/RUN with the
engine off.
3. Press the Remote Keyless Entry (RKE) transmitter’s
LOCK and UNLOCK buttons at the same time for
approximately �ve seconds. The horn sounds twice
to signal the receiver is in relearn mode and TIRE
LEARNING ACTIVE message displays on the DIC
screen.
4. Start with the driver side front tire.
5. Remove the valve cap from the valve cap stem.
Activate the TPMS sensor by increasing or
decreasing the tire’s air pressure for �ve seconds,
or until a horn chirp sounds. The horn chirp, which
may take up to 30 seconds to sound, con�rms that
the sensor identi�cation code has been matched to
this tire and wheel position.6. Proceed to the passenger side front tire, and repeat
the procedure in Step 5.
7. Proceed to the passenger side rear tire, and repeat
the procedure in Step 5.
8. Proceed to the driver side rear tire, and repeat the
procedure in Step 5. The horn sounds two times to
indicate the sensor identi�cation code has been
matched to the driver side rear tire, and the TPMS
sensor matching process is no longer active.
The TIRE LEARNING ACTIVE message on the DIC
display screen goes off.
9. Turn the ignition switch to LOCK/OFF.
10. Set all four tires to the recommended air pressure
level as indicated on the Tire and Loading
Information label.
11. Put the valve caps back on the valve stems.
5-66
Page 411 of 436
Roadside Assistance Program
For vehicles purchased in the U.S., call
1-800-CHEV-USA (1-800-243-8872); (Text telephone
(TTY): 1-888-889-2438).
For vehicles purchased in Canada, call1-800-268-6800.
Service is available 24 hours a day, 365 days a year.
As the owner of a new Chevrolet vehicle, you are
automatically enrolled in the Chevrolet Roadside
Assistance program.
Who is Covered?
Roadside Assistance coverage is for the vehicle
operator, regardless of ownership. In Canada, a person
driving this vehicle without the consent of the owner is
not eligible for coverage.
Services Provided
The following services are provided in the U.S. and
Canada up to 5 years/100,000 miles (160 000 km),
whichever occurs �rst, and, in Canada only, up to a
maximum coverage of $100.
Fuel Delivery:Delivery of enough fuel for the vehicle
to get to the nearest service station (approximately
$5 in Canada). In Canada, service to provide diesel
may be restricted. For safety reasons, propane and
other alternative fuels will not be provided through
this service.
Lock-out Service:Lock-out service will be covered
at no charge if you are unable to gain entry into your
vehicle. A remote unlock may be available if you
have an active OnStar
®subscription. To ensure
security, the driver must present personal
identi�cation before lock-out service is provided.
In Canada, the vehicle registration is also required.
Emergency Tow From a Public Roadway or
Highway:Tow to the nearest dealership for warranty
service or in the event of a vehicle-disabling crash.
Winch-out assistance is provided when the vehicle is
mired in sand, mud, or snow.
Flat Tire Change:Installation of a spare tire in good
condition, when equipped and properly in�ated, is
covered at no charge. The customer is responsible
for the repair or replacement of the tire if not covered
by a warrantable failure.
Jump Start:A battery jump start is covered at no
charge if the vehicle does not start.
Trip Routing Service (Canada only):Upon request,
Roadside Assistance will send you detailed,
computer personalized maps, highlighting your
choice of either the most direct route or the most
scenic route to your destination, anywhere in North
America, along with helpful travel information
pertaining to your trip.
7-7
Page 422 of 436
OnStar®
If your vehicle has OnStar and you subscribe to the
OnStar services, please refer to the OnStar Terms and
Conditions for information on data collection and use.
See alsoOnStar
®System on page 2-39in this manual for
more information.
Navigation System
If your vehicle has a navigation system, use of the
system may result in the storage of destinations,
addresses, telephone numbers, and other trip
information. Refer to the navigation system operating
manual for information on stored data and for deletion
instructions.
Radio Frequency
Identi�cation (RFID)
RFID technology is used in some vehicles for functions
such as tire pressure monitoring and ignition system
security, as well as in connection with conveniences
such as key fobs for remote door locking/unlocking and
starting, and in-vehicle transmitters for garage door
openers. RFID technology in GM vehicles does not use
or record personal information or link with any other
GM system containing personal information.
7-18
Page 432 of 436
Privacy..........................................................7-16
Event Data Recorders..................................7-17
Navigation System.......................................7-18
OnStar.......................................................7-18
Radio Frequency Identi�cation.......................7-18
Programmable Automatic Door Locks.................2-11
R
Radio Frequency Identi�cation (RFID), Privacy....7-18
Radios..........................................................3-64
Radio(s)........................................................3-68
Radios
Navigation/Radio System, see Navigation
Manual...................................................3-98
Reception.................................................3-110
Setting the Time..........................................3-65
Theft-Deterrent..........................................3-108
Rear Compartment Storage Panel/Cover............2-45
Rear Door Security Locks................................2-12
Rear Seat Armrest..........................................2-47
Rear Seat Entertainment System.......................3-99
Rear Windshield Washer/Wiper.........................3-10
Rearview Mirror, Automatic Dimming with
OnStar
®.....................................................2-37
Rearview Mirror with OnStar®...........................2-37Rearview Mirrors.............................................2-37
Reclining Seatbacks, Manual.............................. 1-5
Recommended Fluids and Lubricants.................6-12
Recreational Vehicle Towing.............................4-28
Reduced Engine Power Light............................3-39
Remote Keyless Entry (RKE) System.................. 2-4
Remote Keyless Entry (RKE) System, Operation . . . 2-5
Remote Vehicle Start........................................ 2-8
Removing the Flat Tire and Installing the
Spare Tire..................................................5-79
Removing the Spare Tire and Tools...................5-77
Replacement Bulbs.........................................5-50
Replacement Parts, Maintenance......................6-14
Reporting Safety Defects
Canadian Government..................................7-15
General Motors...........................................7-15
United States Government............................7-14
Restraint System Check
Checking the Restraint Systems....................1-72
Replacing Restraint System Parts After a
Crash.....................................................1-73
Retained Accessory Power (RAP)......................2-21
Roadside
Assistance Program....................................... 7-7
Rocking Your Vehicle to Get it Out....................4-22
Routing, Engine Drive Belt...............................6-15
Running the Engine While Parked.....................2-36
10
Page 434 of 436
StabiliTrak®System.......................................... 4-7
Start Vehicle, Remote....................................... 2-8
Starting the Engine.........................................2-22
Steering.......................................................... 4-9
Steering Wheel Controls, Audio.......................3-108
Steering Wheel, Tilt Wheel................................. 3-6
Storage Areas
Center Console Storage Area........................2-42
Convenience Net.........................................2-49
Cupholder(s)...............................................2-42
Glove Box..................................................2-42
Luggage Carrier..........................................2-43
Rear Compartment Storage Panel/Cover.........2-45
Rear Seat Armrest.......................................2-47
Table.........................................................2-48
Stuck in Sand, Mud, Ice, or Snow.....................4-21
Sun Visors.....................................................2-17
Sunroof.........................................................2-49
T
Table............................................................2-48
Tachometer....................................................3-26
Taillamps
Turn Signal, Stoplamps and Back-up Lamps....5-48
TCS Warning Light..........................................3-32
Theft-Deterrent, Radio....................................3-108Theft-Deterrent Systems...................................2-17
Content Theft-Deterrent................................2-17
PASS-Key
®III+...........................................2-18
PASS-Key®III+ Operation.............................2-18
Tilt Wheel........................................................ 3-6
Time, Setting..................................................3-65
Tire
Pressure Light.............................................3-34
Tires.............................................................5-52
Aluminum or Chrome-Plated Wheels,
Cleaning.................................................5-96
Buying New Tires........................................5-69
Chains.......................................................5-74
Changing a Flat Tire....................................5-76
Cleaning....................................................5-97
Compact Spare Tire.....................................5-88
Different Size..............................................5-71
High-Speed Operation..................................5-61
If a Tire Goes Flat.......................................5-75
In�ation - Tire Pressure................................5-59
Inspection and Rotation................................5-67
Installing the Spare Tire................................5-79
Pressure Monitor Operation...........................5-63
Pressure Monitor System..............................5-62
Removing the Flat Tire.................................5-79
Removing the Spare Tire and Tools...............5-77
Storing a Flat or Spare Tire and Tools............5-86
12
Page 435 of 436
Tires (cont.)
Tire Sidewall Labeling..................................5-53
Tire Terminology and De�nitions....................5-56
Uniform Tire Quality Grading.........................5-71
Wheel Alignment and Tire Balance.................5-73
Wheel Replacement.....................................5-73
When It Is Time for New Tires......................5-68
Towing
Recreational Vehicle.....................................4-28
Towing a Trailer..........................................4-33
Your Vehicle...............................................4-28
Traction
Control System (TCS).................................... 4-6
Control System Warning Light.......................3-32
StabiliTrak
®System....................................... 4-7
Transmission
Fluid, Automatic...........................................5-21
Transmission Operation, Automatic............2-24, 2-27
Trip Odometer................................................3-26
Turn and Lane-Change Signals.......................... 3-8
Turn Signal/Multifunction Lever........................... 3-7
U
Uniform Tire Quality Grading............................5-71
Using this Manual............................................... iii
V
Vehicle
Control........................................................ 4-3
Damage Warnings........................................... iv
Loading......................................................4-22
Service Soon Light......................................3-41
Symbols......................................................... iv
Vehicle Data Recording and Privacy..................7-16
Vehicle Identi�cation
Number (VIN).............................................5-99
Service Parts Identi�cation Label...................5-99
Vehicle Personalization
DIC ...........................................................3-58
Vehicle, Remote Start....................................... 2-8
Ventilation Adjustment......................................3-22
Visors...........................................................2-17
W
Warning Lights, Gages and Indicators................3-24
Warnings
DIC Warnings and Messages........................3-49
Hazard Warning Flashers............................... 3-6
Other Warning Devices.................................. 3-6
Safety and Symbols......................................... iii
Vehicle Damage.............................................. iv
13