2008 CHEVROLET CORVETTE center console
[x] Cancel search: center consolePage 8 of 432
Heated Seats
On vehicles with heated seats, the buttons are located
on the center console.
The ignition must be on for this feature to work.
L:Press to turn the seat on at the high setting, and
twice to turn it to the low setting.
9:Press to turn the system off.
Memory Seat, Mirrors and Steering
Wheel
On vehicles with the memory package, the controls are
located on the driver’s door.
1:Saves the seating position for driver 1.
2:Saves the seating position for driver 2.
B:Recalls the easy exit position.
The numbers on the back of the keyless access
transmitters correspond to the numbers on the memory
buttons.To save seating positions in the memory:
1. Adjust the driver’s seat, both outside mirrors, and
the telescopic steering column to a comfortable
driving position.
2. Press and hold button 1 until two beeps let you know
that the position has been stored in the memory.
A second seating, mirror, and telescopic steering column
position can be set by repeating the above steps and
pressing button 2.
To recall a memory position:
On vehicles with an automatic transmission, press
and release the desired button.
If the vehicle is in PARK (P), a single beep sounds
and the memory position is recalled after a brief
delay.
If the vehicle is not in PARK (P), three beeps sound
and the memory position is not recalled.
On vehicles with a manual transmission, when the
vehicle is on, the parking brake needs to be set to
recall the memory position. Press and release
the desired button.
A single beep sounds and the memory position is
recalled after a brief delay.
If the vehicle is on and the parking brake is not set,
three beeps sound and the memory position is
not recalled.
1-4
Page 66 of 432
Storage Areas................................................2-53
Glove Box...................................................2-53
Cupholders..................................................2-53
Center Console Storage.................................2-53
Floor Mats...................................................2-54
Rear Storage Area........................................2-54
Convenience Net..........................................2-55
Cargo Cover................................................2-56Roof Panel.....................................................2-57
Removing the Roof Panel..............................2-57
Storing the Roof Panel..................................2-59
Installing the Roof Panel................................2-60
Convertible Top..............................................2-62
Convertible Top (Manual)...............................2-62
Convertible Top (Power)................................2-68
Section 2 Features and Controls
2-2
Page 96 of 432

Downshifting (Manual Transmission)
Do not downshift into the gear shown below at a speed
greater than shown in the table:
FIRST (1) 50 mph (80 km/h)
SECOND (2) 74 mph (119 km/h)
THIRD (3) 101 mph (163 km/h)
FOURTH (4) 130 mph (209 km/h)
Notice:If you skip more than one gear when you
downshift, or if you race the engine when you
release the clutch pedal while downshifting, you
could damage the engine, clutch, driveshaft or the
transmission. Do not skip gears or race the
engine when downshifting.
The six-speed transmission has a spring that centers
the shift lever near THIRD (3) and FOURTH (4).
This spring helps you know which gear you are in when
you are shifting. Be careful when shifting from
FIRST (1) to SECOND (2) or downshifting from
SIXTH (6) to FIFTH (5). The spring will try to pull the
shift lever toward FOURTH (4) and THIRD (3).
Make sure you move the lever into SECOND (2) or
FIFTH (5). If you let the shift lever move in the direction
of the pulling, you may end up shifting from FIRST (1)
to FOURTH (4) or from SIXTH (6) to THIRD (3).
Parking Brake
The parking brake lever is located to the right of the
center console.
To set the parking brake, hold the brake pedal down.
Pull the parking brake lever up. If the ignition is on, the
brake system warning light will come on.
To release the parking brake, hold the brake pedal
down. Then push the release button in as you move the
parking brake lever all the way down.
Notice:Driving with the parking brake on can
overheat the brake system and cause premature
wear or damage to brake system parts. Make sure
that the parking brake is fully released and the brake
warning light is off before driving.
2-32
Page 117 of 432
Reprogramming Universal Home
Remote Buttons
Any of the three buttons can be reprogrammed by
repeating the instructions.
Erasing Universal Home Remote
Buttons
The programmed buttons should be erased when the
vehicle is sold or the lease ends.
To erase either Rolling Code or Fixed Code on the
Universal Home Remote device:
1. Press and hold the two outside buttons at the same
time for approximately 20 seconds, until the
indicator lights, located directly above the buttons,
begin to blink rapidly.
2. Once the indicator lights begin to blink, release both
buttons. The codes from all buttons are erased.
For help or information on the Universal Home Remote
System, call the customer assistance phone number
underCustomer Assistance Offices on page 7-6.
Storage Areas
Glove Box
To open the glove box, lift up on the lever. Use the key
to lock and unlock. The glove box has a light inside.
Cupholders
There are two cupholders located on the center console
next to the shift lever. To access, place your thumb
on the left side of the lid and slide the handle to
the right.
Center Console Storage
To use this storage area, pull up the lid on the driver’s
side front edge of the console and swing it to the
passenger side.
2-53
Page 136 of 432
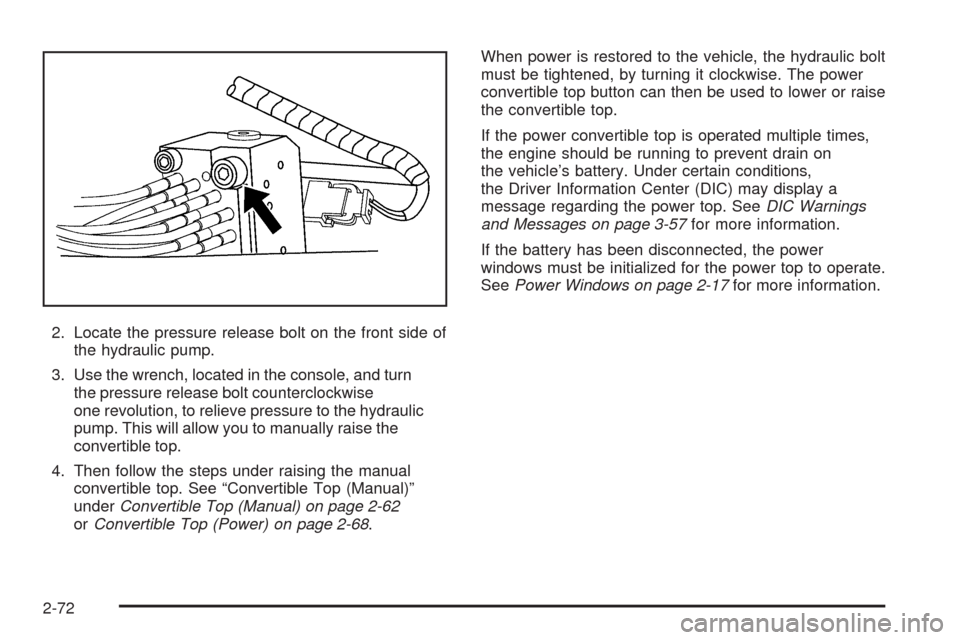
2. Locate the pressure release bolt on the front side of
the hydraulic pump.
3. Use the wrench, located in the console, and turn
the pressure release bolt counterclockwise
one revolution, to relieve pressure to the hydraulic
pump. This will allow you to manually raise the
convertible top.
4. Then follow the steps under raising the manual
convertible top. See “Convertible Top (Manual)”
underConvertible Top (Manual) on page 2-62
orConvertible Top (Power) on page 2-68.When power is restored to the vehicle, the hydraulic bolt
must be tightened, by turning it clockwise. The power
convertible top button can then be used to lower or raise
the convertible top.
If the power convertible top is operated multiple times,
the engine should be running to prevent drain on
the vehicle’s battery. Under certain conditions,
the Driver Information Center (DIC) may display a
message regarding the power top. SeeDIC Warnings
and Messages on page 3-57for more information.
If the battery has been disconnected, the power
windows must be initialized for the power top to operate.
SeePower Windows on page 2-17for more information.
2-72
Page 142 of 432
T. Heated Seat Controls (If Equipped). SeeHeated
Seats on page 1-4.
U. Shift Lever (Automatic Shown). SeeAutomatic
Transmission Operation on page 2-26orManual
Transmission Operation on page 2-30.
V. Active Handling Button. SeeActive Handling System
on page 4-7.
W. Accessory Power Outlet. SeeAccessory Power
Outlet(s) on page 3-24.
X. Selective Ride Control. SeeSelective Ride Control
on page 4-10.
Y. Center Console Cupholder. SeeCupholders on
page 2-53.
Z. Ashtray and Cigarette Lighter. SeeAshtray(s) and
Cigarette Lighter on page 3-25.
AA. Parking Brake. SeeParking Brake on page 2-32.
AB. Glove Box. SeeGlove Box on page 2-53.
AC. Instrument Panel Fuse Block. SeeInstrument Panel
Fuse Block on page 5-100.Hazard Warning Flashers
Your hazard warning �ashers let you warn others.
They also let police know you have a problem. Your
front and rear turn signal lamps will �ash on and off.
The hazard warning
�asher button is located
near the center of the
instrument panel.
Your hazard warning �ashers work no matter what
mode the ignition is in, even if the ignition is turned off.
Press the button to make the front and rear turn
signal lamps �ash on and off. Press the button again to
turn the �ashers off.
When the hazard warning �ashers are on, your turn
signals will not work.
3-6
Page 160 of 432
Clean the inside of the windshield as needed to remove
any dirt or �lm that reduces the sharpness or clarity
of the HUD image.
To clean the HUD, spray household glass cleaner on a
soft, clean cloth. Wipe the HUD lens gently, then dry
it. Do not spray cleaner directly on the lens because the
cleaner could leak into the unit.
If the ignition is on and you can not see the HUD
image, check to see if:
Something is covering the HUD unit.
The HUD dimmer control is adjusted properly.
The HUD image is adjusted to the proper height.
Ambient light is low, in the direction your vehicle
is facing.
A fuse is blown. SeeFuses and Circuit Breakers
on page 5-100.
Keep in mind that your windshield is part of the HUD
system. SeeWindshield Replacement on page 5-55.
Accessory Power Outlet(s)
The accessory power outlet can be used to connect
electrical equipment such as a cellular phone or
CB radio.
The accessory power outlet is located inside the center
console storage compartment, on the forward left side.
To use the outlet, remove the tethered cap. When not
using it, always cover the outlet with the protective cap.
Notice:Leaving electrical equipment plugged in
for an extended period of time while the vehicle is
off will drain the battery. Power is always supplied to
the outlets. Always unplug electrical equipment
when not in use and do not plug in equipment that
exceeds the maximum 20 ampere rating.
Certain electrical accessories may not be compatible
with the accessory power outlet and could result
in blown vehicle or adapter fuses. If you experience a
problem, see your dealer/retailer for additional
information on accessory power outlets.
3-24
Page 178 of 432
Antilock Brake System (ABS)
Warning Light
For vehicles with the
Antilock Brake System
(ABS), this light comes on
brie�y when the engine
is started.
That is normal. If the light does not come on then,
have it �xed so it will be ready to warn you if there is a
problem.
If the ABS light stays on, turn the ignition off. If the light
comes on while driving, stop as soon as it is safely
possible and turn the ignition off. Then start the engine
again to reset the system. If the ABS light stays on,
or comes on again while driving, the vehicle needs
service. If the regular brake system warning light is
not on, the vehicle still has brakes, but not antilock
brakes. If the regular brake system warning light is also
on, the vehicle does not have antilock brakes and
there is a problem with the regular brakes. SeeBrake
System Warning Light on page 3-41.
For vehicles with a Driver Information Center (DIC),
seeDIC Warnings and Messages on page 3-57for all
brake related DIC messages.
Traction Control System (TCS)
Warning Light
This light should come on
brie�y as you start the
engine. If the light does not
come on then, have it
�xed so it will be ready to
warn you if there is a
problem.
If it stays on, or comes on and the Driver Information
Center (DIC) shows a SERVICE TRACTION SYSTEM
message when you are driving, there is a problem
with your Traction Control System (TCS) and your
vehicle needs service. When this light is on, the system
will not limit wheel spin. Adjust your driving accordingly.
If the driver turns off the TCS by pressing the button
on the console, the TCS light will come on and the
TRACTION SYSTEM OFF message will show on the
DIC. SeeDIC Warnings and Messages on page 3-57
for more information.
3-42