2008 CHEVROLET CORVETTE manual radio set
[x] Cancel search: manual radio setPage 133 of 432
Lowering the Power Convertible Top
1. Park on a level surface. Start the engine. Shift an
automatic transmission into PARK (P) and set the
parking brake. Shift a manual transmission into
NEUTRAL, and set the parking brake.
2. Make sure the trunk is closed and the rear trunk
partition in the rear storage area is in the fastened
upright position, and that no objects are forward
of the divider. See “Rear Trunk Partition” under
Rear Storage Area on page 2-54.
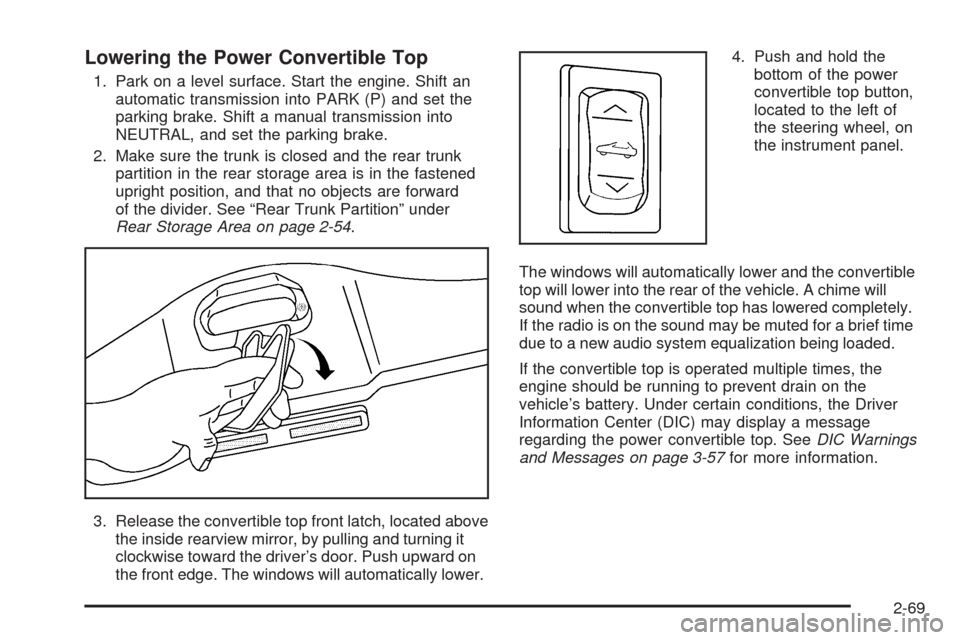
3. Release the convertible top front latch, located above
the inside rearview mirror, by pulling and turning it
clockwise toward the driver’s door. Push upward on
the front edge. The windows will automatically lower.4. Push and hold the
bottom of the power
convertible top button,
located to the left of
the steering wheel, on
the instrument panel.
The windows will automatically lower and the convertible
top will lower into the rear of the vehicle. A chime will
sound when the convertible top has lowered completely.
If the radio is on the sound may be muted for a brief time
due to a new audio system equalization being loaded.
If the convertible top is operated multiple times, the
engine should be running to prevent drain on the
vehicle’s battery. Under certain conditions, the Driver
Information Center (DIC) may display a message
regarding the power convertible top. SeeDIC Warnings
and Messages on page 3-57for more information.
2-69
Page 134 of 432
Raising the Power Convertible Top
Notice:If you raise or lower the convertible top
while the vehicle is in motion, you could damage the
top or the top mechanism. The repairs would not
be covered by your warranty. Always put an
automatic transmission in PARK (P) or a manual
transmission in NEUTRAL before raising or lowering
the convertible top.
1. Park on a level surface. Start the engine. Shift an
automatic transmission into PARK (P) and set the
parking brake. Shift a manual transmission into
NEUTRAL and set the parking brake.
2. Make sure the trunk lid is closed and the rear trunk
partition in the rear storage area is in the fastened
upright position, and that no objects are forward
of the divider. See “Rear Trunk Partition” under
Rear Storage Area on page 2-54.
3. Push and hold the top of the power convertible top
button. The top will raise and the windows will lower
if they were in the raised position. A chime will
sound when the top is raised completely.4. After the convertible top is completely raised,
release the power convertible top button.
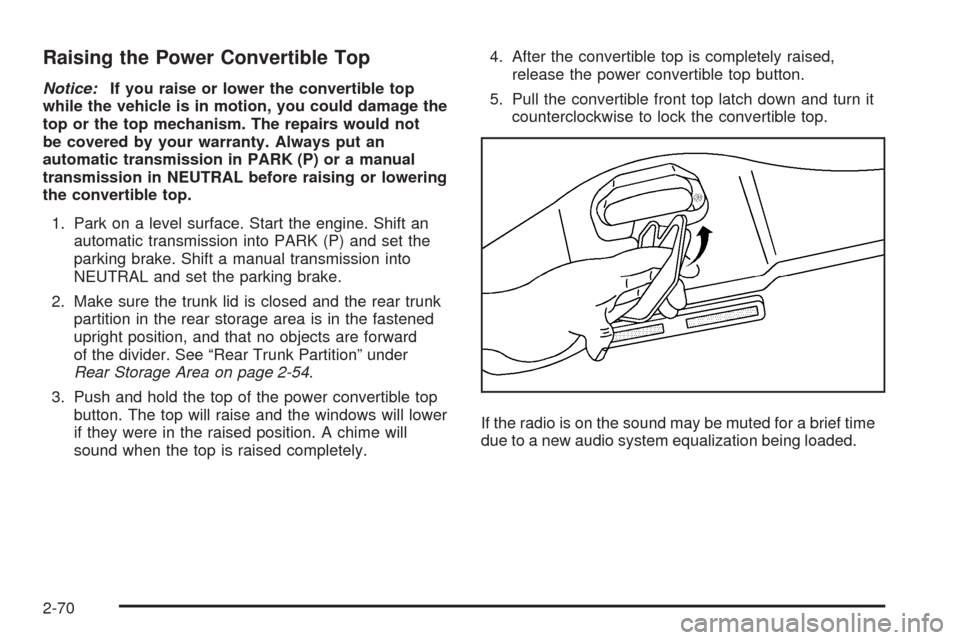
5. Pull the convertible front top latch down and turn it
counterclockwise to lock the convertible top.
If the radio is on the sound may be muted for a brief time
due to a new audio system equalization being loaded.
2-70
Page 157 of 432

Manual Paddle Shift Gear Indicator (If Equipped)
These displays on the HUD are for use when
using the manual paddle shift controls to shift
the transmission. See “Manual Paddle Shift” in
Automatic Transmission Operation on page 2-26.
Shift Light
This light is used for performance driving to indicate
that the vehicle’s best performance level has
been reached to shift the transmission into the next
higher gear. An arrow pointing up will light up on
the display just prior to reaching the engine fuel
cut-off mode. This cut-off is about 6,500 RPM for
the LS3 engine and 7,000 RPM for the LS7 engine.
Check Gages Warning
Engine Coolant Temperature Gage
Transmission Fluid Temperature Gage,
(Automatic Transmission Vehicles Only)
Engine Oil Temperature Gage
Engine Oil Pressure Gage
G-Force Gage
Audio Functions, Street Mode Only
Navigation, Only with Navigation Radio,
Turn-by-Turn GuidanceThere are three HUD modes that you can choose to view
in the HUD display. By pressing the MODE button, you
can scroll through these modes in the following order:
Street Mode supports
audio and navigation
functions with your choice
of tachometer settings.
Track Mode 1 supports the
G-Force gage and minor
gages with a circular
tachometer.
Track Mode 2 supports
G-Force gages and minor
gages with a linear
tachometer.
3-21
Page 218 of 432
If you choose BOTH, on automatic transmission
vehicles, both doors will automatically unlock when the
shift lever is moved into PARK (P). On manual
transmission vehicles, both doors will automatically
unlock when the ignition is turned off or is in RAP.
When the mode you want is selected, press the OPTION
button to set your choice and advance to the next
personal option.
Language:This option allows you to select the
language the DIC, the Head-Up Display (HUD), if your
vehicle has this feature, and the radio uses to display
messages. Each language mode will be displayed in its
own language. For example, English will be displayed
as ENGLISH, Spanish as ESPANOL, etc. If your vehicle
has the navigation system, you will not have the
Japanese language mode.
Press the OPTION button until LANGUAGE appears on
the display, then press the RESET button to scroll
through the following modes:
ENGLISH (default)
DEUTSCH (German)
FRANCAIS (French)
ITALIANO (Italian)
ESPANOL (Spanish)If you choose a language that you do not understand,
press the OPTION and RESET buttons for �ve seconds.
The DIC will begin displaying all of the various
languages one by one for as long as the buttons are
pressed. When the desired language is displayed,
release the buttons and the DIC will set to this language.
When the mode you want is selected, press the
OPTION button to set your choice and advance to the
next personal option.
Personalize Name:This option allows you to type in a
name or greeting that will appear on the DIC display
whenever the corresponding keyless access
transmitter (1 or 2) is used or one of the memory
buttons (1 or 2) located on the driver’s door is pressed.
Press the OPTION button until PERSONALIZE
NAME appears on the display, then press the RESET
button to scroll through the following modes:
YES
NO (default)
If you choose YES, you can type in a name that will
appear on the DIC display.
3-82
Page 224 of 432
Setting Preset Stations
Up to 30 stations (six AM, six XM1 and six XM2
(if equipped), six FM1, and six FM2), can be
programmed on the six numbered pushbuttons, by
performing the following steps:
1. Turn the radio on.
2. Press BAND to select AM, XM1 or XM2
(if equipped), FM1, or FM2.
3. Tune in the desired station.
4. Press AUTO EQ to select the equalization.
5. Press and hold one of the six numbered
pushbuttons until a beep sounds. When that
numbered pushbutton is pressed, the station that
was set, returns and the equalization that was
selected is stored for that pushbutton.
6. Repeat the steps for each pushbutton.
Setting the Tone (Bass/Treble)
O
/e(Bass/Treble):Press to select BASS or
TREBLE. Turn to increase or to decrease the tone.
If a station is weak or has static, decrease the treble.
To adjust the bass and treble to the middle position,
press and hold when the tone control is on the display.
The level changes to the middle position.
To adjust all tone and speaker controls to the middle
position, press and hold when no tone or speaker control
is displayed. AUDIO SETTINGS CENTERED displays.
AUTO EQ (Automatic Equalization):Press to
select customized equalization settings designed for
CLASSICAL, POP, ROCK, JAZZ, TALK, and
COUNTRY. Selecting CUSTOM or changing bass or
treble, returns the EQ to the manual bass and
treble settings.
The radio saves separate AUTO EQ settings for each
preset and source.
If the radio has the Bose
®sound system, the
equalization settings are EQ1 through EQ6 and
CUSTOM.
3-88
Page 230 of 432
If the CD is not removed, after 25 seconds, the CD is
automatically pulled back into the player. If the CD
is pushed back into the player, before the 25 second
time period is complete, the player senses an error and
tries to eject the CD several times before stopping.
Do not repeatedly press the
Xbutton to eject a
CD after you have tried to push it in manually.
The player’s 25-second eject timer resets at each
press of eject, causing the player not to eject the CD
until the 25-second time period has elapsed.
O/e(Tune):Turn to go to the next or previous
track.
{(Reverse):Press and hold to reverse within the
current track.
|(Fast Forward):Press and hold to fast forward
through the current track.
RDM (Random):Press to hear the tracks in random,
rather than sequential, order. RANDOM DISC PLAY
displays.
RDM (Random) (Radio with Six-Disc CD Player):
Press to hear the tracks in random, rather than
sequential order, on one CD or all of the loaded CDs.To use random, do one of the following:
To play the tracks on the CD you are listening to in
random order, press and release until RANDOM
DISC PLAY displays. Once all tracks on this
disc have played, RANDOM DISC PLAY will repeat.
To play the tracks on all of the CDs that are loaded
in random order, press and release until RANDOM
ALL DISCS displays.
To turn off random play, press and release the RDM
button until RANDOM OFF displays.
RPT (Repeat):Press to hear a track over again.
REPEAT displays.
RPT (Repeat) (Radio with Six-Disc CD Player):
Press to hear a track or an entire CD over again.
To use repeat, do one of the following:
To repeat a track, press and release until REPEAT
displays.
To repeat an entire CD, press and release until
REPEAT ONE DISC displays.
To turn off repeated play, press and release the
RPT button until REPEAT OFF displays.
3-94
Page 239 of 432
Navigation/Radio System
Your vehicle may have a navigation radio system.
The navigation system has built-in features intended to
minimize driver distraction. Technology alone, no
matter how advanced, can never replace your own
judgment. See the Navigation System manual for some
tips to help you reduce distractions while driving.
Theft-Deterrent Feature
THEFTLOCK®is designed to discourage theft of your
vehicle’s radio. The feature works automatically by
learning a portion of the Vehicle Identi�cation Number
(VIN). If the radio is moved to a different vehicle, it
will not operate and LOCKED will appear on the display.
With THEFTLOCK
®activated, the radio will not
operate if stolen.
Your radio has a blinking indicator light located on the
upper left side of the radio. The indicator light is used
to show that the theft-deterrent feature mode is set.
The blinking indicator light will only �ash when the
ignition is in the off position.
Audio Steering Wheel Controls
If your vehicle has this
feature, some audio
controls can be adjusted
at the steering wheel.
They include the
following:
xw(Next/Previous):Press the down or up arrow to
go to the next or to the previous radio station and
stay there. The radio only seeks stations with a strong
signal that are in the selected band.
To scan stations, press and hold either the down or up
arrow for two seconds until SCAN displays and a
beep sounds. The radio goes to a station, plays for a
few seconds, then goes to the next station. Press either
the down or up arrow again to stop scanning.
3-103
Page 420 of 432
Audio System.................................................3-84
Audio Steering Wheel Controls....................3-103
Diversity Antenna System............................3-105
Navigation/Radio System, see Navigation
Manual.................................................3-103
Radio Reception........................................3-104
Setting the Clock.........................................3-85
Theft-Deterrent Feature...............................3-103
XM™ Satellite Radio Antenna System...........3-105
Audio System(s).............................................3-85
Automatic Door Lock.......................................2-12
Automatic Transmission
Fluid..........................................................5-27
Operation...................................................2-26
B
Battery..........................................................5-45
Exterior Lighting Battery Saver......................3-19
Run-Down Protection...................................3-20
Brake
Emergencies................................................ 4-5
Brakes..........................................................5-42
System Warning Light..................................3-41
Braking........................................................... 4-4
Braking in Emergencies..................................... 4-5
Break-In, New Vehicle.....................................2-21Bulb Replacement...........................................5-52
Halogen Bulbs............................................5-52
Headlamp Aiming........................................5-51
Headlamps, Front Turn Signal, and
Parking Lamps.........................................5-53
High Intensity Discharge (HID) Lighting...........5-52
Replacement Bulbs......................................5-55
Taillamps, Turn Signal, and Stoplamps............5-54
Buying New Tires...........................................5-74
C
Calibration.............................................2-37, 2-39
California Fuel.................................................. 5-6
California Perchlorate Materials Requirements....... 5-4
California Proposition 65 Warning....................... 5-4
Canadian Owners................................................ ii
Capacities and Speci�cations..........................5-107
Carbon Monoxide...........................2-13, 2-35, 4-19
Care of
Safety Belts................................................5-90
Cargo Cover..................................................2-56
CD, MP3 .......................................................3-98
Center Console Storage Area...........................2-53
Chains, Tire...................................................5-81
Check
Engine Light...............................................3-45
2