2008 CHEVROLET CORVETTE key
[x] Cancel search: keyPage 216 of 432
FOB Reminder:This option chirps the horn three times
when the driver’s door is closed and there is a keyless
access transmitter inside the interior of the vehicle.
This will only occur when the vehicle is off.
Press the OPTION button until FOB REMINDER
appears on the display, then press the RESET button to
scroll through the following modes:
YES
NO (default)
If you choose YES, the horn will chirp three times when
a keyless access transmitter is inside of the vehicle
while the ignition is turned off and the driver’s door is
closed.
If you choose NO, this option will turn off.
When the mode you want is selected, press the
OPTION button to set your choice and advance to the
next personal option.
Passive Door Locking:This option allows you to
select whether the doors automatically lock during
normal vehicle exit. When the ignition is turned off and
all doors become closed, the vehicle will determine
how many keyless access transmitters remain in
the vehicle interior. If at least one keyless access
transmitter has been removed from the interior of the
vehicle, the doors will lock after eight seconds.For example, if there are two keyless access
transmitters in the vehicle and one is removed, the
other will be locked in. The keyless access transmitter
locked in the vehicle can still be used to start the vehicle
or unlock the doors, if needed. A person approaching
the outside of the locked vehicle without an authorized
keyless access transmitter, however, will not be able
to open the door, even with a transmitter in the vehicle.
You may temporarily disable the passive door locking
feature by pressing the door unlock switch for
three seconds on an open door. Passive door locking will
then remain disabled until a door lock switch is pressed or
until the power mode transitions from the off power mode.
Press the OPTION button until PASSIVE DOOR
LOCKING appears on the display, then press the
RESET button to scroll through the following modes:
OFF (default)
SILENT
HORN
If you choose OFF, this option will turn off.
If you choose SILENT, the doors will automatically lock
eight seconds after you turn the ignition off, remove
a keyless access transmitter from the interior of
the vehicle, and close both doors.
3-80
Page 217 of 432
If you choose HORN, the doors will automatically lock
and the horn will chirp eight seconds after you turn
the ignition off, remove a keyless access transmitter
from the interior of the vehicle, and close both doors.
If you are parking in a quiet area and do not want
the horn to sound when the doors lock, press the lock
button on the keyless access transmitter immediately
after removing it from the interior and closing the doors.
This will lock the doors and cancel the passive locking
for this ignition cycle.
When the mode you want is selected, press the
OPTION button to set your choice and advance to the
next personal option.
Passive Door Unlock:This option allows you to select
which doors will automatically unlock when you
approach and open the driver’s door with the keyless
access transmitter. SeeDoor Locks on page 2-10
for more information.
Press the OPTION button until PASSIVE DOOR
UNLOCK appears on the display, then press the RESET
button to scroll through the following modes:
DRIVER (default)
BOTHIf you choose DRIVER, only the driver’s door will
automatically unlock when you approach and open the
driver’s door with the keyless access transmitter.
If you choose BOTH, both doors will automatically
unlock when you approach and open the driver’s door
with the keyless access transmitter.
Auto Unlock:This option allows you to select whether
the driver’s door, both doors or neither door
automatically unlocks when the shift lever is moved into
PARK (P) for automatic transmission vehicles or
when the ignition is turned off or is in RAP for manual
transmission vehicles.
Press the OPTION button until AUTO UNLOCK appears
on the display, then press the RESET button to scroll
through the following modes:
OFF
DRIVER
BOTH (default)
If you choose OFF, this option will turn off.
If you choose DRIVER, on automatic transmission
vehicles, the driver’s door will automatically unlock when
the shift lever is moved into PARK (P). On manual
transmission vehicles, the driver’s door will automatically
unlock when the ignition is turned off or is in RAP.
3-81
Page 218 of 432
If you choose BOTH, on automatic transmission
vehicles, both doors will automatically unlock when the
shift lever is moved into PARK (P). On manual
transmission vehicles, both doors will automatically
unlock when the ignition is turned off or is in RAP.
When the mode you want is selected, press the OPTION
button to set your choice and advance to the next
personal option.
Language:This option allows you to select the
language the DIC, the Head-Up Display (HUD), if your
vehicle has this feature, and the radio uses to display
messages. Each language mode will be displayed in its
own language. For example, English will be displayed
as ENGLISH, Spanish as ESPANOL, etc. If your vehicle
has the navigation system, you will not have the
Japanese language mode.
Press the OPTION button until LANGUAGE appears on
the display, then press the RESET button to scroll
through the following modes:
ENGLISH (default)
DEUTSCH (German)
FRANCAIS (French)
ITALIANO (Italian)
ESPANOL (Spanish)If you choose a language that you do not understand,
press the OPTION and RESET buttons for �ve seconds.
The DIC will begin displaying all of the various
languages one by one for as long as the buttons are
pressed. When the desired language is displayed,
release the buttons and the DIC will set to this language.
When the mode you want is selected, press the
OPTION button to set your choice and advance to the
next personal option.
Personalize Name:This option allows you to type in a
name or greeting that will appear on the DIC display
whenever the corresponding keyless access
transmitter (1 or 2) is used or one of the memory
buttons (1 or 2) located on the driver’s door is pressed.
Press the OPTION button until PERSONALIZE
NAME appears on the display, then press the RESET
button to scroll through the following modes:
YES
NO (default)
If you choose YES, you can type in a name that will
appear on the DIC display.
3-82
Page 219 of 432
To program a name, use the following procedure:
1. Enter the PERSONAL OPTIONS menu and select
the driver number (1 or 2) that you would like to
program by following the instructions listed
previously under “Entering the Personal Options
Menu”.
2. Press the OPTION button until the PERSONALIZE
NAME option appears on the display.
3. Select YES under PERSONALIZE NAME by
pressing the RESET button.
4. Press the OPTION button and a cursor will display
where you can insert a letter.
5. Press the OPTION button again until the letter you
want is displayed. To scroll through the letters faster
and without a beeping noise, keep the OPTIONS
button depressed. There are alpha/numeric
characters and a blank space available.
6. Then press the RESET button to select the letter of
your choice and proceed on to the next space to
the right.If you make a mistake and would like to clear or
replace a letter, perform the following steps:
6.1. Press the RESET button to reach the letter
you would like to change.
6.2. Press the OPTION button to scroll through
the letter choices.
6.3. Press the RESET button to select the letter
and proceed on to the next space to the right.
7. Repeat Steps 5 and 6 until the name or greeting
you want is complete. After the name or greeting
is complete, keep pressing the RESET button
until the display turns blank and exits out of this
option. You can program up to 20 characters.
If you choose NO, this option will turn off.
If a customized name or greeting is not programmed,
the DIC display will show Driver 1 or Driver 2 to
correspond with either the number on the back of the
keyless access transmitter (1 or 2) that is being used or
to the memory button (1 or 2) that is pressed.
PERSONALIZE NAME is the last option available to
program in the PERSONAL OPTIONS menu. Pressing
the OPTION button after this setting will exit you from
the PERSONAL OPTIONS menu. The last item you
were in prior to entering PERSONAL OPTIONS will then
display on the DIC.
3-83
Page 276 of 432
California Proposition 65 Warning
Most motor vehicles, including this one, contain and/or
emit chemicals known to the State of California to
cause cancer and birth defects or other reproductive
harm. Engine exhaust, many parts and systems
(including some inside the vehicle), many �uids, and
some component wear by-products contain and/or
emit these chemicals.
California Perchlorate Materials
Requirements
Certain types of automotive applications, such as airbag
initiators, seat belt pretensioners, and lithium batteries
contained in remote keyless entry transmitters, may
contain perchlorate materials. Special handling may
be necessary. For additional information, see
www.dtsc.ca.gov/hazardouswaste/perchlorate.
Doing Your Own Service Work
{CAUTION:
You can be injured and your vehicle could be
damaged if you try to do service work on a
vehicle without knowing enough about it.
Be sure you have sufficient knowledge,
experience, the proper replacement parts,
and tools before you attempt any vehicle
maintenance task.
Be sure to use the proper nuts, bolts, and
other fasteners. English and metric
fasteners can be easily confused. If you
use the wrong fasteners, parts can later
break or fall off. You could be hurt.
If you want to do some of your own service work, you
should use the proper service manual. It tells you much
more about how to service your vehicle than this
manual can. To order the proper service manual, see
Service Publications Ordering Information on page 7-17.
5-4
Page 377 of 432

Fuse Usage
1Transmission Control Module/
Transmission
2 Horn, Alternator Sense
3 Antilock Brakes/Real Time Damping
4 Wiper
5 Stoplamps/Back-Up Lamps
6 02 Sensor
7 Battery Main 5
8 Park Lamps
9Powertrain Relay Input/Electronic
Throttle Control
10 Manual Transmission Solenoids
11Engine Control Module/Transmission
Control Module/Easy Key Module
12 Odd Numbered Fuel Injectors
13Electronic Suspension Control
(Option)
14Canister Purge Solenoid, Mass Air
Flow Sensor
15 Air Conditioner Compressor
16 Even Numbered Fuel Injectors
17 Windshield WasherFuse Usage
18 Headlamp Washer
19Passenger Side Low-Beam
Headlamp
20 Fuel Pump
21 Driver Side Low-Beam Headlamp
22 Front Fog Lamp
23Passenger Side High-Beam
Headlamp
24 Driver Side High-Beam Headlamp
J-Style Fuses Usage
25 Cooling Fan
26 Battery Main 3
27 Antilock Brake System
28Heating/Ventilation/Air Conditioning
Blower
29 Battery Main 2
30 Starter
31 Audio Ampli�er
32 Blank
33 Battery Main 1
5-105
Page 388 of 432

(f)Lubricate all key lock cylinders and body door
hinges. Lubricate all hinges and latches, including those
for the hood, rear compartment, console door, and
any folding seat hardware. More frequent lubrication
may be required when exposed to a corrosive
environment. Applying silicone grease on weatherstrips
with a clean cloth will make them last longer, seal
better, and not stick or squeak.
(g)A fluid loss in any vehicle system could indicate a
problem. Have the system inspected and repaired
and the fluid level checked. Add fluid if needed.
(h)Change automatic transmission fluid and filter if the
vehicle is mainly driven under one or more of these
conditions:
�In heavy city traffic where the outside temperature
regularly reaches 90°F (32°C) or higher.
�In hilly or mountainous terrain.
�Uses such as high performance operation.
(i)Drain, flush, and refill cooling system. This service
can be complex; you should have your dealer/retailer
perform this service. See Engine Coolant on page 5-28
for what to use. Inspect hoses. Clean radiator,
condenser, pressure cap, and filler neck. Pressure
test the cooling system and pressure cap.(j)If you drive regularly under dusty conditions, the filter
may require replacement more often.
(k)If you drive regularly under dusty conditions, inspect
the filter at each engine oil change.
(l)Visually inspect belt for fraying, excessive cracks, or
obvious damage. Replace belt if necessary.
(m)Drain, flush, and refill clutch hydraulic system at a
regular service interval (IorII) every two years.
This service can be complex; you should have your
dealer/retailer perform this service. See Hydraulic Clutch
on page 5-27.
Owner Checks and Services
These owner checks and services should be performed
at the intervals speci�ed to help ensure vehicle safety,
dependability, and emission control performance. Your
dealer/retailer can assist with these checks and services.
Be sure any necessary repairs are completed at once.
Whenever any �uids or lubricants are added to the
vehicle, make sure they are the proper ones, as shown
inRecommended Fluids and Lubricants on page 6-12.
6-8
Page 393 of 432
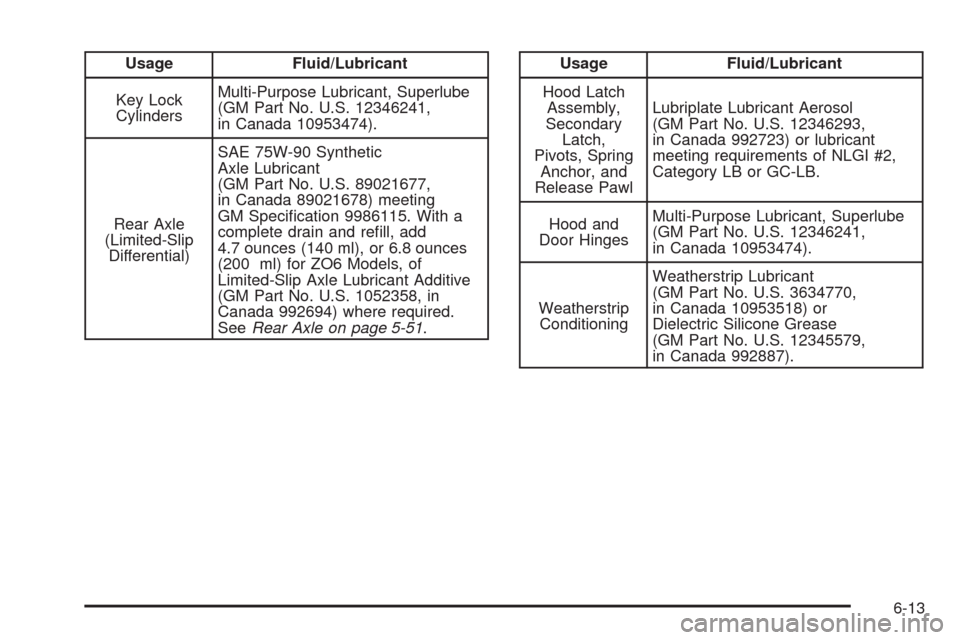
Usage Fluid/Lubricant
Key Lock
CylindersMulti-Purpose Lubricant, Superlube
(GM Part No. U.S. 12346241,
in Canada 10953474).
Rear Axle
(Limited-Slip
Differential)SAE 75W-90 Synthetic
Axle Lubricant
(GM Part No. U.S. 89021677,
in Canada 89021678) meeting
GM Speci�cation 9986115. With a
complete drain and re�ll, add
4.7 ounces (140 ml), or 6.8 ounces
(200 ml) for ZO6 Models, of
Limited-Slip Axle Lubricant Additive
(GM Part No. U.S. 1052358, in
Canada 992694) where required.
SeeRear Axle on page 5-51.Usage Fluid/Lubricant
Hood Latch
Assembly,
Secondary
Latch,
Pivots, Spring
Anchor, and
Release PawlLubriplate Lubricant Aerosol
(GM Part No. U.S. 12346293,
in Canada 992723) or lubricant
meeting requirements of NLGI #2,
Category LB or GC-LB.
Hood and
Door HingesMulti-Purpose Lubricant, Superlube
(GM Part No. U.S. 12346241,
in Canada 10953474).
Weatherstrip
ConditioningWeatherstrip Lubricant
(GM Part No. U.S. 3634770,
in Canada 10953518) or
Dielectric Silicone Grease
(GM Part No. U.S. 12345579,
in Canada 992887).
6-13