2008 AUDI TT ROADSTER key
[x] Cancel search: keyPage 119 of 316
____________________________________________________ T_ r_a _n _ s_ m __ is_ s_ i _o _ n __ ftllll
A ut omat ic selec to r l ever lock <&
The se lector lever is locked in the P and N positions when the igni
tion is on . To move the lever from these positions the driver must
depress the brake pedal. As a reminder to the driver, the fol lowing
warning appears in the instrument cluster display when the selector is in P and N:
A PP LY BRAK E WHEN ENGAGING GEAR WITH VEHIC LE
S TATIONARY
In addition, the symbo l<& for the automat ic selector lever lock illu
minates in the shift gate.
T he selector lever lock is effective only when the vehicle is
stationary and at speeds below 5 km/h . At higher speeds, the lock in
the N position is automatically switched off .
The selecto r lever is not locked when rapid shifts are made through
the N position (e.g . from R to Dl. This allows you to "rock" the vehicle
if it becomes stuck. If the lever is in the N position for more than
1 second with the brake pedal not depressed, the selector lock
engages automatica lly.
R elease button
The release button in the selector lever handle prevents accidenta l
shifts into certain selector lever positions . When you press the
release button, the selector lever lock is cancelled. In the illustra
tion, the positions in wh ich the release button has to be pressed are
highlighted in color=>
page 116, fig. 109 .
I g nition key re m ova l lock
The ignition key can on ly be remove after the ignition is switched off
if the selector lever is in P. As long as the ignition key is removed, the
selector lever is locked in P. •
Controls and equip
ment
Ap plies to vehicles: with S tronic®
Kick -down feature
T he kick-down feature allows maximum acceleration.
If you depress the accelerator pedal ful ly beyond the ful l- th rott le
position, the transmission automatical ly downshifts one gear,
depending on vehicle speed a nd engine rpm . The upshi ft into the
next higher gear takes place as soon as the maximum specified
engine speed is reached.
& WARNING
Pl ease note that the driv e wheel s can sp in if the kick -do wn is used
o n a s mooth slipper y ro ad -ri sk of sk id d ing! •
Applies to vehicles: with S tronic®
Launch Control Program
The Launch Control Program permits maximum accelera
tion.
In order to use Launc h Control, t he ASR (Anti-Slip Regula
tion) must be disab led. When ASR is disabled, the ESP
warning/indicator light
f in t he instrument cluster illumi
nates . So that Launch Control can be used, the engine must
be at operat ing temperature and the steering wheel must
not be turned.
- With the engine running, briefly press the ES P button.
The message "ASR off" appears in the instrument cluster
display .
- Shift the gear lever to "S" or the tiptronic® position.
- Step on the brake peda l w ith yo ur left foo t an d keep the
brake peda l fully depressed for at least one second. ._
I • •
Page 123 of 316

HomeLink® -_______________ ___.
Homelink®
Universal remote control
Applies to veh icles: wit h Home link® unive rsa l rem ote cont rol
General information
The Homelink® feature can learn up to three radio
frequency codes for most current transmitters used for
operating garage doors, estate gates, home or outdoor
lighting systems, and other devices.
You must first program the Homelink® transmitter before you can
use the system~
page 121, "Programming the Homelink® trans
mitter" .
In order to program the Homelink® transmitte r for devices utili zing
rolling cod e, a second person on a ladder who can safely reach the
garage door opener motor is recommended. It is also necessary to
locate the "learn" button on your garage door opener motor . Refer
to the operating instructions for the opener, as the location and
color of this button may vary by manufacturer .
You can still use the original remote control for the device at any
time .
& WARNING
• Never use the Homelink"" transmitter with any garage door
opener that does have not the safety stop and reverse feature as
required by federal safety standards. This includes any garage
door opener model manufactured before April 1, 1982.
• A garage door opener which cannot detect an object, signaling
the door to stop and reverse does not meet current federal safety standards. Using a garage door opener without these features
increases risk of serious injury or death .
Con tro ls and eq uip
ment
& WARNING (continued)
• For safety reasons never release the parking brake or start the
engine while anyone is standing in front of the vehicle.
• A garage door or an estate gate may sometimes be set in
motion when the Homelink® remote control is being
programmed .
If the device is repeatedly activated, this can over
strain motor and damage its electrical components -an over
heated motor is a fire hazard!
• To avoid possible injuries or property damage, please always
make absolutely certain that no persons or objects are located in
the range of motion of any equipment being operated. •
Applies to vehi cles : wit h Home link ® un iv ers al re mote co ntrol
Programming the Homelink ® transmitter
The transmitter is programmed in two phases. For rolling
code transmitters, a third phase is also necessary.
0
Vehicle care I I
Fig. 115 Overhead
console: Homelink®
keypad ...
irechnical data
Page 124 of 316
-L_!H~o~m~ e~L:!!in~ k~®~------------------------------------------------
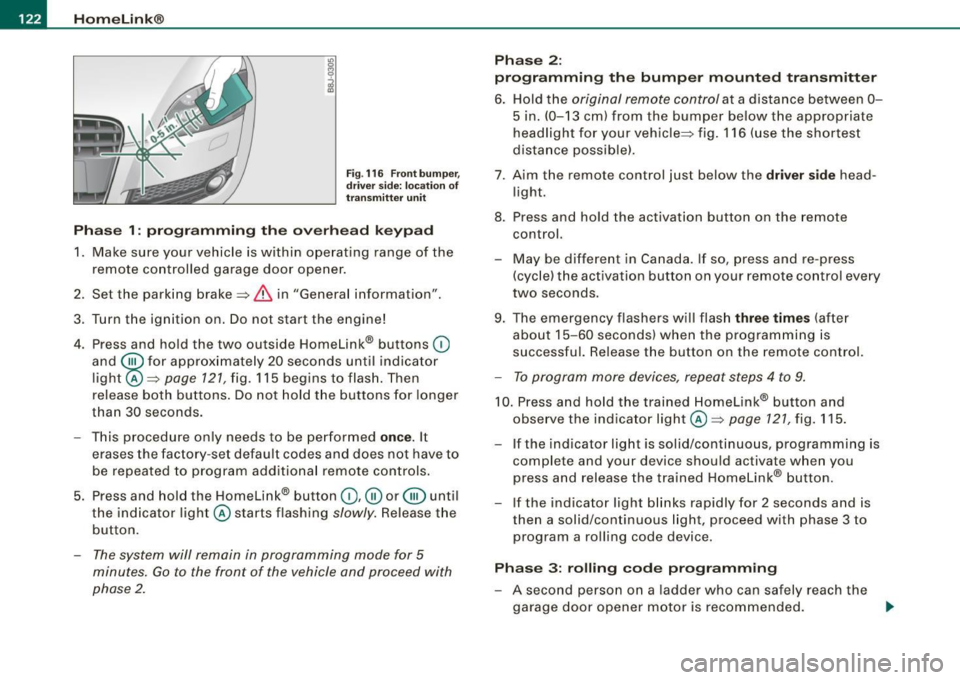
Fig . 116 Front bumper ,
driver side: location of
transmitter unit
Phase 1: programming the overhead keypad
1. Make sure your vehicle is within operating range of the
remote controlled garage door opener.
2. Set the parking brake::::,
& in "Genera l information".
3. Turn the ignition on. Do not start the engine!
4. Press and hold the two outside Homelink® buttons
(D
and @f or approxim~tely 20 sec_onds until indicator
light@::::,
page 121, fig. 115 begins to flash. Then
release both buttons. Do not hold the buttons for longer
than
30 seconds.
- This procedure only needs to be performed
once. It
erases the factory-set default codes and does not have to
be repeated to program additional remote controls.
5. Press and hold the Homelink® button
(D , ® or @ until
the indicator light@starts flashing
slowly. Release the
button.
- The system will remain in programming mode for 5
minutes.
Go to the front of the vehicle and proceed with
phase 2.
Phase 2:
programming the bumper mounted transmitter
6. Hold the original remote control at a distance between 0-
5 in. (0-13 cm) from the bumper below the appropriate
headlight for your vehicle::::, fig.
116 (use the shortest
distance possible).
7 . Aim the remote control just below the driver side head
light.
8. Press and hold the activation button on the remote control.
- May be different in Canada. If so, press and re-press
(cycle) the activation button on your remote control every
two seconds.
9. The emergency flashers will flash three times (after
about
15-60 seconds) when the programming is
successful. Release the button on the remote control.
- To program more devices, repeat steps 4 to 9.
10. Press and hold the trained Homelink® button and
observe the indicator light @::::,
page 121, fig. 115.
If the indicator light is solid/continuous, programming is
complete and your device should activate when you
press and release the trained Homelink® button.
- If the indicator light blinks rapidly for 2 seconds and is
then a solid/continuous light, proceed with phase 3 to
program a rolling code device.
Phase 3: rolling code programming
- A second person on a ladder who can safely reach the
garage door opener motor is recommended.
~
Page 125 of 316
Home Link® -_______________ ___.
11. Locate the "learn" button on the garage door opener
motor (refer to the operating instructions for the opener,
as the locat ion of this button may vary by manufacturer) .
12 . Press and release the learn button on the garage door
opener motor .
- Note : once the button is pressed, there are 30 se cond s in
wh ich to initiate the next step.
13. On the Homelink ® keypad inside the vehicle, firmly
press and hold the Homelink ® button prev iously
programmed in phases 1 and 2 for two seconds and
release . Repeat th is seque nce twi ce.
- Some vehicles may require the press/hold/re lease
sequence up to three times to complete the training
p rocess.
HomeLink ® should now activate your rolling code
equipped device.
If the 5 minut e tim e lim it is exceeded, the e mer gency flasher s will
flash o ne tim e to indicate that the process has been terminated. In
th is case , re p eat st eps 4 through 9.
If the emergency flashers do not flash
three times (after about 15-
60 se conds) , programming was not successful. In thi s case , repeat
steps 4 through 9.
Remo te con trol uni ts for garage door openers in Canada are set to
stop transm itting radio frequency signals aft er two seconds . Th is
time may not be sufficient for the Homelink® system to learn the
rad io frequency signal. P erform a ll oth er steps as described
above. •
Contro ls and eq uip
ment
A pp lies to veh ic les: wi th Homelin k® un iversa l rem ote contr ol
Operating the Homelink ® transmitter
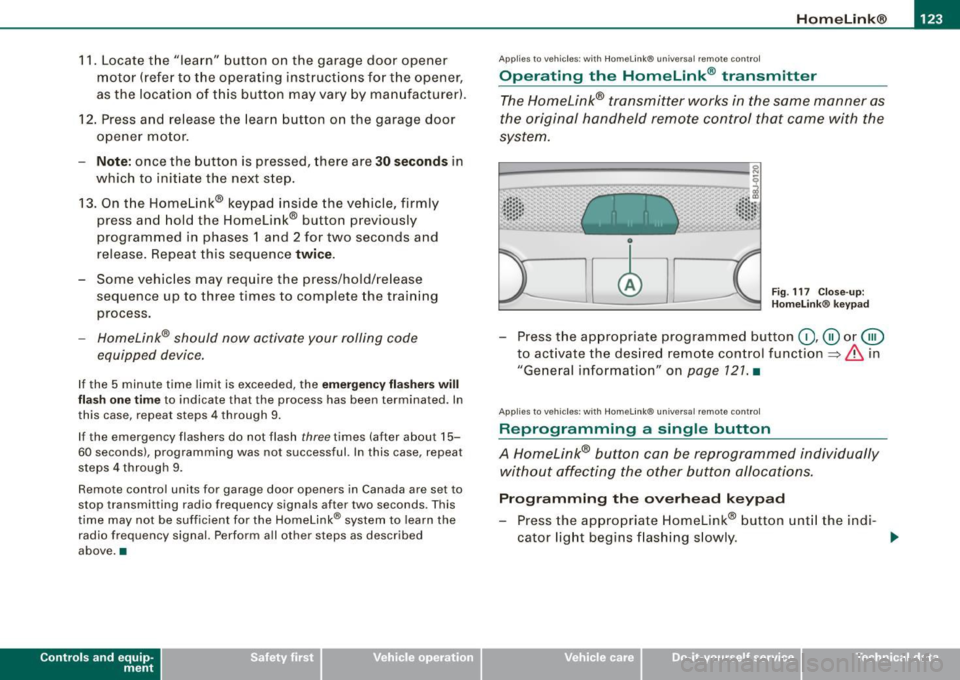
The Homelink® transmitter works in the same manner as
the original handheld remote control that came with the
system.
~ ---- -------- ..... --- --Jlil 9
al ..... .. Cl) .: :: : :: •• •• • .• 1 , .. .• .. .. .. .. ~
Fig . 117 C lose- up:
H ome link® key pad
- Press the appropr iate programmed button G) ,@ or @
to act ivate the des ired remote control function
~ & in
"General information " on
page 121 . •
A pplies to vehi cle s: w it h Homeli nk® univ ersa l re mote c ontro l
Reprogramming a single button
A Homelink® but ton can be reprogrammed individually
without affecting the other button allocations.
Progr amming th e ov erh ea d k eyp ad
- Press the appropriate Homelink® button unt il the ind i-
cator light begins flashing s lowly. _,.
Vehicle care I I irechnical data
Page 126 of 316
• .___H_ o_ m _ e _L_i _ n _k _® ____________________________________________________ _
Pr og ra mming th e bump er m ount ed tr ansmitt er
1. Hold the original remote control at a distance between 0-
5 in. (0 -13 cm ) from the bumper below the appropriate
headlight for your vehicle (use the shortest distance
poss ible).
2. Aim the remote control just below the
dr iver s ide head
l ight.
3. Press and hold the activation button on the remote control.
4. The emergency flashers will flash
three tim es (after
about
15-60 seconds) when the programming is
successful. Now release the button on the remote
co ntrol.
- If the dev ice utilizes a rol ling code, please f ollow phase 3
of ~
page 121, "Programming the Home Link® trans
m itter" for rolling code programming .
This pr oce dure w ill ca use the existing pr ogra mm ing on th e
H om eli nk® button to be eras ed ! •
A pplies to vehicl es: w ith H om eli nk® univ er sal re mot e con tro l
Erasing the programming of the HomeLink ®
transmitter
When you erase the programming, the programming on
all three of the transmitter channels with be lost!
- Perform steps 1 to 4 as described on~ page 122 , "Phase
1 : programming the overhead keypad".
When comp let ed, the Hom elink ® system will be in the program
ming mode and is then ready to learn the codes for remote
controlled devices.
[ i ] T ip s
• Programmed buttons cannot be erased ind ividua lly.
• For security reasons you are adv ised to erase the programming
of the Homelink ® system befo re you sell your vehic le. •
Applies to vehicle s: with Home link® univ er sa l re m ote con tro l
Information and accessories
If you wou ld like more information on Homelink ®, where to
pu rchase the Homelink ® compatib le products , or would li ke to
purchase the Homelink ® Home Lighting Package, please call tol l
free: 1 -800 -355 -3515.
[ i ] T ip s
• The Homelink ® universal transmitter complies with part 15 of
the FCC rules and RSS -2 10 of IC part 15. Operation is subject to th e
following conditions :
- this device may not cause harmful interference, and
- this device must accept any interference that may be received
including in terference that may cause undesired operation .
• Changes or modifications not express ly approved by the party
respons ible for compliance could void th e user 's authority to
operate the device (DOC : ISTC 1763 102 264 Pr ince MODEL/FCC ID :
CB2 V94800l. •
Page 142 of 316
• ....__S_ a_ fe_ t _y=-- b_ e_ lt_s ________________________________________________ _
Safety belts attach passengers to the car and give them the benefit
of being slowed down more gent ly o r "softly" through the "give" in
the safety belts, crush zones and other safety features engineered
into today's vehicles . By "absorbing" the kinetic ene rgy over
a
longer period of time, the safety belts make the forces on the body
more "tolerable" and less likely to cause injury.
Although these examp les are based on a frontal co llision, sa fety
belts can a lso substantially reduce the risk of injury in other kinds
of crashes . So, whether you're on a long trip or just go ing to the
corner store, always buckle up and make sure others do, too. Acci
dent statistics show that vehic le occupants properly wea ring safety
belts have a lower risk of being injured and a much better chance of
surviv ing an accident . Properly using safety belts also great ly
increases the abi lity of the supplementa l airbags to do their job in a
collision. For this reason, wearing a safety belt is legally required in
most countries includ ing much of the United States and Canada.
Although your Audi is equipped with airbags, you sti ll have to wear
t he safety be lts prov ided. Fron t ai rbags, for example, are act iva ted
only in some frontal coll isions. The front airbags are not activated in
a ll frontal co llisions, in side and rear c ollisions, in rol l overs or i n
cases where there is not enough dece leration through impact to the
fron t of the vehicle . The same goes for the ot her airbag sys te m s in
your Audi . So, a lways wear your safety belt and make sure every
body in your vehicle is prope rly restrained! •
Important safety instructions about safety
belts
Safety belts must always be properly positioned a cross
the s trongest bones o f your b ody.
- Always w ear saf ety belts as i llus trat ed and d escrib ed in
th is cha pter .
- M ake sure that your safety b elt s ar e always read y for use
and a re not d am ag ed.
& WARNING
Not wearing safety belts or wearing them improperly increases
the risk of serious personal injury and death . Safety belts can work
only when used co rrectly .
• Alway s fa sten your safety belt s corre ctly before driving off and
make sure all pa ssengers are properly restrained .
• For maximum protection , safety belts mu st always be posi
tioned correctly on the body .
• Never strap more than one person , including sm all children ,
into any single safety belt .
• Never pla ce a safety belt ove r a child sitting on your lap .
• Always keep feet in the footwell in front of the seat while the
v ehicle is being dri ven .
• Never let any person ride with feet on the instrument panel or
s ticking out the window or on the seat .
• Never remove a safety belt while the vehicle i s moving. Doing
so will incre ase your risk of being i njured o r killed.
• Never wear belt s twi sted .
• Never wear belts over rigid or breakable objects in or on your
clothing , such a s eye glasses , pens , key s, etc ., as the se may cau se
i njury .
• Never wear the shoulder part of the belt under your arm or
otherwise out of position .
• Several layer s of heavy clothing may interfere with correct po si
tioning of belts and reduce their effe ctiveness .
• Alway s keep belt bu ckles free of anyth ing th at may prevent the
buckle from latching securely.
• Never use comfort clips or devices that create slack in the
s houlder belt . H owever , special clips may be required for the
c orre ct use of some child re straint system s.
• Never allow safety belt s to become damaged by being caught
in door or seat ha rdware . .,_
Page 144 of 316
___ S_a_ f_ e_ t-= y_ b_e_ l_ t _s _______________________________________________ _
& WARNING
Improperly positioned safety belts can cause serious injury in an
accident =:> page
142, "Safety belt position".
• Safety belts offer optimum protection only when the seat back
is upright and belts are properly positioned on the body.
• Never attach the safety belt to the buckle for another seat.
Attaching the belt to the wrong buckle will reduce safety belt effectiveness and can cause serious personal injury.
• A passenger who is not properly restrained can be seriously
injured by the safety belt itself when it moves from the stronger
parts of the body into critical areas like the abdomen.
• Always lock the convertible locking retractor when you are
securing a child seat in the vehicle=:> page
179. •
Safety belt position
Correct belt position is the key to getting maximum
protection from safety belts.
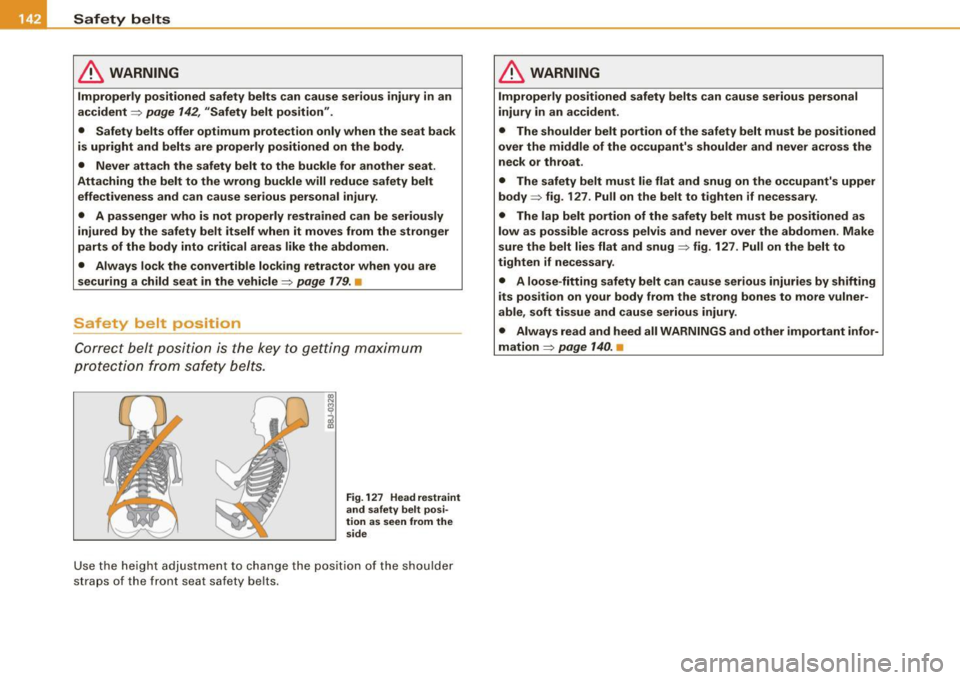
Fig. 127 Head restraint
and safety belt posi
tion as seen from the side
Use the height adjustment to change the position of the shoulder
straps of the front seat safety belts.
& WARNING
Improperly positioned safety belts can cause serious personal
injury in an accident.
• The shoulder belt portion of the safety belt must be positioned
over the middle of the occupant's shoulder and never across the
neck or throat .
• The safety belt must lie flat and snug on the occupant's upper
body
=> fig. 127 . Pull on the belt to tighten if necessary.
• The lap belt portion of the safety belt must be positioned as
low as possible across pelvis and never over the abdomen. Make
sure the belt lies flat and snug => fig. 127. Pull on the belt to
tighten if necessary.
• A loose -fitting safety belt can cause serious injuries by shifting
its position on your body from the strong bones to more vulner
able, soft tissue and cause serious injury.
• Always read and heed all WARNINGS and other important infor
mation => page
140. •
Page 215 of 316
Cleaning and protection -
----------------
•
& WARNING (continued )
• Before reaching into the front plenum panel , always remove the
ignition key . Otherwise , the windshield wiper system could unin
tent ionally be sw itched on, possibly caus ing personal injury from
the moving wiper linkage.
• Never reach into the area around or touch the radiator fan. The
auxiliary fan is temperature controlled and can switch on suddenly
- even when the ignition is off .
• Do not wash, wax or dry the engine with the engine running .
Moving or hot parts could injure you .
• Do not clean the underside of the chassis , fenders, wheel
covers , or other hard to reach parts without protecting your hands
and arms. You may cut yourself on sharp-edged metal parts .
• Always read and heed all WARNINGS and other information
=> page 200. •
Vehicle care I t •