2008 AUDI S6 ECU
[x] Cancel search: ECUPage 255 of 390

Mounting and releasing the anchorage hook
If you use a child restraint system with hooks or other
latches attached to adjustable straps.
Mounting
- Press the anchorage hook wit h the spring catch re lease
onto the lower anchorage so that the anchorage hook locks into place .
- Pull on the anchorage hook to make sure that it has
securely engaged the lower anchorage.
- Tighten the strap following the child restraint manufac
turer 's instructions.
Releasing
- Loosen the tens ion on the strap following the child
restraint manufacturer's instructions .
- Depress the spring catch on the hook. - Hold the spring catch in depressed posit ion .
- Move the hook in the direction of the vehicle floor so that
there is enough space to release the anchorage hook
from the lower anchorage.
& WARNING
• Improper installation of child restraints will increase the risk of
injuries in a crash.
• Always refer to the child restraints manufacturer's instructions
for proper instaHation of the child restraint and proper use of the
lower anchorages or safety belts in your vehicle. •
Safety first
Tether anchors
Child Safety
Fig. 222 Tether
anchors: recess flaps
behind the rear seat
backs
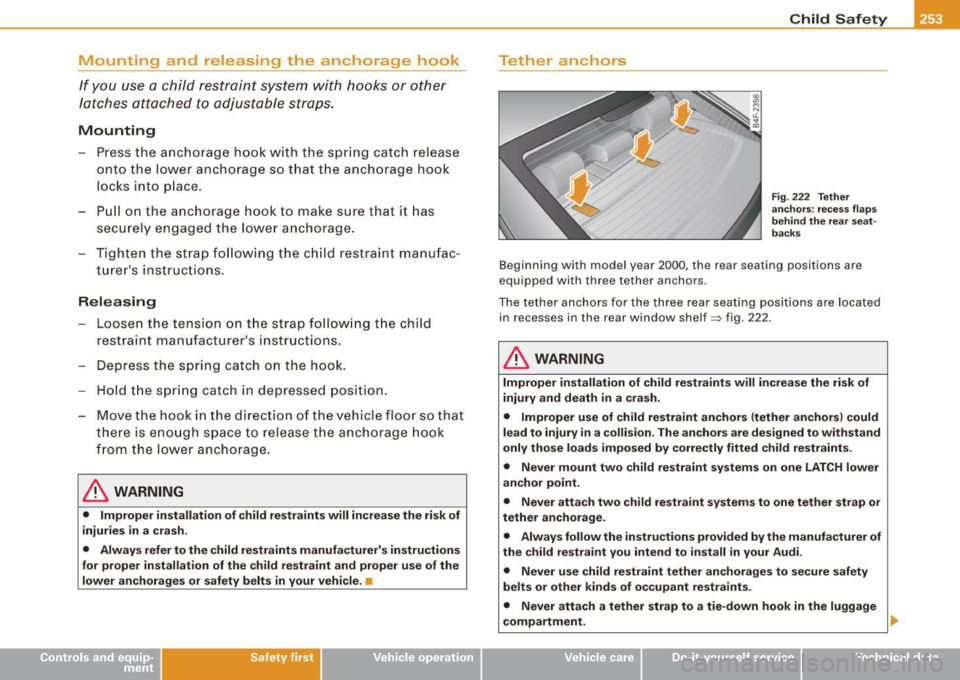
B eginning with mod el year 2000 , th e re ar sea ting posi tions are
equipped with three tether anchors.
The tether anchors for the three rear seating positions are located in r ecess es in the r ear window shelf~ fig . 222.
& WARNING
Improper installation of child restraints will increase the risk of
injury and death in a crash.
• Improper use of child restraint anchors (tether anchors) could
lead to injury in a collision. The anchors are designed to withstand
only those loads imposed by correctly fitted child restraints.
• Never mount two child restraint systems on one LATCH lower
anchor point.
• Never attach two child restraint systems to one tether strap or
tether anchorage.
• Always follow the instructions provided by the manufacturer of
the child restraint you intend to install in your Audi.
• Never use child restraint tether anchorages to secure safety
belts or other kinds of occupant restraints.
• Never attach a tether strap to a tie-down hook in the luggage
compartment.
Vehicle care I I irechnical data
Page 256 of 390

___ C_h_ i_ld _ S_ a_ f_ e_ t-= y'------------------------------------------------
& W ARNING (continued )
• Never secure or attach any luggage or other items to the LATCH
lower anchorages or to the tether anchors.
• If a tether or other strap is used to attach a child restraint to the
front passenger seat, make sure that it is not so tight, that it
causes the weight-sensing mat to measure more weight than is
actually on the seat .
• The heavier weight registered can make the system work as
though an adult were on the seat and deploy the Advanced Airbag
when it must be suppressed causing serious or even fatal injury to
the child .•
T et her strap
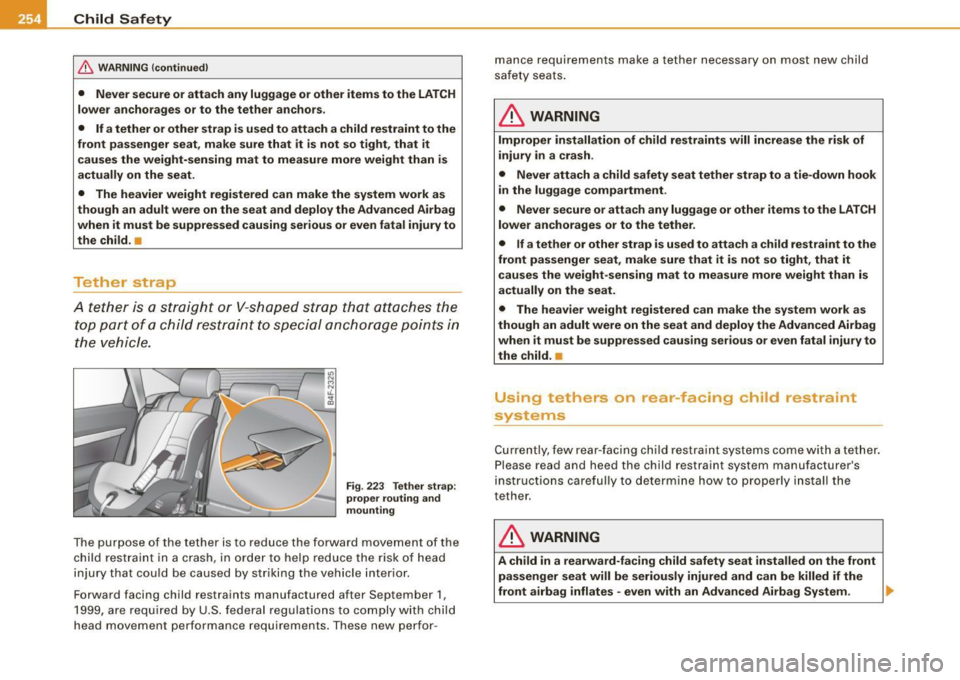
A tether is a stra ig h t or V-shape d strap that atta ches the
top part of a ch ild restraint to sp ecial anchorage po ints in
th e v ehicl e.
Fig . 223 Tether strap :
prope r routing and
mounting
T he purpose of the tether is to reduce the forward movement of t he
ch ild res trai nt in a cras h, in or der t o help re duce t he risk o f head
injury that cou ld b e caused by striking t he vehicle interior.
Forward facing child rest raints manufactured after September 1,
19 99, are require d b y U.S . f edera l reg ulatio ns to comp ly with c hild
head movement performance requirements . These new pe rfor- mance requirements ma
ke a tether necessary on most new child
sa fe ty seats .
& WARNING
Improper installation of child restraints will increase the risk of
injury in a crash .
• Never attach a child safety seat tether strap to a tie -down hook
in the luggage compartment .
• Never secure or attach any luggage or other items to the LATCH
lower anchorages or to the tether.
• If a tether or other strap is used to attach a child restraint to the
front passenger seat , make sure that it is not so tight , that it
causes the weight-sensing mat to measure more weight than is
actually on the seat.
• The heavier weight registered can make the system work as
though an adult were on the seat and deploy the Advanced Airbag
when it must be suppressed causing serious or even fatal injury to
the child .•
Us ing tethe rs on rear.facing chi ld restra int
systems
C ur ren tly , few r ear-faci ng child re stra int s ystems co me with a tether.
P lease read and heed the ch ild restra int system manufactur er's
i n str uct ions care full y to d ete rmin e ho w to prop erly i nsta ll th e
tether.
& WARNING
A child in a rearward-facing child safety seat installed on the front
passenger seat will be seriously injured and can be killed if the
front airbag inflates -even w ith an Advanced Airbag System . ._
Page 257 of 390

& WARNING !continued)
• The inflating airbag will hit the child safety seat or infant
carrier with great force and will smash the child safety seat and
child against the backrest, center arm rest, or door .
• A tight tether or other strap on a rearward-facing child restraint
attached to the front passenger seat can put too much pressure
on the weight -mat in the seat and register a heavier weight in the
Advanced Airbag System. The heavier weight registered can make
the system work as though an adult were on the seat and deploy
the Advanced Airbag when it must be suppressed causing serious
or even fatal injury to the child.
• If you must install a rearward facing child safety seat on the
front passenger seat because of exceptional circumstances and
the PASSENGER AIR BAG OFF light does not come on and stay on,
immediately install the rear-facing child safety seat in a rear
seating position and have the airbag system inspected by your
Audi dealer. •
Securing the upper tether strap to the anchor
bracket
Safety first
Fig. 224 Tether strap:
proper routing and
mounting
Child Safety
Securing the child restraint tether strap to the
tether anchor
- Release or deploy the tether strap on the child restraint
according to the child restraint manufacturer's usage
instructions.
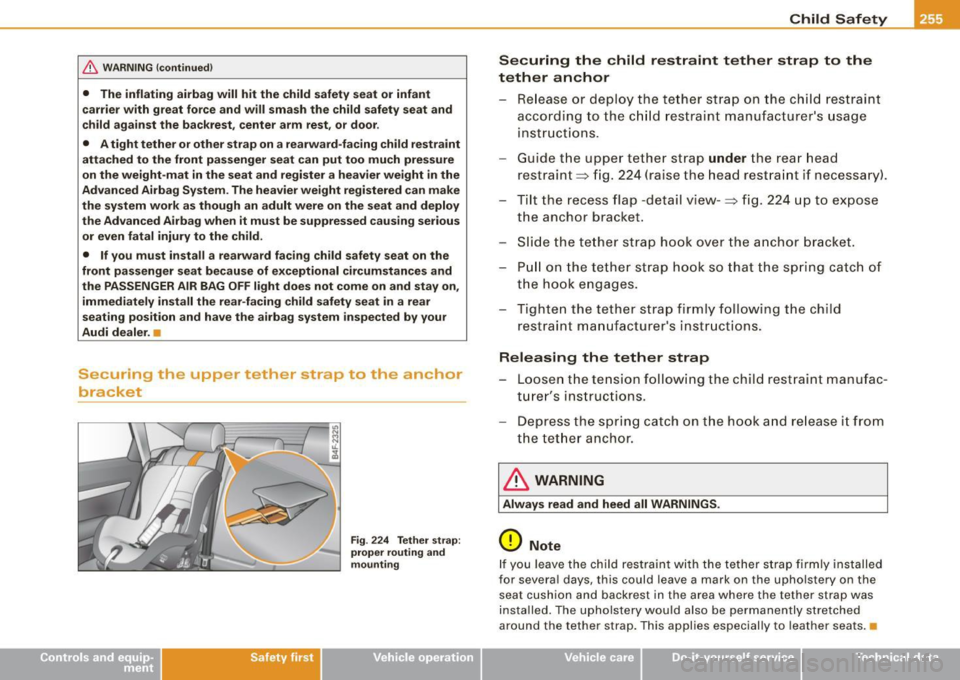
Guide the upper tether strap
under the rear head
restraint ~ fig. 224 (raise the head restraint if necessary) .
- Tilt the recess flap -detail view-:::;, fig. 224 up to expose
the anchor bracket .
- Slide the tether strap hook over the anchor bracket.
- Pull on the tether strap hook so that the spring catch of
the hook engages.
- Tighten the tether strap f irmly following the child
restraint manufacturer's instructions.
Releasing the tether strap
- Loosen the tension following the child restraint manufac
turer's instructions.
- Depress the spring catch on the hook and release it from
the tether anchor.
& WARNING
Always read and heed all WARNINGS.
0 Note
If you leave the child restraint with the tether strap firmly installed
for several days, this could leave a mark on the upholstery on the seat cushion and backrest in the area where the tether strap was
installed. The upholstery would also be permanently stretched
around the tether strap. This applies especially to leather seats.•
Vehicle care
I I irechnical data
Page 274 of 390

-Tr
aile r t ow ing ---=--------------
Trailer towing
Driving with a trailer
General information
Your Audi was designed primarily for passenger transpor
tation.
If you plan to tow a trailer, please remember that the additional load
wi ll affect durability, economy and performance.
Trai ler towing not on ly p laces more stress on the vehicle, it a lso ca lls
for more concentration from the driver.
For this reason, always fol low the operating and driving instructions
provided and use common sense.
0 Note
If you are going to tow a trai ler, you must activate the trailer opera
tion mode =>
page 184, "Towing a trailer".
Technical requirements
Tra iler hitch
Use a weight-carrying hitch conforming to the gross trailer weight .
The hitch must be suitable for your vehicle and trailer and must be
mounted secure ly on the ve hicle's chass is at a
technically sound
location. Use only a trailer hitch with a removable ball mount.
Always check with the trai ler hitch manufacturer to make sure that
you are using the correct hitch .
Do not use a bumper hit ch.
The hitch must be installed in such a way tha t it does not interfere
with the impact-absorbing bumper system. No modifications should be made to the vehic le exhaust and brake systems. From time to time, check that all hitch mounting bolts remain securely
fastened.
When you are no
t towing a trailer, remove the traile r hitch ball
mount. This prevents the hitch from causing damage shou ld your
vehic le be struck from behind=>& .
Traile r br akes
If your trailer is equipped with a braking system, check to be sure
that it conforms to al l regu lations.
The trai ler hydraulic brake system must no t be direct ly connected to
the vehicle's hydraulic brake system.
Safet y chains
Always use safety chains between your vehicle and the trailer.
Trailer light s
Trailer lights must meet a ll regulations. Be sure to check with your
Audi dealer for correc t wiring, sw itches and relays .
Mirrors
If you are unable to see the traf fic behind you using the regu lar
outside mirrors, then you
must install extended mirrors. It is impor
tant that you
always have c lear vision to the rear.
& WARNING
After rem oving the tr aile r hitch , do not store it in your vehi cle. In
ca se of sudde n braking , the hit ch co uld fl y for ward and injure you
or your p asseng ers. a
Page 275 of 390

Operating instructions
Max im um tra iler weight
A trailer for your vehicle is limited to a typical class 1 or class 2
trailer.
T ra ile r l oa d di stributio n
Be sure the load in the trailer is he ld securely in place to prevent it
from shifting forward, backward or sideways .
Never allo w a passe nger to r ide in a tr aile r~ & in "Driving instruc
tions" .
Engin e c oolin g sys te m
Towing a trailer makes the eng ine work harder. It is important that
the cooling system's performance is up to the additiona l load. Make
sure that the coo ling system has enough fluid .
Tire pr ess ure
When towing a trailer, inflate the tires of your vehicle to the co ld tire
pressure listed under "Full load" on the labe l located either on the
driver's side B -pil lar (visible when the door is open) or inside the fuel
filler flap . Inflate trai ler tires to trai ler and tire manufacturers' spec
ifications.
L ig ht s
The head light settings should be checked wit h the trai ler attached
before driving off. Check to make sure both vehicle and trai ler lights
are working properly .
Safe ty c ha in s
Be sure traile r safety chains are properly connected from the trailer
to the hitch on the vehicle. Leave enough slack in the chains to
perm it turning corners . When you i nsta ll safety chains, make sure
they will not drag on the road when you are driving.
T he chains should cross under the trailer tongue to prevent it from
dropping in case of separat ion from the hitch.
Controls and equip
ment Safety first Vehicle operation
Tr
aile r t owing
0 Note
If you are going to tow a trai ler, you must activate the trailer opera
tion mode ~
page 184, "Towing a trailer". •
Driving instructions
Driving with a trailer always requires extra care and
consideration.
To obtain the best possible handling of veh icle and trailer,
please note t he following :
- Do not tow a loaded trailer when your car itself is not
loaded.
Be espec ia lly careful whe n passing other vehicles.
- Observe s peed limits .
Do not drive at the maximum permiss ible speed .
Always apply brakes ear ly.
Moni tor t he temperature ga uge.
Weight distr ibution
Towing a loaded trailer with an empty car results in a highly
unstable distr ibution of weight. If this cannot be avoided, drive at
very low speeds only to avoid the risk of losing steering control.
A "balanced" rig is easier to operate and control. This means that
the tow vehicle should be loaded to the extent possible and perm is
s ib le, while keeping the trailer as light as possib le under the circum
stances . Whenever possible, transfe r so me cargo to t he luggage
compartment of the tow vehicle whi le observing tongue load
requirements and vehicle loading considera tions . .,
Vehicle care Do-it-yourself service Technical data
Page 299 of 390

___________________________________________ C_ h:....:e :....: c:....: k..:..: i..:.. n :..::g ::.....:: a:..:.n ..:..: d=---.:. f..:..:il ..:..:li ..:..n :.:::g !--_!11
•
Closing the engine hood
- Pull the hood down until the pressure from the struts is
reduced .
- Let the hood
drop down and latch in place. Do not try to
push it shut;
it may fail to engage => &.
& WARNING
A hood that is not completely latched could fly up and block your
view while driving.
• When you close the engine hood, check it to make sure the
safety catch has properly engaged. The hood should be flush with
the surrounding vehicle body parts.
• If you notice while driving that the hood is not secured prop
erly, stop at once and close it. •
Working in the engine compartment
Be especially careful whenever you work in the engine
compartment.
Whenever you must perform any work in the engine compartment,
for example checking and filling different fluids, there is a risk of injury, burns and accidents. To prevent personal injury always
observe the following WARNINGS. The engine compartment of any
vehicle is a hazardous area
~ & .
& WARNING
To help avoid injury, before you check anything under the hood :
• Turn off the engine.
• Remove the ignition key.
• Apply the parking brake .
& WARNING (continued)
• Move selector lever to "P" (Park).
• Always let the engine cool down. Hot components will burn
skin on contact.
• To reduce the risk of being burned, never open the hood if you
see or hear steam or coolant escaping from the engine compart
ment. Wait until no steam or coolant can be seen or heard before
carefully opening the hood.
• Keep children away from the engine compartment .
• Never spill fluids on hot engine components. They can cause a
fire.
• Never touch the radiator fan. The auxiliary electric fan is
temperature controlled and can switch on suddenly.
• Never open the coolant reservoir cap when the engine is still
warm . The coolant system is pressurized and hot coolant could
spray out.
• Protect your face, hands and arm from steam or hot engine
coolant by placing a thick rag over the cap when you open the
coolant reservoir.
• If work on the fuel system or the electrical system is necessary :
- Always disconnect the battery.
- Never smoke or work near heaters or open flames . Fluids in
the engine compartment could start a fire.
- Keep an approved fire extinguisher immediately available.
• To avoid electrical shock and personal injury while the engine
is running or being started, never touch:
- Ignition cables
- Other components of the high voltage electronic ignition system.
• If you must perform a check or repair with the engine running: -First, fully apply the parking brake, move selector lever to "P"
(Park). .,
Vehicle care
I t •
Page 304 of 390

___ C_h_ e_ c_k _in --=:: g;__ a_n _d_ f_il _li _n ..:g:a.- ___________________________________________ _
Oil level within range
©
- You must add oil. Afterwards, the oil level should be
within range@.
The oil level needs to be checked at regular intervals. The best times
to do this are whenever you refuel and prior to long tr ips. •
Adding engine oil 'l:::1':
Fig. 234 Engine
compartment: Oil filler
cap locat ion
Before you check anything in the engine compartment,
always read and heed all WARNINGS~ & in "Working in
the engine compartment" on
page 297.
Unscrew the cap
Carefully top off with the appropriate o il in 0.5 liter doses.
- Check the oil level again after two minutes ~
page 301.
Top off the oil again, if necessary.
Screw the cap back on the filling hole and slide the o il
dipstick in as far as it will go.
& WARNING
• While topping off, the oil must not come in contact with hot
engine parts -fire hazard!
• The oil filler cap must be properly secured to prevent oil from
being sprayed on the hot engine and exhaust system when the
engine is running -fire hazard!
• If your skin has come in contact with the engine oil , you must
subsequently cleanse it thoroughly.
0 Note
• T he oil level must not be above range @- danger of converter or
engine damage! Contact an au thorized dealership to draw off oil, if
necessary .
• Audi does not recommend the use of oil additives. They may
damage the engine and adversely affect your New Vehicle Warranty.
sewage network or the soil.
• Observe and follow legal regulations when disposing of empty
oi l containers .•
Changing the engine oil
We recommend that have your oil changed by an autho
rized Audi dealer or a qualified service station .
Before you check anything in the engine compartment, always read
and heed all WARNINGS ~
& in "Working in the engine compart
ment" on
page 297.
The engine oil must be changed according to the intervals specified
in your Maintenance
& Warranty booklet. This is very important ...
Page 323 of 390

Tires and wheels -________________ lf:HIIII
•
& WARNING (continu ed )
• Only when all tires on the veh icle are filled to the correct pres
s ure , the tire pre ssure monitoring sy stem can work correctly .
• The use of incorrect tire pressure values can lead to accidents
or other damage. Therefore it i s es sential that the driver observe
the specified tire pre ssure values for the tires and the correct pres
s ures for the function of the tire pressure monitoring system.
• Alway s inflate tires to the recommended and correct tire pres
sure before driving off .
• Driving with underinflated tires bend more , letting them get
too hot re sulting in tread separation , sudden ti re failure and loss
of control.
• Ex cessive speed and /overloading can cause heat build -up ,
sudden tire failure and loss of control.
• If the tire pressure is too low or too high, the tires will wear
prematurely and the vehicle will not handle well .
• If the tire is not flat and you do not have to change a wheel
immediately , drive at reduced speed to the nearest service stat ion
to che ck the tire pressure and add air as required .
0 Note
Driving without valve stem caps can cause damage to the tire
valves. To preven t this, a lways make su re t hat facto ry instal led
va lve
stem caps on a ll whee ls are securely mounted on the va lve .
'£> For the sake of the environment
Underinflated t ires will a lso increase the fuel consumption. •
Tires and vehicle load limits
There are limits to the amount of load or weight that any vehicle and
any t ire can car ry. A vehicle that i s ove rlo aded wil l n ot hand le well and
is more difficu lt to stop . Overloading can not only lead to loss
o f ve h ic le control, but ca n also damage impor ta nt parts o f the
vehic le and can lead to sudden tire fa ilure, inc luding a blowout and
sudden defla tion that ca n cause the vehic le to cra sh .
Your sa fety and that o f your passe ngers also depe nds on mak ing
sure that load limits are not exceeded . Vehicle load includes every
b ody and everyth ing in and on t he veh ic le . T hese load lim its a re
technica lly referred to as the vehicle's
Gross Vehi cle We ight Rating
(" GVWR"l .
The "GVWR" includes the weight of the basic veh ic le, all factory
insta lled accesso rie s, a ful l tank of fuel , oil, coolant an d other fluids
p lus max imum load. T he ma xim um load inc ludes the number o f
passe ngers that the veh icle is intended to carry ("seat ing capacity")
w ith a n assu med we ight of 150 l bs (68 kg) fo r each passen ger at a
designated seating position and the total weight of any luggage in
the v ehicle. I f you tow a trailer, the we ig ht o f the tra ile r hi tch and t he
tongue weight of the loaded trailer must be includ ed as part of the
ve hicle l oad.
The
Gross Axle Weight Rating ("GAWR"l is t he maximum load that
can be applied at each of the vehicle's two ax le s.
The Gross Ve hicle We ig ht Rat ing and t he G ross A xle Weig ht Rat ing
are listed on the safety comp liance stic ker label located either on
t he d rive r's side 8 -p illar or on th e inside of the fuel fil ler fla p. You r
Audi has 5 seating positions, 2 in the front and 3 in the rear for total
seating ca paci ty of 5 . Each seating p ositi on has a safe ty be lt
=> page 202, "Safety belts" .
The fact that there is an upper limit to your veh icle's Gross Vehicle
W eight Rating m eans tha t the to tal weight o f whateve r is bein g
carried in the vehicle (including the weight of a trailer hitch and the
to ngue we igh t of the l oad ed trai ler) is li mit ed . The m ore passe ng ers
in the vehicle or passengers who are heavie r than the standard
we ig ht s assum ed mean that les s we ight ca n be ca rri ed as luggage.
The tire pressure labe l on your Audi also lists the maximum
com bined we ig ht of a ll of t he occ upa nts and luggage or other ca rg o
~
Vehicle care I t •