2008 AUDI S6 key
[x] Cancel search: keyPage 77 of 390

0 Note
Do not use the high beam or headlight flasher if you know that these
could blind oncoming traffic.•
Interior lights
Front interior lights
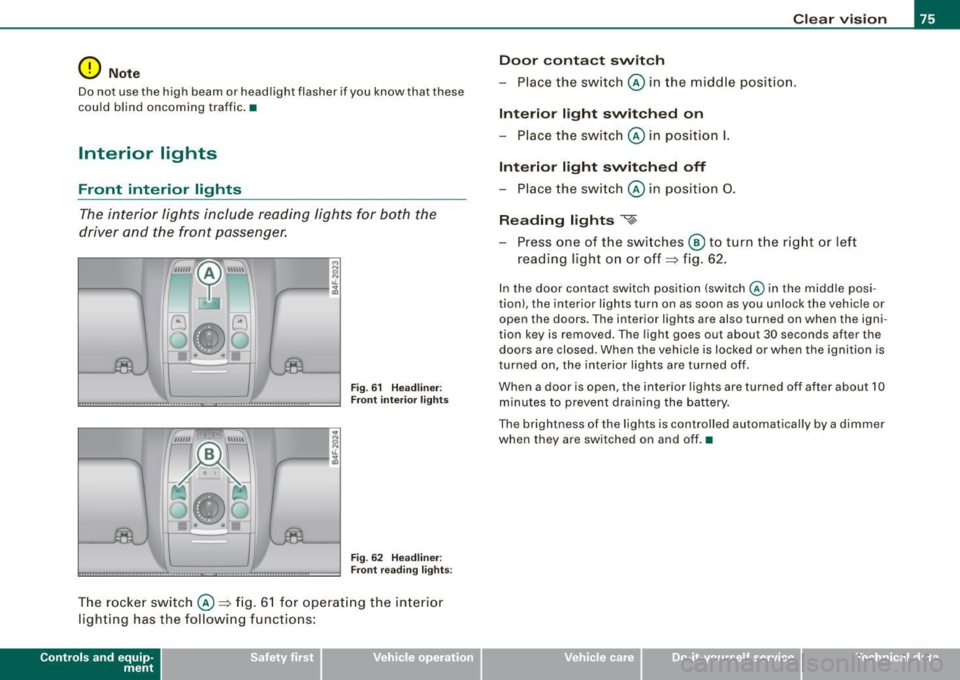
The interior lights include reading lights for both the
driver and the front passenger.
""'' ~ \\\\\
Fig. 61 Headliner :
Front interior lights
Fig . 62 Headliner :
Front reading lights :
The rocker switch @=:>fig. 61 for operating the interior
lighting has the following functions:
Contro ls and eq uip
ment
Clear vision
Door contact switch
- Place the switch @ in the middle position.
Interior light switched on
-Place the switch @ in position I.
Interior light switched off
- Place the switch @ in position 0.
Reading lights '<~
-Press one of the switches @ to turn the right or left
reading light on or off=:> fig. 62.
In the door contact switch position (switch @ in the middle posi
tion) , the interior lights turn on as soon as you unlock the vehicle or
open the doors. The interior lights are also turned on when the igni
tion key is removed . The light goes out about 30 seconds after the
doors are closed. When the vehicle is locked or when the ignition is
turned on, the interior lights are turned off .
When a door is open, the interior lights are turned off after about 10
minutes to prevent draining the battery.
The brightness of the lights is controlled automatically by a dimmer
when they are switched on and off. •
Vehicle care I I irechnical data
Page 86 of 390

Clear vision
Mem ory settin g for th e out sid e mirro rs *
When the seat posi tion is saved in the memory, the posi tion of the
outs ide mirrors is saved at the same time=>
page 91.
If th e position of th e mirror surfac e is changed on a ti lted mirror, this
new position wil l be automatically saved to the remote key when the
vehic le is taken out of reverse gear .
Tilting th e passenger's side out side m irro r (on ly with
e xterior mirror m em ory )
When you move the se lector lever in to R (Reverse), the m irror on the
front passenger's door (knob turned to® =>
page 83, fig. 74) will tilt
s lightly downward. Th is m ake is easier for you to see the curb when
you are backing into a parking spac e.
The mirror returns to its ini tial posit ion as soon as reverse gear is
disengaged and vehic le speed is above about 9 mph (15 km/h). The
mirror also retur ns to its init ia l pos ition if the switch is moved to the
dr iver 's outside mirror
(0 or the ignition is switched off .
Automatic anti-glare for the outside mirror s*
The outside mirrors dim at the same time as the inside mirror . When
the ignition is switched on, the mi rrors automat ically dim
depending on the amount of light striking the mirrors (such as head
lights shi ning into the vehicle from the rear).
When you turn on the interior light, or when you move the selector
lever into
R (Rev erse), the anti-glare function stops and the mirrors
retur n to their original condition (not darkened).
0 Note
• Curved (i .e. convex) mirror surfaces increase you r field o f view .
Remember that vehicles or other objects will appear smaller and
farther away than w hen seen in a flat mirror. If you use this mirr or to
estimate distances of following vehicles when changing lanes , you
cou ld estimate incorrectly and cause an acc ident .
• If the mirror housing is moved unintentionally (for example ,
wh ile pa rking your vehicle), then you must firs t fold the mirro r elec - trically. Do not readjust the mirror housing manually. You cou
ld
damage the m otor wh ich contr ols the mirror .
[ i ] Tips
If the re shou ld be a malfunction in the electrica l system, you can
still adjust the outside mirrors by pressing the edge of the mirror .•
A pplies to vehicle s: w it h a utom ati c d imm ing for out sid e mirro rs
Automatic dimming for outside mirrors
The ou ts ide mirrors are dimmed together with the automa tic
dimming of the inside mirror. When the ign ition is switched on, the
mirrors darken a utomatical ly depending on the lig ht striking them
(e.g. headlights from the rear).
When the interior lighting is switched on and when reverse gear is engaged, the m irrors are switched back to the ir o rigi nal brightness
(not dimmed).
& WARNING
The glas s of the inside rear v iew mirror is layered and contain s an
electrolyte to achieve it s propertie s. Be aware of liquid electrolyte
leaking from a b rok en mirror gla ss . This liquid c an cause irr itat ion
to skin , eyes, and re spiratory sy stem . If you get electrolyte in your
eyes or on your skin , immed iately rinse with plenty of wate r. If i rri
tation persists , seek m edi cal attention .
0 Note
Electrolyte leaking fro m a broken mi rro r glass attacks the veh ic le
paint and p lastic surfaces . Clean up spilled electrolyte immediately
with clear water and a sponge. _,,,
Page 91 of 390

& WARNING !continued)
• Be careful when adjusting the seat height. Check to see that no
one is in the way, or serious injury could result!
• Because the seats can be electrically adjusted with the ignition
key removed, never leave children unattended in the vehicle. Unsu
pervised use of the electric seat adjustments may cause serious
injury. •
Seat adjustment
Fig. 78 Power seat:
Switch for seat adjust
ment
Moving the seat forward and backward G)
- Press the switch forward or backward horizontally~& .
Adjusting the seat height
® and 0 together
- Pull the switch evenly at both ends to raise the seat~ &.
-Push the switch evenly at both ends to lower the seat
~& -
Angling the seat cushion up and down® or 0
To angle the seat cushion up, pull the switch at the front
only~ &-
Con tro ls and eq uip
ment
Seats and storage
- Alternatively, push the switch at the rear only~& .
-To angle the seat cushion down, push the switch at the
front only~
&-
- Alternatively, pull the switch at the rear only=>& .
& WARNING
• Never adjust the driver's or front passenger's seat while the
vehicle is moving. If you do this while the vehicle is moving, you
will be out of position. Always adjust the driver's or front passenger's seat when the vehicle is not moving.
• Be careful when adjusting the seat height. Check to see that no
one is in the way, or serious injury could result!
• Because the seats can be electrically adjusted with the ignition
key removed, never leave children unattended in the vehicle. Unsu
pervised use of the electric seat adjustments may cause serious
injury. •
Adjusting the seatback
.....
----:-:--- -:--=-=-=-=-1 ~ jg
Fig. 79 Power seat:
Switch for seat back
angle
- Push the switch~ fig. 79 forward or to the rear in the
direction of the arrow to adjust the angle of the seat back
=> & . ...
Vehicle care I I irechnical data
Page 93 of 390

Seat memory
Applies to vehicles: w ith seat memory
Driver's seat memory
The seat adjustment settings for two drivers con be stored
using the memory buttons in the driver's door.
Fig . 81 Driver's door :
Seat memory
In addition to the setting for the driver's seat, the settings for the
steering column* and both exterior mirrors can be stored.
Storing and reca lling settings
Using the memory buttons 1 and 2, you can store and recall the
settings for two different drivers=> fig. 81.
The current settings are also automatically stored on the remote control key being used when the vehicle is locked. When the vehicle
is unlocked, the settings stored on the remote contro l key being
used are automatically recalled. This function has to be activated in
the MMI =>
page 92, "Activating remote control key memory".
Turning seat memory on and off
If the [ ON/OFF ! switch is depressed, the seat memory is inoperative.
Th e word OFF next to the [ON/OFF) switch illuminates.
All the stored settings are retained. We recommend using the
I ON/OFF] switch and deactivating the seat memory if the vehic le is
Con tro ls and eq uip
ment
Seats and storage
only going to be used temporarily by a driver whose settings are not
going to be stored. •
Applies to veh icles: w ith seat memory
Storing and recalling a seat position
Before you can store or recall your seat position, the
I ON/OFF] button must be engaged (down) .
Storing settings
- Adjust the driver's seat~
page 88.
-Adjust the steering column*~ page 123.
-Adjust both outside mirrors~ page 83.
-Press the !SE T] button and hold it down. At the same
time, press one of the memory buttons for at least one
second.
- Release the buttons. The settings are now stored under
the corresponding memory button.
Recalling settings
- Driver's door open -press the desired memory button.
- Driver's door closed -press the corresponding memory
button until the stored position is reached.
Successful storage is confirmed audibly and by the light in the [ SET)
button illuminating.
When the vehicle is
locked, the current settings are stored and
assigned to the remote control key. But the settings stored on
memory buttons 1 and 2 are not deleted. They can be recalled at any
time. When the vehicle is
unloc ked, the settings stored on the
remote control key are restored . ..,
Vehicle care I I irechnical data
Page 94 of 390

Seats and storage
If your vehicle is driven by other persons using your remote control key, you should save your individual seat position on one of the
memory buttons. You can recall your settings again simply and
conveniently by pressing the corresponding memory button. When
the vehicle is locked, these settings are automatically re-assigned to
the remote control key and stored.
& WARNING
• For safety reasons, the seat setting can only be recalled when
the vehicle is stationary -otherwise you risk having an accident .
• In an emergency, the recall operation can be stopped by
pressing the [
ON/OFF I button or by briefly pressing any given
memory button. •
Applies to vehicles: with seat memory
Activating remote control key memory
To be able to recall the stored settings with the remote
control key, the function hos to be activated in the MM/.
Fig . 82 MMI display :
Drivers' seat
- Select Seat adjustment in the CAR menu.
- Select
Driver's seat.
-Select Remote control key on to activate the remote
control key memory::::> fig. 82. •
Rear seats
General information
Safe transportation of passengers on the rear seats
requires proper safety precautions.
All passengers on the rear seats must be seated in compliance with
the safety guidelines explained in=>
page 202 and=> page 212. The
correct seating position is critical for the safety of front
and rear
seat passengers alike=>
page 196.
& WARNING
• Occupants in the front and rear seats must always be properly
restrained.
• Do not let anyone ride in the vehicle without the head restraints
provided. Head restraints help to reduce injuries.
• Loose items inside the passenger compartment, can fly
forward in a crash or sudden maneuver and injure occupants.
Always store articles in the luggage compartment and use the
fastening eyes, especially when the rear seat backs have been
folded down.
• Read and heed all WARNINGS=>
page 196, "Proper seating
positions for passengers in rear seats" .•
Page 99 of 390

Returning backrest to upright position
-Pu sh rear seat back rest up until it engages~ &. You will
know that the sea t is proper ly engaged when you can not
see the red marki ng on the lever ®·
Locking the backrest
- Insert yo ur key into t he lock~ page 96, fig. 88 and t urn it
cloc kwise.
Unlocking the backrest
- Inse rt th e key i nto the lock a nd tu rn it co unter-cloc kw ise.
Stowing luggage
- For safe loading and securing of i tems read and follow
the guidelines on~ page 199.
The rear seatback is divided into two segments -one thi rd/two
thirds . You can fold down either or both parts o f the seatback.
T he release levers for the fold ing backrests can be locked when the
backrests are pro pe rly engaged in their up right pos itio n. This
prevents unauthorized access to the luggage compartment from
with in the veh icle. The release levers can on ly be locked with the
master key or emer gency key.
& WARNING
• The ba ck rest must al ways be securely lat ched so that the
safety b elt of the center seating position can work properly to help
protect the o ccupant .
• The backre st must be securely latched in po sition so that no
items contained in the luggage compartment can slide forward
upon sudden brak ing .
• Never allow safety belt s to be come damaged by being caught
in door or seat hardware .
Con tro ls and eq uip
ment
Seats and storag e
& WARNING !continued )
• Torn or frayed safety belts can tear and damaged belt hard
ware can b reak in a cra sh . Inspect the belts periodically . B elt s
showing damage to webbing , bindings, buckles , or retractor s
must be replaced .
& WARNING
Always read and heed WARNINGS ::::;, & in "Loading the luggage
c ompartment " on
page 199.
(D Note
When fo lding the backrest back into p lace, make sure the safety belt
does not get caught, because it can be damaged. A damaged belt
can fail to provide safe restraint . •
Fastening eyelets
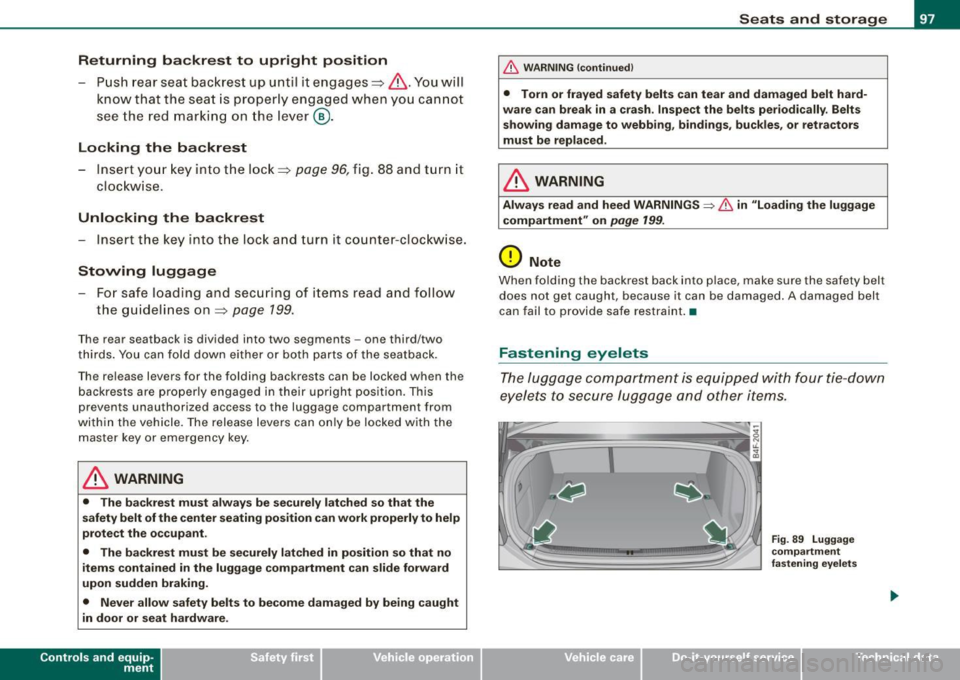
T he luggage compartment is equipped with four tie -down
eyelets to secure lugga ge and other items.
Vehicle care I I
Fig . 8 9 Luggage
co mp artment
fastening eye lets
irechnical data
Page 108 of 390

• ..__S_ e_a _ t_ s_ a_ n_ d_ s_t _o _r_ a-' g==- e ________________________________________________ _
Before you purchase any accessories, always read and follow the
inf orma tion in
=> page 368, "Addi tional acce sso ries and parts
replacement".
& WARNING
Improper use of the cigarette lighter can cause ser ious injury or
start a fire .
• Be careful when using the cigarette lighter . If you do not pay
attention to what you are doing when you are u sing the cigarette
lighter you can burn yourself .
• The cigarette lighter and soc ket remain fu nctional even if the
ignition is sw itched off or the ignition key is removed . Never leave
c hildren in side the vehicle without supervision.
0 Note
To avoid damaging the socket, on ly use p lugs that fit pro perly .
[ i ] Tips
When the engine is o ff an d accessories are st ill plugged in and are
on, the vehicle battery can stil l be dra ined. •
Outlet
The ou tlet in the f ront an d re ar cen ter console m ay be
u sed fo r 12-v olt ap pliances.
- Fo ld th e cov er fo r th e o utlet do wn.
Fig. 103 Center
c o n sole , front : 12 -volt
outlet
Re ar ce nter console: remove the 12 V cove r from t he
out le t.
P lug in appliance to be used .
The outlet may be used for 1 2-vo lt appliances with maximum
consump tion o f up to 100 watts, such as a flash l ight, small vacu um
cleaner, etc.
Befo re yo u pu rchase any accessories, al ways read and f ollow t he
information in=>
page 368, "Additional accessories and parts
r eplacement".
& WARNING
The outlet plus any applian ces plugged into it remain functional
even if the ignition is swit ched off or the ignition key is removed .
Never leave children inside the vehicle without supervision. .,_
Page 110 of 390

• ..__S_ e_a _ t_ s_ a_ n_ d_ s_t _o _r_ a-' g==- e ________________________________________________ _
& WARNING
To reduce the risk of personal injury in an accident or sudden stop,
always keep the glove compartment closed while driving.
[ i J Tips
Should you not be able to open the glove compartment as
described, make sure the valet key function is not activated
=> page 51. •
Emergency unlocking of glove compartment
The glove compartment can be unlocked in an emer
gency.
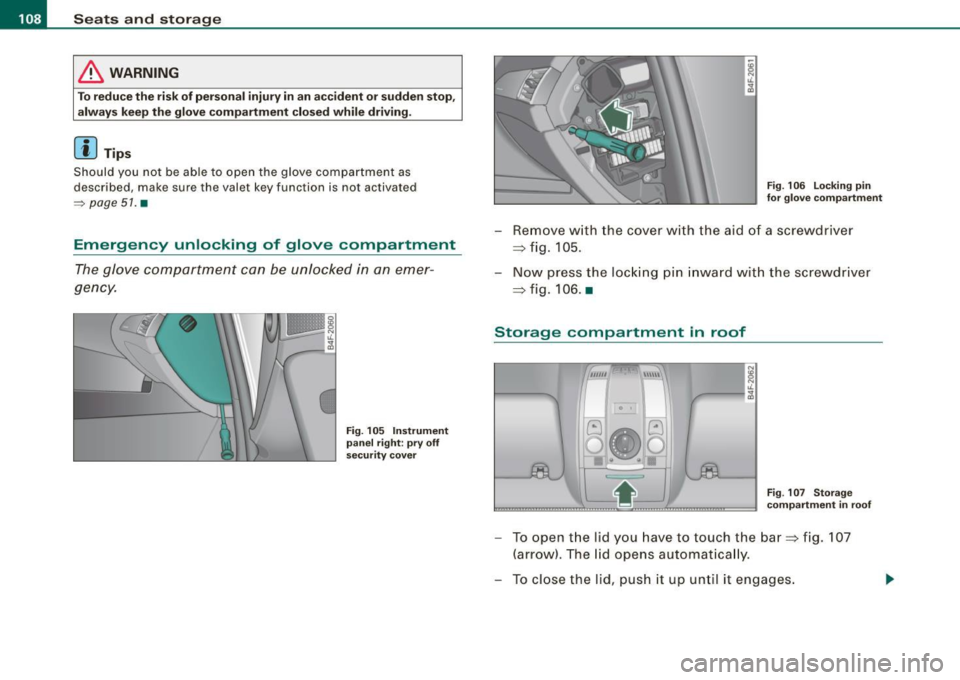
Fig. 105 Instrument
panel right : pry off
security cover
Fig. 106 Locking pin
for glove compartment
- Remove with the cover with the aid of a screwdriver
=> fig. 105.
- Now press the locking pin inward with the screwdriver
=> fig. 106. •
Storage compartment in roof
~1 0 I
G
0
••
8
"' iL
"' a,
Fig. 107 Storage
compartment in roof
- To open the lid you have to touch the bar=> fig. 107
(arrow). The lid opens automatically.
- To close the lid, push it up until it engages.