2008 AUDI S5 brake
[x] Cancel search: brakePage 250 of 294
Downloaded from www.Manualslib.com manuals search engine Self-help 248The TMS can be used at outside temperatures down to – 20 °C.
WARNING
After repairing a tyre please note the following points:•
Do not drive faster than 80 km/h.
•
Avoid heavy acceleration, hard braking and fast cornering.
•
Vehicle handling could be impaired.
•
Tyres which have been sealed using the TMS are only suitable
for temporary use. Damaged tyres must be renewed.
•
The TMS must NOT be used,
−on cuts and punctures larger than 4 mm
−if the wheel rim has been damaged
−if you have been driving with very low pressure or a
completely flat tyre
•
Seek professional assistance if the repair of a tyre puncture is
not possible with the sealing compound.
•
Do not allow the sealant to come into contact with your eyes,
skin or clothing.
•
If you do come into contact with the sealant immediately rinse
the eyes or skin affected with clean water.
•
Change clothing immediately if it becomes soiled with the tyre
sealant.
•
Make sure you do not breathe in the fumes!
•
If any of the tyre sealant is accidentally ingested, immediately
rinse the mouth thoroughly and drink lots of water.
•
Do not induce vomiting. Immediately contact a doctor!
•
If any allergic reactions should occur get medical help immedi-
ately.
•
Keep the sealant away from children.
For the sake of the environment
Used bottles of sealing compound can be returned to an Audi dealer
for disposal.
Note
•
If sealant should leak out, leave it to dry. When it has dried, you
can pull it off like a piece of foil.
•
Observe the expiry date stated on the sealing compound can.
Have the sealing compound exchanged by a qualified workshop.
Repairing a tyrePreparations
– If you have a flat tyre, stop the car well away from moving
traffic.
– Apply the parking brake to stop the vehicle moving acci-
dentally.
–Engage first gear.
– Check whether a repair is possible using the Tyre
Mobility System ⇒page 247.
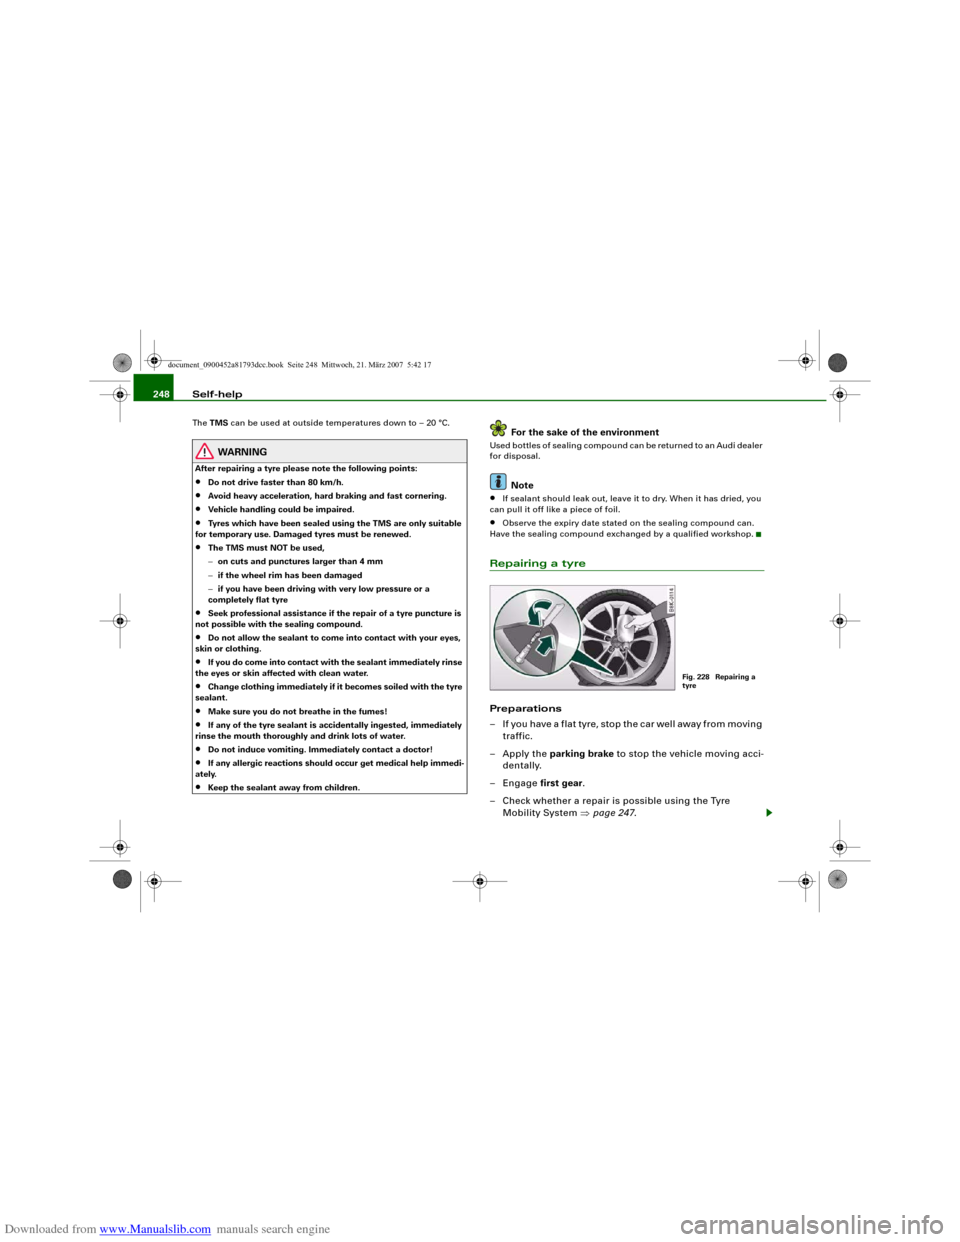
Fig. 228 Repairing a
tyre
document_0900452a81793dcc.book Seite 248 Mittwoch, 21. März 2007 5:42 17
Page 252 of 294
Downloaded from www.Manualslib.com manuals search engine Self-help 250
CautionTake special care if you have to repair a tyre on a gradient.
Note
•
Do not use the compressor for longer than 6 minutes at a time,
as it could overheat. When the compressor has cooled down, you
can use it again.
•
If tyre sealant should leak out, leave it to dry and then pull it off
like foil.
•
After carrying out a tyre repair remember to buy a new tyre
sealant can at a qualified workshop. This will ensure that the Tyre
Mobility System is operative again.
•
Please observe the relevant regulations.
Changing a wheelPreparations
Some preparations are necessary before changing a
wheel.– If you have a flat tyre, stop the car well away from moving
traffic. Choose a location that is as level as possible.
– All passengers should leave the car. They should wait in
a safe place (for instance behind the roadside crash
barrier).
– Apply the parking brake to stop the vehicle moving acci-
dentally.
–Engage first gear (manual gearbox) or move selector
lever to position P (automatic gearbox).– When towing a trailer: unhitch the trailer from your
vehicle.
– Take the tools ⇒page 245 and the spare wheel*
⇒page 246 out of the luggage compartment.
WARNING
If you have a puncture in moving traffic, switch on the hazard
warning lights and place the warning triangle in a visible location.
This is for your own safety and also warns other road users.
Caution
If you have to change the tyre on a gradient, block the wheel oppo-
site the wheel being changed by placing a stone or similar object
under it to prevent the vehicle from rolling away.
Note
Please observe the relevant regulations.How to change a wheel
Change the wheel as described below.–Pull off the hub cap. Also refer to ⇒page 251, “Hub
caps”.
–Loosen the wheel bolts ⇒page 251.
–Raise the car with the jack* ⇒page 252.
–Ta k e o f f the wheel with the flat tyre and then put on the
spare wheel* ⇒page 253.
–Lower the vehicle to the ground.
document_0900452a81793dcc.book Seite 250 Mittwoch, 21. März 2007 5:42 17
Page 259 of 294
Downloaded from www.Manualslib.com manuals search engine Self-help257
Controls
Safety
Driving tips
General maintenance
Self-help
Technical data terminal must not touch metal parts of the vehicle: this can cause
short circuiting.
•
Do not bend over the batteries – risk of acid burns.
•
The screw plugs on the battery cells must be screwed in firmly.
•
Keep sparks, flame and lighted cigarettes away from batteries:
the gases given off can cause an explosion.
•
If jump-starting another vehicle, position the jump leads in
such a way that they cannot come into contact with any moving
parts in the engine compartment of the other vehicle.Caution
Please note that the above method of connecting the leads is meant
for jump-starting your vehicle. If jump-starting another vehicle, you
should not connect the negative lead (–) to the negative terminal of
the discharged battery, but directly to the engine block or a solid
metal part bolted to the engine block. If the battery of the other
vehicle does not have a gas vent, there is a risk that a mixture of
oxygen and hydrogen gas can accumulate and cause an
explosion.Tow-starting and towing awayGeneral notes
Points to observe when tow-starting or towing awayIf you use a towrope:
Notes for the driver of the towing vehicle
– The towrope must be taut before driving off.– Engage the clutch very gently when starting to move; on
vehicles with automatic gearbox press the accelerator
slowly.
Notes for the driver of the towed vehicle
– The ignition should be switched on so that the turn
signals, horn, windscreen wipers and washers can be
used. Please ensure that the steering wheel is unlocked
when you switch on the ignition, and that it moves freely.
–Put gear lever in neutral (manual gearbox) or move
selector lever to position N (automatic gearbox).
– The brake servo and power steering only work when the
engine is running. Considerably more effort is required
on the brake pedal and steering wheel when the engine
is switched off.
– Ensure that the towrope remains taut at all times when
towing.
Towrope or towbar
It is easier and safer to tow a vehicle with a towbar. You should only
use a towrope if you do not have a towbar.
A towrope should be slightly elastic to reduce the loading on both
vehicles. It is advisable to use a towrope made of synthetic fibre or
similar material.
Attach the tow-rope or tow-bar only to the towing anchorages
intended for this purpose ⇒page 258 or ⇒page 259.
Driving technique
Towing requires some experience – especially when using a
towrope. Both drivers should be familiar with the technique required
for towing. Inexperienced drivers should not attempt to tow-start or
tow away another vehicle.
WARNING (continued)
document_0900452a81793dcc.book Seite 257 Mittwoch, 21. März 2007 5:42 17
Page 262 of 294
Downloaded from www.Manualslib.com manuals search engine Self-help 260
WARNING
There is a high risk of accidents when tow-starting, as the towed
vehicle can easily be driven into the towing vehicle.
Caution
When tow-starting the vehicle, do not tow it further than 50 metres:
otherwise the catalytic converter could be damaged.Towing a vehicle with manual gearbox and four-wheel drive
Certain restrictions must be observed when towing your
vehicle.Please observe the notes ⇒page 257.
The vehicle can be towed with a towbar or towrope in the normal
way, with all four wheels on the ground. It can also be towed by a
breakdown truck, with the wheels lifted at either the front or rear.
When doing so, please note the following points:•
The vehicle must not be towed faster than 50 km/h.
•
The vehicle must not be towed further than 50 km.Note
If it is not possible to tow the vehicle as described above, or if it has
to be towed further than 50 km, it must be transported on a special
car transporter or trailer.
Towing a vehicle with automatic gearbox and four-wheel drive
Certain restrictions must be observed when towing your
vehicle.Please observe the notes ⇒page 257.
The vehicle can be towed with a towbar or towrope in the normal
way, with all four wheels on the ground. When doing so, please note
the following points:•
Release the parking brake ⇒page 119.
•
Make sure the selector lever is in the N position.
•
The vehicle must not be towed faster than 50 km/h.
•
The vehicle must not be towed further than 50 km. The reason
for this is: when the engine is not running, the gearbox oil pump
does not work and the gearbox is not adequately lubricated for
higher speeds or longer distances.
The vehicle must not be towed with the wheels lifted at either the
front or rear.Note
If it is not possible to tow the vehicle as described above, or if it has
to be towed further than 50 km, it must be transported on a special
car transporter or trailer.
document_0900452a81793dcc.book Seite 260 Mittwoch, 21. März 2007 5:42 17
Page 266 of 294
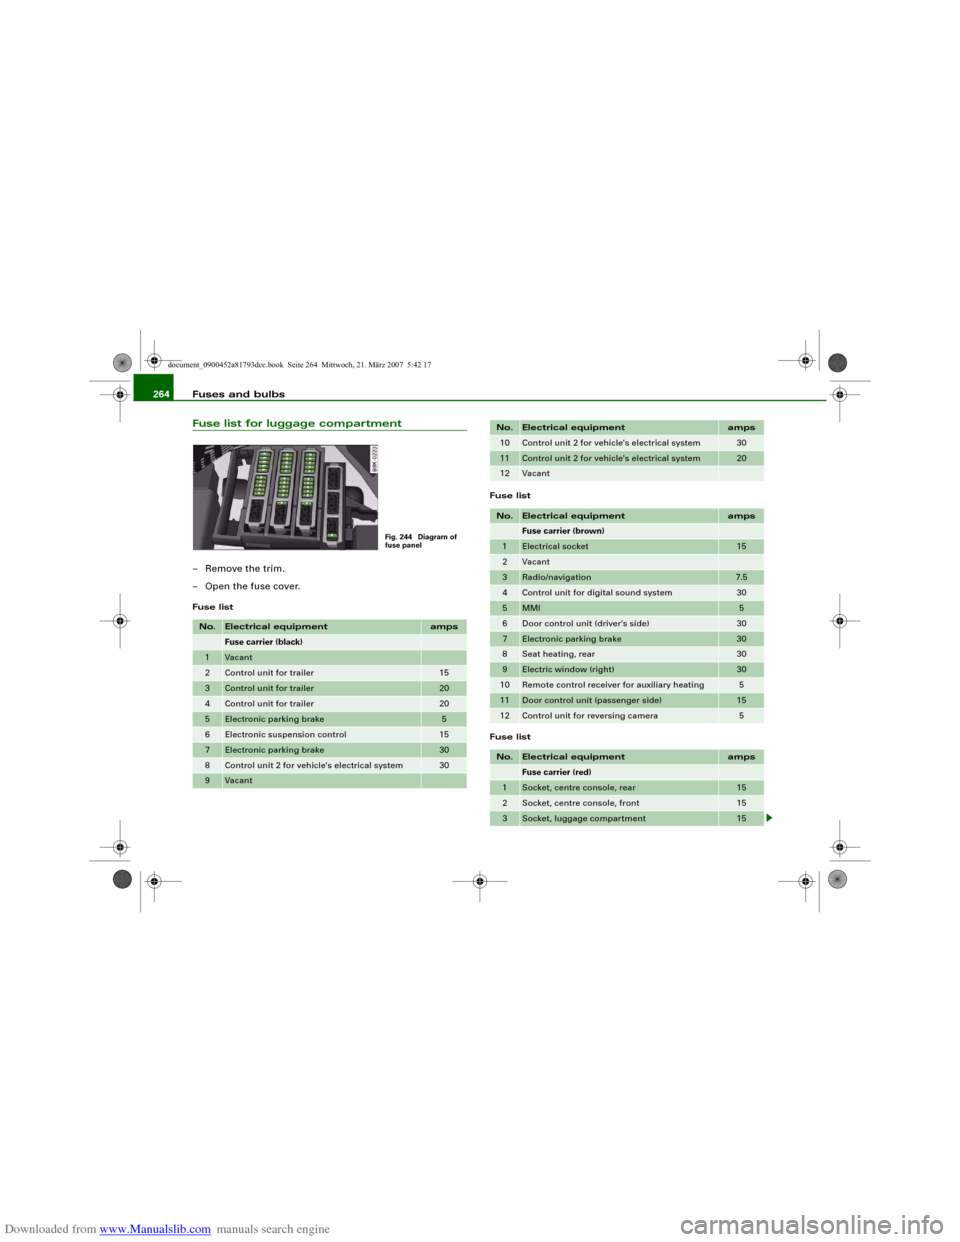
Downloaded from www.Manualslib.com manuals search engine Fuses and bulbs 264Fuse list for luggage compartment– Remove the trim.
– Open the fuse cover.Fuse listFuse list
Fuse listNo.
Electrical equipment
amps
Fuse carrier (black)
1
Vacant
2
Control unit for trailer
15
3
Control unit for trailer
20
4
Control unit for trailer
20
5
Electronic parking brake
5
6
Electronic suspension control
15
7
Electronic parking brake
30
8
Control unit 2 for vehicle's electrical system
30
9
Vacant
Fig. 244 Diagram of
fuse panel
10
Control unit 2 for vehicle's electrical system
30
11
Control unit 2 for vehicle's electrical system
20
12
Vacant
No.
Electrical equipment
amps
Fuse carrier (brown)
1
Electrical socket
15
2
Vacant
3
Radio/navigation
7.5
4
Control unit for digital sound system
30
5
MMI
5
6
Door control unit (driver's side)
30
7
Electronic parking brake
30
8
Seat heating, rear
30
9
Electric window (right)
30
10
Remote control receiver for auxiliary heating
5
11
Door control unit (passenger side)
15
12
Control unit for reversing camera
5
No.
Electrical equipment
amps
Fuse carrier (red)
1
Socket, centre console, rear
15
2
Socket, centre console, front
15
3
Socket, luggage compartment
15
No.
Electrical equipment
amps
document_0900452a81793dcc.book Seite 264 Mittwoch, 21. März 2007 5:42 17
Page 267 of 294
Downloaded from www.Manualslib.com manuals search engine Fuses and bulbs265
Controls
Safety
Driving tips
General maintenance
Self-help
Technical data
BulbsChanging bulbs
Changing bulbs requires a certain degree of practical
skill.You can change the following bulbs for exterior lights yourself:•
Bulb for turn signals
•
Bulb for fog light
•
Bulbs for rear lights in boot lid
•
Bulbs for rear lights in side panel
•
Bulbs for number plate light
The following bulbs should only be changed by a qualified work-
shop:
•
Xenon headlights: Light source for daytime running
lights/parking lights
•
Bulb for headlights: Bi-xenon lights ⇒
•
Light source for turn signal in exterior mirror housing
•
Light source for high-level brake light
As a rule, you require a certain degree of practical skill to change
defective bulbs. This applies in particular to those bulbs which are
only accessible from the engine compartment.
If in doubt, we recommend that you have defective bulbs changed
by a qualified workshop or qualified mechanic.
If you do decide to change bulbs in the engine compartment your-
self, be aware of the safety risks involved ⇒page 221 ⇒.
Types of bulbs
You must only replace a bulb with a bulb of the same type. Informa-
tion regarding e.g. the wattage can be found on the base of the
bulb.
WARNING
•
Take particular care when working on components in the
engine compartment if the engine is warm - risk of burns!
•
Bulbs are sensitive to pressure. The glass can break when you
touch the bulb, causing injury.
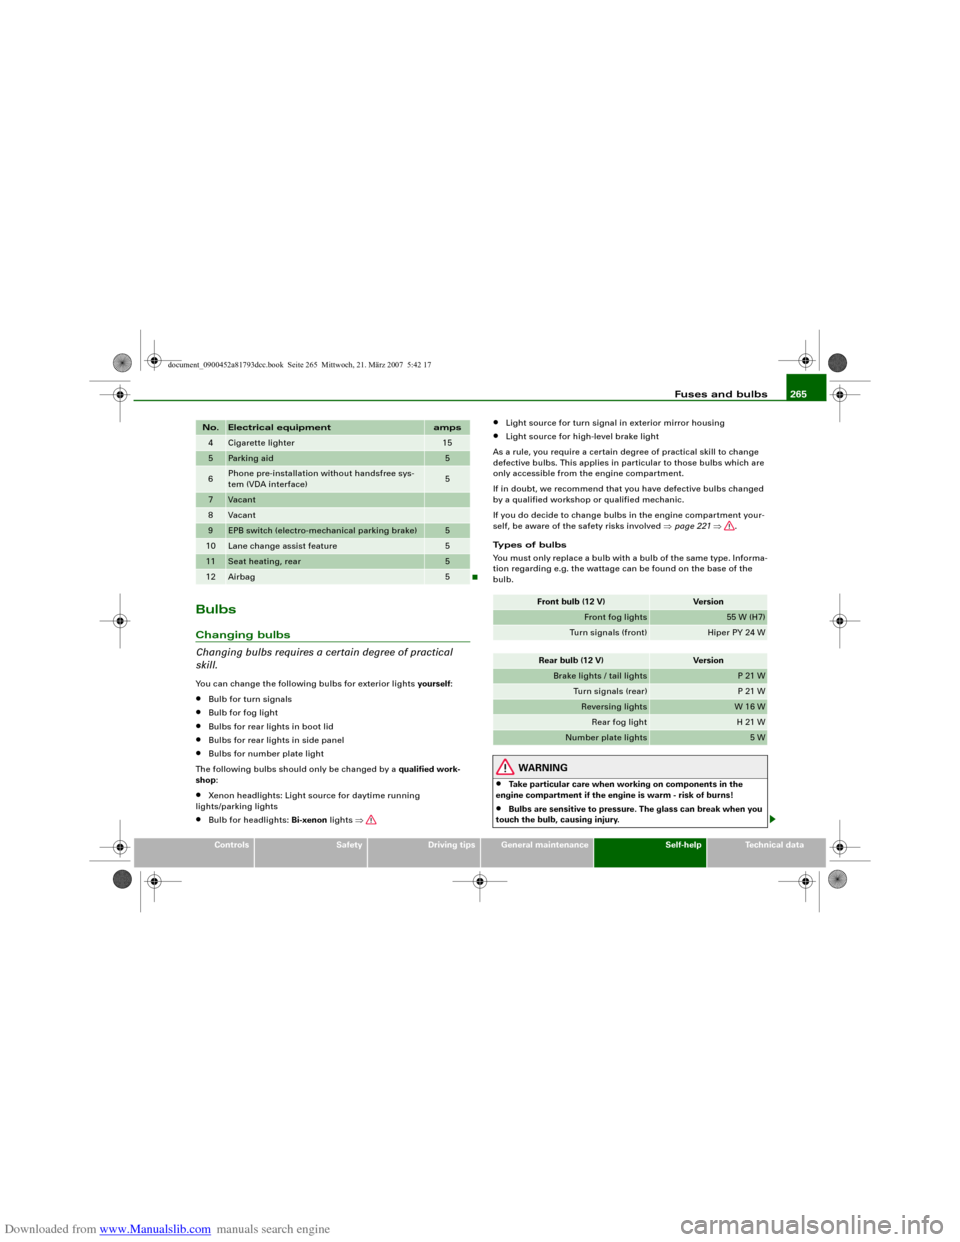
4
Cigarette lighter
15
5
Parking aid
5
6
Phone pre-installation without handsfree sys-
tem (VDA interface)
5
7
Vacant
8
Vacant
9
EPB switch (electro-mechanical parking brake)
5
10
Lane change assist feature
5
11
Seat heating, rear
5
12
Airbag
5
No.
Electrical equipment
amps
Front bulb (12 V)
Version
Front fog lights
55 W (H7)
Turn signals (front)
Hiper PY 24 W
Rear bulb (12 V)
Version
Brake lights / tail lights
P 21 W
Turn signals (rear)
P 21 W
Reversing lights
W 16 W
Rear fog light
H 21 W
Number plate lights
5 W
document_0900452a81793dcc.book Seite 265 Mittwoch, 21. März 2007 5:42 17
Page 271 of 294
Downloaded from www.Manualslib.com manuals search engine Fuses and bulbs269
Controls
Safety
Driving tips
General maintenance
Self-help
Technical data
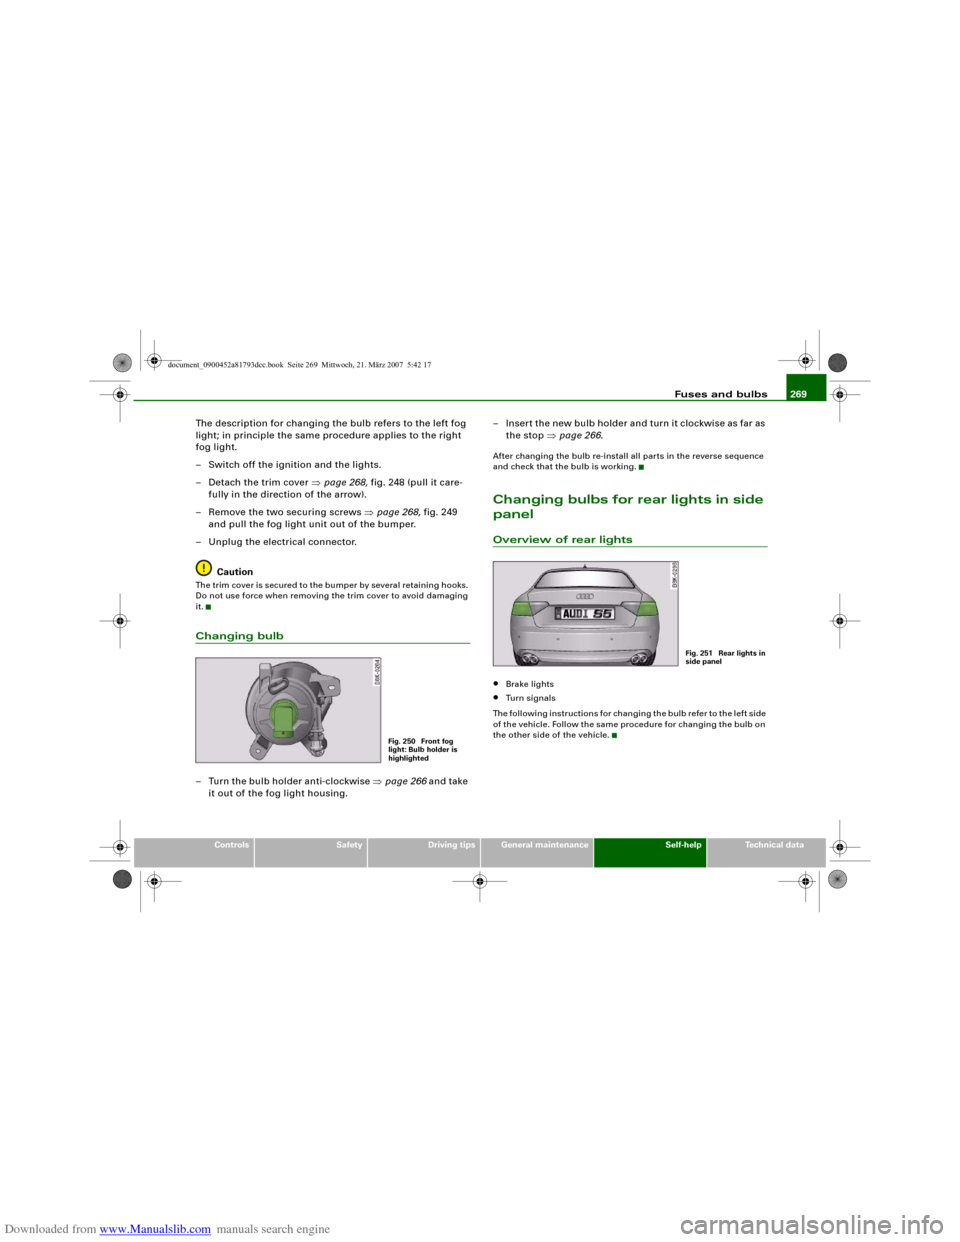
The description for changing the bulb refers to the left fog
light; in principle the same procedure applies to the right
fog light.
– Switch off the ignition and the lights.
– Detach the trim cover ⇒page 268, fig. 248 (pull it care-
fully in the direction of the arrow).
– Remove the two securing screws ⇒page 268, fig. 249
and pull the fog light unit out of the bumper.
– Unplug the electrical connector.
CautionThe trim cover is secured to the bumper by several retaining hooks.
Do not use force when removing the trim cover to avoid damaging
it.Changing bulb– Turn the bulb holder anti-clockwise ⇒page 266 and take
it out of the fog light housing.– Insert the new bulb holder and turn it clockwise as far as
the stop ⇒page 266.
After changing the bulb re-install all parts in the reverse sequence
and check that the bulb is working.Changing bulbs for rear lights in side
panelOverview of rear lights•
Brake lights
•
Turn signals
The following instructions for changing the bulb refer to the left side
of the vehicle. Follow the same procedure for changing the bulb on
the other side of the vehicle.
Fig. 250 Front fog
light: Bulb holder is
highlighted
Fig. 251 Rear lights in
side panel
document_0900452a81793dcc.book Seite 269 Mittwoch, 21. März 2007 5:42 17
Page 273 of 294
Downloaded from www.Manualslib.com manuals search engine Fuses and bulbs271
Controls
Safety
Driving tips
General maintenance
Self-help
Technical data
Changing bulbs
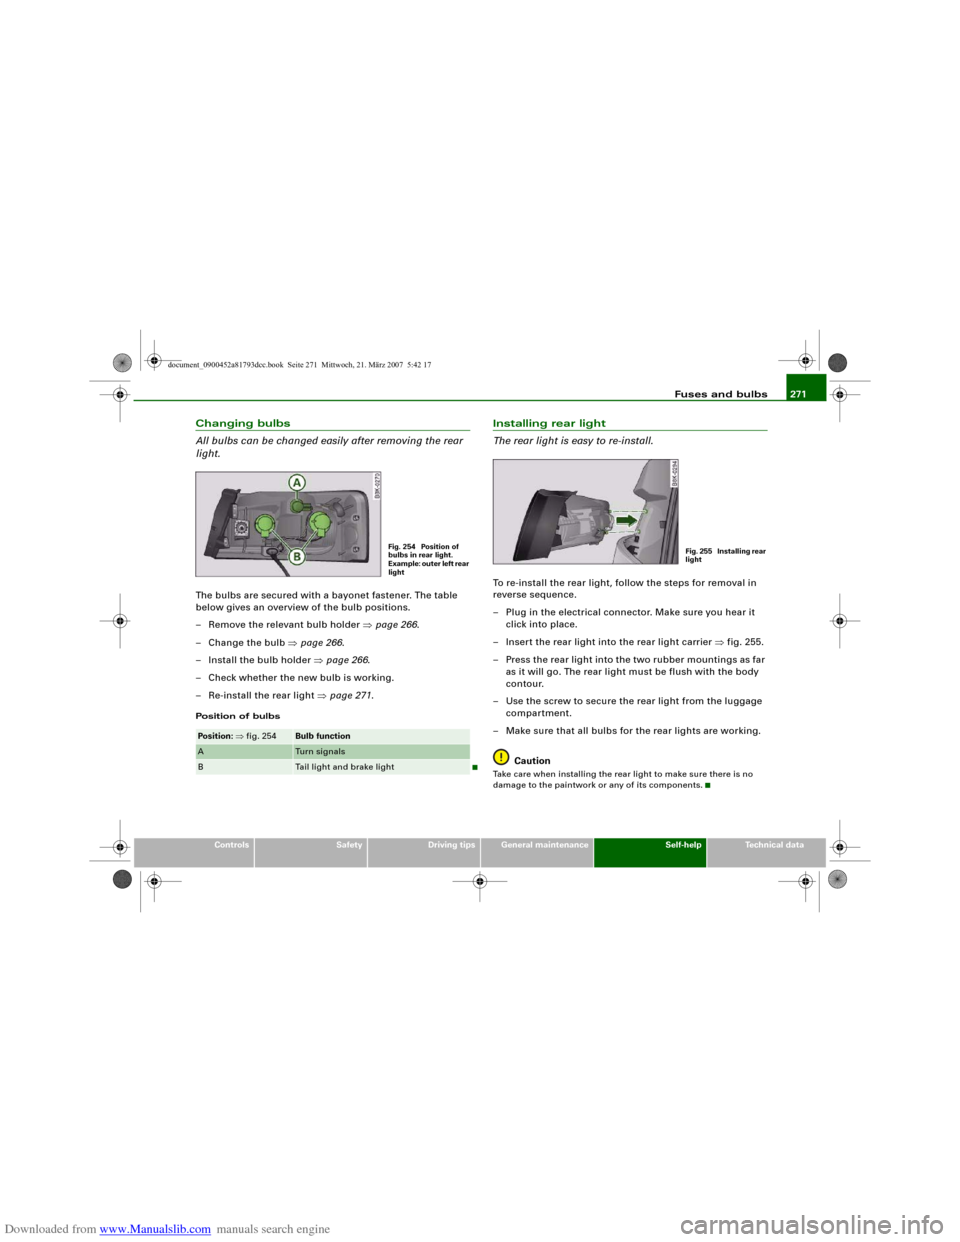
All bulbs can be changed easily after removing the rear
light.The bulbs are secured with a bayonet fastener. The table
below gives an overview of the bulb positions.
– Remove the relevant bulb holder ⇒page 266.
– Change the bulb ⇒page 266.
– Install the bulb holder ⇒page 266.
– Check whether the new bulb is working.
– Re-install the rear light ⇒page 271.Position of bulbs
Installing rear light
The rear light is easy to re-install.To re-install the rear light, follow the steps for removal in
reverse sequence.
– Plug in the electrical connector. Make sure you hear it
click into place.
– Insert the rear light into the rear light carrier ⇒fig. 255.
– Press the rear light into the two rubber mountings as far
as it will go. The rear light must be flush with the body
contour.
– Use the screw to secure the rear light from the luggage
compartment.
– Make sure that all bulbs for the rear lights are working.
CautionTake care when installing the rear light to make sure there is no
damage to the paintwork or any of its components.
Pos iti on: ⇒fig. 254
Bulb function
A
Tu r n s i g n a l s
B
Tail light and brake light
Fig. 254 Position of
bulbs in rear light.
Example: outer left rear
light
Fig. 255 Installing rear
light
document_0900452a81793dcc.book Seite 271 Mittwoch, 21. März 2007 5:42 17