2008 AUDI S5 brake
[x] Cancel search: brakePage 214 of 294
Downloaded from www.Manualslib.com manuals search engine Care of vehicle and cleaning 212Plastic partsPlastic parts will come clean with regular washing. If this is not suffi-
cient, plastic parts should only be treated with a special solvent-free
plastic cleaning agent. Do not use paint cleaners, polishes or wax on
plastic parts.Paint damageMinor damage to the paint, such as scratches or stone chips, should
be touched up without delay before the metal starts to corrode. Suit-
able touch-up brushes or sprays for your car can be obtained from
an Audi dealer.
The number of the original paint finish on the vehicle is given on the
data sticker ⇒page 279.
If corrosion is already visible it must be thoroughly removed by a
qualified workshop.Windows
Clear vision is an essential safety factor.The windscreen must not be cleaned with insect remover or wax,
otherwise the windscreen wipers will not function properly
(juddering).
Traces of rubber, oil, grease or silicone can be removed with a
window cleaning solution or a silicone remover. Wax residue can
only be removed with a special cleaner. Your Audi dealer will be able
to provide you with more detailed information.
The windows should also be cleaned on the inside at regular inter-
vals.
Use a separate cloth or chamois to dry the windows. Cloths used for
waxing and polishing contain residues that will cause smears on the
glass.
WARNING
Do not use water-repellent coatings on the windscreen. In bad visi-
bility conditions such as light rain, low sun or when driving at
night these coatings can cause increased dazzle, which is a
serious safety hazard. Such coatings can also cause the wiper
blades to judder.
Caution
•
Remove snow and ice from windows and mirrors with a plastic
scraper only. To avoid scratches caused by dirt on the glass, the
scraper should only be pushed in one direction and not moved to
and fro.
•
The heating element for the rear window is located on the inner
side of the window. To avoid damaging the heating element, do not
put stickers on the inner side of the window.
•
Never use warm or hot water to remove snow and ice from
windows and mirrors. This could cause the glass to crack!
Rubber seals (weatherstrips)The weatherstrips will remain pliable and last longer if they are
occasionally treated with a suitable care product (for example sili-
cone spray). This will also prevent premature ageing and leaks. The
doors will be easier to open as well. If they are kept pliable, the door
seals will be less likely to freeze up in the winter.WheelsThe wheels require regular attention to preserve their appearance.
It is important to remove road salt and brake dust by washing the
wheels at regular intervals, otherwise the finish will be impaired.
document_0900452a81793dcc.book Seite 212 Mittwoch, 21. März 2007 5:42 17
Page 215 of 294
Downloaded from www.Manualslib.com manuals search engine Care of vehicle and cleaning213
Controls
Safety
Driving tips
General maintenance
Self-help
Technical data After washing, the wheels should only be cleaned with an "acid-
free" cleaning agent for alloy wheels. This is available from Audi
dealers and specialist retailers. Never leave the cleaning agent on
the rims for any longer than specified in the instructions before
rinsing it off. If the wheel cleaner fluid contains acid it can attack the
surfaces of the wheel bolts.
Car polish or other abrasive agents should not be used. If the
protective paint coating is damaged by stone chips etc., the
damaged area should be touched up immediately.
WARNING
Please note when cleaning the wheels that water, ice and road salt
can impair the effectiveness of the brakes – this can cause an
accident.Care of interiorMMI display screen and control consoleThe MMI display screen can be cleaned with a soft cloth and a
special “LCD cleaner” (available from retailers of electrical goods).
Moisten the cloth with a small amount of the cleaning fluid.
Clean the MMI control console with a fine brush first to prevent any
dirt from getting in between the control buttons and the housing.
We then recommend wiping the MMI control console using a cloth
moistened with washing-up liquid and water.
Caution
To avoid scratching the screen, do not wipe the MMI display with a
dry cloth.•
To avoid any possibility of damage, do not let any liquid get
inside the control console.
Plastic parts and leatherettePlastic parts and leatherette can be cleaned with a damp cloth. If
this is not sufficient, plastic parts and leatherette should only be
treated with a special solvent-free plastic cleaner.Textile covers and trim partsTextile covers and trim parts (e.g. seats, door trim) should be
cleaned regularly with a vacuum cleaner. This will remove surface
dirt which could otherwise be rubbed into the textile material
during use. Do not use steam cleaners, as the steam could carry the
dirt deeper into the textile material.
Normal cleaning
We recommend that you use a soft sponge or lint-free, micro-fibre
cloth for normal cleaning. Only use brushes on floor coverings and
mats, as other textile surfaces could become damaged.
In the case of normal surface dirt you can use a foam cleaner. Use a
sponge to spread the foam on the textile surface and to work it into
the material lightly. However, make sure that the textile material
does not become soaking wet. Then dab off the foam with a dry and
absorbent cloth (e.g. a micro-fibre cloth) and vacuum off any
residue once the surface is completely dry.
Removal of stains
To treat stains caused by spilled drinks (coffee, fruit juice or similar)
make up a solution with a mild detergent for sensitive fabrics and
apply it with a sponge. If the stains are difficult to remove, a
washing paste can be applied directly onto the stain and worked
into the fabric. The surface will then have to be wiped with clear
water to remove any residue left by the paste. To do so, use a damp
cloth or sponge and then dab the stain with an absorbent cloth.
Treat chocolate or make-up stains with a washing paste and then
rinse off with water (using a damp sponge).
document_0900452a81793dcc.book Seite 213 Mittwoch, 21. März 2007 5:42 17
Page 223 of 294
Downloaded from www.Manualslib.com manuals search engine Checking and topping up fluids221
Controls
Safety
Driving tips
General maintenance
Self-help
Technical data
Working on components in the engine compartment
Extra caution is necessary when working on components
in the engine compartment.Always be aware of the danger of injury and scalding as well as the
risk of accident or fire when working in the engine compartment
(e.g. when checking and refilling fluids). Always observe the warn-
ings listed below and follow all normal safety precautions. The
engine compartment of any motor vehicle is a potentially
hazardous area. ⇒.
WARNING
•
Switch off the engine.
•
Remove the ignition key.
•
Apply the parking brake.
•
Move the gear lever into neutral.
•
Wait for the engine to cool down.
•
Keep children away from engine compartment.
•
Never spill fluids on hot engine components. These fluids can
cause a fire (e.g. radiator anti-freeze).
•
Take care not to cause short circuits in the electrical system,
especially when working on the battery.
•
Do not touch the radiator fan when the engine is hot. The fan
may start running suddenly.
•
Do not unscrew the cap on the expansion tank when the engine
is hot. The cooling system is under pressure.
•
Protect face, hands and arms by covering the cap with a large,
thick rag to protect against escaping coolant and steam.
•
If any tests have to be performed with the engine running,
there is an extra safety risk from the rotating parts, such as the
drive belts, alternator and radiator fan, etc., and from the high-
voltage ignition system.
•
Observe the following additional warnings if work on the fuel
system or the electrical system is necessary:
−Always disconnect the battery.
−Do not smoke.
−Never work near naked flames.
−Always keep an approved fire extinguisher immediately
available.Caution
When topping up fluids make sure the correct fluid is put into the
correct filler opening. This can otherwise cause serious malfunc-
tions or engine damage.
For the sake of the environment
Inspect the ground underneath your vehicle regularly so that any
leaks are detected at an early stage. If you find oil spots or other
fluids, have your vehicle inspected by a qualified workshop.
Note
On right-hand drive vehicles* some of the containers/ reservoirs
mentioned below are located on the other side of the engine
compartment.Closing the bonnet– To close the bonnet, pull it down to overcome the spring
pressure.
– Then let it drop into the catches; do not press down ⇒.
WARNING (continued)
document_0900452a81793dcc.book Seite 221 Mittwoch, 21. März 2007 5:42 17
Page 224 of 294
Downloaded from www.Manualslib.com manuals search engine Checking and topping up fluids 222
WARNING
•
For safety reasons the bonnet must always be completely
closed when the vehicle is moving. After closing it always check
that it is properly secured. The bonnet must be flush with the adja-
cent body panels.
•
Should you notice that the bonnet is not safely secured when
the vehicle is moving, stop the vehicle immediately and close the
bonnet properly, otherwise it could cause an accident.
Engine compartment layoutEngine compartment layout
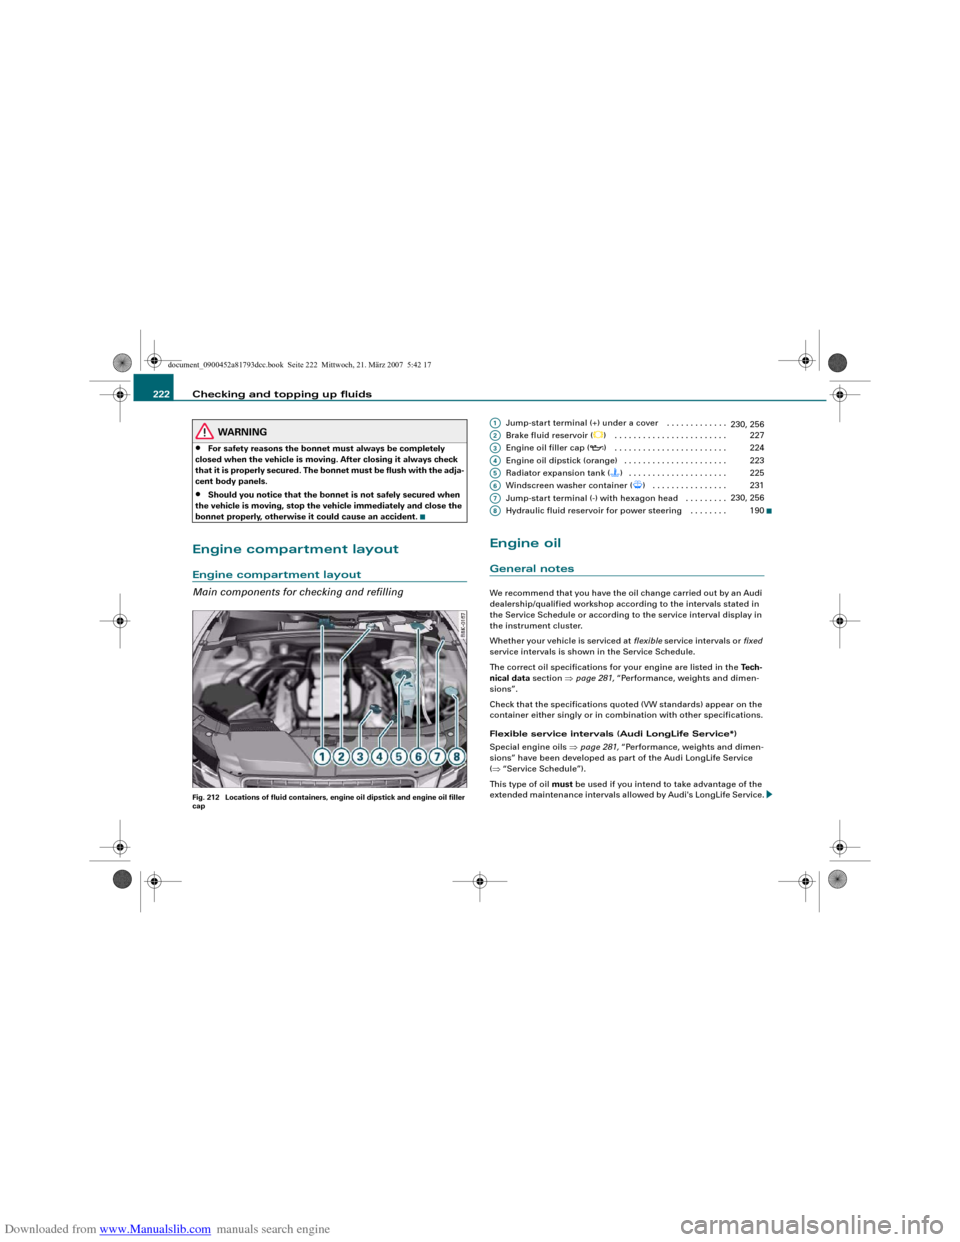
Main components for checking and refillingFig. 212 Locations of fluid containers, engine oil dipstick and engine oil filler
cap
Jump-start terminal (+) under a cover . . . . . . . . . . . . .
Brake fluid reservoir (
) . . . . . . . . . . . . . . . . . . . . . . . .
Engine oil filler cap (
) . . . . . . . . . . . . . . . . . . . . . . . .
Engine oil dipstick (orange) . . . . . . . . . . . . . . . . . . . . . .
Radiator expansion tank () . . . . . . . . . . . . . . . . . . . . .
Windscreen washer container (
) . . . . . . . . . . . . . . . .
Jump-start terminal (-) with hexagon head . . . . . . . . .
Hydraulic fluid reservoir for power steering . . . . . . . .
Engine oilGeneral notesWe recommend that you have the oil change carried out by an Audi
dealership/qualified workshop according to the intervals stated in
the Service Schedule or according to the service interval display in
the instrument cluster.
Whether your vehicle is serviced at flexible service intervals or fixed
service intervals is shown in the Service Schedule.
The correct oil specifications for your engine are listed in the Tech-
nical data section ⇒page 281, “Performance, weights and dimen-
sions”.
Check that the specifications quoted (VW standards) appear on the
container either singly or in combination with other specifications.
Flexible service intervals (Audi LongLife Service*)
Special engine oils ⇒page 281, “Performance, weights and dimen-
sions” have been developed as part of the Audi LongLife Service
(⇒“Service Schedule”).
This type of oil must be used if you intend to take advantage of the
extended maintenance intervals allowed by Audi's LongLife Service.A1
230, 256
A2
227
A3
224
A4
223
A5
225
A6
231
A7
230, 256
A8
190
document_0900452a81793dcc.book Seite 222 Mittwoch, 21. März 2007 5:42 17
Page 229 of 294
Downloaded from www.Manualslib.com manuals search engine Checking and topping up fluids227
Controls
Safety
Driving tips
General maintenance
Self-help
Technical data
Brake fluidChecking brake fluid level
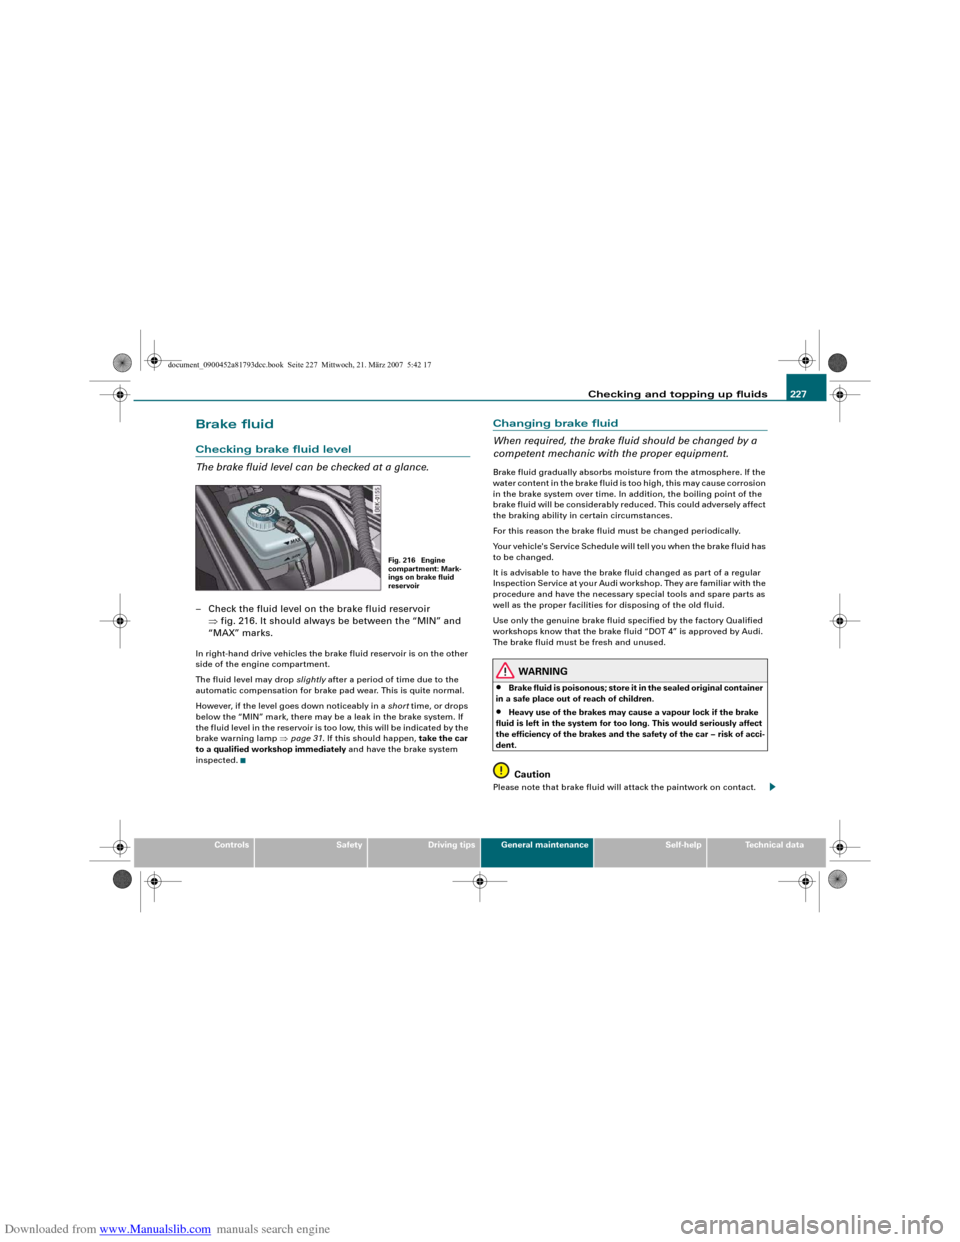
The brake fluid level can be checked at a glance.– Check the fluid level on the brake fluid reservoir
⇒fig. 216. It should always be between the “MIN” and
“MAX” marks.In right-hand drive vehicles the brake fluid reservoir is on the other
side of the engine compartment.
The fluid level may drop slightly after a period of time due to the
automatic compensation for brake pad wear. This is quite normal.
However, if the level goes down noticeably in a short time, or drops
below the “MIN” mark, there may be a leak in the brake system. If
the fluid level in the reservoir is too low, this will be indicated by the
brake warning lamp ⇒page 31. If this should happen, take the car
to a qualified workshop immediately and have the brake system
inspected.
Changing brake fluid
When required, the brake fluid should be changed by a
competent mechanic with the proper equipment.Brake fluid gradually absorbs moisture from the atmosphere. If the
water content in the brake fluid is too high, this may cause corrosion
in the brake system over time. In addition, the boiling point of the
brake fluid will be considerably reduced. This could adversely affect
the braking ability in certain circumstances.
For this reason the brake fluid must be changed periodically.
Your vehicle's Service Schedule will tell you when the brake fluid has
to be changed.
It is advisable to have the brake fluid changed as part of a regular
Inspection Service at your Audi workshop. They are familiar with the
procedure and have the necessary special tools and spare parts as
well as the proper facilities for disposing of the old fluid.
Use only the genuine brake fluid specified by the factory Qualified
workshops know that the brake fluid “DOT 4” is approved by Audi.
The brake fluid must be fresh and unused.
WARNING
•
Brake fluid is poisonous; store it in the sealed original container
in a safe place out of reach of children.
•
Heavy use of the brakes may cause a vapour lock if the brake
fluid is left in the system for too long. This would seriously affect
the efficiency of the brakes and the safety of the car – risk of acci-
dent.Caution
Please note that brake fluid will attack the paintwork on contact.
Fig. 216 Engine
compartment: Mark-
ings on brake fluid
reservoir
document_0900452a81793dcc.book Seite 227 Mittwoch, 21. März 2007 5:42 17
Page 230 of 294
Downloaded from www.Manualslib.com manuals search engine Checking and topping up fluids 228
For the sake of the environmentIf the fluid has to be drained out of the brake system, use an appro-
priate container to catch the used brake fluid and dispose of it in the
proper manner.BatteryGeneral notes
All work on batteries requires specialist knowledge.The battery is virtually maintenance-free. It is checked as part of the
Inspection Service.
We recommend that you replace a battery once it is older than 5
years.
When an airbag is triggered, the battery will, under certain circum-
stances, be disconnected from the on-board power supply for
safety reasons ⇒ in “General notes on airbag system” on
page 166.
Disconnecting the battery
If the battery is disconnected, some of the vehicle's functions will
become inoperative (e.g. electric windows). These functions will
require resetting after the battery is reconnected. For this reason,
the battery should only be disconnected from the vehicle's electrical
system when absolutely necessary.
If the vehicle is not used for long periods
If you do not drive your vehicle for a period of several days or weeks,
the power management will gradually shut off the on-board
systems one by one, or reduce the amount of current they are using.
This limits the amount of power consumed and helps to ensure reli-
able starting even after a long period ⇒page 192.Please note that certain convenience features, such as the Audi
advanced key*, the remote control key or the electrical seat adjust-
ment may not be available when you unlock the vehicle. These func-
tions will be restored when you switch on the ignition and start the
engine.
Winter conditions
At low temperatures the battery has to work very hard. It also
provides only a fraction of the starting power it has at normal
temperatures.
For this reason, we recommend having the battery checked and
charged if necessary before the start of winter ⇒page 230.
WARNING
•
All work on batteries requires specialist knowledge. For queries
regarding the vehicle battery please contact an Audi dealership or
other qualified workshop (risk of chemical burns / risk of explo-
sion).
•
The battery must not be opened. Do not attempt to make any
changes to the electrolyte level of the battery. Otherwise, there is
a risk that a mixture of oxygen and hydrogen gas can accumulate
and cause an explosion.Note
If the vehicle is to be left standing for a period of several weeks at
extremely low temperatures, the battery should be removed from
the vehicle. This ensures that it cannot “freeze up” and be
damaged.
document_0900452a81793dcc.book Seite 228 Mittwoch, 21. März 2007 5:42 17
Page 237 of 294
Downloaded from www.Manualslib.com manuals search engine Wheels and tyres235
Controls
Safety
Driving tips
General maintenance
Self-help
Technical data
– Never use tyres whose actual size exceeds the dimen-
sions of the factory-approved makes of tyre.
– If you wish to fit the vehicle with non-standard rims or
tyres, it is advisable to consult an Audi dealer before
purchasing them.The tyres and wheel rims are an essential part of the vehicle's
design. The tyres and rims approved by Audi are specially matched
to the characteristics of the vehicle and make a major contribution
to good roadholding and safe handling ⇒.
The sizes of the rims and tyres approved for your vehicle are listed
in the vehicle's documents (e.g. EC Certificate of Conformity or COC
document
5)). The vehicle documents vary depending on the
country of residence.
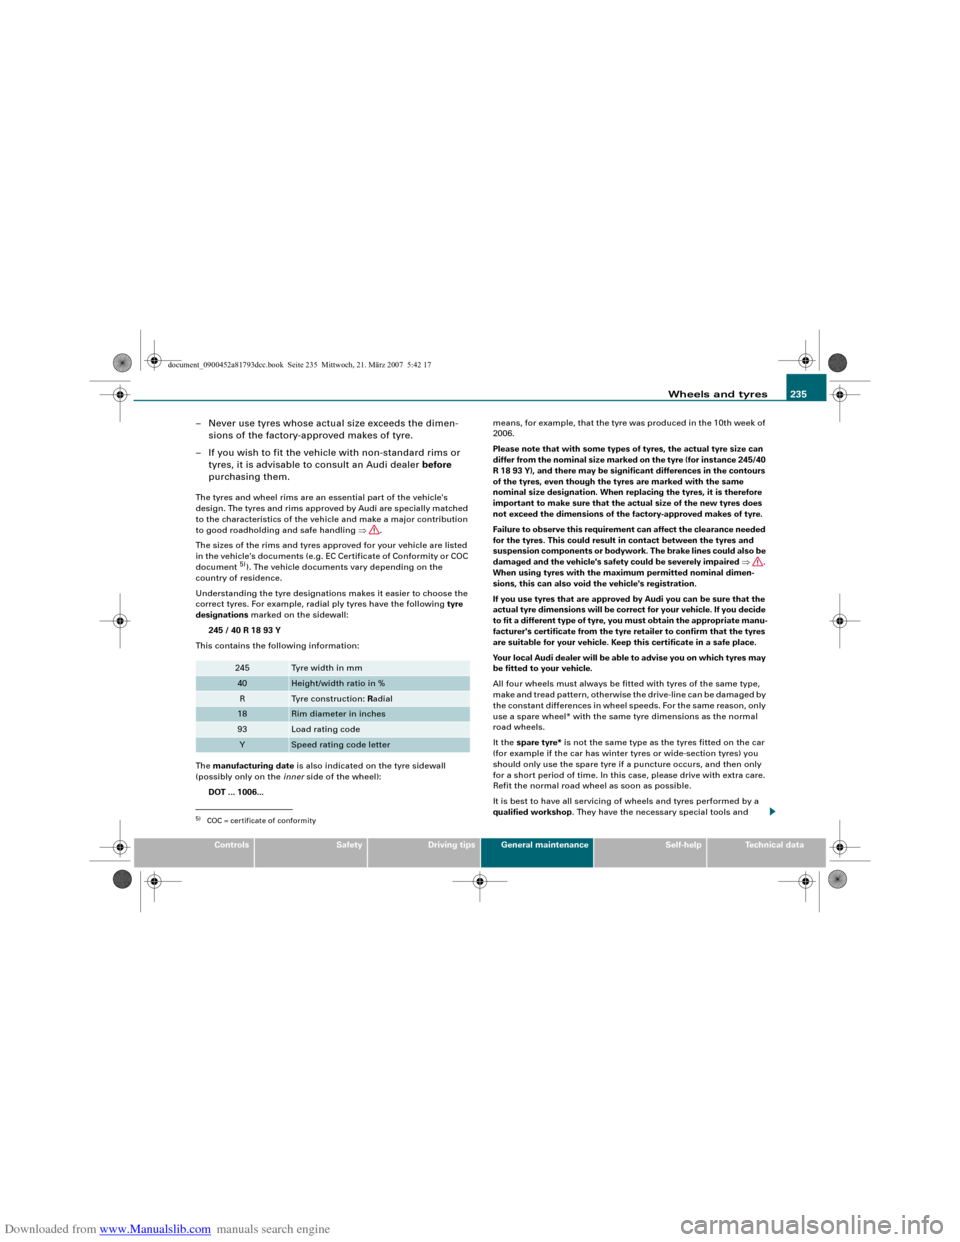
Understanding the tyre designations makes it easier to choose the
correct tyres. For example, radial ply tyres have the following tyre
designations marked on the sidewall:
245 / 40 R 18 93 Y
This contains the following information:
The manufacturing date is also indicated on the tyre sidewall
(possibly only on the inner side of the wheel):
DOT ... 1006...means, for example, that the tyre was produced in the 10th week of
2006.
Please note that with some types of tyres, the actual tyre size can
differ from the nominal size marked on the tyre (for instance 245/40
R 18 93 Y), and there may be significant differences in the contours
of the tyres, even though the tyres are marked with the same
nominal size designation. When replacing the tyres, it is therefore
important to make sure that the actual size of the new tyres does
not exceed the dimensions of the factory-approved makes of tyre.
Failure to observe this requirement can affect the clearance needed
for the tyres. This could result in contact between the tyres and
suspension components or bodywork. The brake lines could also be
damaged and the vehicle's safety could be severely impaired ⇒.
When using tyres with the maximum permitted nominal dimen-
sions, this can also void the vehicle's registration.
If you use tyres that are approved by Audi you can be sure that the
actual tyre dimensions will be correct for your vehicle. If you decide
to fit a different type of tyre, you must obtain the appropriate manu-
facturer's certificate from the tyre retailer to confirm that the tyres
are suitable for your vehicle. Keep this certificate in a safe place.
Your local Audi dealer will be able to advise you on which tyres may
be fitted to your vehicle.
All four wheels must always be fitted with tyres of the same type,
make and tread pattern, otherwise the drive-line can be damaged by
the constant differences in wheel speeds. For the same reason, only
use a spare wheel* with the same tyre dimensions as the normal
road wheels.
It the spare tyre* is not the same type as the tyres fitted on the car
(for example if the car has winter tyres or wide-section tyres) you
should only use the spare tyre if a puncture occurs, and then only
for a short period of time. In this case, please drive with extra care.
Refit the normal road wheel as soon as possible.
It is best to have all servicing of wheels and tyres performed by a
qualified workshop. They have the necessary special tools and
5)COC = certificate of conformity
245
Tyre width in mm
40
Height/width ratio in %
R
Tyre construction: Radial
18
Rim diameter in inches
93
Load rating code
Y
Speed rating code letter
document_0900452a81793dcc.book Seite 235 Mittwoch, 21. März 2007 5:42 17
Page 238 of 294
Downloaded from www.Manualslib.com manuals search engine Wheels and tyres 236replacement parts, trained personnel and facilities for disposing of
the old tyres.
WARNING
•
It is very important to ensure that the tyres you have chosen
have adequate clearance. When selecting replacement tyres, do
not rely entirely on the nominal tyre size marked on the tyre; with
some makes of tyre the effective tyre size can differ significantly
from the nominal dimensions, even though the tyres have the
same size designation. Inadequate tyre clearance can result in
damage to the tyres or the vehicle, causing a serious safety risk. It
may also invalidate the vehicle's type approval for use on public
roads.
•
Please ask your Audi dealer or qualified workshop whether run
flat tyres can be used on your vehicle. Unauthorised use of these
tyres can invalidate the vehicle's type approval for use on public
roads. Furthermore, this could cause damage to your vehicle and
possibly also result in an accident.
•
Avoid running the car on tyres that are more than 6 years old.
If you have no alternative, you should drive slowly and with extra
care at all times.For the sake of the environment
Old tyres must be disposed of according to the laws in the country
concerned.
Note
•
Never mount used tyres if you are not sure of their previous
history.
•
For technical reasons it is not normally possible to use wheel
rims from other vehicles. In some cases this also applies to rims
from other vehicles of the same model.
Wheel bolts
The wheel bolts are designed to suit the rims on your car.The wheel bolts are matched to the rims. When installing different
wheels (for instance wheels with winter tyres) it is important to use
the correct wheel bolts with the right length and correctly shaped
bolt heads. This is essential for the secure fit of the wheels and for
the proper function of the brake system.
Audi dealers have full information on the technical requirements
when installing or changing tyres, rims or wheel trims.
The wheel bolts should be clean and turn easily.
A special adapter is required to turn the anti-theft wheel bolts*
⇒page 254.Winter tyres
Winter tyres will significantly improve the car's handling
in winter road conditions.–Use only radial ply winter tyres.
– Winter tyres must be fitted on all four wheels.
– Only use winter tyres of the correct type approved for
your vehicle.
– Please note that the maximum permissible speed for
winter tyres may be lower than for summer tyres.
– Also note that winter tyres are no longer effective when
the tread is worn down.
– After fitting the wheels you must always check the tyre
pressures. The correct tyre pressures are listed on the
sticker on the end face of the driver's door.
document_0900452a81793dcc.book Seite 236 Mittwoch, 21. März 2007 5:42 17