2008 AUDI S5 change time
[x] Cancel search: change timePage 229 of 294
Downloaded from www.Manualslib.com manuals search engine Checking and topping up fluids227
Controls
Safety
Driving tips
General maintenance
Self-help
Technical data
Brake fluidChecking brake fluid level
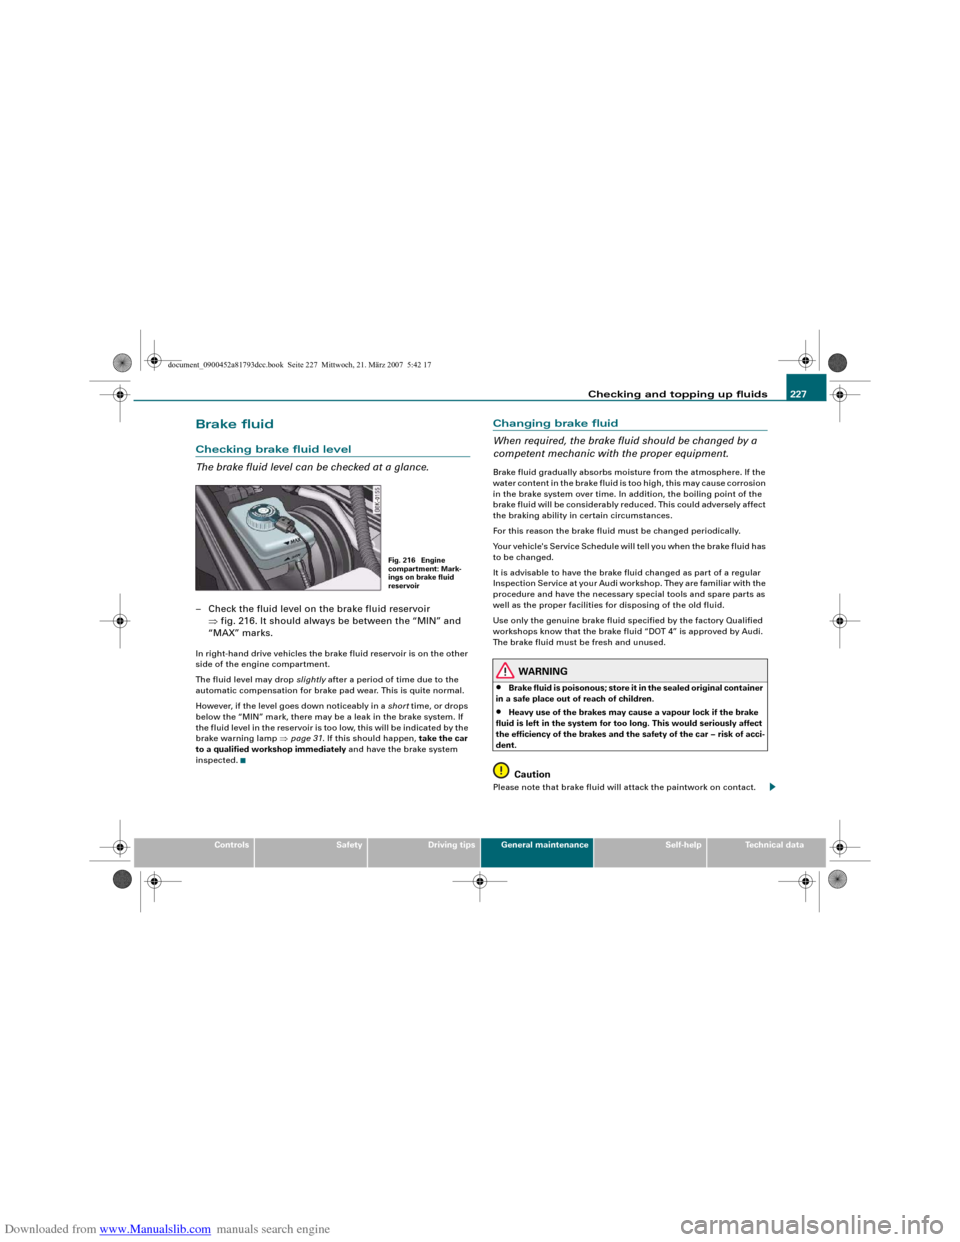
The brake fluid level can be checked at a glance.– Check the fluid level on the brake fluid reservoir
⇒fig. 216. It should always be between the “MIN” and
“MAX” marks.In right-hand drive vehicles the brake fluid reservoir is on the other
side of the engine compartment.
The fluid level may drop slightly after a period of time due to the
automatic compensation for brake pad wear. This is quite normal.
However, if the level goes down noticeably in a short time, or drops
below the “MIN” mark, there may be a leak in the brake system. If
the fluid level in the reservoir is too low, this will be indicated by the
brake warning lamp ⇒page 31. If this should happen, take the car
to a qualified workshop immediately and have the brake system
inspected.
Changing brake fluid
When required, the brake fluid should be changed by a
competent mechanic with the proper equipment.Brake fluid gradually absorbs moisture from the atmosphere. If the
water content in the brake fluid is too high, this may cause corrosion
in the brake system over time. In addition, the boiling point of the
brake fluid will be considerably reduced. This could adversely affect
the braking ability in certain circumstances.
For this reason the brake fluid must be changed periodically.
Your vehicle's Service Schedule will tell you when the brake fluid has
to be changed.
It is advisable to have the brake fluid changed as part of a regular
Inspection Service at your Audi workshop. They are familiar with the
procedure and have the necessary special tools and spare parts as
well as the proper facilities for disposing of the old fluid.
Use only the genuine brake fluid specified by the factory Qualified
workshops know that the brake fluid “DOT 4” is approved by Audi.
The brake fluid must be fresh and unused.
WARNING
•
Brake fluid is poisonous; store it in the sealed original container
in a safe place out of reach of children.
•
Heavy use of the brakes may cause a vapour lock if the brake
fluid is left in the system for too long. This would seriously affect
the efficiency of the brakes and the safety of the car – risk of acci-
dent.Caution
Please note that brake fluid will attack the paintwork on contact.
Fig. 216 Engine
compartment: Mark-
ings on brake fluid
reservoir
document_0900452a81793dcc.book Seite 227 Mittwoch, 21. März 2007 5:42 17
Page 235 of 294
Downloaded from www.Manualslib.com manuals search engine Wheels and tyres233
Controls
Safety
Driving tips
General maintenance
Self-help
Technical data
– The tyre pressures should only be checked when the
tyres are cold. The slightly raised pressures of warm tyres
must not be reduced.
– The pressures must be altered to suit major changes in
the load being carried.
– Avoid fast cornering and hard acceleration.
– Inspect the tyres for irregular wear from time to time.Tyre pressure and vehicle loading
The tyre pressure must be adjusted according to the load the vehicle
is carrying. We recommend adhering to the tyre pressure specifica-
tions for a maximum load. The tyre inflation pressures are listed on
a sticker on the end face of the driver's door ⇒page 232, fig. 219.
However, if you prefer an extra-smooth ride and the vehicle is not
fully loaded, you can select the tyre pressure for a normal load (no
more than three people travelling in the vehicle). However, should
you wish to drive with a full load you must increase the tyre pressure
to the specified maximum.
Under-inflation or over-inflation will reduce the life of the tyres
considerably and also impair the car's handling. Correct inflation
pressures are very important, especially at high speeds. The pres-
sures should therefore be checked at least once a month and before
starting a journey.
Do not forget the spare wheel* when checking the tyre pressures.
Keep the spare tyre inflated to the highest pressure required for the
road wheels.
Driving habits
Fast cornering, heavy acceleration and hard braking (squealing
tyres) all increase tyre wear.Wheel balancing
The wheels on new vehicles are balanced. However, various factors
encountered in normal driving can cause them to become unbal-
anced, which results in steering vibration.
Unbalanced wheels should be rebalanced, as they otherwise cause
excessive wear on steering, suspension and tyres. A wheel must
also be rebalanced when a new tyre is fitted or if a tyre is repaired.
Incorrect wheel alignment
Incorrect wheel alignment causes excessive tyre wear, impairing the
safety of the vehicle. If you notice excessive tyre wear, contact your
Audi dealer.
WARNING
•
Always adapt the tyre pressure accordingly when the vehicle
load changes.
•
Under-inflated tyres flex more and can overheat at continuous
high speeds. This can cause tread separation and tyre blow-out,
which could result in an accident.For the sake of the environment
Under-inflated tyres will increase the fuel consumption.
document_0900452a81793dcc.book Seite 233 Mittwoch, 21. März 2007 5:42 17
Page 236 of 294
Downloaded from www.Manualslib.com manuals search engine Wheels and tyres 234Tread wear indicators
The tread wear indicators show the condition of the tyre
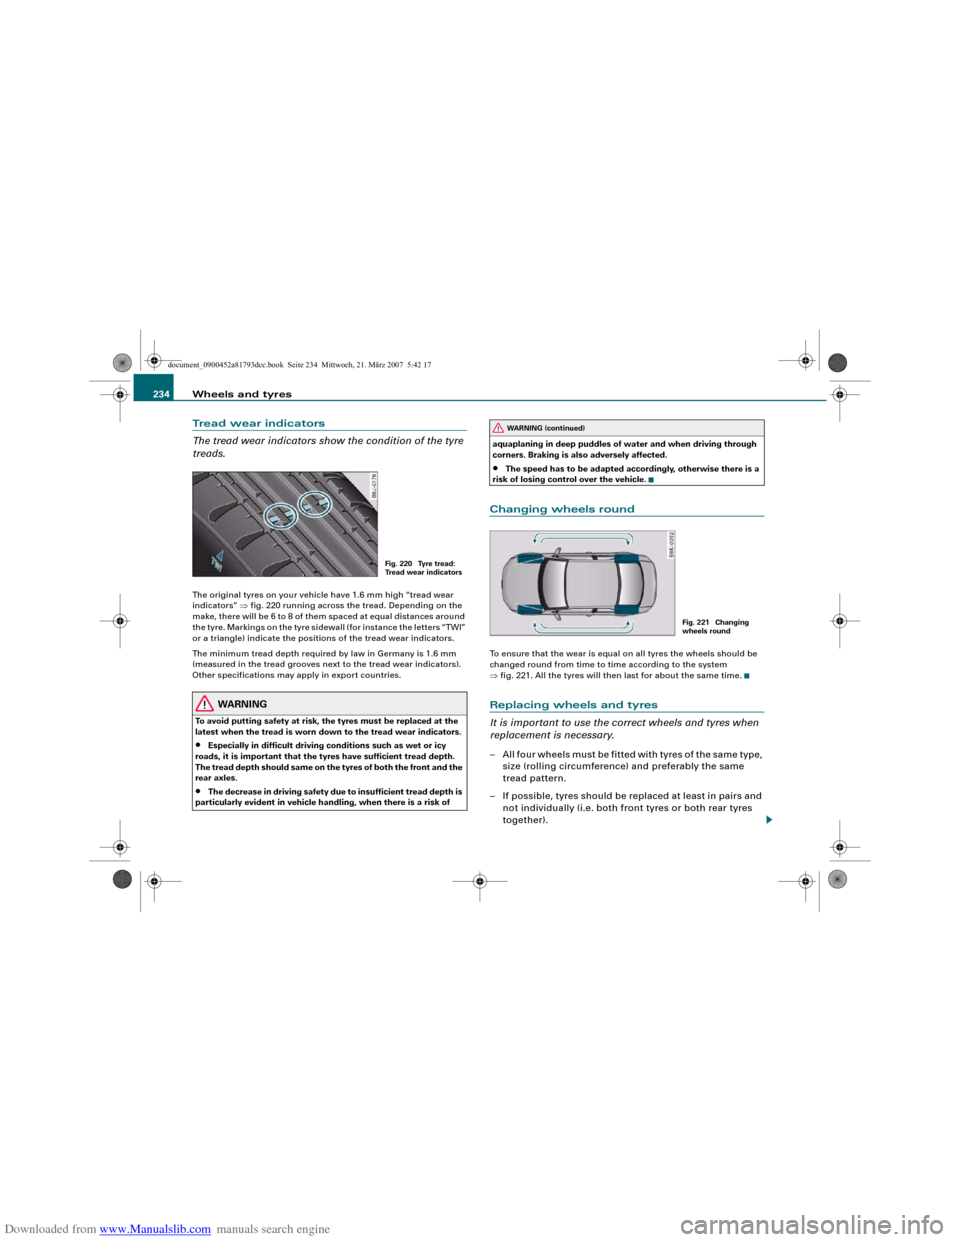
treads.The original tyres on your vehicle have 1.6 mm high “tread wear
indicators” ⇒fig. 220 running across the tread. Depending on the
make, there will be 6 to 8 of them spaced at equal distances around
the tyre. Markings on the tyre sidewall (for instance the letters “TWI”
or a triangle) indicate the positions of the tread wear indicators.
The minimum tread depth required by law in Germany is 1.6 mm
(measured in the tread grooves next to the tread wear indicators).
Other specifications may apply in export countries.
WARNING
To avoid putting safety at risk, the tyres must be replaced at the
latest when the tread is worn down to the tread wear indicators.•
Especially in difficult driving conditions such as wet or icy
roads, it is important that the tyres have sufficient tread depth.
The tread depth should same on the tyres of both the front and the
rear axles.
•
The decrease in driving safety due to insufficient tread depth is
particularly evident in vehicle handling, when there is a risk of aquaplaning in deep puddles of water and when driving through
corners. Braking is also adversely affected.
•
The speed has to be adapted accordingly, otherwise there is a
risk of losing control over the vehicle.
Changing wheels roundTo ensure that the wear is equal on all tyres the wheels should be
changed round from time to time according to the system
⇒fig. 221. All the tyres will then last for about the same time.Replacing wheels and tyres
It is important to use the correct wheels and tyres when
replacement is necessary.– All four wheels must be fitted with tyres of the same type,
size (rolling circumference) and preferably the same
tread pattern.
– If possible, tyres should be replaced at least in pairs and
not individually (i.e. both front tyres or both rear tyres
together).
Fig. 220 Tyre tread:
Tr e a d w e a r i n d i c a t o r s
WARNING (continued)
Fig. 221 Changing
wheels round
document_0900452a81793dcc.book Seite 234 Mittwoch, 21. März 2007 5:42 17
Page 252 of 294
Downloaded from www.Manualslib.com manuals search engine Self-help 250
CautionTake special care if you have to repair a tyre on a gradient.
Note
•
Do not use the compressor for longer than 6 minutes at a time,
as it could overheat. When the compressor has cooled down, you
can use it again.
•
If tyre sealant should leak out, leave it to dry and then pull it off
like foil.
•
After carrying out a tyre repair remember to buy a new tyre
sealant can at a qualified workshop. This will ensure that the Tyre
Mobility System is operative again.
•
Please observe the relevant regulations.
Changing a wheelPreparations
Some preparations are necessary before changing a
wheel.– If you have a flat tyre, stop the car well away from moving
traffic. Choose a location that is as level as possible.
– All passengers should leave the car. They should wait in
a safe place (for instance behind the roadside crash
barrier).
– Apply the parking brake to stop the vehicle moving acci-
dentally.
–Engage first gear (manual gearbox) or move selector
lever to position P (automatic gearbox).– When towing a trailer: unhitch the trailer from your
vehicle.
– Take the tools ⇒page 245 and the spare wheel*
⇒page 246 out of the luggage compartment.
WARNING
If you have a puncture in moving traffic, switch on the hazard
warning lights and place the warning triangle in a visible location.
This is for your own safety and also warns other road users.
Caution
If you have to change the tyre on a gradient, block the wheel oppo-
site the wheel being changed by placing a stone or similar object
under it to prevent the vehicle from rolling away.
Note
Please observe the relevant regulations.How to change a wheel
Change the wheel as described below.–Pull off the hub cap. Also refer to ⇒page 251, “Hub
caps”.
–Loosen the wheel bolts ⇒page 251.
–Raise the car with the jack* ⇒page 252.
–Ta k e o f f the wheel with the flat tyre and then put on the
spare wheel* ⇒page 253.
–Lower the vehicle to the ground.
document_0900452a81793dcc.book Seite 250 Mittwoch, 21. März 2007 5:42 17
Page 267 of 294
Downloaded from www.Manualslib.com manuals search engine Fuses and bulbs265
Controls
Safety
Driving tips
General maintenance
Self-help
Technical data
BulbsChanging bulbs
Changing bulbs requires a certain degree of practical
skill.You can change the following bulbs for exterior lights yourself:•
Bulb for turn signals
•
Bulb for fog light
•
Bulbs for rear lights in boot lid
•
Bulbs for rear lights in side panel
•
Bulbs for number plate light
The following bulbs should only be changed by a qualified work-
shop:
•
Xenon headlights: Light source for daytime running
lights/parking lights
•
Bulb for headlights: Bi-xenon lights ⇒
•
Light source for turn signal in exterior mirror housing
•
Light source for high-level brake light
As a rule, you require a certain degree of practical skill to change
defective bulbs. This applies in particular to those bulbs which are
only accessible from the engine compartment.
If in doubt, we recommend that you have defective bulbs changed
by a qualified workshop or qualified mechanic.
If you do decide to change bulbs in the engine compartment your-
self, be aware of the safety risks involved ⇒page 221 ⇒.
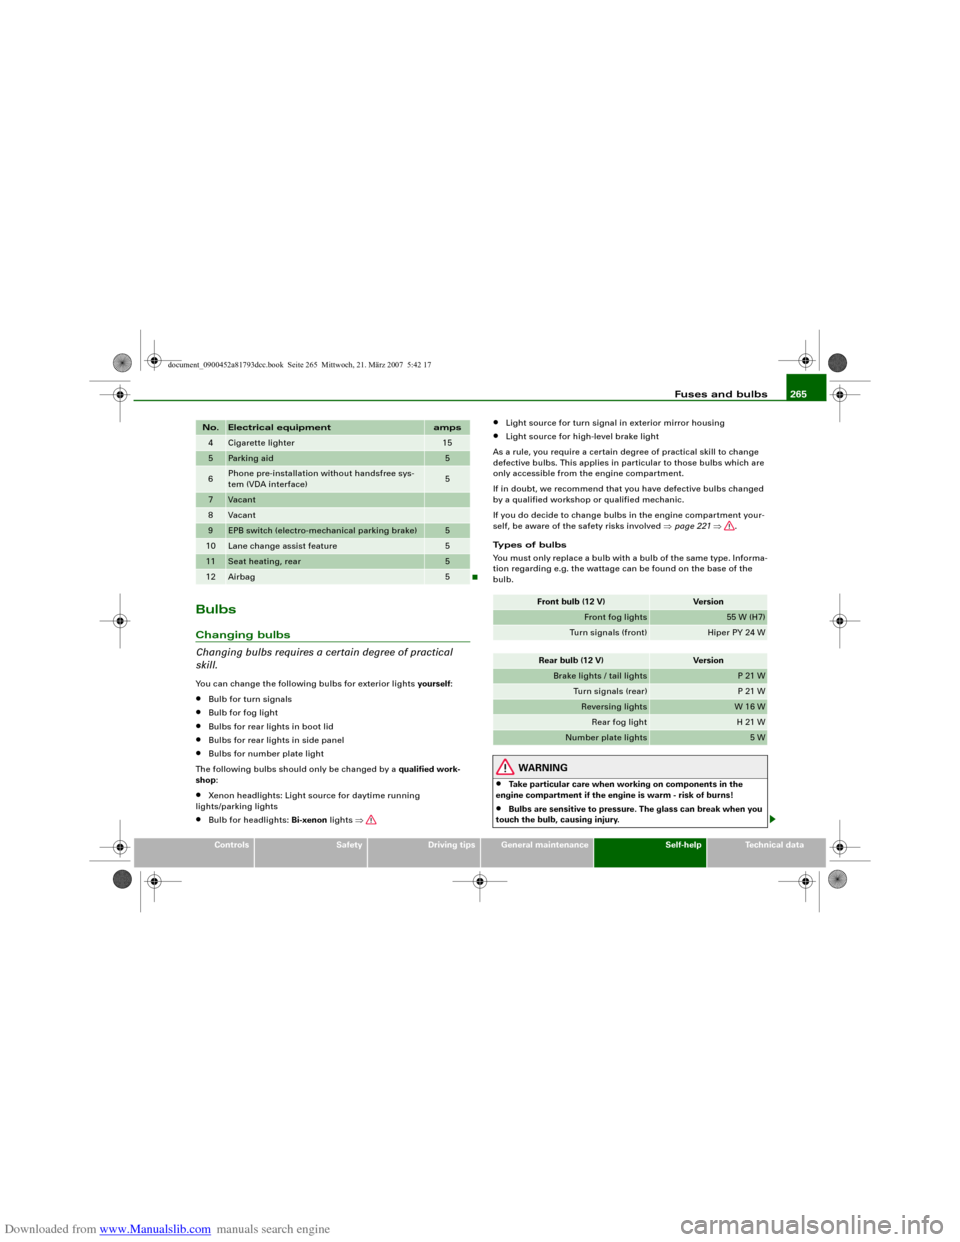
Types of bulbs
You must only replace a bulb with a bulb of the same type. Informa-
tion regarding e.g. the wattage can be found on the base of the
bulb.
WARNING
•
Take particular care when working on components in the
engine compartment if the engine is warm - risk of burns!
•
Bulbs are sensitive to pressure. The glass can break when you
touch the bulb, causing injury.
4
Cigarette lighter
15
5
Parking aid
5
6
Phone pre-installation without handsfree sys-
tem (VDA interface)
5
7
Vacant
8
Vacant
9
EPB switch (electro-mechanical parking brake)
5
10
Lane change assist feature
5
11
Seat heating, rear
5
12
Airbag
5
No.
Electrical equipment
amps
Front bulb (12 V)
Version
Front fog lights
55 W (H7)
Turn signals (front)
Hiper PY 24 W
Rear bulb (12 V)
Version
Brake lights / tail lights
P 21 W
Turn signals (rear)
P 21 W
Reversing lights
W 16 W
Rear fog light
H 21 W
Number plate lights
5 W
document_0900452a81793dcc.book Seite 265 Mittwoch, 21. März 2007 5:42 17