2008 AUDI S5 rear view mirror
[x] Cancel search: rear view mirrorPage 4 of 294
Downloaded from www.Manualslib.com manuals search engine Contents 2ContentsNotes on this Owner's
Manual
. . . . . . . . . . . . . . . . . . . . . .
Controls
. . . . . . . . . . . . . . . . . . . . .
Controls and displays
. . . . . . . . . .
Overview . . . . . . . . . . . . . . . . . . . . . .
Instruments and
warning/indicator lamps
. . . . . . .
Instruments . . . . . . . . . . . . . . . . . . . .
Warning and indicator lamps . . . . .
Driver information system
. . . . . .
Introduction . . . . . . . . . . . . . . . . . . . .
On-board computer . . . . . . . . . . . . .
Speed warning function . . . . . . . . .
Auto-check control . . . . . . . . . . . . . .
Doors and windows
. . . . . . . . . . . .
Remote control keys . . . . . . . . . . . .
Central locking system . . . . . . . . . .
Boot lid . . . . . . . . . . . . . . . . . . . . . . . .
Electric windows . . . . . . . . . . . . . . .
Tilting panorama roof . . . . . . . . . . .
Lights and vision
. . . . . . . . . . . . . . .
Lights . . . . . . . . . . . . . . . . . . . . . . . . .
Interior lights . . . . . . . . . . . . . . . . . . .
Clear vision . . . . . . . . . . . . . . . . . . . .
Windscreen wipers . . . . . . . . . . . . . .Rear-view mirrors . . . . . . . . . . . . . .
Digital compass . . . . . . . . . . . . . . . .
Seats and storage
. . . . . . . . . . . . .
Electric adjustment of front seats
Easy-entry function . . . . . . . . . . . . .
Seat memory . . . . . . . . . . . . . . . . . .
Head restraints . . . . . . . . . . . . . . . .
Front armrest . . . . . . . . . . . . . . . . . .
Luggage compartment . . . . . . . . .
Roof carrier . . . . . . . . . . . . . . . . . . . .
Cup holders . . . . . . . . . . . . . . . . . . .
Ashtrays . . . . . . . . . . . . . . . . . . . . . .
Cigarette lighter and electrical
sockets . . . . . . . . . . . . . . . . . . . . . . .
On-board 230 Volt Euro socket . . .
Storage compartments . . . . . . . . .
Heating and cooling
. . . . . . . . . . .
Deluxe automatic air conditioner .
Deluxe automatic air conditioner -
basic settings . . . . . . . . . . . . . . . . . .
Deluxe automatic air conditioner
plus . . . . . . . . . . . . . . . . . . . . . . . . . .
Deluxe automatic air conditioner
plus - basic settings . . . . . . . . . . . .
Auxiliary heating and auxiliary
ventilation . . . . . . . . . . . . . . . . . . . . .
Seat heating . . . . . . . . . . . . . . . . . . .
Driving
. . . . . . . . . . . . . . . . . . . . . . . . .
Steering . . . . . . . . . . . . . . . . . . . . . . .
Ignition lock . . . . . . . . . . . . . . . . . . .
Starting and stopping the engine
with the advanced key . . . . . . . . . .
Electro-mechanical parking brake
Cruise control system . . . . . . . . . .
Audi parking system
. . . . . . . . . . .
Parking aid systems . . . . . . . . . . . .
parking system . . . . . . . . . . . . . . . . .
parking system plus . . . . . . . . . . . .
parking system advanced . . . . . . .
Towing bracket . . . . . . . . . . . . . . . . .
Settings . . . . . . . . . . . . . . . . . . . . . . .
Special parking situations . . . . . . .
Safety notes . . . . . . . . . . . . . . . . . . .
HomeLink
. . . . . . . . . . . . . . . . . . . . . .
Universal transmitter . . . . . . . . . . . .
Safety
. . . . . . . . . . . . . . . . . . . . . . .
Safe driving
. . . . . . . . . . . . . . . . . . . .
General notes . . . . . . . . . . . . . . . . . .
Correct sitting positions . . . . . . . . .
Pedal area . . . . . . . . . . . . . . . . . . . . .
Stowing luggage safely . . . . . . . . .
Seat belts
. . . . . . . . . . . . . . . . . . . . . .
Why is it so important to use seat
belts? . . . . . . . . . . . . . . . . . . . . . . . . .
Forces acting in a collision . . . . . .
How to wear seat belts properly .
Belt tensioners . . . . . . . . . . . . . . . . .
Airbag system
. . . . . . . . . . . . . . . . . .
Description of airbag system . . . .
Front airbags . . . . . . . . . . . . . . . . . . 5
7
9
9
11
11
15
20
20
25
28
29
38
38
42
48
49
51
54
54
59
60
6265
68
70
70
71
72
74
75
75
82
83
84
85
87
89
91
91
98
99
107
108
112
114
114
114
116
119
123128
128
128
129
131
138
139
141
143
145
145
151
152
152
154
157
158
160
160
161
163
165
166
166
168
document_0900452a81793dcc.book Seite 2 Mittwoch, 21. März 2007 5:42 17
Page 67 of 294
Downloaded from www.Manualslib.com manuals search engine Lights and vision65
Controls
Safety
Driving tips
General maintenance
Self-help
Technical data
– Lift the wiper arm away from the glass.
– Press the release button on the wiper blade
⇒page 64, fig. 66. Hold the wiper blade firmly and press
it forwards slightly .
– Slide the wiper blade upwards .
Fitting the wiper blade
– Fit the new wiper blade into the mounting on the wiper
arm . You should hear it engage in the wiper arm.
– Fold the wiper arm back down onto the glass.
WARNING
•
To prevent smearing on the glass, the wiper blades should be
cleaned regularly using a window cleaner solution. If the wiper
blades are very dirty (insects etc.), they should be cleaned using a
sponge or cloth – bad visibility can cause accidents.
•
For safety, the wiper blades should be changed once or twice a
year.Caution
The windscreen wipers must be in the service position ⇒page 64
when replacing the blades! Otherwise the wiper motor or the paint-
work on the bonnet may be damaged.Rear-view mirrorsManual anti-dazzle adjustmentNormal setting
– Push the lever at the bottom of the mirror away from you.Anti-dazzle setting
– Pull the lever at the bottom of the mirror towards you.
Applies to vehicles: with automatic anti-dazzle adjustment for interior mirrorAutomatic anti-dazzle adjustment
The automatic anti-dazzle function can be switched on
and off as desired.Switching off anti-dazzle function
– Press button ⇒fig. 67 - the indicator lamp will go
out.
Switching on anti-dazzle function
– Press button - the indicator lamp will light up.Anti-dazzle function
The anti-dazzle function is activated every time the ignition is
switched on. The green indicator lamp lights up in the mirror
housing.
When the anti-dazzle function is activated the interior mirror will
darken automatically according to the amount of light it receives
(for example from the headlights of a vehicle behind). The mirror
will not darken automatically:
A1
A2
A3
A4
Fig. 67 Anti-dazzle
interior mirror: On/off
button with indicator
lamp
AA
AB
AA
AB
document_0900452a81793dcc.book Seite 65 Mittwoch, 21. März 2007 5:42 17
Page 68 of 294
Downloaded from www.Manualslib.com manuals search engine Lights and vision 66•
when the interior lighting is switched on
•
when reverse gear is engaged
WARNING
Electrolyte fluid can leak from a broken mirror. This fluid can cause
irritation to the skin, eyes, and respiratory organs. Wash thor-
oughly with clean water should you come into contact with this
fluid. Seek medical assistance if needed.
Caution
Electrolyte fluid leaking from a broken mirror can cause damage to
plastic surfaces. Use a sponge or similar to remove the fluid as soon
as possible.
Note
•
If you switch off the anti-dazzle function for the interior mirror,
this will also deactivate the anti-dazzle function for the exterior
mirrors.
•
The automatic anti-dazzle function will only work properly if the
sun blind* for the rear window is not in use and there are no other
objects preventing light from reaching the interior mirror.
•
Do not attach any stickers to the windscreen in front of the
sensors, as these could lead to malfunctioning of the mirror.
Exterior mirrors
The exterior mirrors are adjusted electrically.Adjusting exterior mirrors
– Turn the adjuster knob to position (left exterior mirror)
or position (right exterior mirror) ⇒fig. 68.
– Move the knob as required to adjust the exterior mirror
for a good rearward view.
Heated mirrors
– Turn the knob to position .
Retracting both exterior mirrors*
– Turn the knob to position .The mirrors are heated depending on the outside temperature until
the ignition is switched off, even if the knob is no longer in position
.
It may be advisable to retract* the exterior mirrors to protect them
when parking or when driving through tight spaces.
Fig. 68 Detail of the
armrest: Adjuster knob
AL
AR
AAAB
AA
document_0900452a81793dcc.book Seite 66 Mittwoch, 21. März 2007 5:42 17
Page 69 of 294
Downloaded from www.Manualslib.com manuals search engine Lights and vision67
Controls
Safety
Driving tips
General maintenance
Self-help
Technical data Memory for exterior mirrors*
On vehicles with memory function for the driver's seat, the setting
of the exterior mirrors is automatically stored together with the seat
position ⇒page 72.
Tilting function for exterior mirror on passenger side*
(only if equipped with memory for exterior mirrors)
When reverse gear is engaged, the mirror surface tilts slightly
downwards, provided the mirror control is switched to the exterior
mirror on the passenger's side (knob in position ⇒page 66,
fig. 68). This provides a better view of the kerb when parking.
The mirror returns to its original position when reverse gear is
disengaged and the vehicle is driven forwards at a speed above
about 15 km/h. The mirror will also return to its original position
when the adjuster knob is turned to the position for the driver's
exterior mirror or when the ignition is switched off.
If the position of the mirror surface is changed while the mirror is
tilted, this new position is automatically stored and assigned to the
remote control key when you disengage reverse gear.
Caution
•
Convex or wide-angle* exterior mirrors give a larger field of
vision. However, they also make objects appear further away than
they actually are. For this reason, you should not rely on these
mirrors for judging the distance of vehicles behind.
•
If one of the mirror housings is knocked out of position (e.g.
when parking), the mirrors must first be fully retracted with the elec-
tric control. Do not readjust the mirror housing by hand, as this will
interfere with the mirror adjuster function.Note
If the electrical adjustment should ever fail to operate, the mirrors
can be adjusted by hand by lightly pressing the edge of the mirror
glass.
Applies to vehicles: with automatic anti-dazzle adjustment for exterior mirrorsAutomatic anti-dazzle adjustment for exterior mirrorsThe exterior mirrors darken together with the automatically
adjusting interior mirror. When the ignition is on, the mirrors will
darken automatically according to the amount of light received (for
example from the headlights of a vehicle behind).
When the interior lights are switched on, or when reverse gear is
engaged, the mirrors revert to their original (i.e. not darkened)
condition.
WARNING
Electrolyte fluid can leak from a broken mirror. This fluid can cause
irritation to the skin, eyes, and respiratory organs. Wash thor-
oughly with clean water should you come into contact with this
fluid. Seek medical assistance if needed.
Caution
Electrolyte fluid leaking from a broken mirror can cause damage to
the paintwork or plastic surfaces. Use a sponge or similar to remove
the fluid as soon as possible.
Note
•
If you switch off the anti-dazzle function for the interior mirror,
this will also deactivate the anti-dazzle function for the exterior
mirrors.
•
The automatic anti-dazzle function will only work properly if the
sun blind* for the rear window is not in use and there are no other
objects preventing light from reaching the interior mirror.
AR
AL
document_0900452a81793dcc.book Seite 67 Mittwoch, 21. März 2007 5:42 17
Page 130 of 294
Downloaded from www.Manualslib.com manuals search engine Audi parking system 128Audi parking systemParking aid systemsApplies to vehicles: with parking systemGeneral notes
Depending on the optional equipment fitted, there are
various parking aid systems to assist you when parking or
manoeuvring in tight spaces.parking system*:
The parking system comprises the rear acoustic parking aid
⇒page 128.
The rear acoustic parking system uses ultrasonic sensors to
measure the distance between the vehicle and an obstacle which
has been detected. There are four sensors which are located in the
rear bumper (two in the centre, two at the sides).
parking system plus*:
The parking system plus* comprises the rear and front acoustic
parking aid ⇒page 129 in conjunction with a graphic display.
The parking system plus* uses ultrasonic sensors to measure the
distance between the vehicle and an obstacle which has been
detected. There are a total of 8 sensors located in the front and rear
bumpers (2 in the centre and 2 on the side of each bumper).
parking system advanced*:
The parking system advanced* comprises the rear and front
acoustic parking aid in conjunction with the graphic display as well
as a reversing camera (Rear View) ⇒page 131.
The reversing camera is located in the boot lid ⇒page 131, fig. 143
and assists the driver when parking or manoeuvring in tight spaces.
The reversing camera provides an image which is shown in the MMI display. It represents the mirror image of a section of the area
behind the vehicle ⇒page 135, fig. 148.
Note
There is a slight delay in the picture display.parking systemApplies to vehicles: with parking systemRear parking aid
The parking aid gives an acoustic warning if it detects any
obstacles behind the vehicle.– Engage reverse gear. You will hear a short beep to
confirm that the rear parking aid has been activated. The
rear parking aid remains active for as long as the reverse
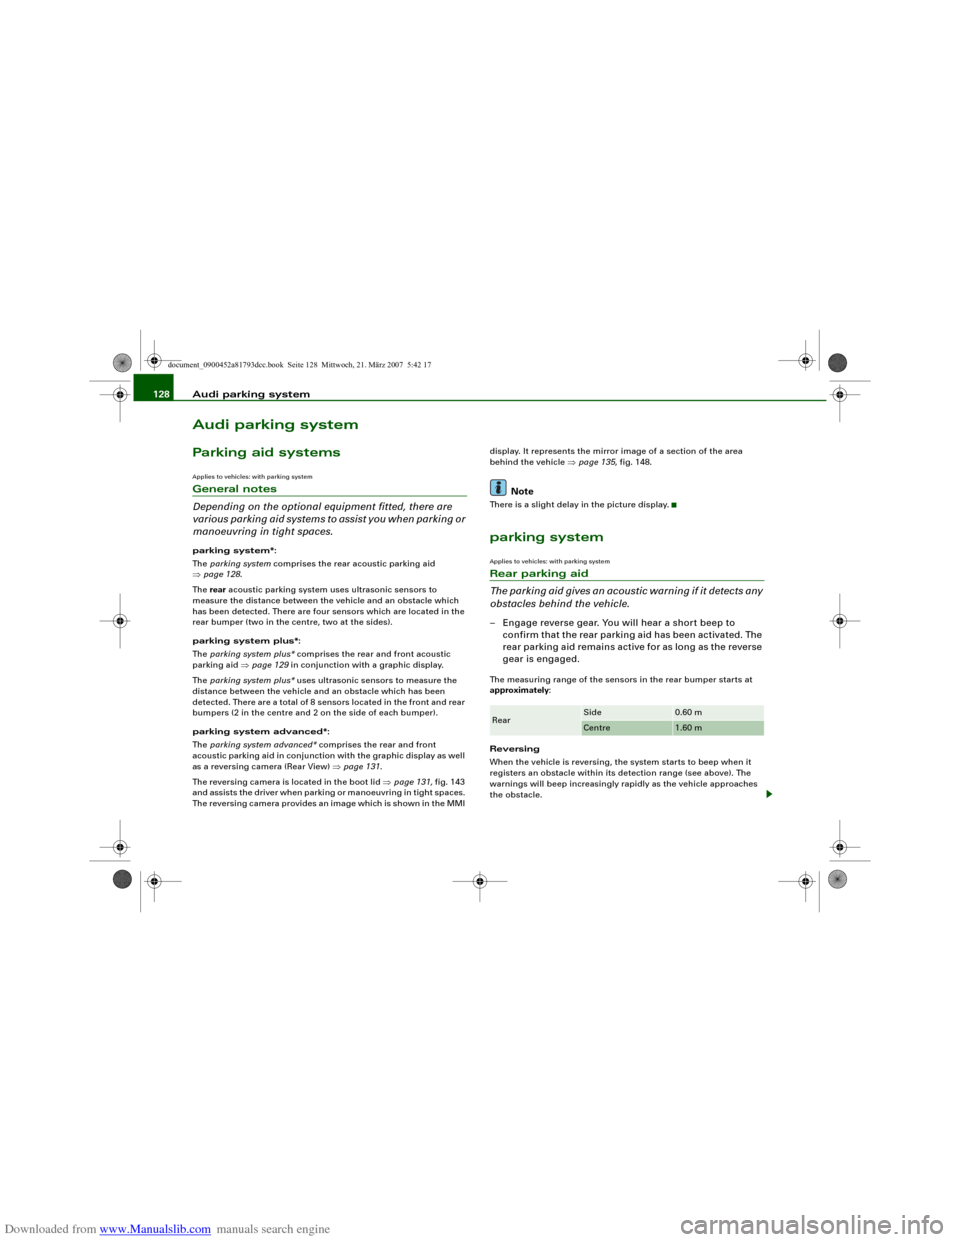
gear is engaged.The measuring range of the sensors in the rear bumper starts at
approximately:
Reversing
When the vehicle is reversing, the system starts to beep when it
registers an obstacle within its detection range (see above). The
warnings will beep increasingly rapidly as the vehicle approaches
the obstacle.Rear
Side
0.60 m
Centre
1.60 m
document_0900452a81793dcc.book Seite 128 Mittwoch, 21. März 2007 5:42 17
Page 135 of 294
Downloaded from www.Manualslib.com manuals search engine Audi parking system133
Controls
Safety
Driving tips
General maintenance
Self-help
Technical data displayed on the MMI screen. The warnings will then return to the
normal volume if the vehicle approaches the detected obstacle
again.
Graphic display
The segments in the MMI display indicate the distance between the
vehicle and an obstacle. The number of segments shown depends
on the obstacle in front of or behind the vehicle. The closer the
vehicle gets to the obstacle the closer the segments move towards
the vehicle in the graphic ⇒page 132, fig. 144. At the latest when
the penultimate segment is highlighted the vehicle has reached the
danger (collision) zone. The driver should then not move back-
wards/forwards any further ⇒.
The graphic display in the MMI screen ⇒page 140 can be switched
off. The acoustic proximity warning will, however, remain activated.
The graphic display will be deactivated as soon as you press a func-
tion selector button on the MMI control console. The graphic
display in the MMI screen can also be switched on again manually
using the switch
. For more information on the MMI control
console please refer to the MMI Operating Manual.
Reversing camera (Rear View)
The mirrored image of the picture supplied by the reversing camera
⇒page 136, fig. 149 is shown in the MMI display. The picture
supplied by the reversing camera also includes orientation lines
and area markings which are projected onto the image to assist you
when parking ⇒page 134. The red line in the picture ⇒page 134,
fig. 145/⇒page 134, fig. 146 shows the collision zone. From here at
the latest, the driver should not reverse any further ⇒.
If your vehicle is near an obstacle, the proximity graphic will also
appear in the reversing camera image. This superimposed graphic
helps the driver to localise the critical area of the vehicle.
If the MMI screen is showing the graphic display you can switch to
the image of the reversing camera by pressing the control button
for the function Rear View ⇒page 132, fig. 144.If the MMI screen is showing the image of the reversing camera you
can switch to the graphic display by pressing the control button for
the function Graphic ⇒page 136, fig. 149.
The image of the reversing camera in the MMI screen ⇒page 140
can be switched off. The acoustic proximity warning will, however,
remain activated.
The image of the reversing camera will be deactivated as soon as
you press a function selector button on the MMI control console.
The image of the reversing camera will be shown again the next
time you park the vehicle. The image of the reversing camera can
also be switched on again manually using the switch
. For more
information on the MMI control console please refer to the MMI
Operating Manual.
WARNING
•
The sensors have blind spots in which obstacles are not regis-
tered. It is particularly important to ensure that there are no small
children or animals near the vehicle, as the sensors may not
always be able to detect them.
•
The parking aid cannot replace the full concentration of the
driver. The driver is always responsible for safety during parking
and other manoeuvres. Always keep a close watch on the area
around the vehicle.
•
Please note that low obstacles detected by the system may no
longer be registered by the sensors as the car moves closer, so the
system will not give any further warning. Certain kinds of obsta-
cles (such as wire fences, chains, thin painted posts or trailer draw
bars, etc.) may not always be detected by the system (accident
risk).Note
•
There is a slight delay in the picture display.
•
You can change the settings for the graphic display and the
reversing camera in the MMI ⇒page 140.
document_0900452a81793dcc.book Seite 133 Mittwoch, 21. März 2007 5:42 17
Page 143 of 294
Downloaded from www.Manualslib.com manuals search engine Audi parking system141
Controls
Safety
Driving tips
General maintenance
Self-help
Technical data fig. 152. You can use the control buttons to switch between the Rear
View camera and Graphic display at any time as desired. The
settings selected on the sound system or MMI remain stored.
Setting “Graphic”:
If you have selected Graphic in the settings, the screen ⇒fig. 156
will automatically show the graphic display when the parking
system is activated.
Setting “Rear View”
If you have selected Rear View the reversing camera image
⇒page 136, fig. 150 will be displayed whenever you activate the
parking system (both when reversing and when driving forwards).
Setting “Automatic”:
If you have selected Automatic the screen will automatically show
the reversing camera image when you engage reverse gear and the
graphic display when you drive forwards.
Setting “Off”:
If you select off the reversing camera and graphic display are both
deactivated. The acoustic parking aid will, however, remain acti-
vated.
Note
If you change the settings on the sound system or MMI, the changes
will not take effect until the next time you switch on the parking
system.
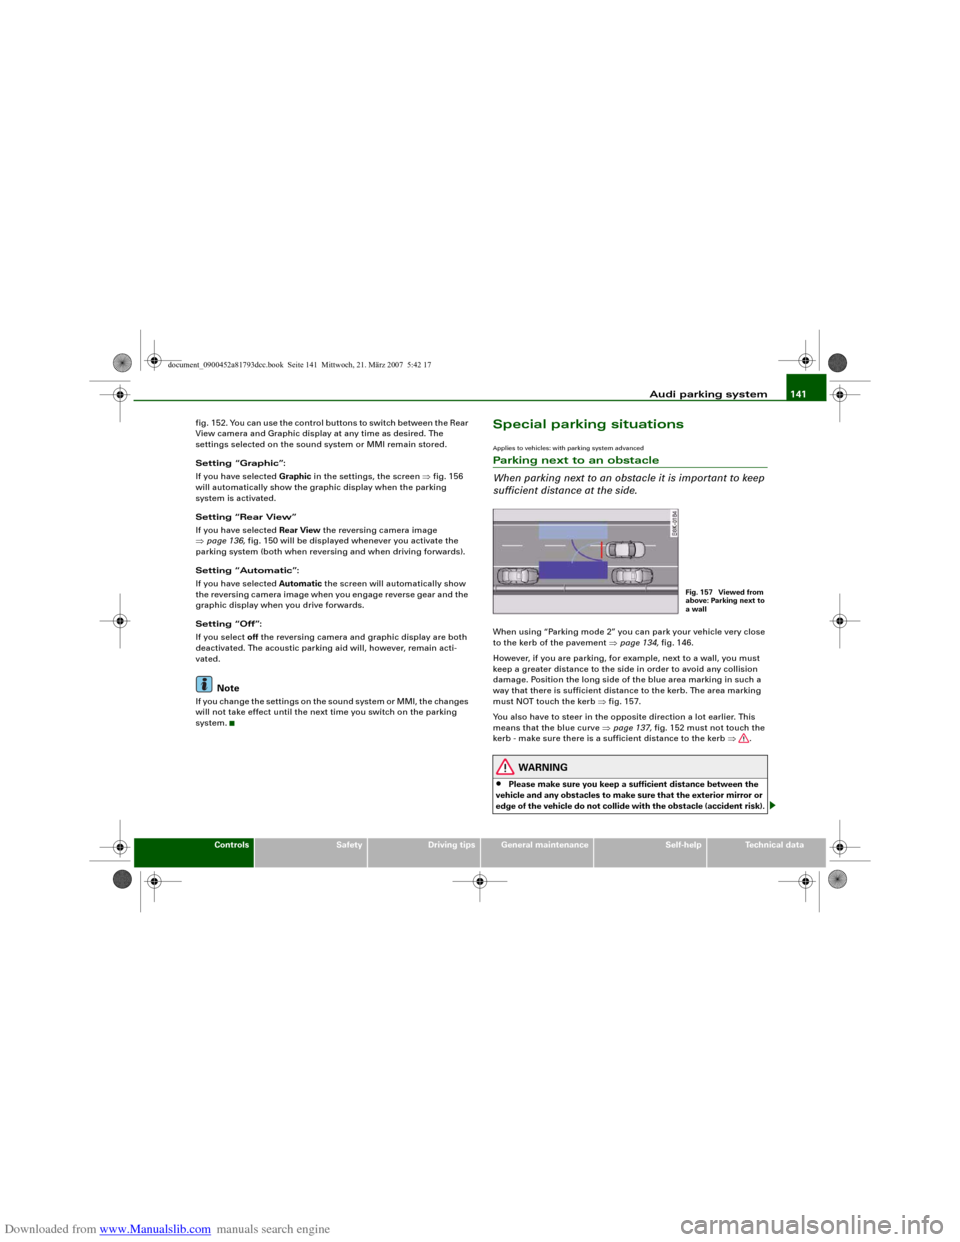
Special parking situationsApplies to vehicles: with parking system advancedParking next to an obstacle
When parking next to an obstacle it is important to keep
sufficient distance at the side.When using “Parking mode 2” you can park your vehicle very close
to the kerb of the pavement ⇒page 134, fig. 146.
However, if you are parking, for example, next to a wall, you must
keep a greater distance to the side in order to avoid any collision
damage. Position the long side of the blue area marking in such a
way that there is sufficient distance to the kerb. The area marking
must NOT touch the kerb ⇒fig. 157.
You also have to steer in the opposite direction a lot earlier. This
means that the blue curve ⇒page 137, fig. 152 must not touch the
kerb - make sure there is a sufficient distance to the kerb ⇒.
WARNING
•
Please make sure you keep a sufficient distance between the
vehicle and any obstacles to make sure that the exterior mirror or
edge of the vehicle do not collide with the obstacle (accident risk).
Fig. 157 Viewed from
above: Parking next to
a wall
document_0900452a81793dcc.book Seite 141 Mittwoch, 21. März 2007 5:42 17
Page 287 of 294
Downloaded from www.Manualslib.com manuals search engine Index285
Controls
Safety
Driving tips
General maintenance
Self-help
Technical data Blower
Deluxe automatic air conditioner . . . . 94
Deluxe automatic air conditioner plus . .
102
Bonnet
Closing . . . . . . . . . . . . . . . . . . . . . . . . . 221
Opening . . . . . . . . . . . . . . . . . . . . . . . . 220
Releasing . . . . . . . . . . . . . . . . . . . . . . . 220
Boot
SeeLoading luggage compartment . 158
SeeLuggage compartment . . . . . . . . . 75
Boot lid
Central locking system . . . . . . . . . . . . . 48
Manual release . . . . . . . . . . . . . . . . . . . . 49
Brake system
Brake assist system . . . . . . . . . . . . . . . 187
Brake fluid . . . . . . . . . . . . . . . . . . . . . . 227
Brake light defective . . . . . . . . . . . . . . . 36
Brake pads worn . . . . . . . . . . . . . . . . . . 36
Brake servo . . . . . . . . . . . . . . . . . . . . . . 189
Electro-mechanical parking brake . . . 119
General notes . . . . . . . . . . . . . . . . . . . . 189
Malfunction . . . . . . . . . . . . . . . . . . . . . . 31
Warning lamp . . . . . . . . . . . . . . . . . . . . 19
Bulb holder
Bayonet fastener . . . . . . . . . . . . . . . . . 266
Bulb monitor . . . . . . . . . . . . . . . . . . . . . . . . 36
Bulbs
Bayonet fastener . . . . . . . . . . . . . . . . . 266
Changing (general notes) . . . . . . . . . . 265
Bulbs, changing . . . . . . . . . . . . . . . . . . . . 265
Brake lights . . . . . . . . . . . . . . . . . . . . . 269
Bulb holder with bayonet fastener . . 266Front fog lights . . . . . . . . . . . . . . . . . . 268
Number plate light . . . . . . . . . . . . . . . 274
Rear fog light . . . . . . . . . . . . . . . . . . . . 272
Rear lights . . . . . . . . . . . . . . . . . . . . . . 269
Reversing light . . . . . . . . . . . . . . . . . . . 272
Turn signals (rear) . . . . . . . . . . . . . . . . 269
Business equipment . . . . . . . . . . . . . . . . . 240
CCapacities . . . . . . . . . . . . . . . . . . . . . . . . . . 279
Car keys . . . . . . . . . . . . . . . . . . . . . . . . . . . . 38
Care of vehicle . . . . . . . . . . . . . . . . . . . . . . 210
Catalytic converter . . . . . . . . . . . . . . . . . . 195
Central locking system . . . . . . . . . . . . . . . . 42
Boot lid . . . . . . . . . . . . . . . . . . . . . . . . . . 48
Deadlock mechanism . . . . . . . . . . . . . . 45
Fuel tank flap . . . . . . . . . . . . . . . . . . . . 217
Locking . . . . . . . . . . . . . . . . . . . . . . . . . . 45
Locking and unlocking the vehicle from
inside . . . . . . . . . . . . . . . . . . . . . . . . . . 46
Manual locking . . . . . . . . . . . . . . . . . . . . 47
Opening and closing windows . . . . . . . 50
Switches on driver's door . . . . . . . . . . . 46
Unlocking . . . . . . . . . . . . . . . . . . . . . . . . 45
Changing a wheel . . . . . . . . . . . . . . . . . . . 250
Changing bulbs
SeeBulbs . . . . . . . . . . . . . . . . . . . . . . . 265
Chassis number . . . . . . . . . . . . . . . . . . . . . 279
Child safety . . . . . . . . . . . . . . . . . . . . . . . . 175
Child safety seat . . . . . . . . . . . . . . . . . . . . 176
Child seat categories . . . . . . . . . . . . . . 176
Fitting . . . . . . . . . . . . . . . . . . . . . . . . . . 179ISOFIX system . . . . . . . . . . . . . . . . . . . . 181
On front passenger's seat . . . . . . . . . . 176
Safety notes . . . . . . . . . . . . . . . . . . . . . 175
Cigarette lighter . . . . . . . . . . . . . . . . . . . . . . 85
Cleaning . . . . . . . . . . . . . . . . . . . . . . . . . . . 210
Cleaning Alcantara . . . . . . . . . . . . . . . . . . 216
Cleaning seat covers
Alcantara . . . . . . . . . . . . . . . . . . . . . . . . 216
Natural leather . . . . . . . . . . . . . . . . . . . 215
Textile covers . . . . . . . . . . . . . . . . . . . . 213
Cleaning textile covers and trim parts . . 213
Clock, setting . . . . . . . . . . . . . . . . . . . . . . . . 13
Closing
Bonnet . . . . . . . . . . . . . . . . . . . . . . . . . . 221
Coat hooks . . . . . . . . . . . . . . . . . . . . . . . . . . 90
Colour code . . . . . . . . . . . . . . . . . . . . . . . . 279
Compact temporary spare wheel
SeeSpare wheel . . . . . . . . . . . . . . . . . . 246
Compartment for (sun)glasses . . . . . . . . . 89
Compass in mirror . . . . . . . . . . . . . . . . . . . . 68
Controls and displays
Overview . . . . . . . . . . . . . . . . . . . . . . . . . . 9
Convenience close function . . . . . . . . . . . . 50
Convenience open function . . . . . . . . . . . . 50
Cooling system
Anti-freeze additive . . . . . . . . . . . . . . . 224
Checking coolant level . . . . . . . . . . . . 225
Coolant . . . . . . . . . . . . . . . . . . . . . . . . . 224
Coolant temperature gauge . . . . . . . . . 11
Malfunction . . . . . . . . . . . . . . . . . . . . . . 32
Radiator fan . . . . . . . . . . . . . . . . . . . . . 226
Topping up coolant . . . . . . . . . . . . . . . 226
document_0900452a81793dcc.book Seite 285 Mittwoch, 21. März 2007 5:42 17