2008 AUDI A4 tow
[x] Cancel search: towPage 138 of 342
adaptive cruise control (ACC) 136•
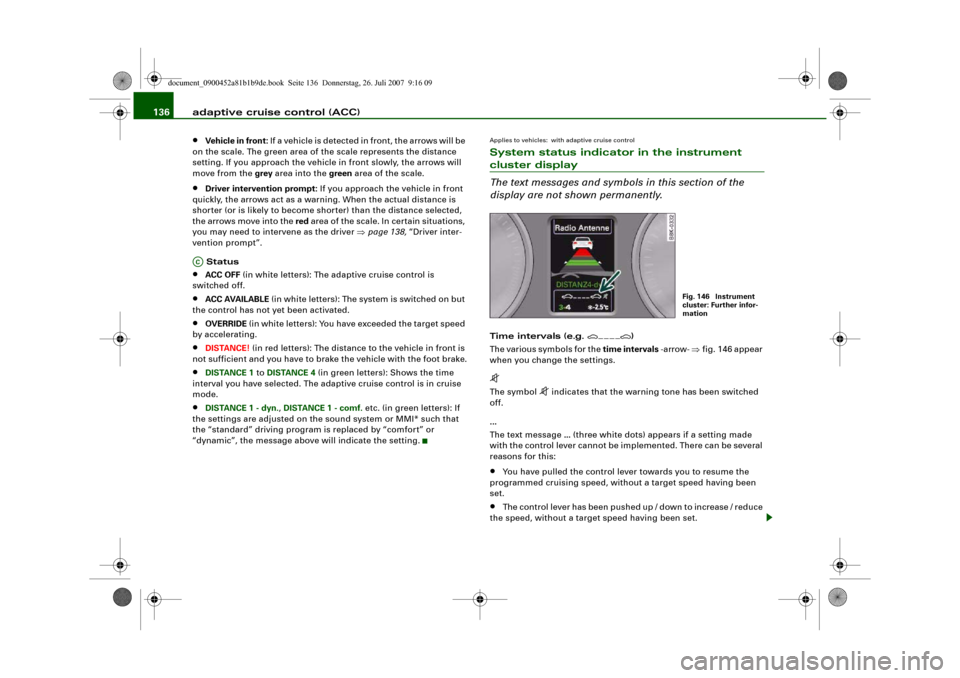
Vehicle in front: If a vehicle is detected in front, the arrows will be
on the scale. The green area of the scale represents the distance
setting. If you approach the vehicle in front slowly, the arrows will
move from the grey area into the green area of the scale.
•
Driver intervention prompt: If you approach the vehicle in front
quickly, the arrows act as a warning. When the actual distance is
shorter (or is likely to become shorter) than the distance selected,
the arrows move into the red area of the scale. In certain situations,
you may need to intervene as the driver ⇒page 138, “Driver inter-
vention prompt”.
Status
•
ACC OFF (in white letters): The adaptive cruise control is
switched off.
•
ACC AVAILABLE (in white letters): The system is switched on but
the control has not yet been activated.
•
OVERRIDE (in white letters): You have exceeded the target speed
by accelerating.
•
DISTANCE! (in red letters): The distance to the vehicle in front is
not sufficient and you have to brake the vehicle with the foot brake.
•
DISTANCE 1 to DISTANCE 4 (in green letters): Shows the time
interval you have selected. The adaptive cruise control is in cruise
mode.
•
DISTANCE 1 - dyn., DISTANCE 1 - comf. etc. (in green letters): If
the settings are adjusted on the sound system or MMI* such that
the “standard” driving program is replaced by “comfort” or
“dynamic”, the message above will indicate the setting.
Applies to vehicles: with adaptive cruise controlSystem status indicator in the instrument cluster display
The text messages and symbols in this section of the
display are not shown permanently.Time intervals (e.g.
)
The various symbols for the time intervals -arrow- ⇒fig. 146 appear
when you change the settings.
The symbol
indicates that the warning tone has been switched
off.
...
The text message ... (three white dots) appears if a setting made
with the control lever cannot be implemented. There can be several
reasons for this:
•
You have pulled the control lever towards you to resume the
programmed cruising speed, without a target speed having been
set.
•
The control lever has been pushed up / down to increase / reduce
the speed, without a target speed having been set.
AC
Fig. 146 Instrument
cluster: Further infor-
mation
document_0900452a81b1b9de.book Seite 136 Donnerstag, 26. Juli 2007 9:16 09
Page 141 of 342
adaptive cruise control (ACC)139
Controls
Safety
Driving tips
General maintenance
Self-help
Technical data
•
An acoustic warning will also sound (unless it has been deacti-
vated in the sound system or MMI* settings).Note
•
Pressing the brake pedal will switch off the adaptive cruise
control system. The speed set at that point will, however, remain
stored until the adaptive cruise control is activated again.
•
To resume the programmed cruising speed, release the brake
pedal and pull the control lever towards you ⇒page 132,
“Switching off the system (with speed memory function) and reacti-
vating it”.
•
If you exceed the target speed by pressing the accelerator, the
driver intervention prompt will not be accompanied by a warning
tone. The indicator lamp shown in the display will also switch off
when the target speed is exceeded.
•
If the adaptive cruise control triggers a braking operation the
hydraulic brake system is under pressure. This is why brake pedal
travel will be shorter and the pedal will feel “harder”.
Applies to vehicles: with adaptive cruise controlSetting the warning tone volume and driving program
You can change the adaptive cruise control settings on
the sound system or MMI* to suit your individual driving
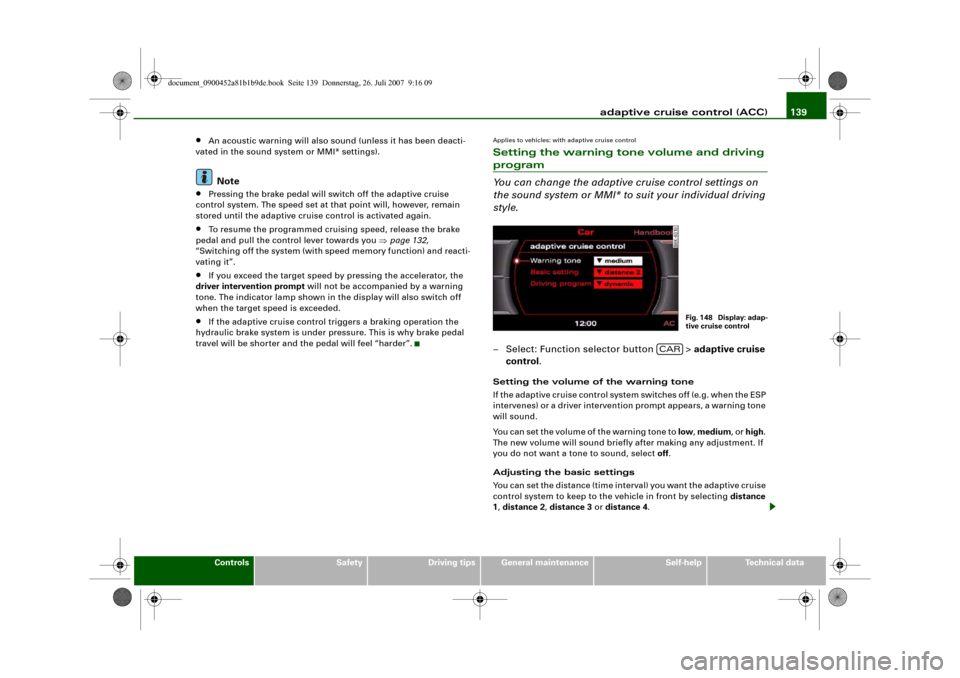
style.– Select: Function selector button > adaptive cruise
control.Setting the volume of the warning tone
If the adaptive cruise control system switches off (e.g. when the ESP
intervenes) or a driver intervention prompt appears, a warning tone
will sound.
You can set the volume of the warning tone to low, medium, or high.
The new volume will sound briefly after making any adjustment. If
you do not want a tone to sound, select off.
Adjusting the basic settings
You can set the distance (time interval) you want the adaptive cruise
control system to keep to the vehicle in front by selecting distance
1, distance 2, distance 3 or distance 4.
Fig. 148 Display: adap-
tive cruise control
CAR
document_0900452a81b1b9de.book Seite 139 Donnerstag, 26. Juli 2007 9:16 09
Page 149 of 342
Audi lane assist147
Controls
Safety
Driving tips
General maintenance
Self-help
Technical data
•
Unfilled lines: The lane assist is switched on but not ready for
warning ⇒page 146, fig. 161,
Version : High-resolution display
•
Solid white lines: The lane assist is switched on and ready to
warn.
•
Solid red line (left or right): The lane assist warns you before you
cross the lane demarcation ⇒page 146, fig. 160.
•
Unfilled lines: The lane assist is switched on but not ready for
warning ⇒page 146, fig. 161.
Messages in the instrument cluster display
Should the lane assist be deactivated automatically, the indicator
lamp in the instrument cluster will go out and one of the following
messages will appear in the instrument cluster display:
Audi lane assist not available: currently no sensor vision
This message is displayed when the camera is no longer functional
after the system has continuously failed to detect the lane mark-
ings. This can have the following causes:
•
The outside of the camera window ⇒page 145, fig. 159 is dirty
or frosted. Please remove dirt or ice from this area of the wind-
screen.
•
The inside of the camera window is misted up. In this case,
please wait for the camera window to demist before switching on
the lane assist system again.
•
Due to the conditions (e.g. snow-covered road) the system has
not been able to detect the lane markings for a long period. Do not
switch the lane assist system on again before the lane markings are
discernible.
Audi lane assist currently not available
A temporary error is preventing the lane assist system from fully
functioning. Try switching on the lane assist system again later.
Audi lane assist: system faultThe system should be checked by an Audi dealership or other qual-
ified workshop.
Applies to vehicles: with lane assistSetting the warning time and steering vibration
You can change the lane assist settings on the sound
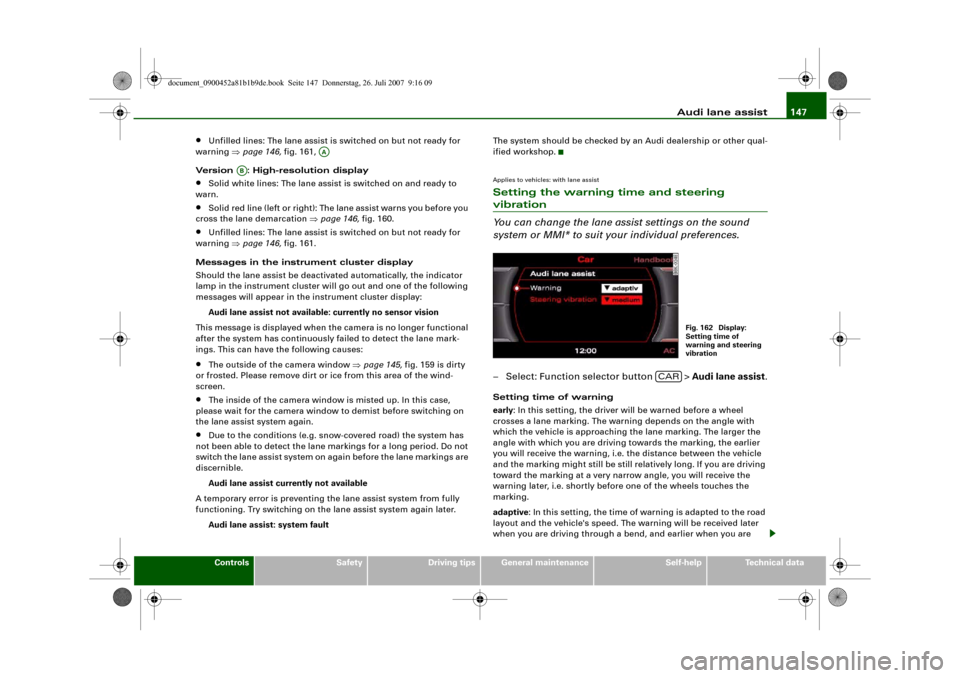
system or MMI* to suit your individual preferences.– Select: Function selector button > Audi lane assist.Setting time of warning
early: In this setting, the driver will be warned before a wheel
crosses a lane marking. The warning depends on the angle with
which the vehicle is approaching the lane marking. The larger the
angle with which you are driving towards the marking, the earlier
you will receive the warning, i.e. the distance between the vehicle
and the marking might still be still relatively long. If you are driving
toward the marking at a very narrow angle, you will receive the
warning later, i.e. shortly before one of the wheels touches the
marking.
adaptive: In this setting, the time of warning is adapted to the road
layout and the vehicle's speed. The warning will be received later
when you are driving through a bend, and earlier when you are
AA
AB
Fig. 162 Display:
Setting time of
warning and steering
vibration
CAR
document_0900452a81b1b9de.book Seite 147 Donnerstag, 26. Juli 2007 9:16 09
Page 151 of 342
Audi side assist149
Controls
Safety
Driving tips
General maintenance
Self-help
Technical data
Audi side assistLane change assist featureApplies to vehicles: with side assistDescription
The side assist function assists the driver when changing
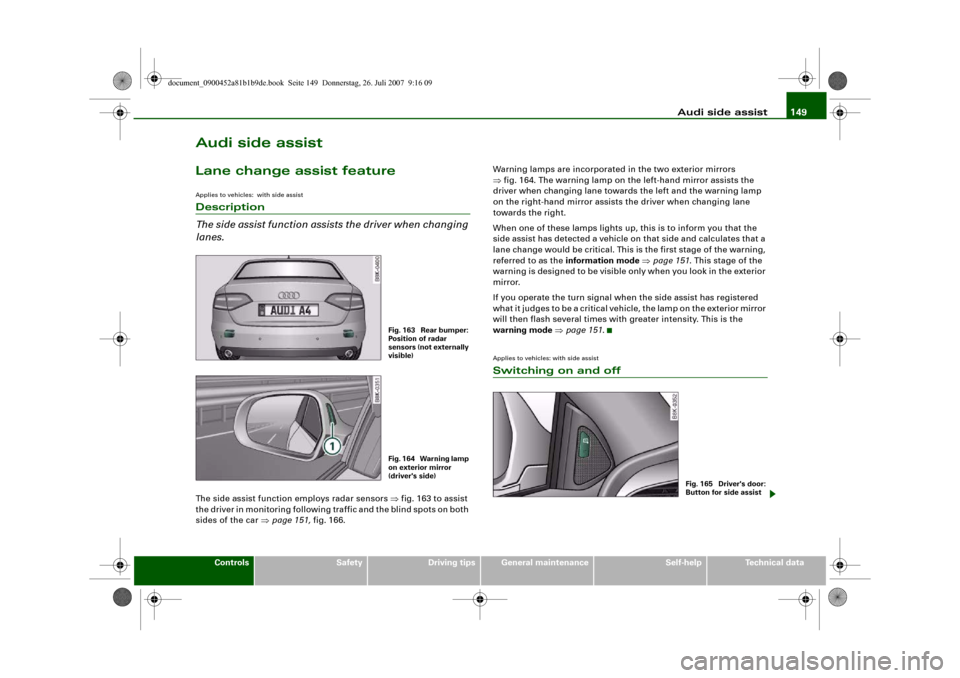
lanes.The side assist function employs radar sensors ⇒fig. 163 to assist
the driver in monitoring following traffic and the blind spots on both
sides of the car ⇒page 151, fig. 166.Warning lamps are incorporated in the two exterior mirrors
⇒fig. 164. The warning lamp on the left-hand mirror assists the
driver when changing lane towards the left and the warning lamp
on the right-hand mirror assists the driver when changing lane
towards the right.
When one of these lamps lights up, this is to inform you that the
side assist has detected a vehicle on that side and calculates that a
lane change would be critical. This is the first stage of the warning,
referred to as the information mode ⇒page 151. This stage of the
warning is designed to be visible only when you look in the exterior
mirror.
If you operate the turn signal when the side assist has registered
what it judges to be a critical vehicle, the lamp on the exterior mirror
will then flash several times with greater intensity. This is the
warning mode ⇒page 151.
Applies to vehicles: with side assistSwitching on and off
Fig. 163 Rear bumper:
Position of radar
sensors (not externally
visible)Fig. 164 Warning lamp
on exterior mirror
(driver's side)
Fig. 165 Driver's door:
Button for side assist
document_0900452a81b1b9de.book Seite 149 Donnerstag, 26. Juli 2007 9:16 09
Page 152 of 342
Audi side assist 150
Switching on
– Press the button ⇒page 149, fig. 165. The red indicator
lamp in the button will light up.
Switching off
– Press the button again. The indicator lamp in the button
will go out.The system is designed to provide assistance on motorways and
other out-of-town roads, so it only operates at speeds above about
60 km/h.
WARNING
•
Please note that the sensors are not always able to detect all
vehicles which may represent a potential hazard (accident risk).
•
Please note that the side assist is not able to give adequate
warning of vehicles approaching very fast from behind, or vehicles
that you are overtaking rapidly.
•
The radar sensor's "field of vision" can be impaired by rain,
snow or a lot of water on the road. This results in vehicles not
being reliably recognised or, in some circumstances, not being
detected at all by the side assist. Always give your full attention to
the position of your vehicle on the road and other nearby traffic.
•
The side assist only gives a warning of approaching vehicles
and vehicles in the blind spots when road speed is above 60 km/h.
•
Please note that the side assist does not operate in tight bends
(with a radius of less than 200 metres).
•
The side assist feature is not a substitute for the full concentra-
tion of the driver. The driver is always responsible for the safety of
lane changes and other manoeuvres. Always give your full atten-
tion to the position of your vehicle on the road and other nearby
traffic.
Caution
•
To avoid impairing the function of the side assist, do not attach
any objects (e.g. stickers or bicycle carriers) in such a way that they
might interfere with the radar sensors in the rear bumper.
•
Make sure that the warning lamps on the exterior mirrors are not
obscured by stickers or other objects.Note
•
To ensure that the side assist function works properly, do not
allow snow and ice to accumulate on the rear bumper near the radar
sensors. Please observe the additional notes on ⇒page 157.
•
The side assist function will be switched off automatically when
the electrical connector for the trailer socket is plugged in on vehi-
cles with a factory-fitted towing bracket.
•
The side assist should be switched off manually when towing a
trailer if the vehicle is equipped with a towing bracket which was not
factory-fitted.
•
The side assist system will switch off automatically if it detects
an obstruction that impairs the function of the radar sensors.
•
The warning lamps on the exterior mirrors may not be properly
visible if tinted foil is affixed to the side windows on the driver's or
passenger's side.
document_0900452a81b1b9de.book Seite 150 Donnerstag, 26. Juli 2007 9:16 09
Page 159 of 342
Audi side assist157
Controls
Safety
Driving tips
General maintenance
Self-help
Technical data Audi side assist: system fault
The system should be checked by an Audi dealership or other qual-
ified workshop.
Audi side assist not available when towing
On vehicles with a factory-fitted towing bracket the side assist func-
tion will be switched off automatically when the electrical connector
for the trailer is plugged in, and this message will appear in the
instrument cluster display. The side assist function may not be
switched off automatically if the towing bracket is not of the factory-
fitted type.
Applies to vehicles: with side assistSafety notesThe function of the side assist can be restricted when driving in
tight bends or over crests and in bad weather conditions.
It is possible that the radar sensors may register objects such as
high or offset roadside barriers as well as other vehicles.
The side assist system is programmed for lanes of a fixed width, and
is not able to measure differing lane widths. It monitors a zone
equivalent to one normal lane width on either side. If the lanes are
narrower than this, or if vehicles are not travelling in the centre of
the lanes, the system may give a warning for vehicles which it
judges to be critical, even though they are not in fact travelling in an
adjacent lane.
WARNING
•
Please note that the sensors are not always able to detect all
vehicles which may represent a potential hazard (accident risk).
•
Please note that the side assist is not able to give adequate
warning of vehicles approaching very fast from behind, or vehicles
that you are overtaking rapidly.
•
The radar sensor's "field of vision" can be impaired by rain,
snow or a lot of water on the road. This results in vehicles not
being reliably recognised or, in some circumstances, not being
detected at all by the side assist. Always give your full attention to
the position of your vehicle on the road and other nearby traffic.
•
The side assist only gives a warning of approaching vehicles
and vehicles in the blind spots when road speed is above 60 km/h.
•
Please note that the side assist does not operate in tight bends
(with a radius of less than 200 metres).
•
The side assist feature is not a substitute for the full concentra-
tion of the driver. The driver is always responsible for the safety of
lane changes and other manoeuvres. Always give your full atten-
tion to the position of your vehicle on the road and other nearby
traffic.Caution
To avoid impairing the function of the side assist, do not attach any
objects (e.g. stickers or bicycle carriers) in such a way that they
might interfere with the radar sensors in the rear bumper.
Note
For reasons of safety, the side assist system must be checked by a
qualified workshop if the positions of the radar sensors have been
affected by a rear-end collision, etc.Applies to vehicles: with side assistConformity certificationThe side assist employs radar sensors operating in one of two
frequency bands at 24 GHz. Please note that in some countries only
one of these two frequency bands is permitted. Accordingly, the
frequency band permitted in the country where the vehicle is being
WARNING (continued)
document_0900452a81b1b9de.book Seite 157 Donnerstag, 26. Juli 2007 9:16 09
Page 166 of 342
Automatic gearbox 164moving the selector lever either in or out of position P. The lever can
only be moved out of position P when the ignition is on.
R - Reverse gear
When reverse gear is engaged the gearbox automatically selects the
lowest gear ratio.
Reverse gear must only be engaged when the vehicle is stationary
and the engine is idling ⇒.
To move the selector lever to position R, press in the interlock
button and at the same time press the brake pedal. Depending on
the model, one or two reversing lights will come on in selector lever
position R (when ignition is switched on).
N - Neutral
In this position the gearbox is in neutral ⇒.
D - Drive (forwards)
In this position the gearbox automatically selects the best gear
ratio. This depends on the engine load, the road speed and the
dynamic gear control program (DCP).
Press the brake pedal when moving the selector lever from N to D if
the vehicle is stationary or at speeds below 5 km/h ⇒.
In some situations (such as on mountain roads or when towing a
trailer or caravan) it can be advantageous to switch temporarily to
tiptronic mode ⇒page 166, so that the gear ratios can be selected
manually to suit the driving conditions.
S - Sport position
Select this position if you wish to take full advantage of the car's
performance. This setting makes use of the engine's maximum
power output. When accelerating the gear shifts will be noticeable.
Press the brake pedal when moving the selector lever from N to S if
the vehicle is stationary or at speeds below 5 km/h ⇒.
WARNING
•
Never move the selector lever to R or P when driving, as this
could cause an accident.
•
In selector position D or S the vehicle must always be held with
the foot brake when the engine is running. This is because an auto-
matic gearbox still transmits power even at idling speed, and the
vehicle tends to “creep”. The throttle must on no account be
opened inadvertently (for instance by hand from the engine
compartment) when a gear is engaged with the vehicle stationary.
The vehicle could otherwise start moving immediately (in some
cases even if the parking brake is engaged) and possibly cause an
accident.
•
To avoid accidents, apply the parking brake and put the
selector lever in position P before opening the bonnet and working
on the vehicle with the engine running. Please observe the impor-
tant safety warnings ⇒page 255, “Working on components in the
engine compartment”.Note
You can select the sport program for gear changes on vehicles with
Audi drive select* by activating the DYNAMIC mode. There is no S
position on the selector lever.•
Applies to vehicles with tiptronic gearbox:
•
If the lever is moved accidentally to N when driving, release the
accelerator and let the engine speed drop to idling before selecting
D or S again.
•
For the sake of fuel economy (and the environment), the gearbox
ratios on some models are designed so that maximum speed is only
obtained when the selector lever is at position S.
document_0900452a81b1b9de.book Seite 164 Donnerstag, 26. Juli 2007 9:16 09
Page 170 of 342
Automatic gearbox 168
– Briefly pull the left-hand paddle lever to change down
to a lower gear.
– Briefly pull the right-hand paddle lever to change up
to a higher gear.The paddle levers are activated when the selector lever is in position
D or S, or the position for the manual shift programme (tiptronic).
The manual shift programme can, of course, still be operated using
the selector lever in the centre console.Applies to vehicles: with multitronic® or tiptronicManual release of selector lever
The selector lever can be released manually if the elec-
trical power supply should fail.
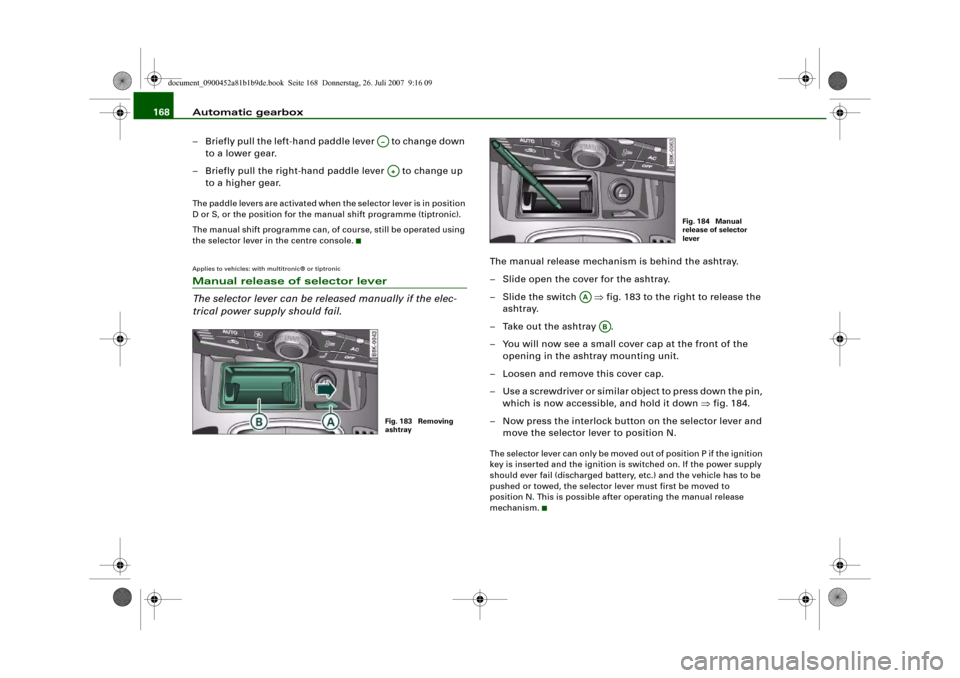
The manual release mechanism is behind the ashtray.
– Slide open the cover for the ashtray.
–Slide the switch ⇒fig. 183 to the right to release the
ashtray.
– Take out the ashtray .
– You will now see a small cover cap at the front of the
opening in the ashtray mounting unit.
– Loosen and remove this cover cap.
– Use a screwdriver or similar object to press down the pin,
which is now accessible, and hold it down ⇒fig. 184.
– Now press the interlock button on the selector lever and
move the selector lever to position N.The selector lever can only be moved out of position P if the ignition
key is inserted and the ignition is switched on. If the power supply
should ever fail (discharged battery, etc.) and the vehicle has to be
pushed or towed, the selector lever must first be moved to
position N. This is possible after operating the manual release
mechanism.
A–A+Fig. 183 Removing
ashtray
Fig. 184 Manual
release of selector
lever
AA
AB
document_0900452a81b1b9de.book Seite 168 Donnerstag, 26. Juli 2007 9:16 09