2008 AUDI A4 tow
[x] Cancel search: towPage 118 of 342
Driving 116DrivingSteeringApplies to vehicles: with manually adjustable steering columnAdjusting the steering wheel position
The height and reach of the steering wheel can be
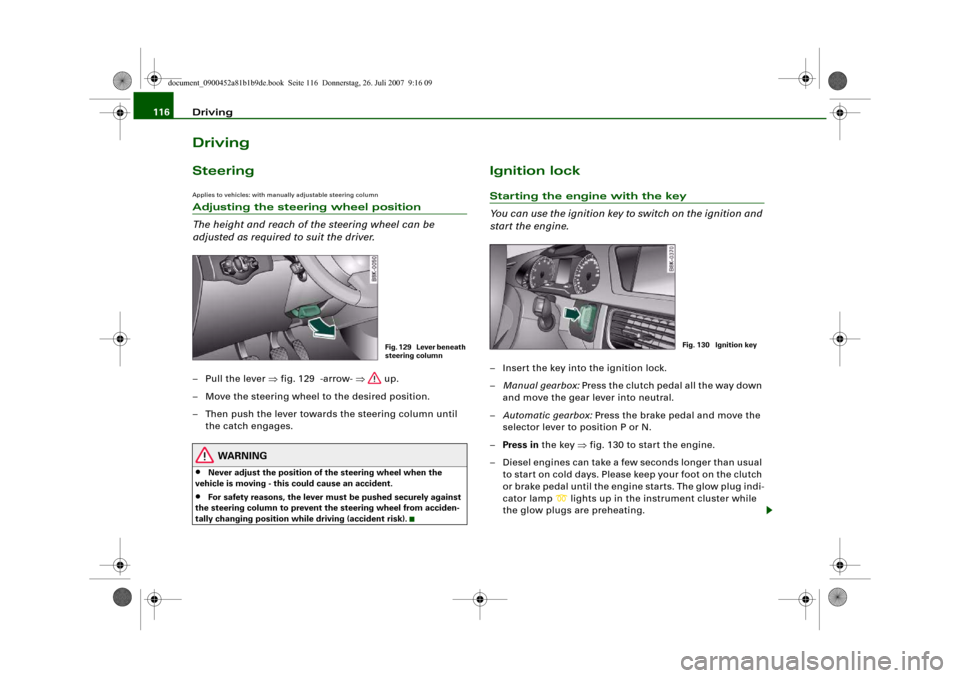
adjusted as required to suit the driver.– Pull the lever ⇒fig. 129 -arrow- ⇒ up.
– Move the steering wheel to the desired position.
– Then push the lever towards the steering column until
the catch engages.
WARNING
•
Never adjust the position of the steering wheel when the
vehicle is moving - this could cause an accident.
•
For safety reasons, the lever must be pushed securely against
the steering column to prevent the steering wheel from acciden-
tally changing position while driving (accident risk).
Ignition lockStarting the engine with the key
You can use the ignition key to switch on the ignition and
start the engine.– Insert the key into the ignition lock.
–Manual gearbox: Press the clutch pedal all the way down
and move the gear lever into neutral.
–Automatic gearbox: Press the brake pedal and move the
selector lever to position P or N.
–Press in the key ⇒fig. 130 to start the engine.
– Diesel engines can take a few seconds longer than usual
to star t on cold days. Please keep your foot on the clutch
or brake pedal until the engine starts. The glow plug indi-
cator lamp
lights up in the instrument cluster while
the glow plugs are preheating.
Fig. 129 Lever beneath
steering column
Fig. 130 Ignition key
document_0900452a81b1b9de.book Seite 116 Donnerstag, 26. Juli 2007 9:16 09
Page 122 of 342
Driving 120Steering lock
The steering is locked if the key is not in the ignition and the driver
door has been opened. The steering lock acts as a theft deterrent.
WARNING
Never run the engine in confined spaces. The exhaust gases are
toxic.•
Never switch off the engine until the vehicle is stationary.
•
The brake servo and the power steering system work only
when the engine is running. You need more strength to steer and
brake the vehicle when the engine is switched off. This would
mean a greater risk of accidents and serious injury, because you
cannot steer and brake in the normal manner.Caution
•
Avoid high engine speeds, full throttle and extreme load condi-
tions until the engine has reached its normal operating tempera-
ture, otherwise this can damage the engine.
•
The engine cannot be started by push-starting or towing.
•
If the engine has been working hard for a long time, there is a risk
of heat building up in the engine compartment after the engine has
been switched off; this could cause engine damage. For this reason,
you should leave the engine idling for about 2 minutes before
switching it off.Note
If you open the driver's door while the ignition is switched on, a
warning buzzer will sound, and the message Ignition is on will
appear in the display. In this case, please switch off the ignition.
Switching off the engine with the Start/Stop button–Stop the vehicle.
– Automatic gearbox: Move the selector lever to position P
or N.
–Press the Start/Stop button ⇒page 118, fig. 131.Emergency Off function
Should it be necessary in an emergency, the engine can be switched
off when the selector lever is in position R, D or S. To switch off the
engine (max. speed 10 km/h) press and hold the Start/Stop button
and keep your foot on the brake.
WARNING
•
Never switch off the engine until the vehicle is stationary.
•
The brake servo and the power steering system work only
when the engine is running. You need more strength to steer and
brake the vehicle when the engine is switched off. This would
mean a greater risk of accidents and serious injury, because you
cannot steer and brake in the normal manner.Caution
If the engine has been working hard for a long time, there is a risk
of heat building up in the engine compartment after the engine has
been switched off; this could cause engine damage. For this reason,
you should leave the engine idling for about 2 minutes before
switching it off.
Note
After the engine is stopped the radiator fan may run on for up to
10 minutes, even if the ignition is switched off. The fan may also
document_0900452a81b1b9de.book Seite 120 Donnerstag, 26. Juli 2007 9:16 09
Page 125 of 342
Driving123
Controls
Safety
Driving tips
General maintenance
Self-help
Technical data braking force of the parking brake is only released when there is
enough power at the wheels to make the vehicle move in the desired
direction.
Note
For safety reasons the parking brake will only release automatically
if the driver's seat belt is engaged in its buckle.Driving away when towing a trailer
Please note the following points to prevent the vehicle
from rolling back unintentionally on a gradient.– Pull and hold the parking brake switch and press the
accelerator. The parking brake will remain engaged and
prevent any tendency to roll back down the slope.
– You can release the parking brake switch as soon as the
engine is delivering enough power to the wheels.Depending on the weight of the vehicle and trailer and the steep-
ness of the slope, there may be a tendency to roll back downhill
when driving away from a standstill. You can prevent this by pulling
out the parking brake switch as you press the accelerator (in the
same way as with a conventional handbrake).Emergency braking function
This feature enables you to stop the vehicle if the main
brake system should fail or if the pedal is obstructed.– Pull out and hold the parking brake switch to stop the
vehicle with the parking brake in an emergency.
– The brakes will be released immediately if you release the
switch or press down the accelerator.
If you pull out and hold the parking brake switch at a road speed
above about 8 km/h, this will initiate an emergency brake applica-
tion. The brakes are then applied hydraulically at all four wheels.
The effect is the same as an emergency stop (full brake application)
⇒
To prevent the emergency braking function from being used acci-
dentally, a warning buzzer sounds when the switch is operated. The
brakes are released immediately when you release the switch or
press down the accelerator.
WARNING
You should only use the emergency braking function in a real
emergency, for example if the brake system should fail or if the
brake pedal is obstructed. If you use the emergency braking func-
tion by activating the parking brake switch, the effect is similar to
a full brake application (emergency stop). Please remember that
the ESP (with its combined ABS, EDL and traction control func-
tions) is still subject to certain physical limits. In a corner or in bad
road or weather conditions an emergency stop can cause the
vehicle to skid or lose steering control.Driver messages in the instrument cluster displayCaution: Vehicle parked too steep
This message can appear when you apply the parking brake if the
car is parked on a gradient steeper than about 30%.
In this case the parking brake may not be strong enough to prevent
the vehicle from rolling back accidentally.
Please release parking brake
However, please remember that, for safety reasons, the parking
brake will only release automatically if the driver's seat belt is
buckled.
document_0900452a81b1b9de.book Seite 123 Donnerstag, 26. Juli 2007 9:16 09
Page 128 of 342
Driving 126
– Pull the lever to position ⇒page 125, fig. 134 to
switch on the system.
– Drive at the speed you wish to set the system to.
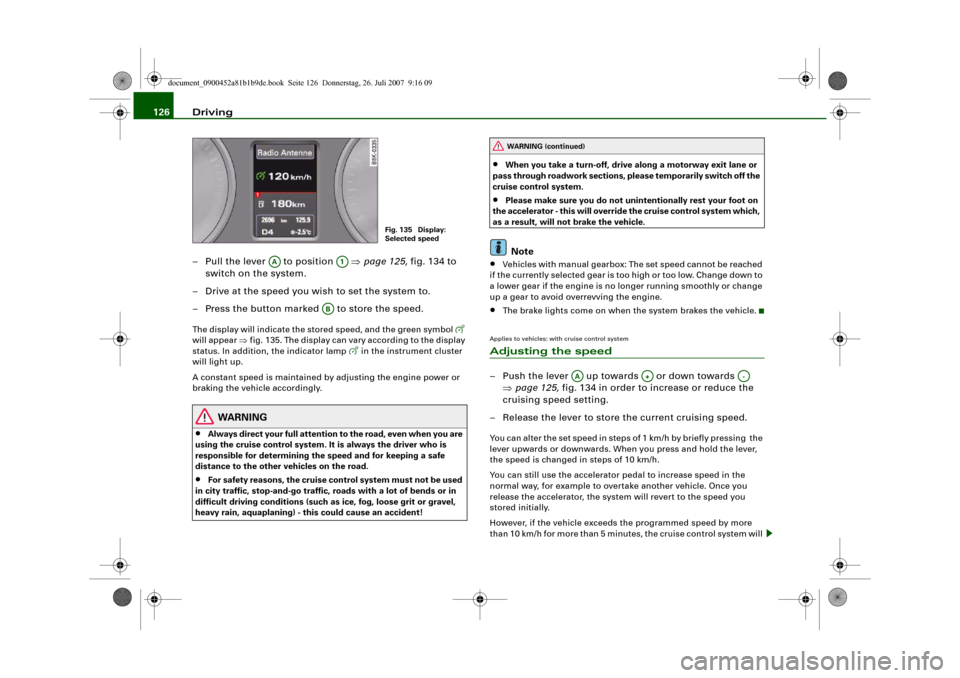
– Press the button marked to store the speed.The display will indicate the stored speed, and the green symbol
will appear ⇒fig. 135. The display can vary according to the display
status. In addition, the indicator lamp
in the instrument cluster
will light up.
A constant speed is maintained by adjusting the engine power or
braking the vehicle accordingly.
WARNING
•
Always direct your full attention to the road, even when you are
using the cruise control system. It is always the driver who is
responsible for determining the speed and for keeping a safe
distance to the other vehicles on the road.
•
For safety reasons, the cruise control system must not be used
in city traffic, stop-and-go traffic, roads with a lot of bends or in
difficult driving conditions (such as ice, fog, loose grit or gravel,
heavy rain, aquaplaning) - this could cause an accident!
•
When you take a turn-off, drive along a motorway exit lane or
pass through roadwork sections, please temporarily switch off the
cruise control system.
•
Please make sure you do not unintentionally rest your foot on
the accelerator - this will override the cruise control system which,
as a result, will not brake the vehicle.Note
•
Vehicles with manual gearbox: The set speed cannot be reached
if the currently selected gear is too high or too low. Change down to
a lower gear if the engine is no longer running smoothly or change
up a gear to avoid overrevving the engine.
•
The brake lights come on when the system brakes the vehicle.
Applies to vehicles: with cruise control systemAdjusting the speed– Push the lever up towards or down towards
⇒page 125, fig. 134 in order to increase or reduce the
cruising speed setting.
– Release the lever to store the current cruising speed.You can alter the set speed in steps of 1 km/h by briefly pressing the
lever upwards or downwards. When you press and hold the lever,
the speed is changed in steps of 10 km/h.
You can still use the accelerator pedal to increase speed in the
normal way, for example to overtake another vehicle. Once you
release the accelerator, the system will revert to the speed you
stored initially.
However, if the vehicle exceeds the programmed speed by more
than 10 km/h for more than 5 minutes, the cruise control system will
Fig. 135 Display:
Selected speed
AA
A1
AB
WARNING (continued)
AA
A+
A-
document_0900452a81b1b9de.book Seite 126 Donnerstag, 26. Juli 2007 9:16 09
Page 129 of 342
Driving127
Controls
Safety
Driving tips
General maintenance
Self-help
Technical data be deactivated temporarily. The green symbol in the display will
change to white but the stored speed will be retained.
Applies to vehicles: with cruise control systemPre-selecting a speed
You can pre-select a desired speed while the vehicle is
stationary.– Switch on the ignition.
– Pull the lever to position 1 ⇒page 125, fig. 134.
– Push the lever up towards or down towards in
order to increase or reduce the cruising speed setting.
– Release the lever to store the cruising speed setting
displayed.This function allows you to enter the desired cruise control setting
speed ahead of time, for example before joining a motorway. Once
you are on the motorway, you can activate the cruise control system
by pulling the lever to position .Applies to vehicles: with cruise control systemSwitching off the cruise control systemSwitching off temporarily
– Press the brake pedal, or
– Manual gearbox: Press the clutch pedal for a relatively
long period, or
– Push lever to position (click stop not engaged)
⇒page 125, fig. 134, or– Drive more than 10 km/h faster than the stored speed
over a period of more than 5 minutes.
Switching off completely
– Press the lever to position (click stop engaged), or
– Switch off the ignition.
The speed setting will remain stored after the system is temporarily
deactivated. To resume the programmed cruising speed, release the
clutch or brake pedal and pull the lever to position .
The stored speed will be deleted once the ignition is switched off.
WARNING
Do not resume the programmed cruising speed if this is too high
for the traffic conditions - this can cause accidents.
AA
A+
A-
A1
AA
A2
AA
A2
A1
document_0900452a81b1b9de.book Seite 127 Donnerstag, 26. Juli 2007 9:16 09
Page 131 of 342

adaptive cruise control (ACC)129
Controls
Safety
Driving tips
General maintenance
Self-help
Technical data
•
Adaptive cruise control will not react when approaching a
stationary obstacle, e.g. the end of a traffic jam or a broken-down
vehicle, or if a vehicle should come towards you in the same lane.
•
Please make sure you do not unintentionally rest your foot on
the accelerator - this will override the adaptive cruise control
system which, as a result, will not automatically brake the vehicle.Note
•
For safety reasons, the speed setting will be deleted when the
ignition is switched off.
•
Switching on the adaptive cruise control automatically activates
the Electronic Stabilisation Program (ESP) and the traction control
system (ASR). These two systems cannot be deactivated while the
adaptive cruise control is switched on.
•
Damage caused by impacts (e.g. if the vehicle is damaged when
parking) can affect the radar sensor settings. This can cause the
system to malfunction or switch off completely.
•
The radar sensor is heated. However, in winter conditions, you
should make sure that the radar sensor is free of ice and snow
before you set off. If necessary, carefully clean the cover of the radar
sensor and the surrounding area ⇒page 128, fig. 136.
•
To make sure that the radar sensor is fully operative, do not
attach any objects (e.g. stickers, add-on parts or other accessories)
to the area surrounding the radar sensor. Do not paint the area
surrounding the radar sensor.
Applies to vehicles: with adaptive cruise control and manual gearboxVehicles with manual gearbox
The driver of a vehicle with a manual gearbox of course
has to change gears as appropriate, even when the adap-
tive cruise control is activated.The adaptive cruise control is available from the second to the sixth
gear (when driven in normal engine speed range).
When the adaptive cruise control is activated, the driver must press
the clutch pedal as normal in order to change gear. When changing
gear or pressing the clutch pedal (for up to 20 seconds), the adap-
tive cruise control will remain activated.
When changing gear, the driver does not have to accelerate after
engaging a gear as the engine torque will be coordinated by the
adaptive cruise control.
The following situations may lead to an automatic deactivation of
the adaptive cruise control:•
pressing the clutch pedal too long (longer than approx.
20 seconds)
•
incorrect changing of gears and/or use of the clutch pedalNote
•
The adaptive cruise control cannot be activated while changing
gears.
WARNING (continued)
document_0900452a81b1b9de.book Seite 129 Donnerstag, 26. Juli 2007 9:16 09
Page 134 of 342
adaptive cruise control (ACC) 132
Setting a higher speed
–Briefly move the control lever up towards ⇒fig. 140.
The speed will be incremented by one graduation on the
scale in the speedometer.
– Press the control lever up towards and hold it in this
position. The speed setting is indicated by the diodes in
the speedometer; the speed will be increased accord-
ingly.
Setting a lower speed
–Briefly move the control lever down towards . The
speed will be reduced by one graduation on the scale in
the speedometer.
– Press the control lever down towards and hold it in
this position. The speed setting is indicated by the
diodes in the speedometer; the speed will be reduced
accordingly.After releasing the control lever, the system will adapt your speed to
the setting you have selected.
Following any changes, the new stored speed will be displayed
briefly in the system status indicator ⇒page 136.
Note
You can still use the accelerator pedal at any time to increase speed
in the normal way. The previously programmed speed will be
resumed when the accelerator pedal is released. You can set a new
speed at any time by pressing the button ⇒page 131,
fig. 139.
Applies to vehicles: with adaptive cruise controlSwitching off the system (with speed memory function) and reactivating it
In some situations it makes sense to switch off the
system.Switching off the system (with speed memory
function)
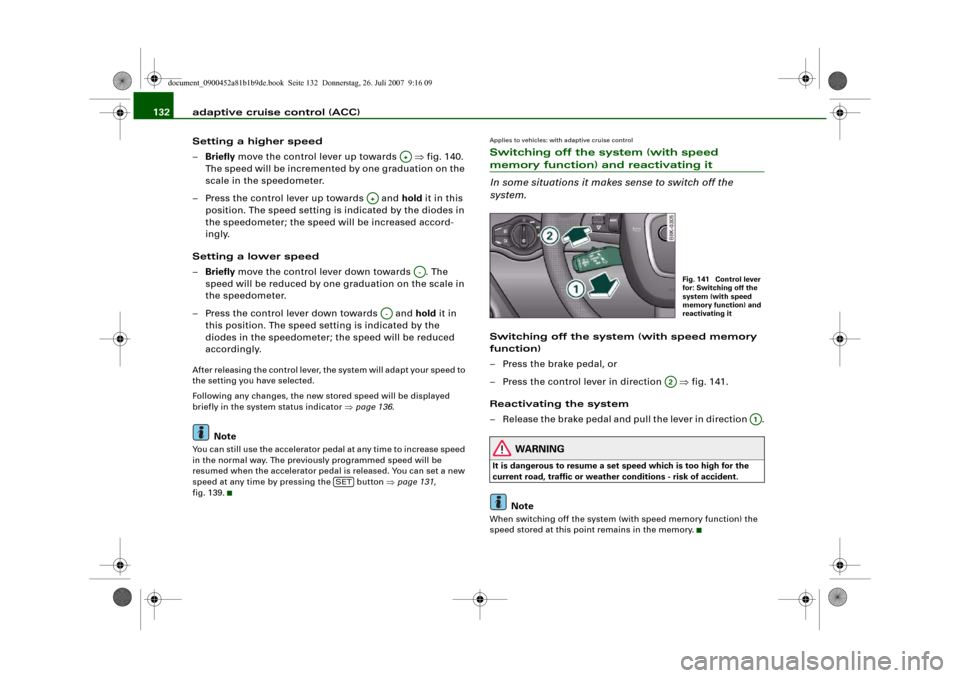
– Press the brake pedal, or
– Press the control lever in direction ⇒fig. 141.
Reactivating the system
– Release the brake pedal and pull the lever in direction .
WARNING
It is dangerous to resume a set speed which is too high for the
current road, traffic or weather conditions - risk of accident.
Note
When switching off the system (with speed memory function) the
speed stored at this point remains in the memory.
A+
A+
A-
A-
SET
Fig. 141 Control lever
for: Switching off the
system (with speed
memory function) and
reactivating it
A2
A1
document_0900452a81b1b9de.book Seite 132 Donnerstag, 26. Juli 2007 9:16 09
Page 135 of 342

adaptive cruise control (ACC)133
Controls
Safety
Driving tips
General maintenance
Self-help
Technical data
Applies to vehicles: with adaptive cruise controlSetting the distance
The distance can be set in 4 different stages.– Briefly press the sliding switch ⇒fig. 142 once towards
or . The display in the instrument cluster will briefly
show the current distance setting.
– Press the sliding switch again towards or to
increase or reduce the distance by one level at a time.Choosing the distance
The adaptive cruise control system determines the distance to the
vehicle in front by time intervals. It defines a time-based distance to
the vehicle in front which is kept at a constant level. This converts
to a distance which depends on the speed - the higher the speed,
the higher the safety distance in metres ⇒.
The actual distance maintained by the adaptive cruise control can
be longer or shorter, depending on the traffic situation and the
driving style of the driver in front.
Distance 1
This setting is suitable for brisk driving in a line of traffic. The time
interval is 1 second. This is equivalent to (for instance):•
A distance of 14 metres at a speed of 50 km/h
•
A distance of 36 metres at a speed of 130 km/h
Distance 2
This setting is suitable for relaxed “moving with the flow” in a line
of traffic. The time interval is 1.3 seconds. This is equivalent to (for
instance):•
A distance of 18 metres at a speed of 50 km/h
•
A distance of 47 metres at a speed of 130 km/h
Distance 3
This (recommended) setting is suitable for relaxed “moving with the
flow” in a line of traffic. The time interval is 1.8 seconds. This is
equivalent to (for instance):•
A distance of 25 metres at a speed of 50 km/h
•
A distance of 65 metres at a speed of 130 km/h
Distance 4
This setting is suitable for single-carriageway roads. The time
interval is 2.3 seconds. This is equivalent to (for instance):•
A distance of 32 metres at a speed of 50 km/h
•
A distance of 83 metres at a speed of 130 km/h
You can control the acceleration and braking response of your
vehicle in adaptive cruise control mode by adjusting the settings on
the sound system or MMI* ⇒page 139. Depending on the driving
program and distance selected, acceleration and braking response
will range from dynamic (1) to relaxed (5).
Fig. 142 Control lever
for: Setting the
distance
A+
A-
A+
A-
Driving pro-
gram
dynamic
standard
comfort
Distance 1
1
2
3
Distance 2
2
3
4
Distance 3
2
3
4
Distance 4
3
4
5
document_0900452a81b1b9de.book Seite 133 Donnerstag, 26. Juli 2007 9:16 09