2008 AUDI A4 technical data
[x] Cancel search: technical dataPage 35 of 342
Driver information system33
Controls
Safety
Driving tips
General maintenance
Self-help
Technical data easily when braking. This could cause the tail of the vehicle to skid
sideways. Drive carefully to the nearest qualified workshop and
have the fault rectified.
Note
The warning lamp
in the instrument cluster will start flashing as
well if there is a fault in the brake system.
Fault in the cooling system
Faults in the cooling system must be rectified immedi-
ately.If the
symbol flashes in the display, this means that
either the coolant temperature is too high or the coolant
level is too low. The symbol is accompanied by a driver
message giving you more information about the fault. This
message will disappear after about 5 seconds, but you can
call it up again at any time by pressing the button:
Switch off engine, check coolant level
–Stop the vehicle.
– Switch off the engine.
– Check the coolant level ⇒page 261.
– Add more coolant if necessary ⇒page 261.
– Wait for the symbol to go out before driving on.
– Obtain professional assistance if necessary.
If the coolant level is correct, the overheating may be caused by a
malfunction of the radiator fan.If the alternator warning lamp lights up as well ⇒page 32, it is
possible that the drive belt has broken.
WARNING
•
If your vehicle should break down for technical reasons, stop it
at a safe distance away from moving traffic, switch off the engine
and turn on the hazard warning lights ⇒page 61, “Hazard
warning lights ”.
•
Never open the bonnet if you can see or hear steam or coolant
escaping from the engine compartment; there is a risk of being
scalded. Wait until you can no longer see or hear escaping steam
or coolant.
•
The engine compartment of any motor vehicle is a dangerous
place. Before carrying out any work in the engine compartment,
switch off the engine and allow it to cool down. Please observe the
important safety warnings ⇒page 255, “Working on components
in the engine compartment”.Caution
Do not drive on if the symbol
has come on to indicate a fault in
the cooling system, otherwise there is a risk of damaging the
engine.
Engine oil pressure too low
If the engine oil pressure is too low the fault must be recti-
fied immediately.If the
symbol flashes in the display, the oil pressure is
too low. The symbol is accompanied by a driver message
giving you more information about the fault. This message
WARNING (continued)
SET
document_0900452a81b1b9de.book Seite 33 Donnerstag, 26. Juli 2007 9:16 09
Page 37 of 342
Driver information system35
Controls
Safety
Driving tips
General maintenance
Self-help
Technical data
5 seconds, but you can call it up again at any time by
pressing the button:
Ignition lock defective. Contact workshop!
–Do not switch off the engine.
– Drive the vehicle without delay to a qualified workshop
and have the fault repaired.The ignition cannot be switched off if there is a fault in the elec-
tronic ignition lock. For this reason, you should drive the vehicle
without delay to a qualified workshop and have the cause of the
fault repaired.
If the vehicle is equipped with the advanced key* feature, you
should not switch off the engine with the Stop/Start button because
it cannot be started again after the ignition has been switched off.
Note
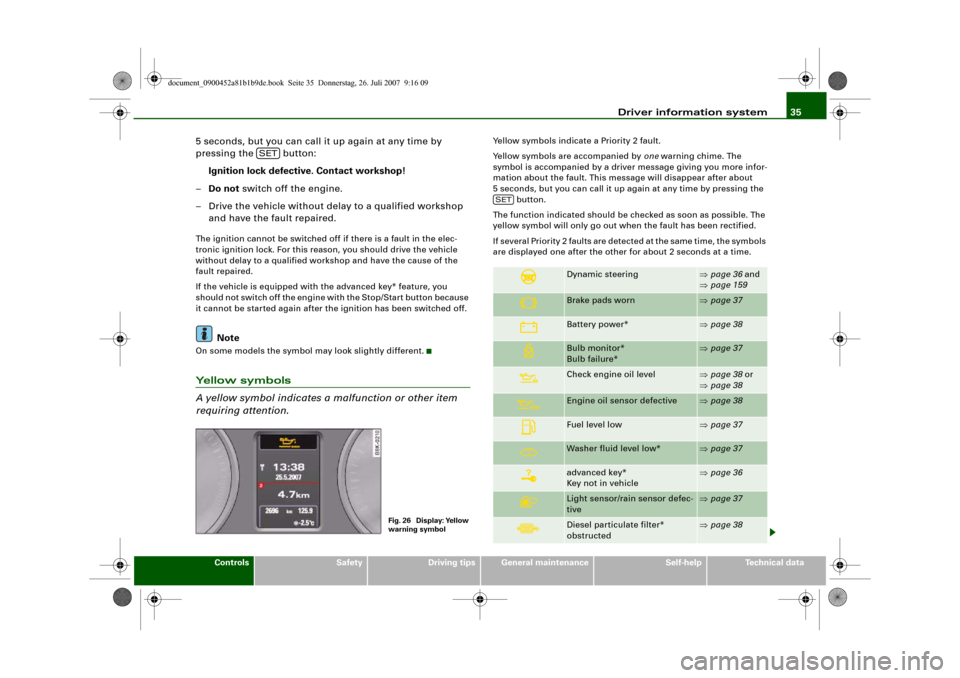
On some models the symbol may look slightly different.Yellow symbols
A yellow symbol indicates a malfunction or other item
requiring attention.
Yellow symbols indicate a Priority 2 fault.
Yellow symbols are accompanied by one warning chime. The
symbol is accompanied by a driver message giving you more infor-
mation about the fault. This message will disappear after about
5 seconds, but you can call it up again at any time by pressing the
button.
The function indicated should be checked as soon as possible. The
yellow symbol will only go out when the fault has been rectified.
If several Priority 2 faults are detected at the same time, the symbols
are displayed one after the other for about 2 seconds at a time.
SET
Fig. 26 Display: Yellow
warning symbol
Dynamic steering
⇒page 36 and
⇒page 159
Brake pads worn
⇒page 37
Battery power*
⇒page 38
Bulb monitor*
Bulb failure*
⇒page 37
Check engine oil level
⇒page 38 or
⇒page 38
Engine oil sensor defective
⇒page 38
Fuel level low
⇒page 37
Washer fluid level low*
⇒page 37
advanced key*
Key not in vehicle
⇒page 36
Light sensor/rain sensor defec-
tive
⇒page 37
Diesel particulate filter*
obstructed
⇒page 38
SET
document_0900452a81b1b9de.book Seite 35 Donnerstag, 26. Juli 2007 9:16 09
Page 39 of 342
Driver information system37
Controls
Safety
Driving tips
General maintenance
Self-help
Technical data
Light sensor / rain sensor defective
Automatic headlights / automatic wipers defective
If the symbol appears, this means that the light sensor / rain
sensor is not functioning.For safety reasons, the dipped beam head-
lights will then be switched on permanently when the light switch
is set to the AUTO position. However, you can still switch the lights
on and off in the normal way with the light switch. If the rain sensor
is defective, the functions operated via the windscreen wiper lever
will still be available. You should have the light sensor / rain sensor
checked by a qualified workshop as soon as possible.
Brake pads worn
Brake pads!
If the symbol lights up, have the front brake pads (and, for
safety's sake the rear pads as well) inspected by a qualified
workshop.
Applies to vehicles: with bulb monitorBulb monitor
The bulb monitor checks whether the lights on the vehicle
are working.The bulb monitor checks whether the lights on the vehicle are
working. If it detects a defective bulb on the vehicle it will show a
yellow warning symbol together with a message indicating which
light is not working.
Bulb failure
If the symbol
lights up, this means that one of the turn signals
(front or rear), headlights, brake lights, rear lights, fog lights or the
rear fog light is not working.
WARNING
•
Bulbs are sensitive to pressure. The glass can break when you
touch the bulb, causing injury.
•
Incorrect handling of the high-voltage element of xenon gas-
discharge bulbs* can have potentially fatal consequences.Note
Have the components repaired or replaced by a qualified
workshop.Applies to vehicles: with washer fluid warning systemWasher fluid level low
Please top up washer fluid
If the symbol lights up, top up the fluid for the windscreen
washer and headlight washer system* ⇒page 267.
Fuel level low
Please refuel
When this symbol
comes on for the first time, there are about
8 litres of fuel left in the tank. You should fill up as soon as possible
⇒page 252.
If this warning symbol lights up although the fuel tank is sufficiently
filled, there is a malfunction in the fuel tank system. The display will
also show the driver message Tank system malfunction ! Contact
workshop. Please contact a qualified workshop.
document_0900452a81b1b9de.book Seite 37 Donnerstag, 26. Juli 2007 9:16 09
Page 41 of 342
Driver information system39
Controls
Safety
Driving tips
General maintenance
Self-help
Technical data
Applies to vehicles: with dynamic headlight range controlHeadlight range control defective
Headlight range control defective
This symbol
indicates a malfunction in the dynamic headlight
range control. Take the vehicle to a qualified workshop to have the
dynamic headlight range control function repaired.
Applies to vehicles: with adaptive lightadaptive light defective
adaptive light defective
This symbol
indicates that the adaptive light is defective. Take
the vehicle to a qualified workshop to have the headlights and/or
the control unit for the adaptive light repaired.
Ignition lock defective
Ignition lock defective
If the symbol
lights up in the display, there is a malfunction in
the electronic ignition lock. Take the vehicle to a qualified workshop
to have the problem remedied.
Applies to vehicles: with Audi drive selectSuspension control
This warning lamp monitors the damping effect of the
shock absorbers.
Suspension: system fault
If the symbol lights up in the display, there is a malfunction in the
vehicle suspension. Take the vehicle to a qualified workshop to have
the problem remedied.
Windscreen wipers defective
Windscreen wipers defective
This symbol
indicates a malfunction in the electronics for the
windscreen wipers. Take the vehicle to a qualified workshop to have
the windscreen wiper system repaired.
Tyre pressure monitoring systemApplies to vehicles: with tyre pressure monitoringTyre pressure monitoring display appears
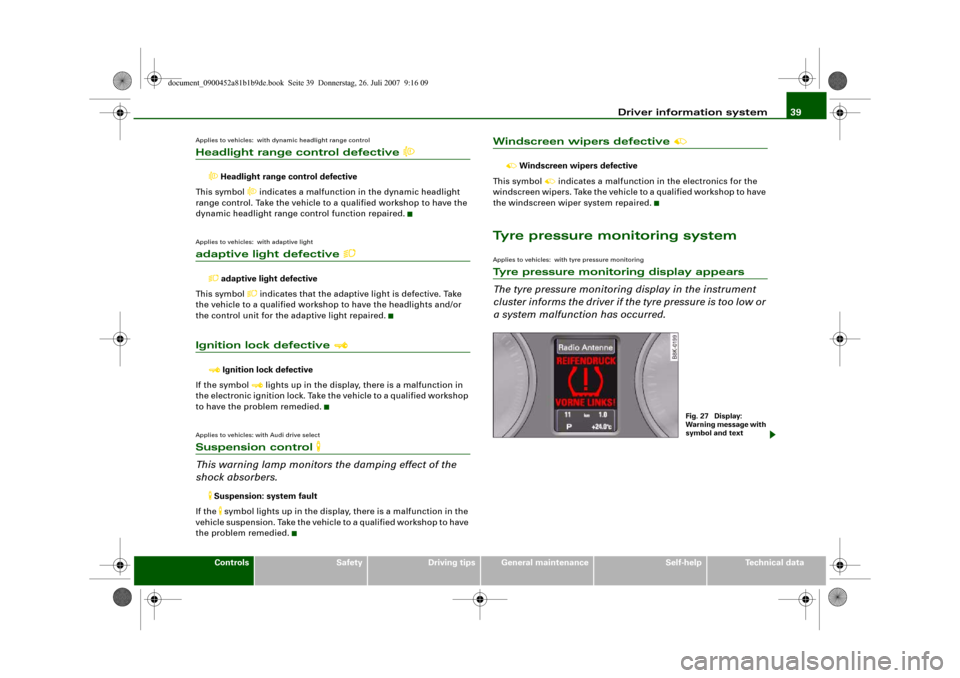
The tyre pressure monitoring display in the instrument
cluster informs the driver if the tyre pressure is too low or
a system malfunction has occurred.
Fig. 27 Display:
Warning message with
symbol and text
document_0900452a81b1b9de.book Seite 39 Donnerstag, 26. Juli 2007 9:16 09
Page 43 of 342
Driver information system41
Controls
Safety
Driving tips
General maintenance
Self-help
Technical data
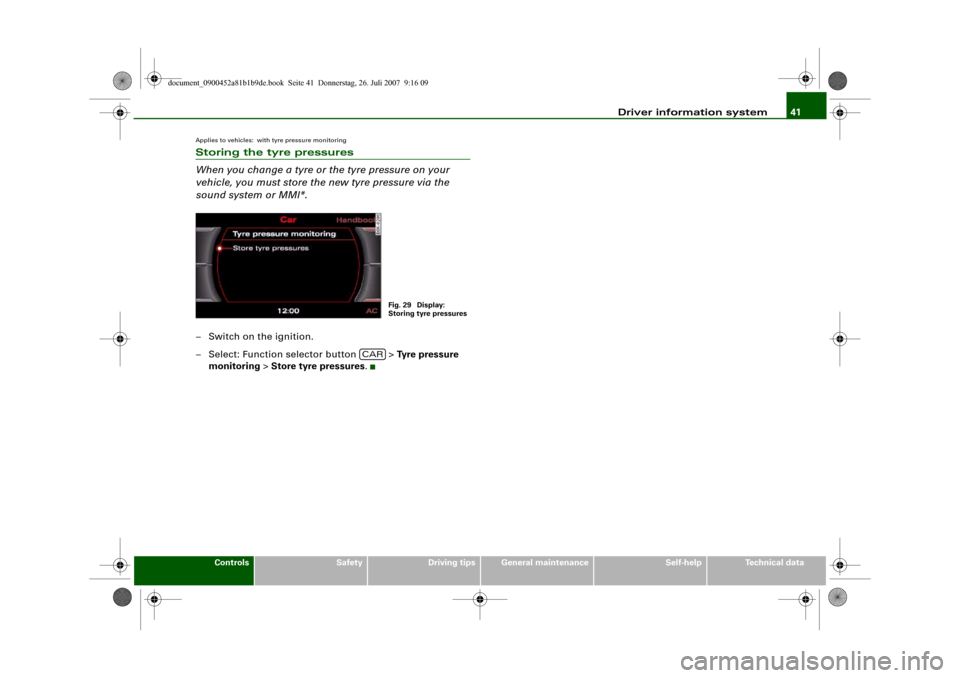
Applies to vehicles: with tyre pressure monitoringStoring the tyre pressures
When you change a tyre or the tyre pressure on your
vehicle, you must store the new tyre pressure via the
sound system or MMI*.– Switch on the ignition.
– Select: Function selector button > Tyre pressure
monitoring > Store tyre pressures.
Fig. 29 Display:
Storing tyre pressures
CAR
document_0900452a81b1b9de.book Seite 41 Donnerstag, 26. Juli 2007 9:16 09
Page 45 of 342
Doors and windows43
Controls
Safety
Driving tips
General maintenance
Self-help
Technical data To prevent yourself from being locked out, do not lock the vehicle
with the remote control key before closing the doors or boot lid. If
you accidentally press the locking button on your remote control
key when any of the doors (except for the driver's door) are open,
then put the key down inside the car and forget to take it with you
when you close the doors, you can still open the doors for about one
minute before the vehicle is locked.
WARNING
Do not leave anyone (especially children) in the car if it is locked
from the outside and the deadlock mechanism is activated: the
doors and windows cannot then be opened from the inside.
Locked doors could delay assistance in an emergency, potentially
putting lives at risk.
Note
•
Never leave any valuable items in the vehicle unattended. Even a
locked vehicle is not a safe.
•
If the diode on the driver's window sill lights up for about
30 seconds when the vehicle is locked, the central locking system or
anti-theft alarm* is not working properly. Please have the malfunc-
tion repaired by an Audi dealer or qualified workshop.
•
The interior monitor of the anti-theft alarm* system will only
function as intended if the windows and the tilting panorama roof*
are closed.
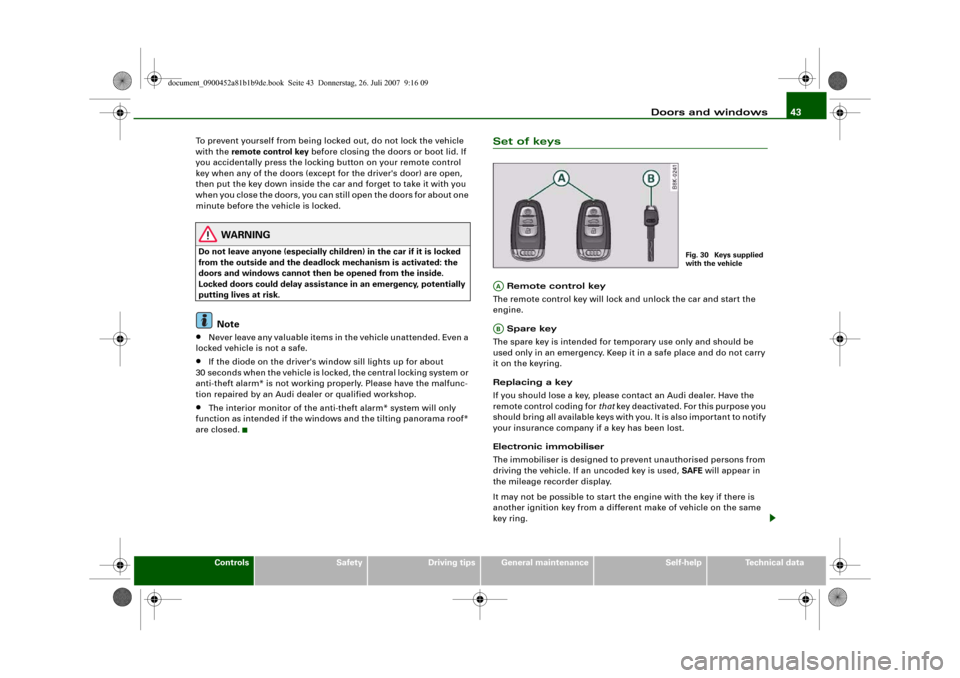
Set of keys Remote control key
The remote control key will lock and unlock the car and start the
engine.
Spare key
The spare key is intended for temporary use only and should be
used only in an emergency. Keep it in a safe place and do not carry
it on the keyring.
Replacing a key
If you should lose a key, please contact an Audi dealer. Have the
remote control coding for that key deactivated. For this purpose you
should bring all available keys with you. It is also important to notify
your insurance company if a key has been lost.
Electronic immobiliser
The immobiliser is designed to prevent unauthorised persons from
driving the vehicle. If an uncoded key is used, SAFE will appear in
the mileage recorder display.
It may not be possible to start the engine with the key if there is
another ignition key from a different make of vehicle on the same
key ring.
Fig. 30 Keys supplied
with the vehicle
AAAB
document_0900452a81b1b9de.book Seite 43 Donnerstag, 26. Juli 2007 9:16 09
Page 47 of 342
Doors and windows45
Controls
Safety
Driving tips
General maintenance
Self-help
Technical data
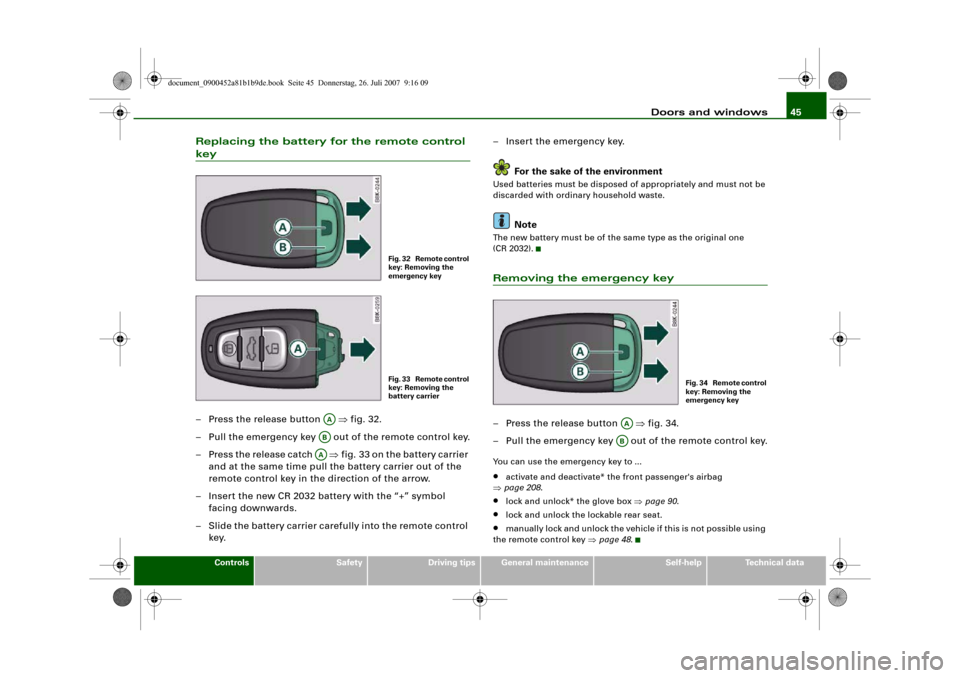
Replacing the battery for the remote control key– Press the release button ⇒fig. 32.
– Pull the emergency key out of the remote control key.
– Press the release catch ⇒fig. 33 on the battery carrier
and at the same time pull the battery carrier out of the
remote control key in the direction of the arrow.
– Insert the new CR 2032 battery with the “+” symbol
facing downwards.
– Slide the battery carrier carefully into the remote control
key.– Insert the emergency key.
For the sake of the environment
Used batteries must be disposed of appropriately and must not be
discarded with ordinary household waste.
Note
The new battery must be of the same type as the original one
(CR 2032).Removing the emergency key– Press the release button ⇒fig. 34.
– Pull the emergency key out of the remote control key.You can use the emergency key to ...•
activate and deactivate* the front passenger's airbag
⇒page 208.
•
lock and unlock* the glove box ⇒page 90.
•
lock and unlock the lockable rear seat.
•
manually lock and unlock the vehicle if this is not possible using
the remote control key ⇒page 48.
Fig. 32 Remote control
key: Removing the
emergency keyFig. 33 Remote control
key: Removing the
battery carrier
AAABAA
F i g . 3 4 R e m o t e c o n t r o l
key: Removing the
emergency key
AAAB
document_0900452a81b1b9de.book Seite 45 Donnerstag, 26. Juli 2007 9:16 09
Page 49 of 342
Doors and windows47
Controls
Safety
Driving tips
General maintenance
Self-help
Technical data
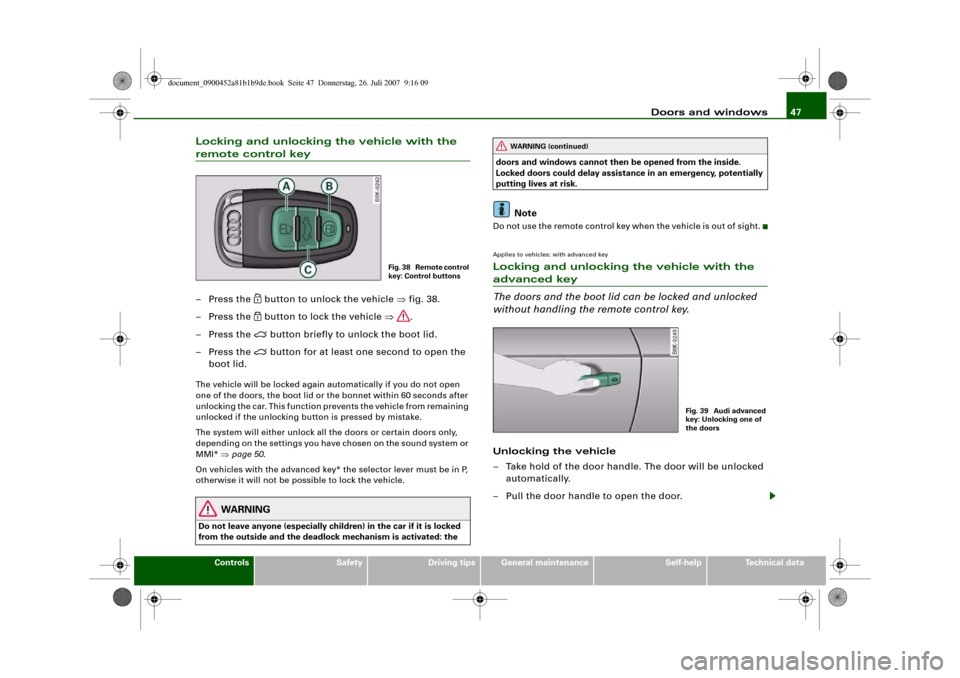
Locking and unlocking the vehicle with the remote control key– Press the
button to unlock the vehicle ⇒fig. 38.
– Press the button to lock the vehicle ⇒.
– Press the
button briefly to unlock the boot lid.
– Press the
button for at least one second to open the
boot lid.
The vehicle will be locked again automatically if you do not open
one of the doors, the boot lid or the bonnet within 60 seconds after
unlocking the car. This function prevents the vehicle from remaining
unlocked if the unlocking button is pressed by mistake.
The system will either unlock all the doors or certain doors only,
depending on the settings you have chosen on the sound system or
MMI* ⇒page 50.
On vehicles with the advanced key* the selector lever must be in P,
otherwise it will not be possible to lock the vehicle.
WARNING
Do not leave anyone (especially children) in the car if it is locked
from the outside and the deadlock mechanism is activated: the doors and windows cannot then be opened from the inside.
Locked doors could delay assistance in an emergency, potentially
putting lives at risk.
Note
Do not use the remote control key when the vehicle is out of sight.Applies to vehicles: with advanced keyLocking and unlocking the vehicle with the advanced key
The doors and the boot lid can be locked and unlocked
without handling the remote control key.Unlocking the vehicle
– Take hold of the door handle. The door will be unlocked
automatically.
– Pull the door handle to open the door.
Fig. 38 Remote control
key: Control buttons
WARNING (continued)
Fig. 39 Audi advanced
key: Unlocking one of
the doors
document_0900452a81b1b9de.book Seite 47 Donnerstag, 26. Juli 2007 9:16 09