Page 17 of 152
, it
takes several seconds for the navigation
system to boot up.
The first screen to appear is the
naviga")
Navigation System17
Getting Started
System Start-up
When you turn the ignition to ON (II), it
takes several seconds for the navigation
system to boot up.
The first screen to appear is the
navigation system globe screen. The
screen then changes to the Disclaimer
screen:
NOTE:
The OK button does not appear
immediately. It appears after the
software is loaded. Read this disclaimer carefully so you
understand it before continuing. Push in
on the joystick, or touch
OK, and the
map screen will appear on the display.
The “OK” cannot be activated by voice.
If you do not press the joystick or touch
OK , the screen will go dark after 30
seconds. To return to the Disclaimer
screen, press any navigation or voice
control button.
NOTE:
If you do not select OK, and then enter
the Setup or Information screens, some
items are not available, and will show
up as darkened buttons (grayed out).
See System Function Diagram on
page24.
If you have entered any Calendar
reminders, they are displayed after you
select OK. The
Calendar reminder screen
remains displayed until you select OK,
Remind Later or press the CANCEL
button.
If you select OK, the reminder will not
show up again. If you wish to have the
reminder show up agai n later in the day,
touch the Remind Later button.
If you press the CANCEL button, the
message will be displayed the next time
you start the vehicle.
NOTE:
The system will display the current
message and any older or previously
unread messages, with the newest
message listed first.
2008 TL
Page 18 of 152

18Navigation System
Getting Started
Map Screen Legend
Acura Dealer
School
Restaurant
AT M
Parking Lot
Post OfficeHonda Dealer
Hospital
Grocery Store
Gas Station
Hotel/Lodging
Parking Garage
Freeway Exit Information
Map Orientation
(see page57)
GPS Signal Strength: Best Reception
: Good Reception
Missing: Poor/No Reception
Current Map Scale
(see page56)
ICON Button (see page61)
Vehicle Position (see page64)
(Use voice command “Display the current location.” or
touch the icon to show current location.) Landmark Icon
(see page58)
Streets
(see Map Overview on page6)
Red: Interstates or Freeways
Black: Verified Streets
Light Brown: Unverified Streets
Map Features
Dark Green: Park
Light Blue: Hospital
Brown: Shopping Mall
Light Brown: Indian Reservation
Green: Golf Course
Gray: Airport/Stadium/Business
Blue: Body of Water
Blue/Green: Cemetery
Matte Blue: University
NOTE:
If you move the joystick over an area
(map features shown above), the name
is displayed on the screen.
Current Street (see page6)
NOTE:
See Map Legend on the Information screen for further explanation.
“Breadcrumbs”
(see Off-road Tracking on page63)
“North Up”
“Heading Up”
Incident Icon
Weather
Accident / Incident (other)
Construction
2008 TL
Page 19 of 152

Navigation System19
Getting Started
Map Screen Description
Zoom In/Out
Use the ZOOM buttons to change the
scale of the map. Zooming in increases
the detail, while zooming out gives you
a wide area view. After changing the
scale, give the system a few moments to
update the display.
Map Scrolling
To view other areas on the map, move
the joystick left, right, up, or down. The
map will shift in that direction. To
return the map to your current location,
press either the MAP/GUIDE, the
CANCEL , or the NAVI BACK button.
The display automatically changes to
the map screen when you reach your
destination. Press the MENU button to
return to the Enter destination by
screen.
Displaying Current Location
You can say “Display current location.”
or touch the vehicle position icon at any
time to see the current address, latitude,
longitude and elevation. The screen will
change to:
NOTE:
The elevation will not appear when the
system is temporarily lacking proper
GPS information. The system elevation
may not agree with elevations shown on
roadside elevation signs, and may
fluctuate plus or minus 100 feet or more. You can say “Save current location.” or
select
Save on the screen to save the
current location in your Address Book.
Select Traffic Incidents to display a
list of the traffic incidents within a 30-
mile radius of your current position.
You can view this same list by saying
“Display traffic incidents.” See page22
for a discussion of this feature.
Select Return to return to the previous
screen.
2008 TL
Page 20 of 152

20Navigation System
Getting Started
Traffic Display Legend
NOTE:
When driving to a destination on freeways that have traffic flow data, the route line is
used to display moderate and heavy traffic flow status instead of the colored bands
on the side of the road. The route line color indicates the following conditions:
Free Flow Traffic - a section of the blue route line will be bordered with a light
green line (this may be difficult to see)
Moderate Traffic Flow - a section of the route line will change from blue to
orange
Heavy Traffic Flow - a section of the route line will change from blue to red
Unknown Traffic Flow - a section of the route line is blue
Map Scale (5 - 1/2 mile):
Traffic flow and incident icons are
only displayed for the following
scales: 1/2, 1, 2, 5 mile (or 800m,
1600m, 3km, 8km).
Incident Icons
Incident Icon Update Details:
Typically M–F, 5:00 AM – 7:00
PM (varies by metropolitan area)
Continuously updated signal is received.
Accident / Incident (other)
Construction
Weather
Traffic Flow Data
(using bands parallel to the road) Heavy traffic: 0 – 27 mph
(approx.)
Moderate traffic: 27 – 52 mph
(approx.)
Free flow traffic: 52 + mph
(approx.)
(shown for both sides of the freeway where
available)
Viewing Incident Details:
To view the incident details, use
the joystick to position the cursor
(round red circle below) over an
incident icon and push in.
Hearing Incident Details:
To have the message read to you, push in on
the joystick a second time.
To return to current position, say, or select
Return.
Message Button
Indicates that you have a message. View
messages by touching the message button.
See page71.
Traffic Flow Data Update Details:
Available 24 hrs a day, 7 days a week
Continuously updated
2008 TL
Page 21 of 152
,
accidents, and c")
Navigation System21
Getting Started
Real Time Traffic Display
The navigation screen can display up-
to-the-minute traffic information when
available including flow (traffic speed),
accidents, and construction on freeways
in more than 40 major metro areas. See
page122 for a list of the current US
cities that offer traffic information.
The display of traffic flow and incidents
on your map screen is optional and can
be turned On/Off by selecting the
“Traffic” icon on the Icon bar (see
Showing Icons on the Map on page61).The current metropolita
n areas that have
traffic coverage can be seen on page
122. For more current metro coverage
information, go to www.acura.com/
realtimetraffic . This link offers
additional information on real-time
information, includ ing the following:
The latest list of metro areas that have Nav-Traffic
Detailed coverage information for each metro area showing what roads
have traffic speeds, traffic icons, or
both
An XM-Nav-Traffic demonstration
Frequently asked questions (FAQs)
Viewing Flow Data
Traffic flow data is displayed as colored
bands on either side of the freeway (see
Traffic Display Legend on page20).
The different color bands represent the
average road speeds as determined by
“under-road sensors.”
While driving to your destination on a
road, that has traffic flow data, your
route line color is used to display the
traffic flow data. This means that when
the map scale is set to one of the traffic
scales (1/2 through 5 mile scale), your
blue route line may appear as alternating
orange, red or blue segments (see
Traffic Display Legend on page20).
NOTE:
A blue route line segment on a freeway
can mean one of two things:
The under road sensors indicate free flow traffic.
The road has no sensors, and traffic conditions are unknown (they could
be congested).
2008 TL
Page 22 of 152

22Navigation System
Getting Started
Naturally, only roads with these sensors
will show traffic information. The
amount of flow data varies considerably
from one city to another. This map
display is refreshed continuously. You
can only view traffic information in the
city where you are located.
NOTE:
Traffic flow, and incident icons are only displayed the 1/2, 1, 2, and 5
mile scales (800m, 1600m, 3km, 8km
scales).
Not all freeways within a metropolitan area have traffic flow
data (colored bands on the side of the
freeways) - this is normal, and you
cannot assume that a lack of data
implies no traffic.
Not all cities have traffic flow information. See c ities listed on
page122.
Due to freeway maintenance and construction, traffic flow may be
available only for one side of a road,
or to be missing entirely for some
portion of the freeway. The displayed traffic flow may
disagree with the information from
other audio or Internet based traffic
displays.
If traffic flow is not showing, verify that the “TRAFFIC” selection for the
Icon Bar is ON, and that the icon
options for traffic are both ON. (see
page61).
Viewing Incident Reports
Incident reports appear as small
diamond shaped icons (see Traffic
Display Legend on page20 for
examples). There are three ways to view
traffic incidents:
By voice control, say “Display traffic incidents.”
Select Traffic Incidents from the
Current location screen.
Select an incident icon from the map
screen.
NOTE:
The first method is recommended
because it works on any scale, and
requires the minimum input.
Listing Traffic Incidents by Voice
Control
From the map screen (any scale), say
“Display traffic incidents,” or “Display
traffic list.” A list of all incidents within
the metro traffic area will be displayed.
Incidents are listed by distance from
your current position outward in all
directions. To view an incident details,
select an incident from the list.
2008 TL
Page 23 of 152

Navigation System23
Getting Started
Listing Traffic Incidents
Select Traffic Incidents from the
Current Location screen. A list of all
incidents within the metro traffic area
will be displayed. See Displaying
Current Location on page19.
No Traffic within 30 Miles
If you say “Display traffic incidents” or
select Traffic Incidents but there are
no incidents within 30 miles of your
current location, the following screen
will be displayed.
Selecting an Incident Icon from the
Map Screen
Zoom in or out so that you are between
the 1/2 and 5 mile scales. (The map
must be on the 1/2 to 5 mile scales to
view the incident icons.) To view the
details of a specific incident, use the
joystick to position the cursor (round
red circle) over the incident icon you are
interested in. Then push in on the
joystick to view a pop-up box summary
describing the incident. To see and hear
the incident details, select Traffic
Detail . To return to your current
position map screen, say or select
Return . To continue viewing incidents
in your “scrolled to” location, press the
CANCEL button. NOTE:
Incident reports may be displayed on
roads that have no traffic flow data
available.
Freeway incident reports can lag behind the actual incident, or remain
displayed after an incident has
cleared. This is normal, and is
dependant on the reporting agency,
and the speed at which the data is
updated.
The displayed incidents may disagree with the information from other audio
or internet based traffic information
displays.
2008 TL
Page 24 of 152

24Navigation System
Getting Started
System Function Diagram
This diagram shows the navigation
system features, starting at the center
and working outward in layers. The
navigation program starts at “Key ON,”
and then displays the globe screen
(blue). If OK is selected on the
Disclaimer screen, the functions in the
yellow segments of the diagram become
available in the Setup and Information
screens. The white segments of the
diagram are available anytime, even if
you do not select OK.
The items above the map screen show
various methods to begin driving to
your destination (orange). You are
provided with map/voice guidance,
routing cautions, and a direction list.
While driving to your destination, use
the voice control system as much as
possible to interact with the navigation,
audio, and climat e control systems
(green).
REMINDERS(pg.17)CALENDAR
-THEMAPSCREEN(pg.18)-
(MAP/VOICEGUIDANCE,ROUTINGCAUTIONS,DIRECTIONSLIST)
-DRIVINGTOYOURDESTINATION-
VOI CE:
"HELP"
(ALL)
(pg. 137)
VOICE:
"INFORMA TION
SCREE N"
(pg. 72)
VOICE:
"MENU" (to
change route) (pg. 66)
VOICE:
"HOW F AR OR LONG
TO THE
DESTIN AT ION?"
(pg.
137)
VOICE:
"DISPLAY (OR S AV E )
CURR
ENT LOCA TION"
(pg.
64)VOICE:
"WHAT TIME
IS IT?"
(pg. 137)
VOI CE:
AUD IO
(pg. 141 - 144)
VOI CE:
CLIMA TE
F
AN, TEMP
(pg. 140, 141)
ENTER
WAY POINTS
(pg. 66)
VIEW
TRAFFIC (pg. 20)
VOI CE:
"ZOOM IN/Z OOM OUT"
(pg. 56, 138)
VOI CE:
"HIDE/DISPLA Y ICONS"
(pg. 59,138)
VIEW TRAFFIC (pg. 20)
ADD BOOK (pg. 81)PINs (pg. 85)UNITS MI/KM (pg. 98)VOICE MALE/F (pg . 98)UNVERIFIED (pg. 88)AVOID ARE
AS (pg. 92)TIME ZONE (pg. 99)DAYLIGHT SAV. ( pg. 98)OFF-ROAD TRACKING
(pg. 63, 95)CORRECT VEHICLE POSITIO N (pg. 96)MAP COLOR (pg. 100)MENU COLO R (pg. 100)
GUIDE. PROMPTS (pg. 80)VERSION (pg . 97)
MESS
AGES (pg. 101)
BRIGHTNESS (pg. 78)VO
LUM E (pg.78)DISPLAY (pg. 79)CONTRAST (pg. 80)
CALL (pg. 77)
COST (pg. 75)
NUMERIC RA TING
(pg. 76)
ENTER (pg. 74)LIST (pg. 74)MATH (pg. 76)CONVER T (pg. 77)LIST (pg. 73)
NAVI, AUDIO,
CLIMA TE (pg. 72)
SELECT CA TEGOR Y
(PG. 72)
IMPORT/SEAR CH/DELETE (pg. 73)
PRESS
OK
NOT
PRESSEDOK
NOT
SELECTEDOK
ROAD SIDE
ASSISTAN CE
KEY TO ZAGAT
RATINGS
CALEND ARCALCULA TORMAP LEGEND
PHONE BOOKMESSAGE
VOI CE HELP
SELECT BAND/
FREQUENCYVOL BALANCECD
FUNCTIONSOTHER AUD IOBRIGHTNESS
ZOOM IN/OUT
SETUP
BUT TO N
(pg. 78)
A/C
B
UTTON
(pg. 10)
AUDIO
BUT TO N
(pg. 10)
INFO
BUT TO N
(pg. 72)
REAR CA MERA (REVERSE)
THEDISCLAIMERSCREEN(pg.17)
VOICE: "FIND
NEAREST..." A
TM, ETC .
(pg.
139)
SELECT A
DESTINA TION
WITH
JO YSTIC K
(pg. 69)
VOI CE:
"GO HOME" (pg. 46)
VOICE:
"MENU" FOR ENTER
DESTINATION
SCREEN (pg. 25)
CONTINUE TO THE
DESTINATION
(RESUME)
AFTER REST
ART
(pg. 70)
GLOBESCREENKEYON
Formoreinformation,see
PERSO NALBASICROUTING
GUIDANCE
CLOCK
ADJUSTMENT
VEHICLECOLOR
SET TEMPAC ON/OFFVENTFA N
ACU RALINKSYSTEM INFO .
SET UP
SCREEN (FIRST)
thevehicleOwner'smanual.
VOICECOMMANDS
AUD IO (pg. 141 - 14 4)
CLIMATE CONTR OL
(pg. 140, 141)
INFO SCREEN (pg. 1 44)
2008 TL
 1
1 2
2 3
3 4
4 5
5 6
6 7
7 8
8 9
9 10
10 11
11 12
12 13
13 14
14 15
15 16
16 17
17 18
18 19
19 20
20 21
21 22
22 23
23 24
24 25
25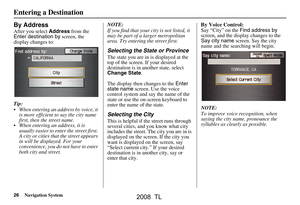 26
26 27
27 28
28 29
29 30
30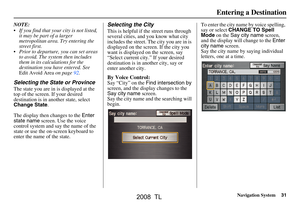 31
31 32
32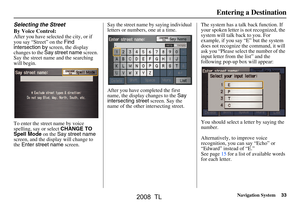 33
33 34
34 35
35 36
36 37
37 38
38 39
39 40
40 41
41 42
42 43
43 44
44 45
45 46
46 47
47 48
48 49
49 50
50 51
51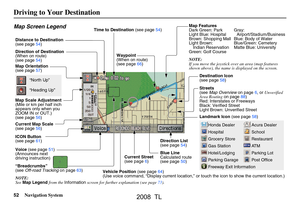 52
52 53
53 54
54 55
55 56
56 57
57 58
58 59
59 60
60 61
61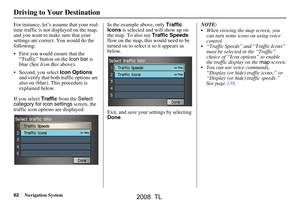 62
62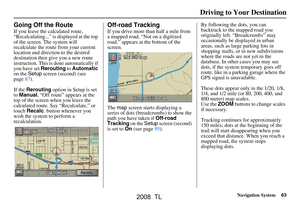 63
63 64
64 65
65 66
66 67
67 68
68 69
69 70
70 71
71 72
72 73
73 74
74 75
75 76
76 77
77 78
78 79
79 80
80 81
81 82
82 83
83 84
84 85
85 86
86 87
87 88
88 89
89 90
90 91
91 92
92 93
93 94
94 95
95 96
96 97
97 98
98 99
99 100
100 101
101 102
102 103
103 104
104 105
105 106
106 107
107 108
108 109
109 110
110 111
111 112
112 113
113 114
114 115
115 116
116 117
117 118
118 119
119 120
120 121
121 122
122 123
123 124
124 125
125 126
126 127
127 128
128 129
129 130
130 131
131 132
132 133
133 134
134 135
135 136
136 137
137 138
138 139
139 140
140 141
141 142
142 143
143 144
144 145
145 146
146 147
147 148
148 149
149 150
150 151
151