Page 41 of 90
Features and functions
34
and the operating conditions. (See page 71
for adjustment procedures.)
Up position (a):
There is less water resistance in this position,
so straight-ahead acceleration when on plane
and top speed are enhanced.
Down position (b):
This position gives the watercraft more
“hook”, which enhances turning performance.
1Yamaha Adjustable Sponson (YAS)
UF1G74E0.book Page 34 Monday, July 31, 2006 10:10 AM
Page 42 of 90

Operation
35
EJU31800
Fuel and oil
This engine uses Yamaha’s oil injection sys-
tem, which provides superior lubrication by
ensuring the proper fuel-to-oil ratio for all op-
erating conditions. No fuel premixing is nec-
essary, except during the engine break-in
period. Simply pour gasoline into the fuel tank
and oil into the oil tank.
The engine utilizes an electronic fuel injection
system to deliver the optimal air-fuel ratio re-
quired by the engine. By ensuring the optimal
combustion conditions, this system is able to
increase startability and improve fuel econo-
my.
EJU31850Gasoline
WARNING
EWJ00440
GASOLINE AND ITS VAPORS ARE HIGH-
LY FLAMMABLE AND EXPLOSIVE!
�Do not smoke when refueling, and keep
away from sparks, flames, and other
sources of ignition.
�Stop the engine before refueling.
�Refuel in a well-ventilated area with the
watercraft in a horizontal position.
�Do not stand or sit on the watercraft
while refueling in case of fire.
�Take care not to spill gasoline. If gaso-
line spills, wipe it up immediately with
dry rags. Always properly dispose of
gasoline-soaked rags.
�Avoid overfilling the fuel tank. Stop fill-
ing when the fuel level just reaches the
bottom of the filler tube. Do not fill up the
filler tube because fuel expands as it
warms up and could overflow. If tempo-
rarily leaving the watercraft with a full
fuel tank, do not leave it in direct sun-
light. Leave it in a well-ventilated areawith the watercraft in a horizontal posi-
tion.
�Tighten the fuel tank filler cap securely
after refueling.
�If you should swallow some gasoline, in-
hale a lot of gasoline vapor, or get gaso-
line in your eyes, get immediate medical
attention.
�If any gasoline spills on your skin or
clothing, immediately wash the affected
area with soap and water and change
your clothes.
CAUTION:
ECJ00320
�Do not use leaded gasoline. Leaded gas-
oline can seriously damage the catalytic
converter.
�Use only fresh gasoline that has been
stored in clean containers.
EJU31860Gasohol
There are two types of gasohol: gasohol con-
taining ethanol and that containing methanol.
Gasohol containing ethanol can be used if
ethanol content does not exceed 10% and the
fuel meets the minimum octane ratings.
Gasohol containing methanol is not recom-
mended by Yamaha because it can cause
fuel system damage and engine performance
problems.Recommended gasoline:
Regular unleaded gasoline with a mini-
mum octane rating of
86 (Pump octane number) = (R +
M)/2
90 (Research octane number)
UF1G74E0.book Page 35 Monday, July 31, 2006 10:10 AM
Page 43 of 90

Operation
36
EJU318802-stroke engine oil
CAUTION:
ECJ00270
Use only YAMALUBE 2-W engine oil, oth-
erwise the catalytic converter and other
engine components could be seriously
damaged.
NOTE:
YAMALUBE 2-W engine oil is developed for
this watercraft and available from a Yamaha
dealer.
EJU31920Filling the fuel tank
CAUTION:
ECJ00290
Be careful when refueling. Avoid getting
water and other contaminants in the fuel
tank. Contaminated fuel can cause poor
running and engine damage.
(1) Open the hood, remove the front storage
compartment, and then check the fuel
level. (See “Front storage compartment”
on page 32 for more information.)
(2) Remove the fuel tank filler cap, and then
slowly add fuel to the fuel tank. Stop fillingwhen the fuel level just reaches the bot-
tom of the filler tube.
(3) Install the fuel tank filler cap and front
storage compartment, and then close the
hood.
NOTE:
Do not fill up the filler tube because fuel ex-
pands as it warms up and could overflow.
EJU31960Filling the oil tank
WARNING
EWJ00420
�Do not add gasoline to the oil tank. Fire
or explosion could result.
�Oil in the bilge is a serious fire hazard.
Wipe up any spilled oil immediately.
CAUTION:
ECJ00300
Do not allow the oil tank to become com-
pletely empty. If the oil tank becomes emp-
ty, the oil pump must be bled to ensure
proper oil flow, otherwise engine damage
could result. If necessary, have a Yamaha
dealer bleed the oil pump.
(1) Remove the seat to view the oil level.
(See page 21 for seat removal and instal-
lation procedures.) Recommended engine oil:
YAMALUBE 2-W
Fuel tank capacity:
60.0 L (15.9 US gal) (13.2 Imp.gal)
UF1G74E0.book Page 36 Monday, July 31, 2006 10:10 AM
Page 44 of 90
Operation
37
(2) Remove the oil tank filler cap, and then
very slowly add engine oil to the oil tank.
Stop filling when the oil level just reaches
the top of the oil tank.
Oil tank capacity:
5.5 L (1.45 US gal) (1.21 Imp.gal)
UF1G74E0.book Page 37 Monday, July 31, 2006 10:10 AM
Page 45 of 90

Operation
38
EJU31980
Pre-operation checks EJU31990Pre-operation check list
Before operating this watercraft, perform the checks in the following check list. See the accom-
panying text in this chapter for details on how to perform the checks.
WARNING
EWJ00410
If any item in the pre-operation check list is not working properly, have it inspected and
repaired before operating the watercraft, otherwise an accident could occur.
NOTE:
Pre-operation checks should be made each time the watercraft is used. These checks can be
completed in a short time. It is worth the time spent to ensure safety and reliability.
ITEM ROUTINE PAGE
BEFORE LAUNCH OR OPERATION
Engine compartmentRemove the seat and front storage compartment to
ventilate the engine compartment. Check for fuel va-
pors and loose electrical connections.39
BilgeCheck for water and fuel and drain if necessary. 39
Stern drain plugsCheck for proper installation. 40
Throttle leverCheck that the throttle lever springs back smoothly. 42
Steering systemCheck for proper operation. 42
QSTSCheck for proper operation. 42
Fuel and oilCheck the fuel and oil levels and replenish if neces-
sary.
Check the hoses and tanks for leakage.39
Water separatorCheck for water and drain if necessary. 39
BatteryCheck the electrolyte level and battery condition. 40
HoodCheck that the hood is securely closed. 21
SeatCheck that the seat is securely installed. 21
Hull and deckCheck the hull and deck for cracks and other dam-
age.39
Jet intakeCheck for debris and remove if necessary. 43
Fire extinguisherCheck the condition and replace if necessary. 41
Engine shut-off cordCheck the condition and replace if frayed or broken. 44
SwitchesCheck the start switch, engine stop switch, and en-
gine shut-off switch for proper operation.44
AFTER LAUNCH
Cooling water pilot outletCheck that water is discharged while the engine is
running and the watercraft is in the water.44
Multifunction information
centerCheck for warning indications and proper operation. 44
UF1G74E0.book Page 38 Monday, July 31, 2006 10:10 AM
Page 46 of 90

Operation
39
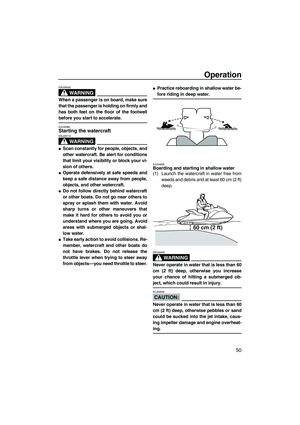
EJU32280Pre-operation check points EJU32300Engine compartment
Ventilate the engine compartment before
each use.
To ventilate the engine compartment, remove
the seat and front storage compartment. (See
“Seat” on page 21 and “Front storage com-
partment” on page 32 for more information.)
Leave the engine compartment open for a few
minutes to allow any fuel vapors to escape.
While the engine compartment is open, check
for loose electrical connections.
WARNING
EWJ00460
Failure to ventilate the engine compart-
ment could result in a fire or explosion. Do
not start the engine if there is a fuel leak or
a loose electrical connection.
EJU32350Hull and deck
Check the hull and deck for cracks and other
damage. If any damage is found, have a
Yamaha dealer repair the watercraft.
EJU32371Fuel and oil systems
Check the fuel system for leakage, cracks,
and malfunctions before each use. (See page
66 for check points and correct procedures.)
(1) Remove the fuel tank filler cap to release
any pressure that might have built up in
the fuel tank.(2) Remove the seat and front storage com-
partment. (See “Seat” on page 21 and
“Front storage compartment” on page 32
for more information.)
(3) Check the fuel and oil levels in the tanks
and replenish if necessary. (See page 36
for refueling procedures and page 36 for
oil tank filling procedures.)
(4) Install the fuel tank filler cap, seat, and
front storage compartment.
EJU32420Water separator
Check the water separator for water. The wa-
ter separator retains any water that may have
entered through the fuel tank breather hose if
the watercraft was capsized. Normally, the
water separator is empty.
If water remains in the water separator, drain
it by removing the drain screw. Place a drain
pan under the water separator to catch the
draining water or use a dry cloth to soak up
any water that could spill into the watercraft. If
any water spills into the watercraft, be sure to
wipe it up with a dry cloth. Also, be sure to in-
stall the drain screw after draining the water
separator.
EJU32440Bilge
Check the bilge for moisture and fuel residue.
This watercraft is equipped with a convention-
al jet vacuum bilge draining system and an
1Water separator
2Drain screw
UF1G74E0.book Page 39 Monday, July 31, 2006 10:10 AM
Page 47 of 90

Operation
40
electric bilge draining system. The electric
bilge draining system is operated when the
engine is running. When excess water reach-
es the water inlet of the electric bilge pump,
the water is discharged via the exhaust pas-
sage from the jet thrust nozzle.
A small quantity of water will remain in the
bilge and should be drained manually. To
drain any residual water, beach the watercraft
and perform the following procedure.
To drain water from the bilge:
(1) Remove the stern drain plugs.
(2) Raise the bow of the watercraft until the
water drains.
(3) After the water has drained, wipe the
bilge with dry rags to make sure that it is
thoroughly dry.
(4) Install the stern drain plugs.
CAUTION:
ECJ00360
�Before installing the stern drain plugs,
clean the drain plug threads to remove
any foreign materials, such as dirt or
sand. Otherwise, the stern drain plugs
could be damaged, allowing water to en-
ter the engine compartment.
�Make sure that the stern drain plugs are
tightened securely before launching the
watercraft. Otherwise, water may flood
the engine compartment and cause the
watercraft to submerge.
EJU32470Stern drain plugs
Check the stern drain plugs for proper instal-
lation.
CAUTION:
ECJ00360
�Before installing the stern drain plugs,
clean the drain plug threads to remove
any foreign materials, such as dirt or
sand. Otherwise, the stern drain plugs
could be damaged, allowing water to en-
ter the engine compartment.
�Make sure that the stern drain plugs are
tightened securely before launching the
watercraft. Otherwise, water may flood
the engine compartment and cause the
watercraft to submerge.
EJU32480Battery
Check the battery condition and the electro-
lyte level.
UF1G74E0.book Page 40 Monday, July 31, 2006 10:10 AM
Page 48 of 90

Operation
41
Check that the battery leads are tightened se-
curely and that there is no corrosion on the
battery terminals.
WARNING
EWJ00450
�The battery must always be fully
charged and in good condition. Loss of
battery power may leave you stranded.
Never operate the watercraft if the bat-
tery does not have sufficient power to
start the engine or if it shows any other
signs of decreased power.
�Be sure to connect the breather hose to
the battery. Fire or explosion could re-
sult if the breather hose is damaged, ob-
structed, or not connected properly.
Make sure that the battery is securely held in
place.
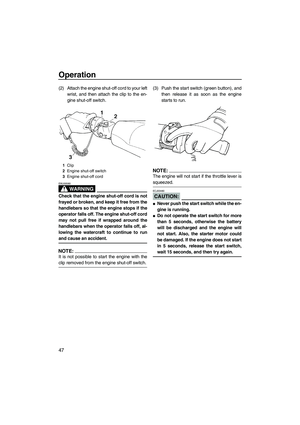
EJU32520Fire extinguisher
Check that there is a full fire extinguisher on
board.
The fire extinguisher container is located in
the battery compartment under the seat.
To open the fire extinguisher container, turn
the cap counterclockwise.
To close the fire extinguisher container, insert
the fire extinguisher into the container, and
then install the cap and tighten it securely.
NOTE:
�To check the fire extinguisher, see the in-
structions supplied by the fire extinguisher
manufacturer. Always keep the fire extin-
guisher in the fire extinguisher container.
�Always carry a fire extinguisher on board. A
fire extinguisher is not standard equipment
with this watercraft. If you do not have one,
1Positive (+) battery terminal: Red lead
2Negative (–) battery terminal: Black lead
3Breather hose
1Fire extinguisher container
2Fire extinguisher container cap
UF1G74E0.book Page 41 Monday, July 31, 2006 10:10 AM


Up position (a):
There is less water resistance in this position,
so straight-ahead acceleration when o")
 Remove the oil tank filler cap, and then
very slowly add engine oil to the oil tank.
Stop filling when the oil level just reaches
the top of the oil tank.
Oil tank capacity:
5.5 L (1.")