2007 YAMAHA GIGGLE50 brake
[x] Cancel search: brakePage 6 of 72

1
2
3
4
5
6
7
8
9
EAU10210
TABLE OF CONTENTSSAFETY INFORMATION ................... 1-1
Fur ther safe-riding points ............... 1-4
DESCRIPTION ................................... 2-1
Left view ......................................... 2-1
Right view ....................................... 2-2
Controls and instruments ............... 2-3
INSTRUMENT AND CONTROL FUNC-
TIONS ................................................ 3-1
Main switch/steering lock ............... 3-1
Keyhole cover ................................. 3-2
Indicator and warning lights ........... 3-2
Speedometer unit ........................... 3-4
Fuel gauge ...................................... 3-4
Handlebar switches ........................ 3-5
Front brake lever ............................. 3-6
Rear brake lever ............................. 3-6
Fuel tank cap .................................. 3-6
Fuel .................................................3-7
Catalytic converter .......................... 3-8
Kickstarter....................................... 3-8
Seat ................................................3-9
Luggage hook ................................. 3-9
Helmet holder ................................. 3-9
Storage compartment ................... 3-10
PRE-OPERATION CHECKS ............. 4-1
Pre-operation check list .................. 4-2OPERATION AND IMPORTANT RIDING
POINTS .............................................. 5-1
Star ting the engine ......................... 5-1
Star ting off ...................................... 5-2
Acceleration and deceleration ........ 5-2
Braking........................................... 5-2
Engine break-in .............................. 5-3
Parking........................................... 5-3
PERIODIC MAINTENANCE AND MINOR
REPAIR .............................................. 6-1
Periodic maintenance and lubrication
chart............................................ 6-2
Removing and installing panels ..... 6-5
Checking the spark plug ................. 6-6
Engine oil and oil strainer ............... 6-7
Final transmission oil ...................... 6-9
Coolant......................................... 6-10
Replacing the air filter element ..... 6-12
Checking the throttle cable free
play............................................ 6-12
Valve clearance ............................ 6-12
Tires.............................................. 6-13
Cast wheels .................................. 6-15
Adjusting the brake lever free
play............................................ 6-15
Adjusting the rear brake lever free
play............................................ 6-16
Checking the front and rear brake
shoes......................................... 6-16Checking and lubricating the throttle
grip and cable ............................ 6-17
Lubricating the front and rear brake
levers......................................... 6-17
Checking and lubricating the
centerstand............................... 6-18
Checking the front fork ................. 6-18
Checking the steering ................... 6-19
Checking the wheel bearings ....... 6-19
Battery.......................................... 6-20
Replacing the fuse ........................ 6-21
Replacing the headlight bulb ........ 6-22
Replacing the tail/brake light bulb 6-23
Replacing a turn signal light bulb . 6-24
Troubleshooting............................ 6-24
Troubleshooting charts ................. 6-25
SCOOTER CARE AND STORAGE ... 7-1
Care ................................................ 7-1
Storage ........................................... 7-3
SPECIFICATIONS ............................. 8-1
CONSUMER INFORMATION ............ 9-1
Identification numbers .................... 9-1
15P-F8199-E0_ch0.pmd2007/06/13, 11:15 5
Page 11 of 72

1-4
1
2
3
4
5
6
7
8
9
EAU10220
Q QQ Q
Q
SAFETY INFORMATION
9Take care not to spill any
gasoline on the engine or
exhaust system when refueling.
9Never refuel while smoking or
in the vicinity of an open flame.
8Never start the engine or let it run
for any length of time in a closed
area. The exhaust fumes are poi-
sonous and may cause loss of con-
sciousness and death within a
short time. Always operate your
scooter in an area that has adequate
ventilation.
8Always turn the engine off before
leaving the scooter unattended and
remove the key from the main
switch. When parking the scooter,
note the following:
9The engine and exhaust
system may be hot, therefore,
park the scooter in a place
where pedestrians or children
are not likely to touch these hot
areas.
9Do not park the scooter on a
slope or soft ground, otherwise
it may fall over.
9Do not park the scooter near a
flammable source (e.g., akerosene heater, or near an
open flame), otherwise it could
catch fire.
8If you should swallow any gasoline,
inhale a lot of gasoline vapor, or
allow gasoline to get into your eyes,
see your doctor immediately. If any
gasoline spills on your skin or cloth-
ing, immediately wash the affected
area with soap and water and
change your clothes. Safe-riding points
EAUT2030
Further safe-riding points8Make sure to signal clearly when
making turns.
8Braking can be extremely difficult
on a wet road. Avoid hard braking,
because the scooter could slide.
Apply the brakes slowly when stop-
ping on a wet surface.
8Slow down as you approach a cor-
ner or turn. Once you have com-
pleted a turn, accelerate slowly.
8Be careful when passing parked
cars. A driver might not see you and
open a door in your path.
8Railroad crossings, streetcar rails,
iron plates on road construction
sites, and manhole covers become
extremely slippery when wet. Slow
down and cross them with caution.
Keep the scooter upright, otherwise
it could slide out from under you.
8The brake lining could get wet when
you wash the scooter. After wash-
ing the scooter, check the brakes
before riding.
8Always wear a helmet, gloves, trou-
sers (tapered around the cuff and
ankle so they do not flap), and a
15P-F8199-E0_ch1.pmd2007/06/20, 14:20 4
Page 15 of 72

2-2
1
2
3
4
5
6
7
8
9
DESCRIPTION
EAU10420
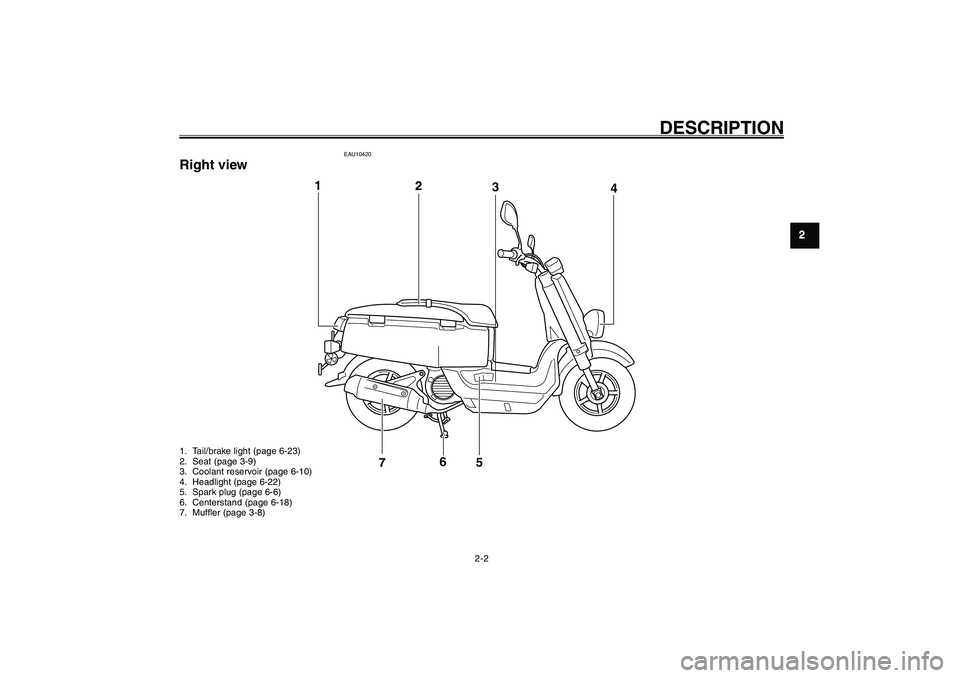
Right view1. Tail/brake light (page 6-23)
2. Seat (page 3-9)
3. Coolant reservoir (page 6-10)
4. Headlight (page 6-22)
5. Spark plug (page 6-6)
6. Centerstand (page 6-18)
7. Muffler (page 3-8)
2
3 1
4
5
6
7
15P-F8199-E0_ch2.pmd2007/06/13, 11:16 2
Page 16 of 72

2-3
1
2
3
4
5
6
7
8
9
DESCRIPTION
EAU10430
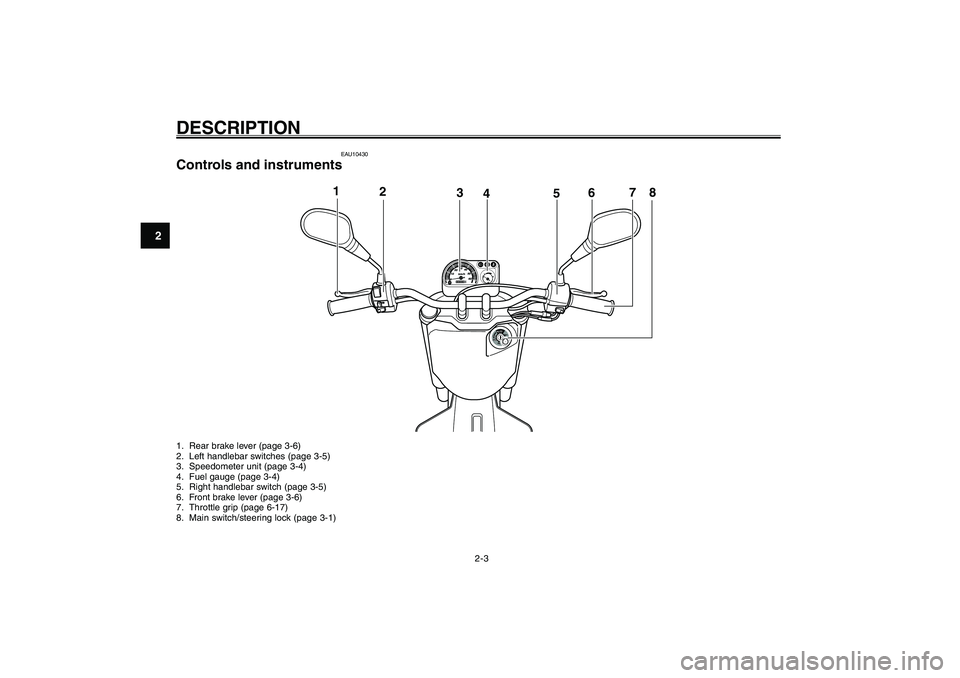
Controls and instruments1. Rear brake lever (page 3-6)
2. Left handlebar switches (page 3-5)
3. Speedometer unit (page 3-4)
4. Fuel gauge (page 3-4)
5. Right handlebar switch (page 3-5)
6. Front brake lever (page 3-6)
7. Throttle grip (page 6-17)
8. Main switch/steering lock (page 3-1)
1
2
3
4
5
6
7
8
15P-F8199-E0_ch2.pmd2007/06/13, 11:16 3
Page 21 of 72

3-5
1
2
3
4
5
6
7
8
9
INSTRUMENT AND CONTROL FUNCTIONS
The fuel gauge indicates the amount of
fuel in the fuel tank. The needle moves
towards “E” (Empty) as the fuel level
decreases. When the needle reaches
the red line, refuel as soon as possible.NOTE:
Do not allow the fuel tank to empty it-
self completely.
EAU12347
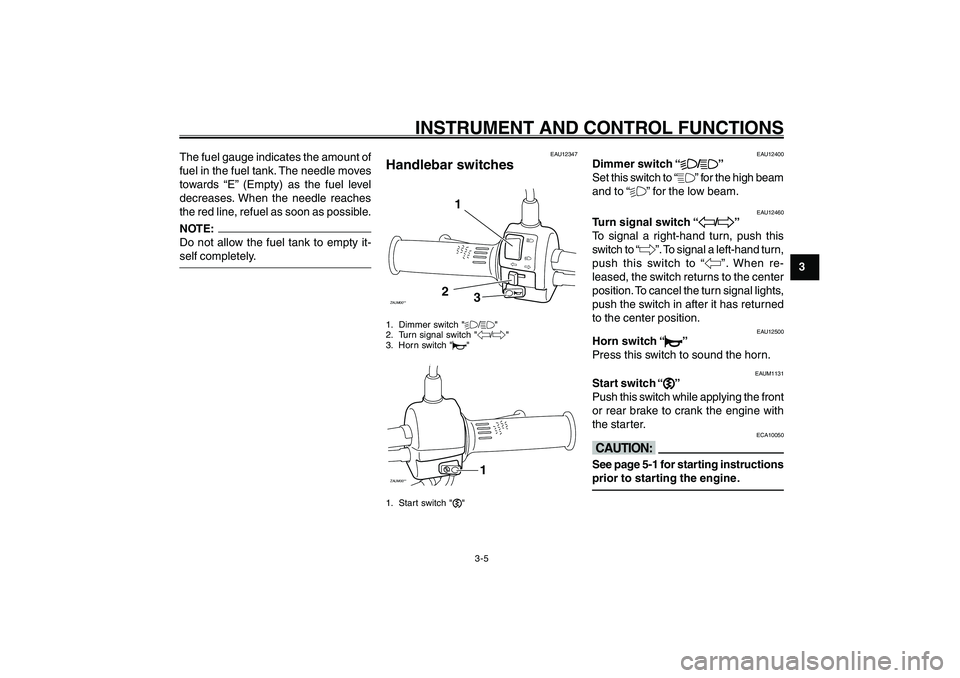
Handlebar switchesZAUM00**
1
2
3
1. Dimmer switch "%/&"
2. Turn signal switch "4/6"
3. Horn switch "*"ZAUM00**
1
1. Start switch ","
Handlebar switches
Dimmer switch
Turn signal switch
Horn switch
Start switch
EAU12400
Dimmer switch “
% %% %
%/
& && &
&”
Set this switch to “&” for the high beam
and to “%” for the low beam.
EAU12460
Turn signal switch “
4 44 4
4/
6 66 6
6”
To signal a right-hand turn, push this
switch to “6”. To signal a left-hand turn,
push this switch to “4”. When re-
leased, the switch returns to the center
position. To cancel the turn signal lights,
push the switch in after it has returned
to the center position.
EAU12500
Horn switch “
* ** *
*”
Press this switch to sound the horn.
EAUM1131
Start switch “
, ,, ,
,”
Push this switch while applying the front
or rear brake to crank the engine with
the starter.
ECA10050
cCSee page 5-1 for starting instructions
prior to starting the engine.
15P-F8199-E0_ch3.pmd2007/06/20, 14:21 5
Page 22 of 72

3-6
1
2
3
4
5
6
7
8
9
INSTRUMENT AND CONTROL FUNCTIONSBrake lever, front
Brake lever, rear
Fuel tank cap
EAU12950
Rear brake lever
1
ZAUM00**1. Rear brake leverThe rear brake lever is located on the
left handlebar grip. To apply the rear
brake, pull this lever toward the handle-
bar grip.
EAUT2280
Fuel tank capZAUM00**
3
1
2
1. Fuel tank cap lid
2. Fuel tank cap
3. Match marksTo remove the fuel tank cap
Open the lid, insert the key into the lock,
and then turn it 1/4 turn clockwise. The
lock will be released and the fuel tank
cap can be removed.
To install the fuel tank cap
1. Inser t the fuel tank cap into the tank
opening with the key inserted in the
lock and the match marks aligned.
2. Turn the key counterclockwise to
the original position, remove it, and
then close the lid.
EAU12900
Front brake lever
1
ZAUM00**1. Front brake leverThe front brake lever is located on the
right handlebar grip. To apply the front
brake, pull this lever toward the handle-
bar grip.
15P-F8199-E0_ch3.pmd2007/06/20, 14:21 6
Page 28 of 72

4-2
1
2
3
4
5
6
7
8
9
PRE-OPERATION CHECKS
EAU15605
Pre-operation check listPre-operation check list
ITEM CHECKS PAGE
Fuel• Check fuel level in fuel tank.
• Refuel if necessary.
• Check fuel line for leakage.3-7
Engine oil• Check oil level in engine.
• If necessary, add recommended oil to specified level.
• Check vehicle for oil leakage.6-7
Final transmission oil• Check vehicle for oil leakage. 6-9
Coolant• Check coolant level in reservoir
• If necessary, add recommended coolant to specified level.
• Check cooling system for leakage.6-10
Front brake• Check operation.
• Lubricate cable if necessary.
• Check lever free play.
• Adjust if necessary.6-15,6-16
Rear brake• Check operation.
• Lubricate cable if necessary.
• Check lever free play.
• Adjust if necessary.6-16
~6-17
Throttle grip• Make sure that operation is smooth.
• Check cable free play.
• If necessary, have Yamaha dealer adjust cable free play and lubricate cable and
grip housing.6-17
Wheels and tires• Check for damage.
• Check tire condition and tread depth.
• Check air pressure.
• Correct if necessary.6-13~6-15
Brake levers• Make sure that operation is smooth.
• Lubricate lever pivoting points if necessary.6-1
7
15P-F8199-E0_ch4.pmd2007/06/13, 11:16 2
Page 30 of 72

5-1
1
2
3
4
5
6
7
8
9
OPERATION AND IMPORTANT RIDING POINTS
EAU15942
OPERATION AND IMPORTANT RIDING POINTS
EAU15980
EWA10870
w● ●● ●
●
Become thoroughly familiar with
all operating controls and their
functions before riding. Consult
a Yamaha dealer regarding any
control or function that you do
not thoroughly understand.
● ●● ●
●
Never start the engine or oper-
ate it in a closed area for any
length of time. Exhaust fumes
are poisonous, and inhaling
them can cause loss of con-
sciousness and death within a
short time. Always make sure
that there is adequate ventila-
tion.
● ●● ●
●
For safety, always start the en-
gine with the centerstand down.
Starting the engine
EAUT2250
Starting the engine
ECA10250
cCSee page 5-3 for engine break-in in-
structions prior to operating the ve-
hicle for the first time.1. Turn the key to “ON”.
ECAT1070
cCThe engine trouble warning light and
coolant temperature warning light
should come on for a few seconds,
then go off. If these warning lights
do not go off, have a Yamaha dealer
check their electrical circuits.2. Close the throttle completely.
3. Start the engine by pushing the
start switch while applying the front
or rear brake.NOTE:
If the engine does not start, release the
start switch, wait a few seconds, and
then try again. Each starting attempt
should be as short as possible to pre-serve the battery. Do not crank the en-
gine more than 5 seconds on any one
attempt. If the engine does not start with
the starter motor, try using the
kickstarter.
ECA11040
cCFor maximum engine life, never ac-
celerate hard when the engine is
cold!
15P-F8199-E0_ch5.pmd2007/06/13, 11:17 1