Page 27 of 140
4-5
1
2
34
5
6
7
8
9
10
11
EBU18411
Brake lever
The brake lever is located at the right handlebar
grip. To apply the front brake, pull the brake lever
toward the handlebar grip.
EBU18432
Brake pedal
The brake pedal is located on the right side of the
ATV. To apply the rear brake, push down on the
brake pedal.
EBU18500
Parking brake
Use the parking brake before starting the engine or
parking the ATV, especially on a slope. Squeeze
the clutch lever while pushing the button, then
push in the lock plate to apply the parking brake.
Squeeze the clutch lever to release the parking
brake.NOTE:
When the parking brake is used, engine speed is
limited to 2300 r/min. Be sure the parking brake is
released before moving the throttle lever. Other-
1. Brake lever
1
1. Brake pedal
1
Page 28 of 140
4-6
1
2
34
5
6
7
8
9
10
11
wise, the engine will misfire, preventing normal op-
eration.
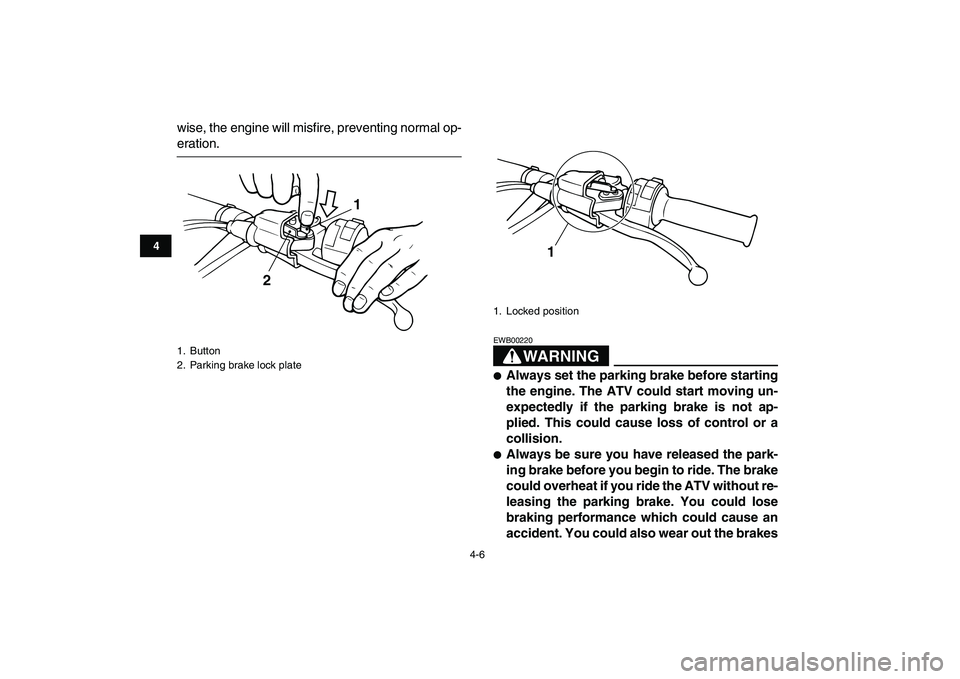
WARNING
EWB00220
�
Always set the parking brake before starting
the engine. The ATV could start moving un-
expectedly if the parking brake is not ap-
plied. This could cause loss of control or a
collision.
�
Always be sure you have released the park-
ing brake before you begin to ride. The brake
could overheat if you ride the ATV without re-
leasing the parking brake. You could lose
braking performance which could cause an
accident. You could also wear out the brakes
1. Button
2. Parking brake lock plate
1
2
1. Locked position
1
Page 29 of 140
4-7
1
2
34
5
6
7
8
9
10
11
prematurely.
EBU18530
Shift pedal
This ATV is equipped with a constant-mesh 6-
speed transmission. The shift pedal is located on
the left side of the engine and is used in combina-
tion with the clutch when shifting.
EBU18650
Kickstarter
Fold out the kickstarter lever, move it down lightly
with your foot until the gears engage, and thenpush it down smoothly but forcefully. This model is
equipped with a primary kickstarter, allowing the
engine to be started in any gear if the clutch is dis-
engaged. However, shifting the transmission into
the neutral position before starting is recommend-
ed.
EBU18720
Fuel tank cap
Remove the fuel tank cap by turning it counter-
clockwise.
1. Shift pedal
2. Neutral position
6
5
4
1 2 3N
12
1. Kickstarter
1
Page 31 of 140

4-9
1
2
34
5
6
7
8
9
10
11
of gasoline or higher octane grade.
CAUTION:
ECB00060
Use only unleaded gasoline. The use of leaded
gasoline will cause severe damage to internal
engine parts, such as the piston rings, as well
as to the exhaust system.
WARNING
EWB00310
�
Do not overfill the fuel tank. Fuel expands
when it heats up. If the fuel tank is overfilled,
fuel could spill out due to heat from the en-
gine or the sun.
�
Be careful not to spill fuel, especially on the
engine or exhaust pipe which can cause a
fire and severe injury. Wipe up any spilled
fuel immediately.
�
Do not refuel right after the engine has been
running and is still very hot.
�
Be sure the fuel tank cap is closed securely.
EBU18830
Fuel cock
The fuel cock supplies fuel from the tank to the car-
buretors while also filtering it.The fuel cock lever positions are explained as fol-
lows and shown in the illustrations.
OFF
With the fuel cock lever in this position, fuel will not
flow. Always turn the fuel cock lever to this position
when the engine is not running.
1. Arrow mark positioned over “OFF”
RES
ONFUEL
OFF
1
Page 32 of 140
4-10
1
2
34
5
6
7
8
9
10
11
ON
With the fuel cock lever in this position, fuel flows
to the carburetors. Turn the fuel cock lever to this
position when starting the engine and riding.
RES
This indicates reserve. With the fuel cock lever in
this position, the fuel reserve is made available.
Turn the fuel cock lever to this position if you run
out of fuel while riding. When this occurs, refuel as
soon as possible and be sure to turn the fuel cock
lever back to “ON”!
EBU18840
Starter (choke)
Starting a cold engine requires a richer air-fuel mix-
ture, which is supplied by the starter (choke).
Move the starter (choke) in direction (a) to turn on
1. Arrow mark positioned over “ON”
ON
FUEL
RES
OFF
ON
1
1. Arrow mark positioned over “RES”
OFF
ONFUEL RES
RES
1
Page 33 of 140
4-11
1
2
34
5
6
7
8
9
10
11
the starter (choke).
Move the starter (choke) in direction (b) to turn off
the starter (choke).
See the “Starting a cold engine” section on page
6-1 for proper operation.
EBU18870
Seat
To remove the seat
Pull the seat lock lever upward and pull up the seat
at the rear.
To install the seat
Insert the projection on the front of the seat into the
seat holder and push down on the seat at the rear.NOTE:
Make sure that the seat is securely fitted.
1. Starter (choke)
1 (a)(b)
1. Seat lock lever
1
Page 42 of 140

5-4
1
2
3
45
6
7
8
9
10
11
EBU19550
Fuel and 2-stroke engine oil mixing
ratio
If Yamalube “R” oil is not available, select an oil
from the following list.
CAUTION:
ECB00140
Never mix two types of 2-stroke engine oil in
the same batch. Always use the same type of
oil to ensure maximum engine performance.
EBU19580
Transmission oil
Make sure that the transmission oil is at the speci-
fied level. Add oil as necessary. (See page 8-9.)
EBU19630
Coolant
Make sure that the coolant is at the specified level.
Add coolant as necessary. (See page 8-11.)
NOTE:
The coolant level must be checked on a cold en-
gine since the level varies with engine tempera-
ture.WARNING
EWB00510
Wait for the engine and radiator to cool before
removing the radiator cap. You could be
burned by hot fluid and steam blown out under
pressure. Always put a thick rag over the cap
when opening. Allow any remaining pressure
to escape before completely removing the cap.
EBU19710
Front and rear brakes
Brake lever and brake pedal
�
Check that there is no free play in the brake le-
ver. If there is free play, have a Yamaha dealer
check the brake system.
�
Check for correct brake pedal height. (See Recommended 2-stroke engine oil:
Yamalube “R” (Yamalube Racing 2-cycle oil)
Mixing ratio:
24:1
Recommended 2-stroke engine oil Mixing ratio
Castrol R30
20:1 Castrol A545
Castrol A747
Page 47 of 140

6-1
1
2
3
4
56
7
8
9
10
11
EBU19880
OPERATION
EBU19900
Read the Owner’s Manual carefully before riding
the ATV.
WARNING
EWB00630
Read the Owner’s Manual carefully to become
familiar with all controls in order to help pre-
vent any loss of control, which could cause an
accident or injury. If there is a control or func-
tion you do not understand, ask your Yamaha
dealer.
EBU20281
Starting a cold engine
WARNING
EWB00640
Always make sure all control cables work
smoothly before you begin riding in cold
weather. If the control cables are frozen or do
not work smoothly, you could be unable to
control the ATV, which could lead to an acci-
dent or collision.
CAUTION:
ECB00150
See the “Engine break-in” section on page 6-4
prior to operating the engine for the first time.
1. Set the parking brake.
2. Turn the fuel cock to “ON”.
3. Turn the main switch to “ON” and the engine
stop switch to “RUN”.
4. Shift the transmission into neutral.
5. Use the starter (choke) in reference to the fig-
ure:
Position (1):
�
Cold engine start with ambient temperature be-
low 5 °C (40 °F).
Position (2):
�
Cold engine start with ambient temperature be-
tween 0 °C (30 °F) and 30 °C (90 °F).
Position (3):
�
Cold engine start with ambient temperature
above 25 °C (80 °F).


.
Move the starter (choke) in direction (b) to turn off
the starter (choke).
See the “Starting a cold engine” section on page
6-1 for proper ope")