Page 66 of 140

7-12
1
2
3
4
5
67
8
9
10
11
these components.
With the engine idling, pull the clutch lever to dis-
engage the clutch and shift into 1st gear, and then
release the parking brake. Open the throttle grad-
ually, and at the same time, release the clutch le-
ver slowly. Once the ATV has attained adequate
speed, release the throttle lever and at the same
time, quickly pull in the clutch lever and shift into
2nd gear. Open the throttle part way and gradually
release the clutch. Use this same procedure as
you move into the higher gears. Be sure to coordi-
nate the use of the throttle and shift pedal properly.
If the throttle is applied too abruptly or if the throttle
is not released during shifting, or if the shift pedal
is not released before applying the throttle, the
front wheels may lift off the ground, resulting in a
loss of directional control. Avoid higher speeds un-
til you are thoroughly familiar with the operation of
your ATV.
WARNING
EWB01720
Always open the throttle gradually and release
the clutch lever slowly. Otherwise, the ATV
could wheelie which would increase the
chance of an accident.CAUTION:
ECB00230
Do not shift gears without releasing the throt-
tle. Damage to the engine or drive train may oc-
cur.
When slowing down or stopping, release the throt-
tle and apply the brakes smoothly and evenly. As
you slow down, shift to a lower gear. Be sure that
the engine has sufficiently slowed before engaging
a lower gear. Improper use of the brakes or shifting
can cause the tires to lose traction, reducing con-
trol and increasing the possibility of an accident.WARNING
EWB01560
Make sure the engine has sufficiently slowed
before shifting to a lower gear. Engaging a low-
er gear when the engine speed is too high
could cause the wheels to stop rotating.
TURNING YOUR ATV
To achieve maximum traction on unpaved surfac-
es, the two rear wheels are mounted solidly on one
axle and turn together at the same speed. There-
fore, unless the wheel on the inside of the turn is al-
lowed to slip or lose some traction, the ATV will
resist turning. A special turning technique must be
Page 77 of 140

8-1
1
2
3
4
5
6
78
9
10
11
EBU21654
PERIODIC MAINTENANCE AND MINOR REPAIR
EBU21670
Safety is an obligation of the owner. Periodic in-
spection, adjustment and lubrication will keep your
ATV in the safest and best operating condition
possible. The most important points of inspection,
adjustment, and lubrication are explained on the
following pages.
The intervals given in the periodic maintenance
and lubrication chart should be considered as a
general guide under normal riding conditions.
However, DEPENDING ON THE WEATHER,
TERRAIN, GEOGRAPHICAL LOCATION, AND
INDIVIDUAL USE, THE MAINTENANCE INTER-
VALS MAY NEED TO BE SHORTENED.
WARNING
EWB01840
Never service an engine while it is running.
Moving parts can catch clothing or parts of the
body, causing injury. Electrical components
can cause shocks or start fires. Turn off the en-
gine when performing maintenance unless
otherwise specified. Have a Yamaha dealer
perform the service if you are not familiar with
maintenance work.
EBU21690
Owner’s manual and tool kit
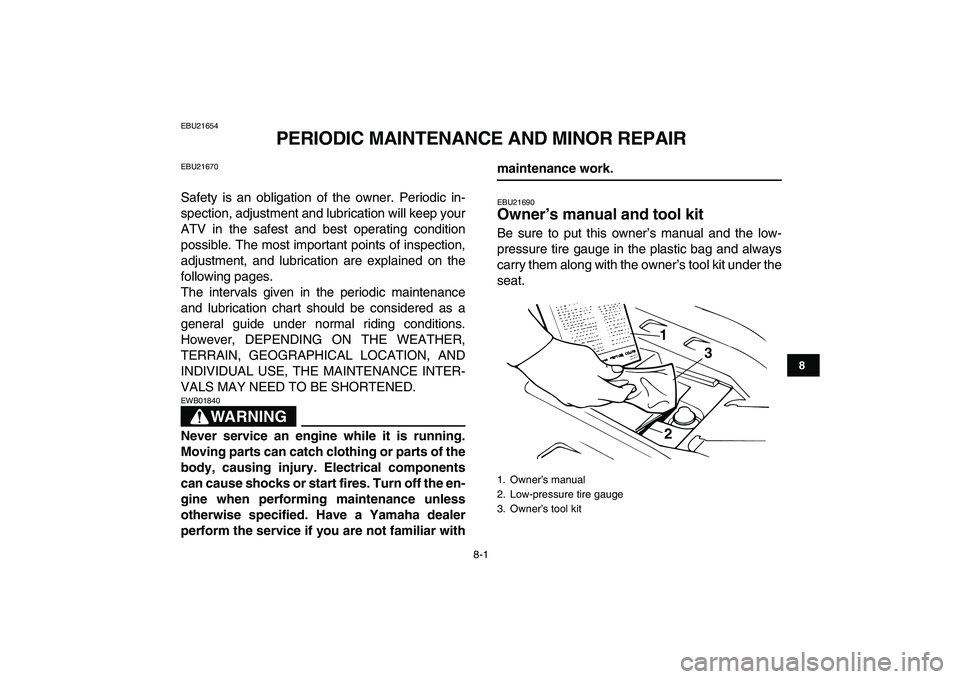
Be sure to put this owner’s manual and the low-
pressure tire gauge in the plastic bag and always
carry them along with the owner’s tool kit under the
seat.
1. Owner’s manual
2. Low-pressure tire gauge
3. Owner’s tool kit
1
23
Page 81 of 140

8-5
1
2
3
4
5
6
78
9
10
11
15
*
Chassis fasteners
�
Make sure that all nuts, bolts, and screws are
properly tightened.
√√√√√
16
*
Shock absorber
assemblies
�
Check operation and correct if necessary.
�
Check for oil leakage and replace if necessary.
√√√
17
*
Steering system
�
Check operation and repair or replace if damaged.
�
Check toe-in and adjust if necessary.
√√√√√
18
*
Carburetors
�
Check starter (choke) operation and correct if nec-
essary.
�
Check engine idling speed and synchronization,
and adjust if necessary.
√√√√
19
*
Crankcase breather
system
�
Check breather hose for cracks or other damage,
and replace if necessary.
√√√
20 Transmission oil
�
Change.
�
Check ATV for oil leakage, and correct if neces-
sary.
√ √√√
21 Cooling system
�
Check coolant level and ATV for coolant leakage,
and correct if necessary.
√√√√√
�
Replace coolant. Every 2 years
22
*
Moving parts and
cables
�
Lubricate.
√√√√
23
*
Throttle lever hous-
ing and cable
�
Check operation and correct if necessary.
�
Check throttle cable free play and adjust if neces-
sary.
�
Lubricate throttle lever housing and cable.
√√√√√
NO. ITEMCHECK OR MAINTENANCE
JOBINITIAL EVERY
Whichev-
er comes
firstmonth136612
km
(mi)320
(200)1200
(750)2400
(1500)2400
(1500)4800
(3000)
hours 20 75 150 150 300
Page 83 of 140

8-7
1
2
3
4
5
6
78
9
10
11
EBU28320
Checking the spark plugs
The spark plugs are important engine compo-
nents, which are easy to check. Since heat and de-
posits will cause any spark plug to slowly erode,
the spark plugs should be removed and checked in
accordance with the periodic maintenance and lu-
brication chart. In addition, the condition of the
spark plugs can reveal the condition of the engine.
To remove a spark plug
1. Remove the spark plug cap.
2. Remove the spark plug as shown, with the
spark plug wrench included in the owner’s toolkit.
To check the spark plugs
1. Check that the porcelain insulator around the
center electrode of each spark plug is a medi-
um-to-light tan (the ideal color when the ATV
is ridden normally).
2. Check that all spark plugs installed in the en-
gine have the same color.NOTE:
If any spark plug shows a distinctly different color,
the engine could be operating improperly. Do not
attempt to diagnose such problems yourself. In-
1. Spark plug cap
1
1. Spark plug wrench
1
Page 85 of 140

8-9
1
2
3
4
5
6
78
9
10
11
a spark plug, a good estimate of the correct torque
is 1/4–1/2 turn past finger tight. However, the spark
plug should be tightened to the specified torque as
soon as possible.
4. Install the spark plug cap.
EBU23341
Transmission oil
The transmission oil level should be checked be-
fore each ride. In addition, the transmission oil
must be changed at the intervals specified in the
periodic maintenance and lubrication chart.
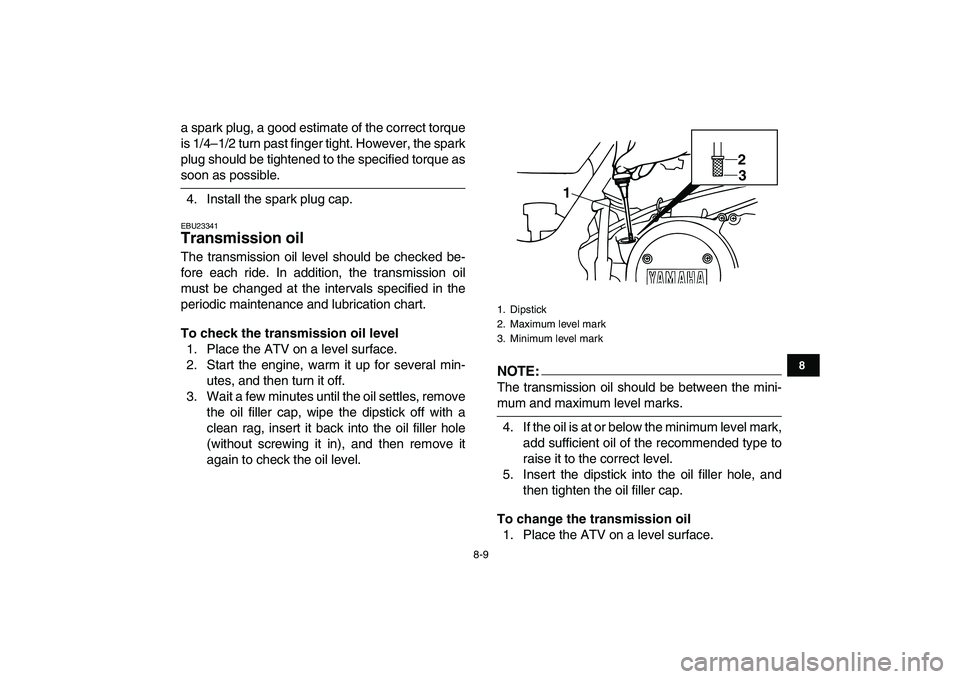
To check the transmission oil level
1. Place the ATV on a level surface.
2. Start the engine, warm it up for several min-
utes, and then turn it off.
3. Wait a few minutes until the oil settles, remove
the oil filler cap, wipe the dipstick off with a
clean rag, insert it back into the oil filler hole
(without screwing it in), and then remove it
again to check the oil level.NOTE:
The transmission oil should be between the mini-
mum and maximum level marks.
4. If the oil is at or below the minimum level mark,
add sufficient oil of the recommended type to
raise it to the correct level.
5. Insert the dipstick into the oil filler hole, and
then tighten the oil filler cap.
To change the transmission oil
1. Place the ATV on a level surface.
1. Dipstick
2. Maximum level mark
3. Minimum level mark
12
3
Page 86 of 140

8-10
1
2
3
4
5
6
78
9
10
11
2. Start the engine, warm it up for several min-
utes, and then turn it off.
3. Place an oil pan under the transmission to col-
lect the used oil.
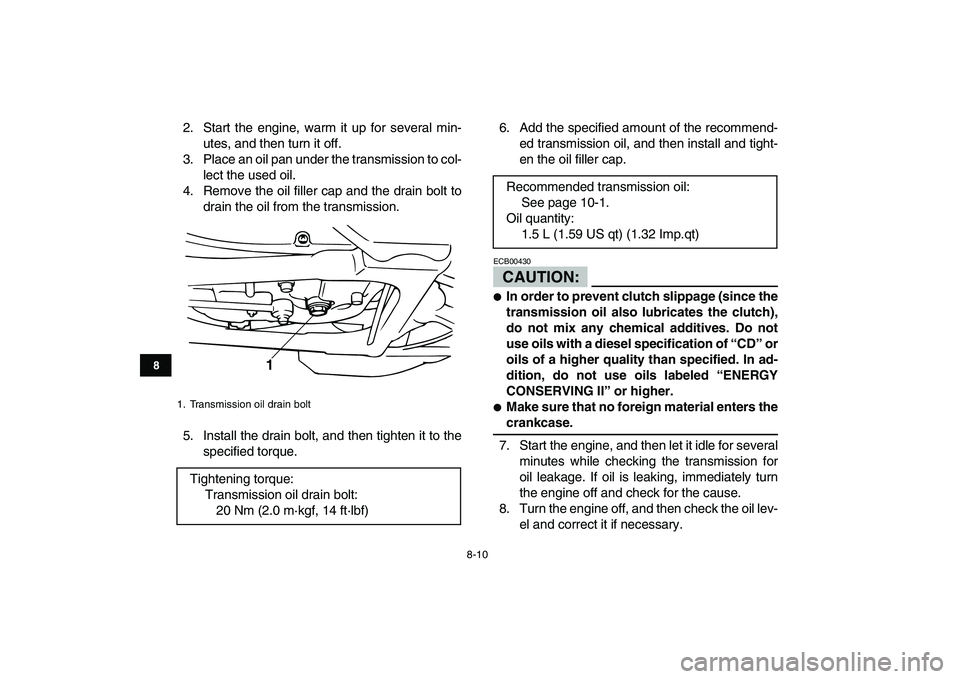
4. Remove the oil filler cap and the drain bolt to
drain the oil from the transmission.
5. Install the drain bolt, and then tighten it to the
specified torque.6. Add the specified amount of the recommend-
ed transmission oil, and then install and tight-
en the oil filler cap.
CAUTION:
ECB00430
�
In order to prevent clutch slippage (since the
transmission oil also lubricates the clutch),
do not mix any chemical additives. Do not
use oils with a diesel specification of “CD” or
oils of a higher quality than specified. In ad-
dition, do not use oils labeled “ENERGY
CONSERVING II” or higher.
�
Make sure that no foreign material enters the
crankcase.
7. Start the engine, and then let it idle for several
minutes while checking the transmission for
oil leakage. If oil is leaking, immediately turn
the engine off and check for the cause.
8. Turn the engine off, and then check the oil lev-
el and correct it if necessary.
1. Transmission oil drain bolt
Tightening torque:
Transmission oil drain bolt:
20 Nm (2.0 m·kgf, 14 ft·lbf)
1
Recommended transmission oil:
See page 10-1.
Oil quantity:
1.5 L (1.59 US qt) (1.32 Imp.qt)
Page 87 of 140
8-11
1
2
3
4
5
6
78
9
10
11
EBU23470
Coolant
The coolant level should be checked before each
ride. In addition, the coolant must be changed at
the intervals specified in the periodic maintenance
and lubrication chart.
EBU23501
To check the coolant level
1. Place the ATV on a level surface.
NOTE:
The coolant level must be checked on a cold en-
gine since the level varies with engine tempera-
ture.
2. Check the coolant level in the coolant reser-
voir.
NOTE:
The coolant should be between the minimum and
maximum level marks.3. If the coolant is at or below the minimum level
mark, remove the seat. (See page 4-11.)
4. Open the coolant reservoir cover.
1. Maximum level mark
2. Minimum level mark
1
2
Page 88 of 140

8-12
1
2
3
4
5
6
78
9
10
11
5. Remove the reservoir cap, add coolant or dis-
tilled water to the maximum level mark, and
then install the reservoir cap.
CAUTION:
ECB00401
�
If coolant is not available, use distilled water
or soft tap water instead. Do not use hard wa-ter or salt water since it is harmful to the en-
gine.
�
If water has been used instead of coolant, re-
place it with coolant as soon as possible,
otherwise the cooling system will not be pro-
tected against frost and corrosion.
�
If water has been added to the coolant, have
a Yamaha dealer check the antifreeze con-
tent of the coolant as soon as possible, oth-
erwise the effectiveness of the coolant will
be reduced.
6. Close the coolant reservoir cover.
7. Install the seat.
NOTE:
If the engine overheats, see page 8-51 for further
instructions.
EBU23521
To change the coolant
WARNING
EWB01890
Wait for the engine and radiator to cool before
removing the radiator cap. You could be
burned by hot fluid and steam blown out under
pressure. Always place a thick rag over the cap
1. Coolant reservoir cover
2. Coolant reservoir cap
Coolant reservoir capacity (up to the maximum
level mark):
0.28 L (0.30 US qt) (0.25 Imp.qt)
1
2