2007 VOLVO XC90 lock
[x] Cancel search: lockPage 156 of 268
2007 Volvo XC90
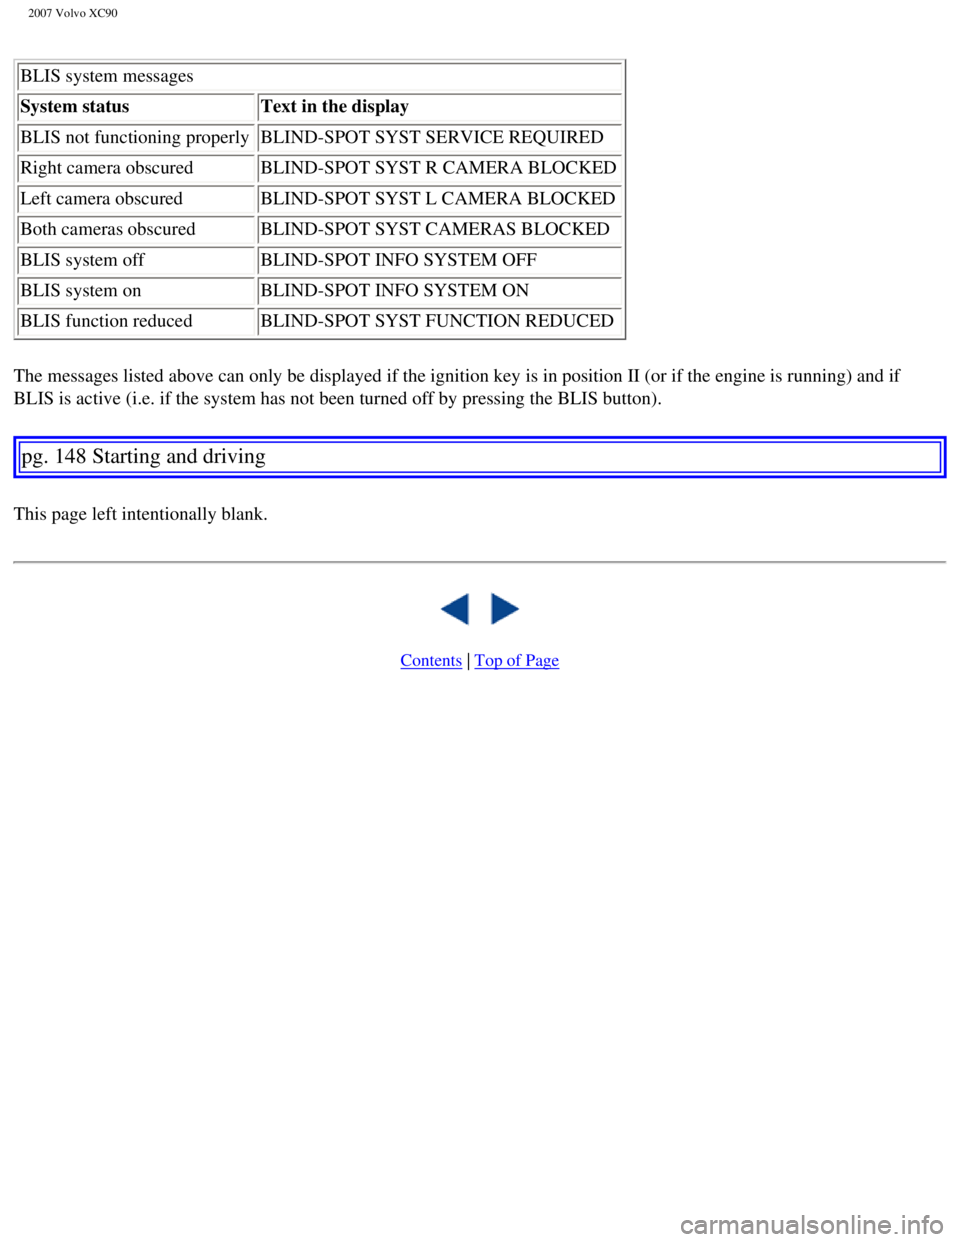
BLIS system messages
System statusText in the display
BLIS not functioning properly BLIND-SPOT SYST SERVICE REQUIRED
Right camera obscured BLIND-SPOT SYST R CAMERA BLOCKED
Left camera obscured BLIND-SPOT SYST L CAMERA BLOCKED
Both cameras obscured BLIND-SPOT SYST CAMERAS BLOCKED
BLIS system off BLIND-SPOT INFO SYSTEM OFF
BLIS system on BLIND-SPOT INFO SYSTEM ON
BLIS function reduced BLIND-SPOT SYST FUNCTION REDUCED
The messages listed above can only be displayed if the ignition key is i\
n position II (or if the engine is running) and if
BLIS is active (i.e. if the system has not been turned off by pressing \
the BLIS button).
pg. 148 Starting and driving
This page left intentionally blank.
Contents | Top of Page
file:///K|/ownersdocs/2007/2007_XC90/07xc90_06.htm (32 of 32)12/30/200\
6 5:53:44 PM
Page 172 of 268
2007 Volvo XC90
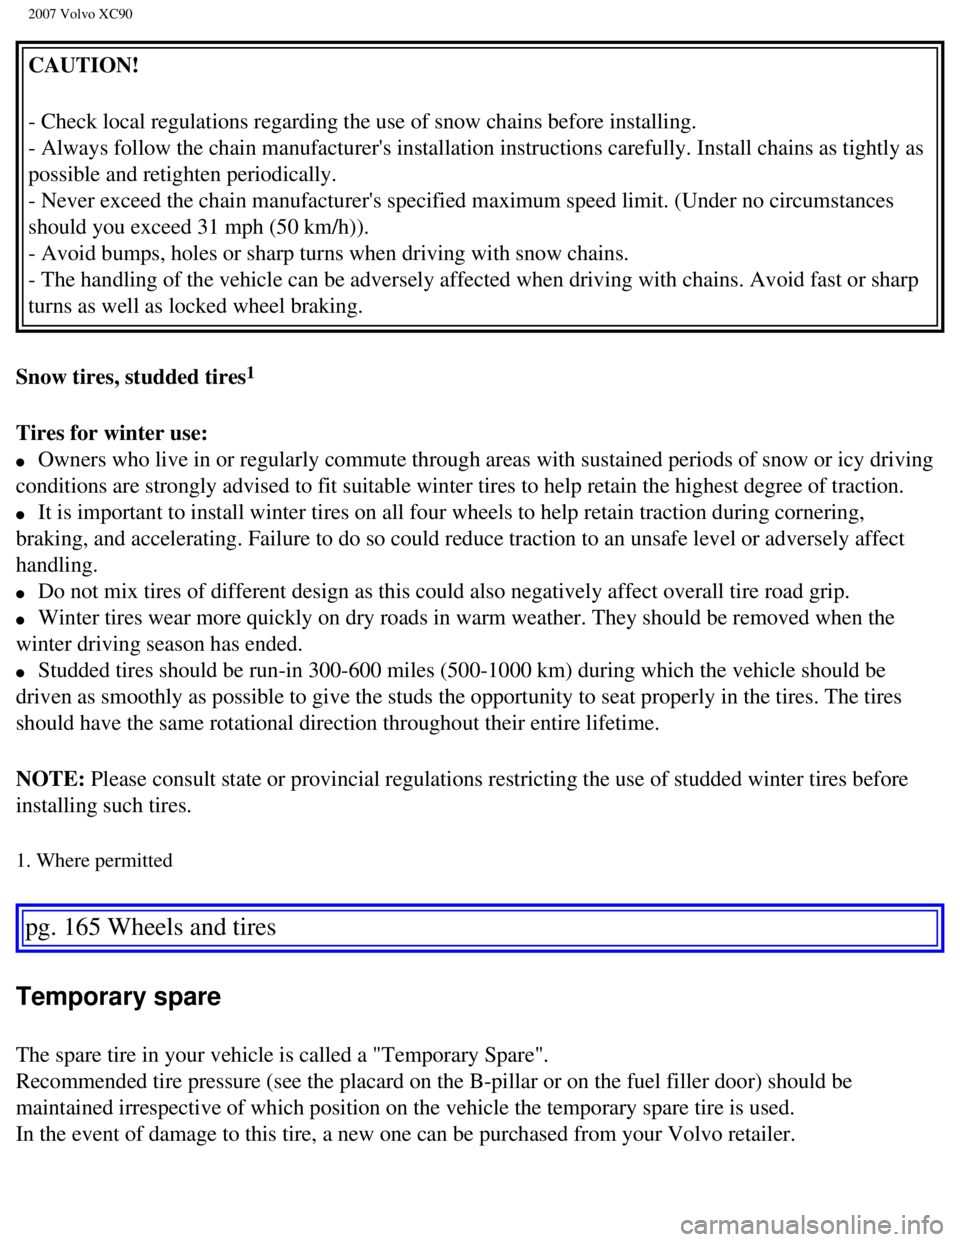
CAUTION!
- Check local regulations regarding the use of snow chains before instal\
ling.
- Always follow the chain manufacturer's installation instructions caref\
ully. Install chains as tightly as
possible and retighten periodically.
- Never exceed the chain manufacturer's specified maximum speed limit. (\
Under no circumstances
should you exceed 31 mph (50 km/h)).
- Avoid bumps, holes or sharp turns when driving with snow chains.
- The handling of the vehicle can be adversely affected when driving wit\
h chains. Avoid fast or sharp
turns as well as locked wheel braking.
Snow tires, studded tires
1
Tires for winter use:
l Owners who live in or regularly commute through areas with sustained per\
iods of snow or icy driving
conditions are strongly advised to fit suitable winter tires to help ret\
ain the highest degree of traction.
l It is important to install winter tires on all four wheels to help retai\
n traction during cornering,
braking, and accelerating. Failure to do so could reduce traction to an \
unsafe level or adversely affect
handling.
l Do not mix tires of different design as this could also negatively affec\
t overall tire road grip.
l Winter tires wear more quickly on dry roads in warm weather. They should\
be removed when the
winter driving season has ended.
l Studded tires should be run-in 300-600 miles (500-1000 km) during whic\
h the vehicle should be
driven as smoothly as possible to give the studs the opportunity to seat\
properly in the tires. The tires
should have the same rotational direction throughout their entire lifeti\
me.
NOTE: Please consult state or provincial regulations restricting the use of s\
tudded winter tires before
installing such tires.
1. Where permitted
pg. 165 Wheels and tires
Temporary spare
The spare tire in your vehicle is called a "Temporary Spare".
Recommended tire pressure (see the placard on the B-pillar or on the fu\
el filler door) should be
maintained irrespective of which position on the vehicle the temporary s\
pare tire is used.
In the event of damage to this tire, a new one can be purchased from you\
r Volvo retailer.
file:///K|/ownersdocs/2007/2007_XC90/07xc90_07.htm (16 of 23)12/30/200\
6 5:53:47 PM
Page 175 of 268
2007 Volvo XC90
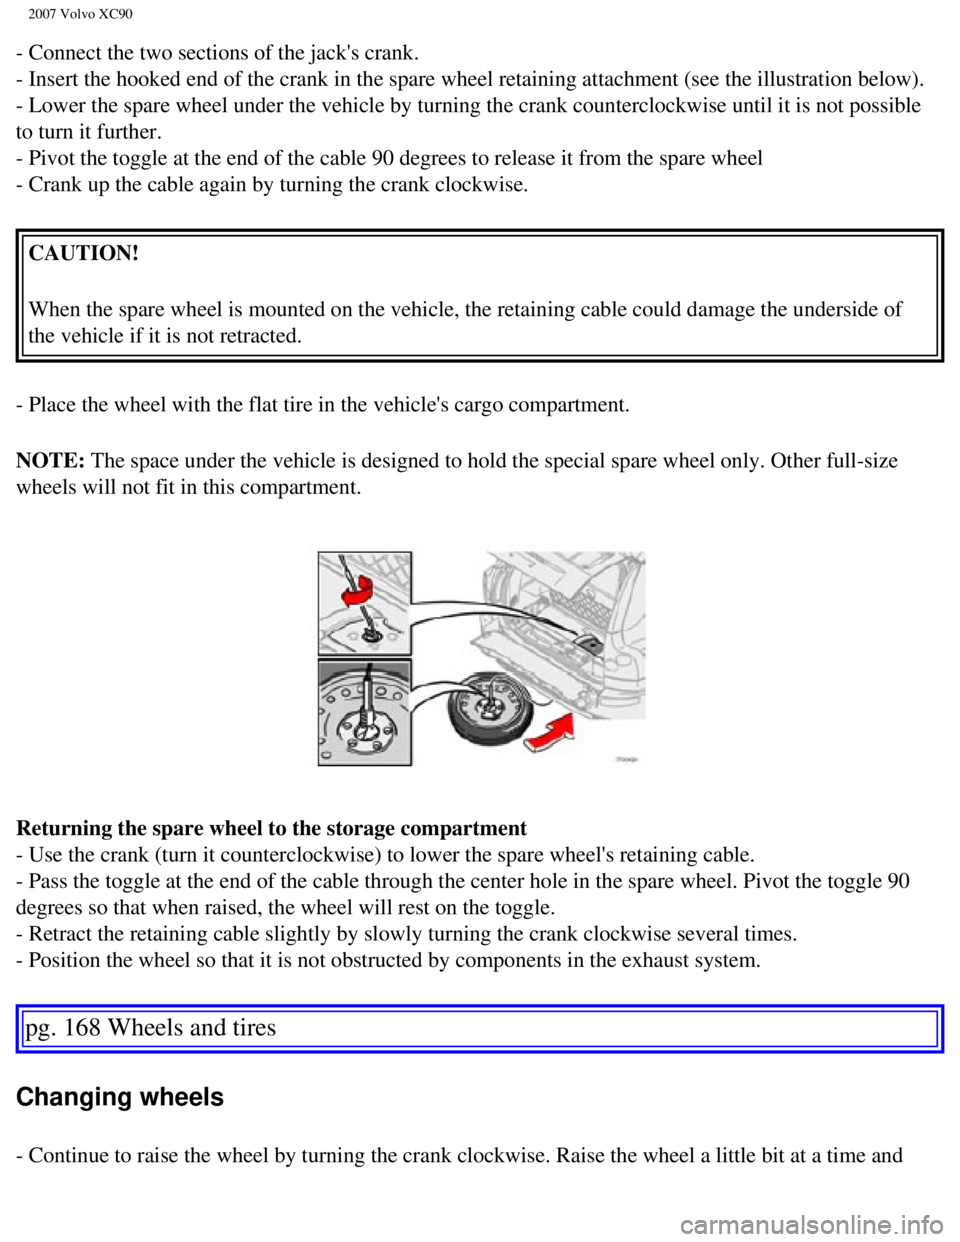
- Connect the two sections of the jack's crank.
- Insert the hooked end of the crank in the spare wheel retaining attach\
ment (see the illustration below).
- Lower the spare wheel under the vehicle by turning the crank countercl\
ockwise until it is not possible
to turn it further.
- Pivot the toggle at the end of the cable 90 degrees to release it from\
the spare wheel
- Crank up the cable again by turning the crank clockwise. CAUTION!
When the spare wheel is mounted on the vehicle, the retaining cable coul\
d damage the underside of
the vehicle if it is not retracted.
- Place the wheel with the flat tire in the vehicle's cargo compartment.\
NOTE: The space under the vehicle is designed to hold the special spare wheel\
only. Other full-size
wheels will not fit in this compartment.
Returning the spare wheel to the storage compartment
- Use the crank (turn it counterclockwise) to lower the spare wheel's \
retaining cable.
- Pass the toggle at the end of the cable through the center hole in the\
spare wheel. Pivot the toggle 90
degrees so that when raised, the wheel will rest on the toggle.
- Retract the retaining cable slightly by slowly turning the crank clock\
wise several times.
- Position the wheel so that it is not obstructed by components in the e\
xhaust system.
pg. 168 Wheels and tires
Changing wheels
- Continue to raise the wheel by turning the crank clockwise. Raise the \
wheel a little bit at a time and
file:///K|/ownersdocs/2007/2007_XC90/07xc90_07.htm (19 of 23)12/30/200\
6 5:53:47 PM
Page 177 of 268

2007 Volvo XC90
WARNING!
The undersides of accessory running boards are not intended for attachin\
g the
jack.
Changing a wheel
- Park the vehicle on a firm, level, non-slippery surface.
- Engage the parking brake and put the gear selector in the Park positio\
n.
- Loosen the wheel bolts by exerting downward pressure on the lug wrench\
.
- Remove the wheel cap (where applicable) using the lug wrench in the \
tool bag.
pg. 169 Wheels and tires
Changing wheels
- With the wheels still on the ground, use the lug wrench to loosen the \
wheel bolts 1/2 - 1 turn. Turn the
bolts counterclockwise to loosen the bolts.
CAUTION!
- The vehicle must not be driven with wheels of different dimensions or \
with a spare tire other than
the one that came with the vehicle. The use of different size wheels can\
seriously damage your
vehicle's transmission.
- Correct tightening torque on wheel bolts must be observed.
- The wheel bolts should never be greased or lubricated.
- Extended, chromed wheel bolts must not be used with steel rims, as the\
y make it impossible to fit
the hub caps.
pg. 170 Wheels and tires
Changing wheels
file:///K|/ownersdocs/2007/2007_XC90/07xc90_07.htm (21 of 23)12/30/200\
6 5:53:47 PM
Page 179 of 268
2007 Volvo XC90
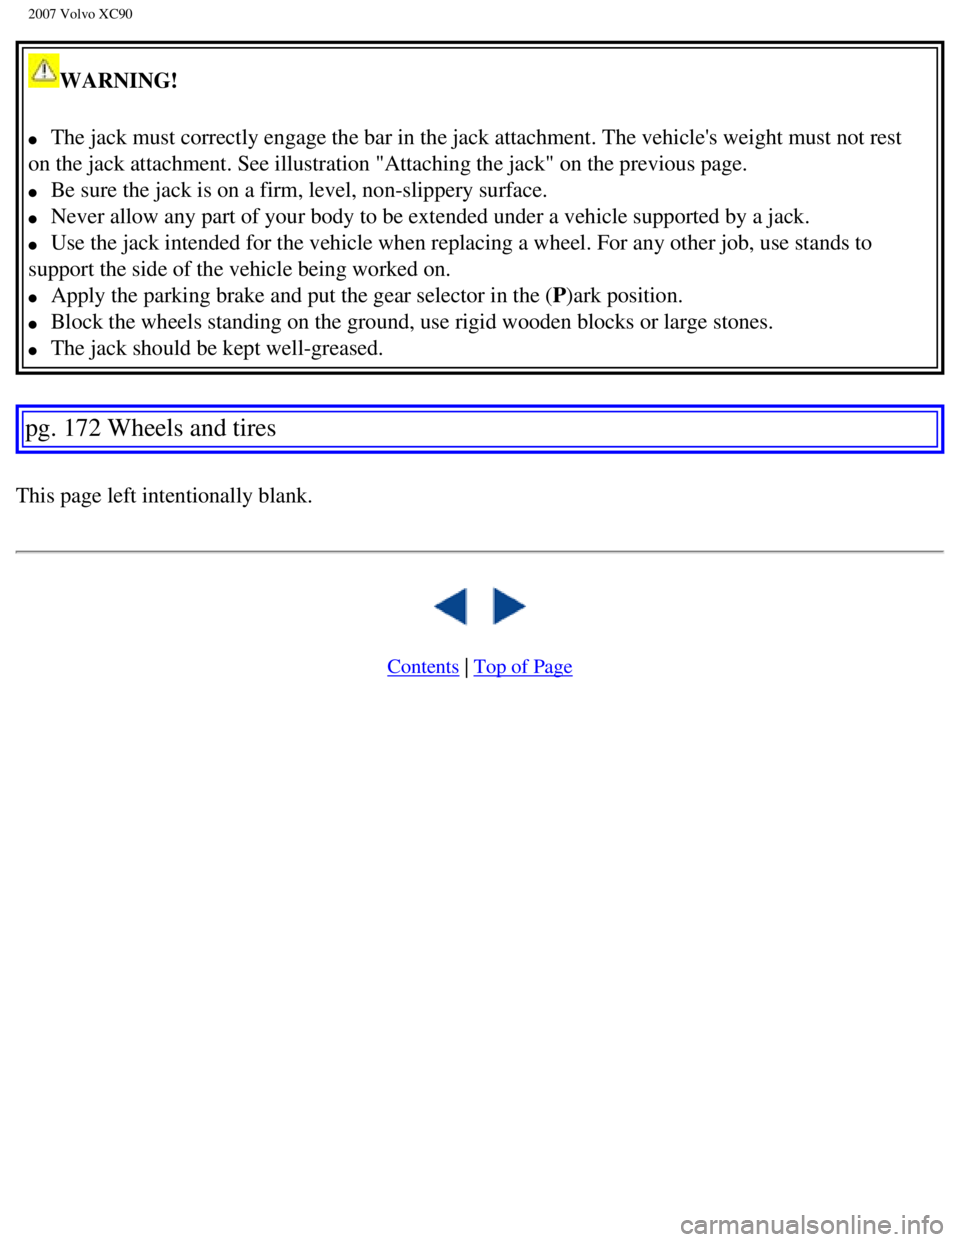
WARNING!
l The jack must correctly engage the bar in the jack attachment. The vehic\
le's weight must not rest
on the jack attachment. See illustration "Attaching the jack" on the pre\
vious page.
l Be sure the jack is on a firm, level, non-slippery surface.
l Never allow any part of your body to be extended under a vehicle support\
ed by a jack.
l Use the jack intended for the vehicle when replacing a wheel. For any ot\
her job, use stands to
support the side of the vehicle being worked on.
l Apply the parking brake and put the gear selector in the (P)ark position.
l Block the wheels standing on the ground, use rigid wooden blocks or larg\
e stones.
l The jack should be kept well-greased.
pg. 172 Wheels and tires
This page left intentionally blank.
Contents | Top of Page
file:///K|/ownersdocs/2007/2007_XC90/07xc90_07.htm (23 of 23)12/30/200\
6 5:53:47 PM
Page 181 of 268
2007 Volvo XC90
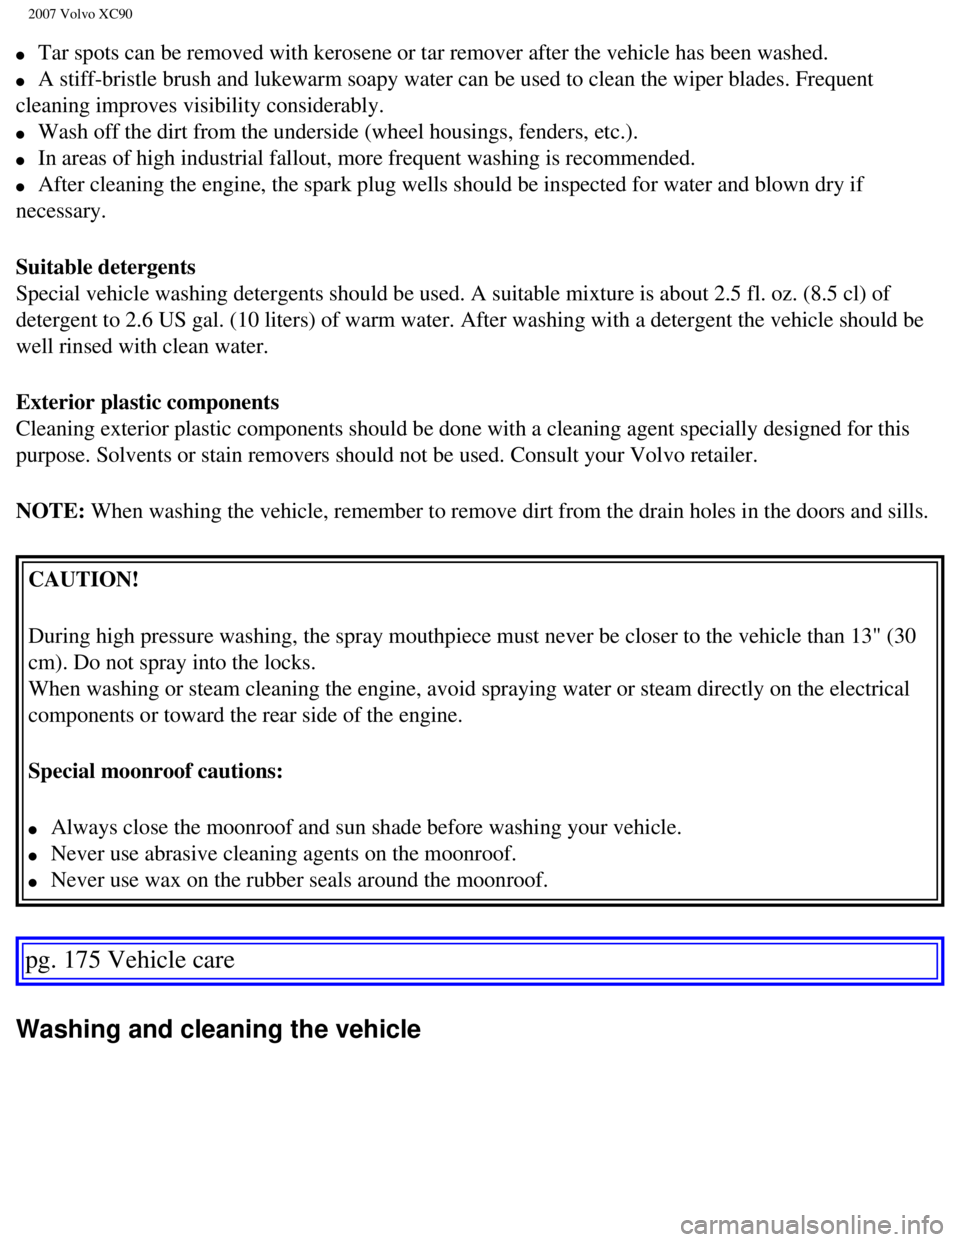
l Tar spots can be removed with kerosene or tar remover after the vehicle \
has been washed.
l A stiff-bristle brush and lukewarm soapy water can be used to clean the \
wiper blades. Frequent
cleaning improves visibility considerably.
l Wash off the dirt from the underside (wheel housings, fenders, etc.). \
l In areas of high industrial fallout, more frequent washing is recommende\
d.
l After cleaning the engine, the spark plug wells should be inspected for \
water and blown dry if
necessary.
Suitable detergents
Special vehicle washing detergents should be used. A suitable mixture is\
about 2.5 fl. oz. (8.5 cl) of
detergent to 2.6 US gal. (10 liters) of warm water. After washing with\
a detergent the vehicle should be
well rinsed with clean water.
Exterior plastic components
Cleaning exterior plastic components should be done with a cleaning agen\
t specially designed for this
purpose. Solvents or stain removers should not be used. Consult your Vol\
vo retailer.
NOTE: When washing the vehicle, remember to remove dirt from the drain holes \
in the doors and sills.
CAUTION!
During high pressure washing, the spray mouthpiece must never be closer \
to the vehicle than 13" (30
cm). Do not spray into the locks.
When washing or steam cleaning the engine, avoid spraying water or steam\
directly on the electrical
components or toward the rear side of the engine.
Special moonroof cautions:
l Always close the moonroof and sun shade before washing your vehicle.
l Never use abrasive cleaning agents on the moonroof.
l Never use wax on the rubber seals around the moonroof.
pg. 175 Vehicle care
Washing and cleaning the vehicle
file:///K|/ownersdocs/2007/2007_XC90/07xc90_08.htm (2 of 7)12/30/2006 \
5:53:48 PM
Page 205 of 268

2007 Volvo XC90
NOTE: After the battery has been disconnected or replaced, lock and unlock th\
e vehicle with the central
locking system's remote control to reactivate such features as the power\
windows, moonroof, courtesy
lighting, etc.
WARNING!
Ventilation hose:
l The battery generates hydrogen gas, which is flammable and explosive. Th\
e battery is fitted with a
ventilation hose which vents hydrogen gas out of the battery compartment\
through a ventilation
opening in the bottom of this compartment. If the battery must be replac\
ed, it is essential that the
ventilation hose is properly connected to the battery and that it is rou\
ted through the ventilation
opening provided (see illustration).
l Be sure the ventilation hose is free of debris.
l Only use replacement batteries equipped with a ventilation hose. Consult\
your Volvo retailer.
pg. 194 Maintenance
Replacing bulbs
When replacing bulbs, keep the following points in mind:
l Never touch the glass of bulbs with your fingers. Grease and oils from y\
our fingers vaporize in the
heat and will leave a deposit on the reflector, which will damage it.
l The optional Active Bi-Xenon headlight bulbs contain trace amounts of me\
rcury. These bulbs should
always be disposed of by an authorized Volvo retailer.
l The following bulbs should only be replaced by a trained and qualified V\
olvo service technician:
- Active Bi-Xenon headlights,
- Courtesy (dome) lighting,
- Reading lights,
- Glove compartment lights
- Turn signals and courtesy lights in the side door mirrors
- High-mounted brake lights
file:///K|/ownersdocs/2007/2007_XC90/07xc90_09.htm (19 of 37)12/30/200\
6 5:53:50 PM
Page 209 of 268

2007 Volvo XC90
- Remove the rubber cover over the bulb (1) by pulling it off.
- Turn the bulb holder counterclockwise and pull it out of the headlight\
housing.
- Remove the connector from the bulb unit (2) by pressing the lock tab\
out and pulling.
- Connect the connector to the new bulb unit until it clicks into place.\
- Press a new bulb unit into the headlight housing and turn it clockwise\
into place.
- Reinstall the plastic cover.
pg. 197 Maintenance
Replacing bulbs
Replacing the parking light/side marker light bulbs
- Turn the lamp holder approximately 1/4 turn counterclockwise and pull \
it out of the headlight housing.
- Pull the bulb straight out.
- Align the guide lugs on the side of the base of the new bulb in the gr\
ooves in the holder and press it
into place.
- Press the lamp holder into the place in the headlight housing and turn\
it approximately 1/4 turn
clockwise.
file:///K|/ownersdocs/2007/2007_XC90/07xc90_09.htm (23 of 37)12/30/200\
6 5:53:50 PM