2007 VOLVO XC90 ECO mode
[x] Cancel search: ECO modePage 101 of 268

2007 Volvo XC90
Sliding center seat - second row (seven-seat models only)
The center seat in the second row can be moved farther forward than the \
outboard seats. This makes it
possible for a child seated in this position to sit closer to the people\
in the front seats.
1. The center console cannot be removed on vehicles equipped with the op\
tional Rear Seat Entertainment
System.
pg. 89 Interior
Rear seats
Head restraint - second row, center position
The head restraint in the center position can be adjusted to 4 different\
heights.
To raise - pull the restraint up until it clicks into one of the four heights po\
sitions.
To lower - press the button at the base of the support (see illustration above)\
and press the head restraint
down.
file:///K|/ownersdocs/2007/2007_XC90/07xc90_04.htm (7 of 23)12/30/2006\
5:53:40 PM
Page 102 of 268

2007 Volvo XC90
WARNING!
l Please note that the lowest head restraint position is only intended for\
use when the backrest is to
be folded down, or when the seat is not occupied.
l The head restraint is intended to help protect the head/neck in a collis\
ion. Ensure that it is properly
adjusted for the occupant of the seat.
pg. 90 Interior
Rear seats
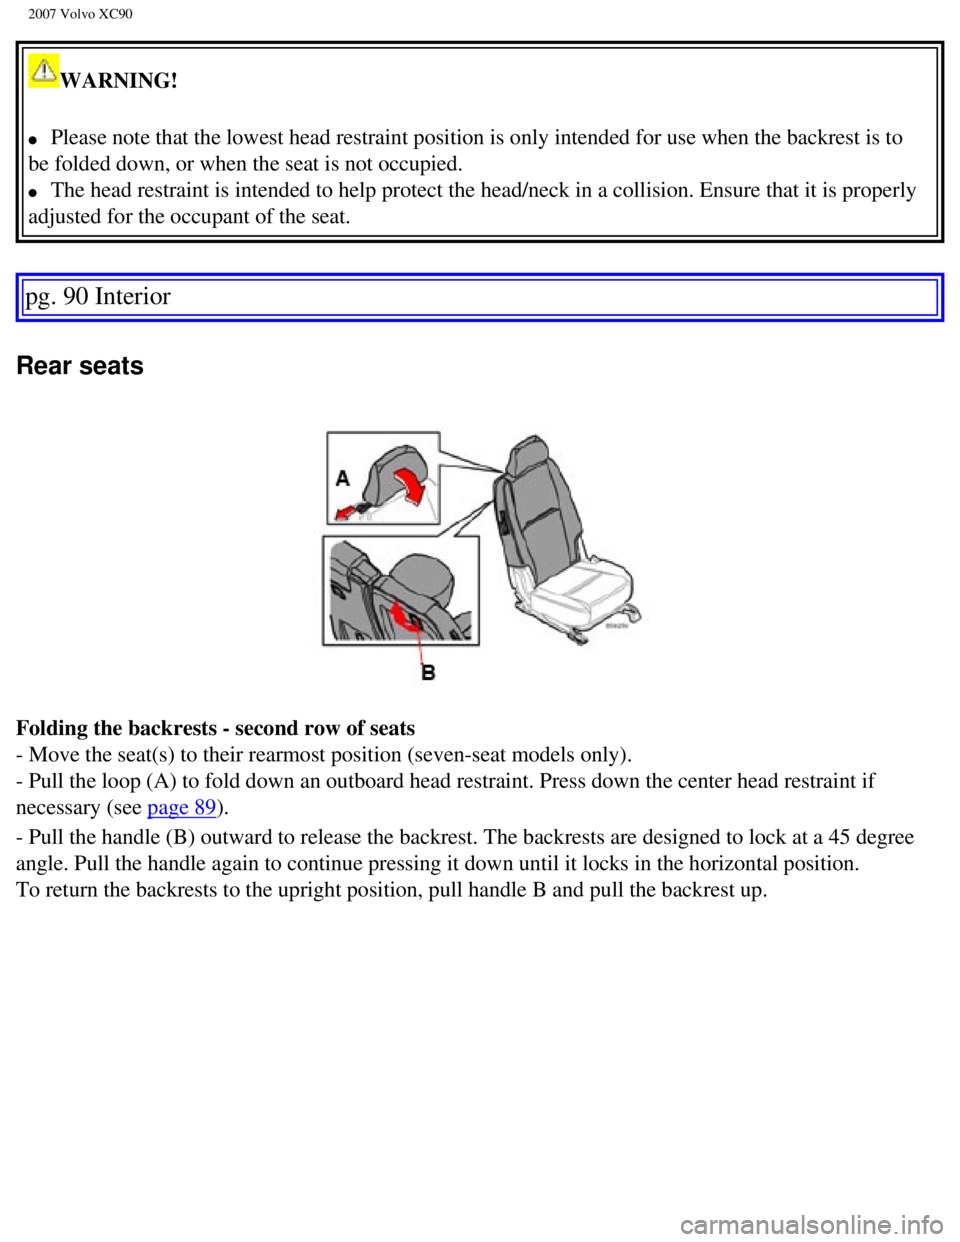
Folding the backrests - second row of seats
- Move the seat(s) to their rearmost position (seven-seat models only\
).
- Pull the loop (A) to fold down an outboard head restraint. Press dow\
n the center head restraint if
necessary (see
page 89).
- Pull the handle (B) outward to release the backrest. The backrests a\
re designed to lock at a 45 degree
angle. Pull the handle again to continue pressing it down until it locks\
in the horizontal position.
To return the backrests to the upright position, pull handle B and pull \
the backrest up.
file:///K|/ownersdocs/2007/2007_XC90/07xc90_04.htm (8 of 23)12/30/2006\
5:53:40 PM
Page 112 of 268

2007 Volvo XC90
WARNING!
When the rear backrest(s) are folded down, the vehicle should not be l\
oaded to a level higher than 2
in. (5 cm) below the upper edge of the rear side windows. Objects plac\
ed higher than this level could
impede the function of the inflatable curtain.
pg. 98 Interior
Securing cargo
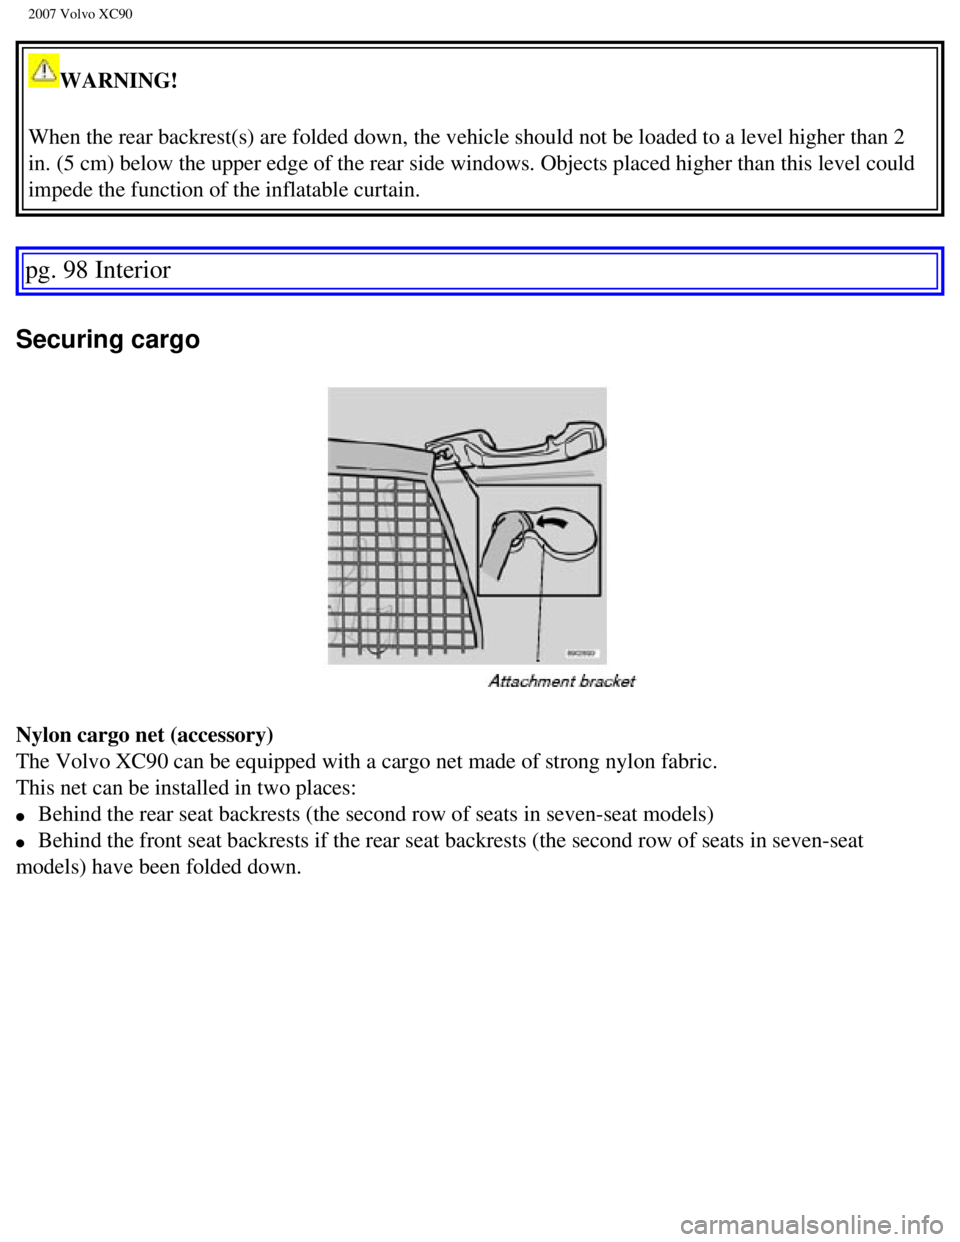
Nylon cargo net (accessory)
The Volvo XC90 can be equipped with a cargo net made of strong nylon fab\
ric.
This net can be installed in two places:
l Behind the rear seat backrests (the second row of seats in seven-seat m\
odels)
l Behind the front seat backrests if the rear seat backrests (the second \
row of seats in seven-seat
models) have been folded down.
file:///K|/ownersdocs/2007/2007_XC90/07xc90_04.htm (18 of 23)12/30/200\
6 5:53:40 PM
Page 114 of 268

2007 Volvo XC90
Folding and storing the cargo net
Press the release buttons on the hinges (1 in the illustration above) \
and fold the net. The cargo net can be
stored under the floor of the cargo area on five-seat models.
WARNING!
l Be sure the cargo net is properly inserted in the attachment brackets an\
d the straps are correctly
attached to the eyelets and pulled taut.
l Do not use the net if it is damaged in any way.
l When it is not in use, store the net so that it cannot be thrown forward\
in the event of sudden
braking, etc.
pg. 100 Interior
Securing cargo
Steel grid (accessory)
Installing the grid, upper attachments
- Lift in the grid through the tailgate or through one of the rear passe\
nger doors (in this case, fold down
the rear seat backrests/backrests in second row of seats in seven-seat m\
odels).
- Insert one of the grid's upper attachments into an attachment bracket \
above one of the rear passenger
doors (see illustration above).
- Push the grid's attachment into the forward position in the attachment\
bracket (see inset illustration
above) to lock the attachment in place.
file:///K|/ownersdocs/2007/2007_XC90/07xc90_04.htm (20 of 23)12/30/200\
6 5:53:40 PM
Page 115 of 268

2007 Volvo XC90
- Insert the grid's other upper attachment in the attachment bracket abo\
ve the opposite rear passenger
door, and press the attachment into the forward position in the attachme\
nt bracket to lock it in place.
Installing the grid, lower attachments
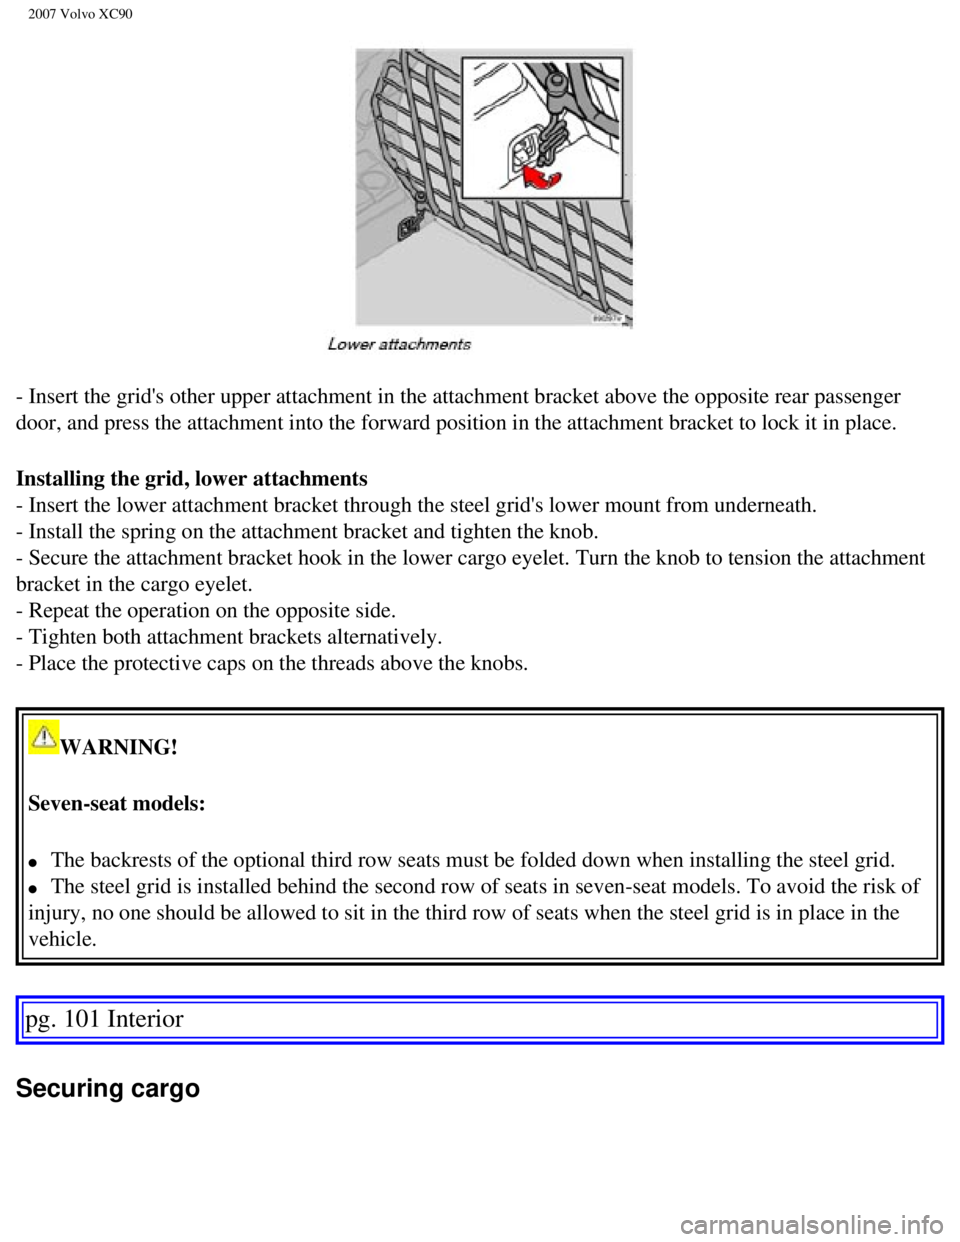
- Insert the lower attachment bracket through the steel grid's lower mou\
nt from underneath.
- Install the spring on the attachment bracket and tighten the knob.
- Secure the attachment bracket hook in the lower cargo eyelet. Turn the\
knob to tension the attachment
bracket in the cargo eyelet.
- Repeat the operation on the opposite side.
- Tighten both attachment brackets alternatively.
- Place the protective caps on the threads above the knobs.
WARNING!
Seven-seat models:
l The backrests of the optional third row seats must be folded down when i\
nstalling the steel grid.
l The steel grid is installed behind the second row of seats in seven-seat\
models. To avoid the risk of
injury, no one should be allowed to sit in the third row of seats when t\
he steel grid is in place in the
vehicle.
pg. 101 Interior
Securing cargo
file:///K|/ownersdocs/2007/2007_XC90/07xc90_04.htm (21 of 23)12/30/200\
6 5:53:40 PM
Page 122 of 268

2007 Volvo XC90
NOTE: This function will not open the tailgate.
Button 6 (Unlock): Press this button once to unlock the driver's door only. Wait for at le\
ast 1 second
and press the button again (within 10 seconds) to unlock all doors, an\
d the tailgate.
NOTE:
l If an airbag deploys, your vehicle's SRS control module will attempt to \
automatically unlock all
doors.
l The keys may also be used to lock and unlock the doors, and to activate \
and deactivate the alarm
system.
l To avoid leaving your keys in the vehicle, make a habit of always lockin\
g the vehicle with the remote
control.
l If the key blade section of the remote is not fully folded out when star\
ting the vehicle, the immobilizer
function may make it impossible to start the engine.
l The vehicle can be locked even if a door is open. When the door(s) are\
closed, they will be locked.
Please be aware that the keys could be locked in the car when this is do\
ne.
Automatic re-locking
If the doors are unlocked, the locks will automatically reengage (re-lo\
ck) and the alarm will rearm after
2 minutes unless a door or the tailgate has been opened. This helps prev\
ent the car from inadvertently
being left unlocked.
l FCC ID:LQNP2T-APU
This device complies with part 15 of the FCC rules. Operation is subject\
to the following conditions:
(1) This device may not cause harmful interference, and (2) this dev\
ice must accept any interference
received, including interference that may cause undesired operation.
l Canadian 2306104388
Model 504 2927 by Donnelly
Operation is subject to the following conditions: (1) this device may \
not cause interference, and (2)
this device must accept any interference, including interference that ma\
y cause undesired operation of
the device.
l Canadian 2306104388A
Model 509 977 by Connaught Electronics
Operation is subject to the following conditions: (1) this device may \
not cause interference, and (2)
this device must accept any interference, including interference that ma\
y cause undesired operation of
the device.
pg. 107 Locks and alarm
Keys and remote controls
file:///K|/ownersdocs/2007/2007_XC90/07xc90_05.htm (5 of 7)12/30/2006 \
5:53:41 PM
Page 133 of 268

2007 Volvo XC90
WARNING!
Never switch off the ignition (turn the ignition key to position 0) or\
remove the key from the ignition switch while the
vehicle is in motion. This could cause the steering wheel to lock, which\
would make the vehicle impossible to steer.
Economical driving conserves natural resources
Better driving economy may be obtained by thinking ahead, avoiding rapid\
starts and stops and adjusting the speed of your
vehicle to immediate traffic conditions. Observe the following rules:
l Bring the engine to normal operating temperature as soon as possible by \
driving with a light foot on the accelerator
pedal for the first few minutes of operation. A cold engine uses more fu\
el and is subject to increased wear.
l Whenever possible, avoid using the vehicle for driving short distances. \
This does not allow the engine to reach normal
operating temperature.
l Drive carefully and avoid rapid acceleration and hard braking.
l Use the transmission's (D)rive position as often as possible and avoid using "kickdown" to help \
improve fuel economy.
l Do not exceed posted speed limits.
l Avoid carrying unnecessary items (extra load) in the vehicle.
l Maintain correct tire pressure. Check tire pressure regularly (when tir\
es are cold).
l Remove snow tires when threat of snow or ice has ended.
1. The gear selector must be in the (P)ark position (automatic transmission).
2. Please be aware that leaving the key in this position will increase b\
attery drain.
pg. 122 Starting and driving
Economical driving
l Note that roof racks, ski racks, etc, increase air resistance and also f\
uel consumption.
l At highway driving speeds, fuel consumption will be lower with the air c\
onditioning on and the windows closed than
with the air conditioning off and the windows open.
l Using the onboard trip computer's fuel consumption modes can help you le\
arn how to drive more economically.
Other factors that decrease gas mileage are:
l Dirty air cleaner
l Dirty engine oil and clogged oil filter
l Dragging brakes
l Incorrect front end alignment.
Some of the above mentioned items and others are checked at the standard\
Maintenance Service intervals.
CAUTION!
Drive slowly and carefully if going through standing water (i.e. floode\
d roadways, etc.). Damage to the engine could
result if excess water is drawn in through the air intake system. Never \
drive the vehicle in water deeper than 18 inches
(48 cm).
pg. 123 Starting and driving
file:///K|/ownersdocs/2007/2007_XC90/07xc90_06.htm (9 of 32)12/30/2006\
5:53:44 PM
Page 137 of 268

2007 Volvo XC90
W - Winter/Wet driving mode - enhanced vehicle traction
Press the button at the base of the gear selector to engage/disengage th\
is driving mode (see illustration).
l Mode W will only function if the gear selector is in the (D)rive position.
l When the W driving mode is engaged, this is displayed in the instrument \
panel (see page 46).
This mode may be selected for starting/ moving off on slippery roads.
1. Six-speed transmission: gears 2, 3, 4, 5, and 6.
pg. 126 Starting and driving
All Wheel Drive (option)
All Wheel Drive (AWD) - general information
Your Volvo can be equipped with permanent All Wheel Drive (option), wh\
ich means that power is distributed
automatically between the front and rear wheels. Under normal driving co\
nditions, most of the engine's power is directed
to the front wheels. However, if there is any tendency for the front whe\
els to spin, an electronically controlled coupling
distributes power to the wheels that have the best traction.
Tire dimensions
Volvo recommends that you always drive on tires of the same brand, size,\
construction (radial), tread pattern, load-,
speed-, traction- , temperature-, and treadwear rating. Never drive on m\
ixed tires, except for brief periods when the
temporary spare tire is in use.
Always use properly inflated tires of correct dimensions. Tire size and \
inflation pressures are shown on the tire inflation
pressure placards, located on the driver's side B-pillar (the structura\
l member at the side of the vehicle, at the rear of the
driver's door opening), or on the inside of the fuel filler door on Can\
adian models.
Temporary Spare
The temporary spare tire is for temporary, low-speed, short-distance use\
only. Replace it with a full-sized tire as soon as
possible. Do not drive on the temporary spare at speeds above 50 m.p.h. \
(80km/h) or for distances greater than 50 miles
(80 km).
Never install snow chains on a temporary spare.
pg. 127 Starting and driving
Brake system
file:///K|/ownersdocs/2007/2007_XC90/07xc90_06.htm (13 of 32)12/30/200\
6 5:53:44 PM