2007 VOLVO S40 ECO mode
[x] Cancel search: ECO modePage 144 of 208
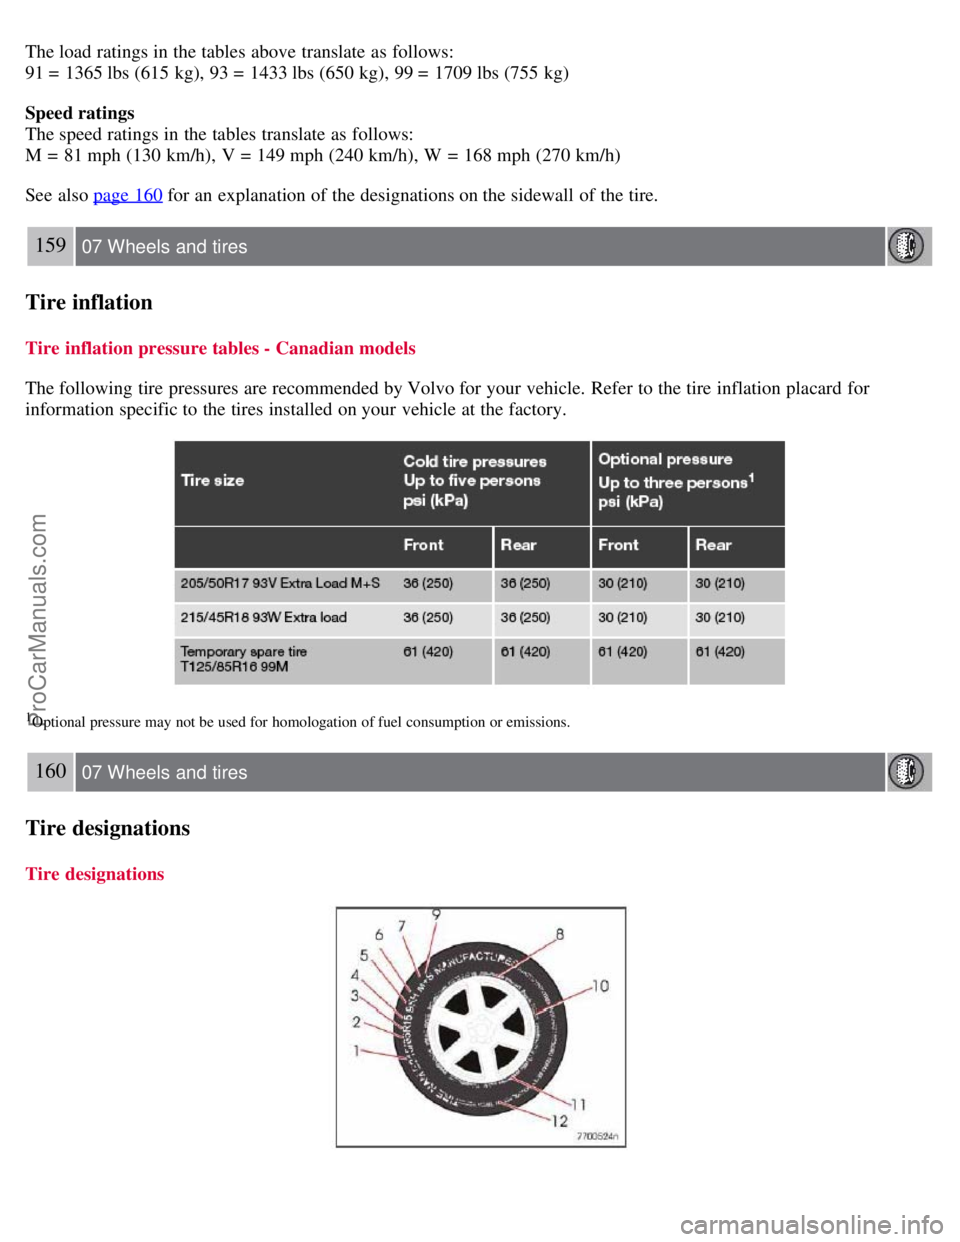
The load ratings in the tables above translate as follows:
91 = 1365 lbs (615 kg), 93 = 1433 lbs (650 kg), 99 = 1709 lbs (755 kg)
Speed ratings
The speed ratings in the tables translate as follows:
M = 81 mph (130 km/h), V = 149 mph (240 km/h), W = 168 mph (270 km/h)
See also page 160
for an explanation of the designations on the sidewall of the tire.
159 07 Wheels and tires
Tire inflation
Tire inflation pressure tables - Canadian models
The following tire pressures are recommended by Volvo for your vehicle. Refer to the tire inflation placard for
information specific to the tires installed on your vehicle at the factory.
1Optional pressure may not be used for homologation of fuel consumption or emissions.
160 07 Wheels and tires
Tire designations
Tire designations
ProCarManuals.com
Page 146 of 208
162 07 Wheels and tires
Glossary of tire terminology
Glossary of tire terminology
Tire information placard: A placard showing the OE (Original Equipment) tire sizes, recommended inflation
pressure, and the maximum weight the vehicle can carry.
Tire Identification Number (TIN) : A number on the sidewall of each tire providing information about the tire
brand and manufacturing plant, tire size and date of manufacturer.
Inflation pressure : A measure of the amount of air in a tire.
Standard load: A class of P-metric or Metric tires designed to carry a maximum load at 35 psi [37 psi (2.5 bar) for
Metric tires]. Increasing the inflation pressure beyond this pressure will not increase the tires load carrying capability.
Extra load : A class of P-metric or Metric tires designed to carry a heavier maximum load at 41 psi [43 psi (2.9 bar)
for Metric tires]. Increasing the inflation pressure beyond this pressure will not increase the tires load carrying
capability.
kPa : Kilopascal, a metric unit of air pressure.
PSI: Pounds per square inch, a standard unit of air pressure.
B-pillar : The structural member at the side of the vehicle behind the front door.
Bead area of the tire : Area of the tire next to the rim.
Sidewall of the tire: Area between the bead area and the tread.
Tread area of the tire : Area of the perimeter of the tire that contacts the road when mounted on the vehicle.
Rim: The metal support (wheel) for a tire or a tire and tube assembly upon which the tire beads are seated.
Maximum load rating : a figure indicating the maximum load in pounds and kilograms that can be carried by the
tire. This rating is established by the tire manufacturer.
Maximum permissible inflation pressure : the greatest amount of air pressure that should ever be put in the tire.
This limit is set by the tire manufacturer.
Recommended tire inflation pressure : inflation pressure, established by Volvo, which is based on the type of tires
that are mounted on a vehicle at the factory. This inflation pressure is affected by the number of occupants in the car,
the amount of cargo, and the speed at which the vehicle will be driven for a prolonged period. This information can be
found on the tire inflation placard(s) located on the driver's side B-pillar or on the inside of the fuel filler door on
Canadian models, and in the tire inflation table in this chapter.
Cold tires : The tires are considered to be cold when they have the same temperature as the surrounding (ambient)
air. This temperature is normally reached after the car has been parked for at least 3 hours.
163 07 Wheels and tires
Vehicle loading
Loading the vehicle
Properly loading your vehicle will provide maximum return of vehicle design performance.
Before loading your vehicle, familiarize yourself with the following terms for determining your vehicle's weight
ratings, with or without a trailer, from the vehicle's Federal/Canadian Motor Vehicle Safety Standards
(FMVSS/CMVSS) label, and the vehicle's tire information placard:
Curb weight
The weight of the vehicle including a full tank of fuel and all standard equipment. It does not include passengers,
cargo, or optional equipment.
Capacity weight
ProCarManuals.com
Page 188 of 208
6. EXIT-press to cancel a menu selection or a selected function
7. AUTO -search for and store the strongest radio stations in the area in which you are driving
Searching for stations
There are two ways to manually tune a radio station:
1. Turn the TUNING dial (3) to the desired frequency.
2. Press the left or right arrow key on the MENU NAVIGATION CONTROL and hold it down. The radio scans
slowly in the selected direction and will increase the scanning speed after a few seconds. Release the button when the
desired frequency appears in the display.
The frequency can be fine-tuned by short presses on the left/right arrow keys.
Storing preset stations
Manually storing a station
1. Tune to the desired station.
2. Press and hold the preset button under which the station is to be stored. The audio system sound will be interrupted
for a few seconds and STATION STORED will appear in the display.
NOTE
A total of 30 stations can be stored; 10 stations each in AM , FM1 and FM2 .
Automatically storing a station
Pressing AUTO (7) automatically searches for and stores up to ten strong AM or FM stations in a separate memory. If
more than ten stations are found, the ten strongest ones are stored. This function is especially useful in areas in which
you are not familiar with radio stations or their frequencies.
To use the AUTO function:
1. Select a waveband using the AM/FM button (1).
2. Start the search by pressing AUTO until AUTO STORING appears in the display.
When the search is completed, AUTO STORING will no longer be displayed. If there are no stations with sufficient
signal strength, NO AST FOUND is displayed.
The auto-stored stations can be selected using the preset buttons (2).
Press EXIT (6) to terminate the automatic storing function.
When the radio is in auto-store mode, AUTO is shown in the display. AUTO disappears when you return to normal
radio mode, which can be done by briefly pressing AM/FM (1), EXIT (6), or AUTO (7).
214 10 Audio
Radio functions
To return to the Auto-store mode, press the AUTO button briefly and select a stored station by pressing one of the
preset buttons (2).
ProCarManuals.com
Page 189 of 208
Saving auto-stored stations in the preset memory
An auto-stored station can be saved in the memory for manually preset stations.
1. Press AUTO (7) briefly.
2. Auto is displayed.
3. Press one of the preset buttons (2) under which the station is to be stored. Hold down the button until STATION
STORED is displayed.
The radio will then exit auto-store mode and the stored station can be selected by pressing the preset button.
Scanning
SCAN (4) automatically searches through the selected waveband for strong AM or FM stations. When the radio finds a
station, that station will be played for approximately 8 seconds, after which scanning resumes.
Activating/deactivating SCAN
1. Select radio mode using the AM/FM button (2).
2. Press SCAN to activate the function. SCAN is shown in the display.
3. Press the SCAN or EXIT button to deactivate the scan function and listen to the selected station.
Storing a station found with SCAN
A station can be stored as a preset while the SCAN function is activated.
Press one of the preset buttons (2) under which the station is to be stored. Hold down the button until STATION
STORED is displayed.
The SCAN function will be deactivated and the station can be selected by pressing the preset button.
Radio text
Certain stations broadcast program information, which can be shown in the display.
To start this function:
1. Select FM1 or FM2 and press the MENU button.
2. Press ENTER .
3. Select RADIOTEXT in the menu and press ENTER .
To deactivate this function, select RADIOTEXT again and press ENTER.
215 10 Audio
Sirius satellite radio (option or retailer-installed accessory)
Listening to satellite radio
The Sirius satellite system consists of a number of high elevation satellites in geosynchronous orbit.
ProCarManuals.com
Page 194 of 208
To change the code:
1. Select CHANGE CODE and press ENTER.
2. Enter the current code and press ENTER .
3. Enter the code and press ENTER .
4. Confirm the new code and press ENTER .
If an incorrect code is entered, the text WRONG CODE! is displayed.
If you have forgotten the access code:
1. Select " SIRIUS ID " in the Sirius settings menu and press ENTER .
2. Press and hold the ENTER button for 2 seconds.
3. The current code will be displayed.
Your Volvo retailer can also provide you with assistance.
SIRIUS ID
This function displays the 12-digit Sirius activation ID.
219 10 Audio
CD player/CD changer (option)
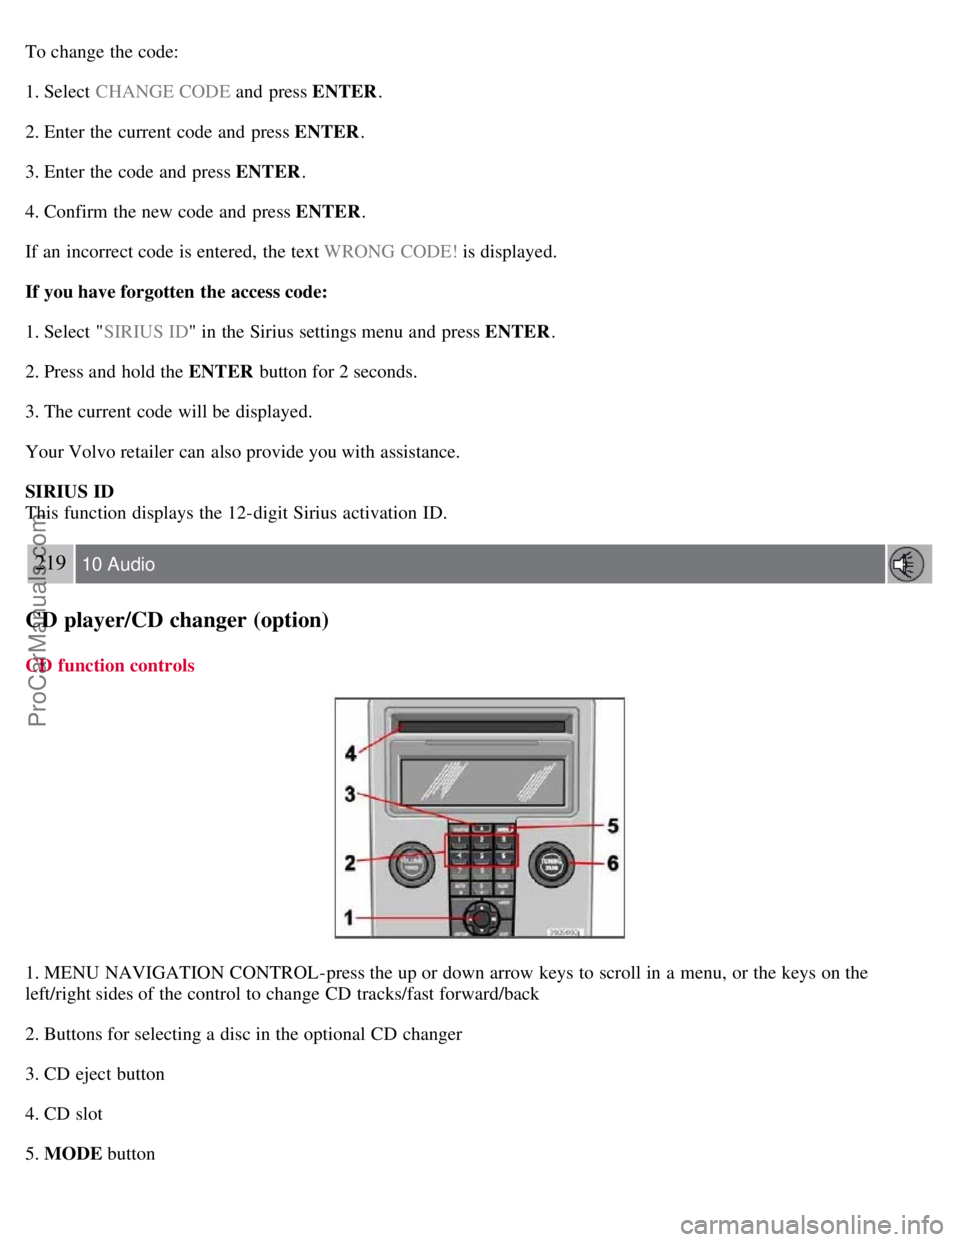
CD function controls
1. MENU NAVIGATION CONTROL-press the up or down arrow keys to scroll in a menu, or the keys on the
left/right sides of the control to change CD tracks/fast forward/back
2. Buttons for selecting a disc in the optional CD changer
3. CD eject button
4. CD slot
5. MODE button
ProCarManuals.com
Page 195 of 208
6. TUNING dial for selecting tracks
Playing a CD
Single CD player
Start the CD player by pressing the MODE button (5) and inserting a disc in the slot (4). If there is already a disc
inserted, it will begin to play.
NOTE
If a CD is in the slot when the audio system is in CD mode, the CD will be played automatically.
CD changer
The CD changer can hold up to six discs.
1. Start the CD changer by pressing the MODE button (5).
2. Select an empty position using the 1-6 buttons or the up/down keys on the MENU NAVIGATION CONTROL. The
display shows which positions are empty.
3. Insert a disc into the slot (4).
NOTE
Ensure that INSERT DISC is displayed before inserting a disc.
If a CD position in the changer containing a disc is selected, and the audio system is in CD mode when it is
switched on, the CD will play automatically.
CD eject
Eject from Single CD player
Press the eject button (3) to eject the disc.
Eject from CD changer
This function makes it possible to eject a single disc, or to eject all of the discs in the changer.
Press the eject button (3) briefly to eject the disc that is currently playing.
A longer press (more than two seconds) starts the process of ejecting all of the discs in the changer.
220 10 Audio
CD player/CD changer (option)
NOTE
The EJECT ALL function can only be used while the vehicle is at a standstill and will be cancelled if the vehicle
begins to move.
For reasons of traffic safety, the ejected CD must be removed within 12 seconds or it will be automatically drawn
back into the slot and the CD player will enter pause mode. Press the CD button to restart the disc.
CD Pause
When the audio system volume is turned off completely, the CD player will pause and will resume playing when the
volume is turned up again.
ProCarManuals.com
Page 198 of 208
Press the eject button (3) to eject the disc.
CD changer
This function makes it possible to eject a single disc, or to eject all of the discs in the changer.
Press the eject button (3) briefly to eject the disc that is currently playing.
A longer press (more than two seconds) starts the process of ejecting all of the discs in the changer.
NOTE
The Eject all function can only be used while the vehicle is at a standstill and will be cancelled if the vehicle
begins to move.
For reasons of traffic safety, the ejected CD must be removed within 12 seconds or it will be automatically drawn
back into the slot and the CD player will enter pause mode. Press the CD button to restart the disc.
Compact disc care
Keep the following in mind when playing/ handling compact discs
Do not put tape or labels on the disc itself. They could become stuck in the player.
CDR discs can cause listening problems due to the quality of the disc or recording equipment used.
222 10 Audio
CD player/CD changer (option)
DualDisc: The audio side of a DualDisc (combined CD/DVD) does not meet CD specifications and may not play in
your audio system.
Keep the discs clean. Wipe them with a soft, clean, lint-free cloth, working from the center outward. If necessary,
dampen the cloth with a neutral soap solution. Dry thoroughly before using.
Never use cleaning spray or antistatic liquid. Use only cleaners specifically made for CDs.
Use discs of the correct size only (3.5" discs should never be used).
Volvo does not recommend the use of plastic outer rings on the disc.
Condensation may occur on discs/optical components of the changer in cold winter weather. The disc can be dried
with a clean, lint-free cloth. Optical components in the CD changer may, however, take up to one hour to dry off.
Never attempt to play a damaged CD.
When not in use, the discs should be stored in their covers. Avoid storing discs in excessive heat, direct sunlight or
in dusty locations.
223 10 Audio
Audio menu
FM1/FM2 menu
1. RADIOTEXT ON/OFF
2. ADVANCED RADIO SETTINGS
3. AUDIO SETTINGS
AM menu
ProCarManuals.com