2007 VOLVO S40 ECU
[x] Cancel search: ECUPage 35 of 208

Booster cushions
Securing a booster cushion
WARNING
A child seat should never be used in the front passenger seat of any vehicle with a front passenger airbag - not even
if the "Passenger airbag off" symbol near the rear-view mirror is illuminated (on vehicles equipped with Occupant
Weight Sensor). If the severity of an accident were to cause the airbag to inflate, this could lead to serious injury or
death to a child seated in this position.
Booster cushions are recommended for children who have outgrown convertible seats.
1. Place the booster cushion in the rear seat of the vehicle.
2. With the child properly seated on the booster cushion, attach the seat belt to or around the cushion according to the
manufacturer's instructions.
3. Fasten the seat belt by inserting the latch plate into the buckle (lock) until a distinct click is audible.
4. Ensure that the seat belt is pulled taut and fits snugly around the child.
WARNING
The hip section of the three-point seat belt must fit snugly across the child's hips, not across the stomach.
ProCarManuals.com
Page 36 of 208
The shoulder section of the three-point seat belt should be positioned across the chest and shoulder.
The shoulder belt must never be placed behind the child's back or under the arm.
41 01 Safety
ISOFIX lower anchors
Using the ISOFIX lower child seat anchors
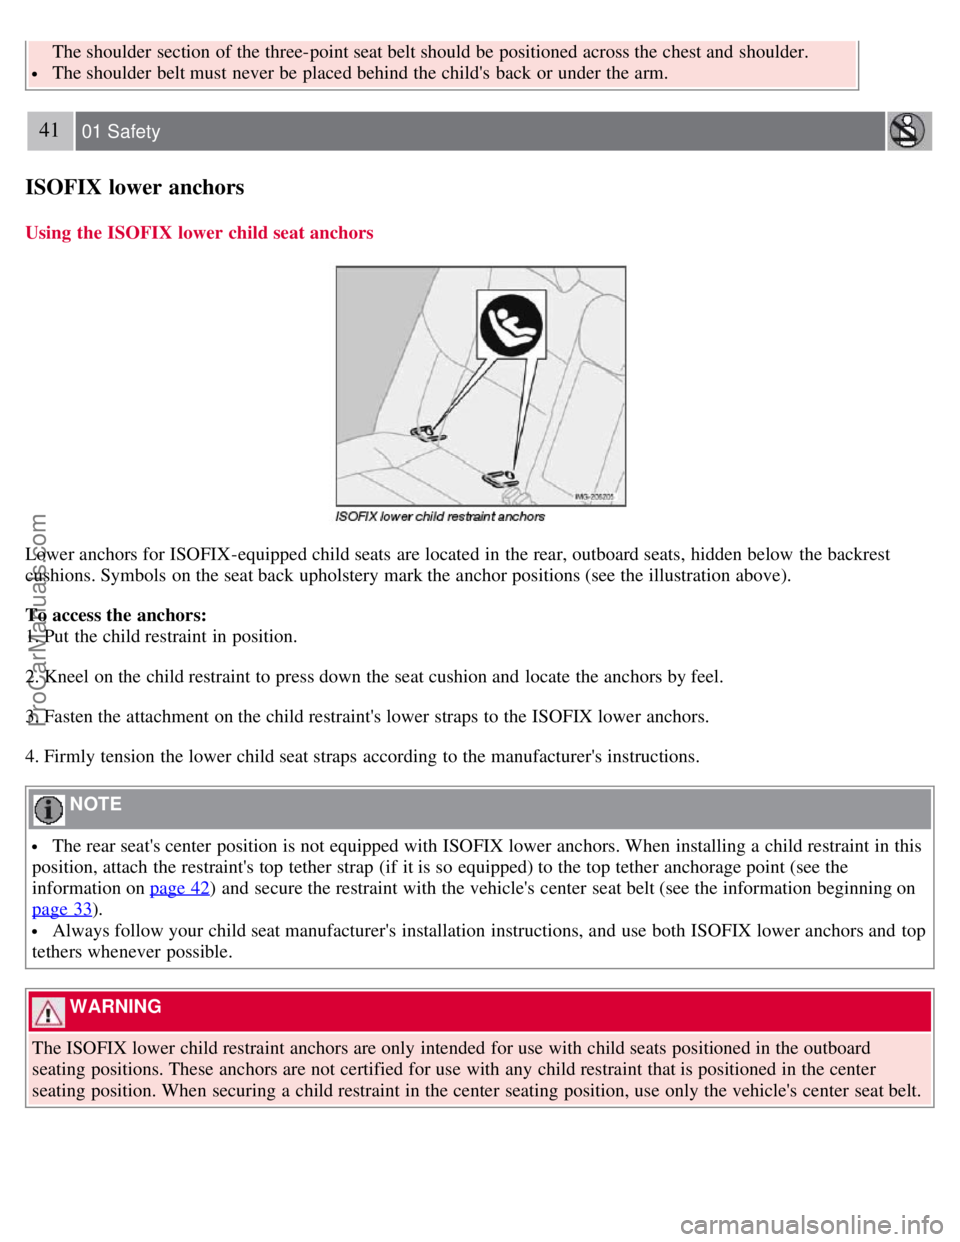
Lower anchors for ISOFIX-equipped child seats are located in the rear, outboard seats, hidden below the backrest
cushions. Symbols on the seat back upholstery mark the anchor positions (see the illustration above).
To access the anchors:
1. Put the child restraint in position.
2. Kneel on the child restraint to press down the seat cushion and locate the anchors by feel.
3. Fasten the attachment on the child restraint's lower straps to the ISOFIX lower anchors.
4. Firmly tension the lower child seat straps according to the manufacturer's instructions.
NOTE
The rear seat's center position is not equipped with ISOFIX lower anchors. When installing a child restraint in this
position, attach the restraint's top tether strap (if it is so equipped) to the top tether anchorage point (see the
information on page 42
) and secure the restraint with the vehicle's center seat belt (see the information beginning on
page 33
).
Always follow your child seat manufacturer's installation instructions, and use both ISOFIX lower anchors and top
tethers whenever possible.
WARNING
The ISOFIX lower child restraint anchors are only intended for use with child seats positioned in the outboard
seating positions. These anchors are not certified for use with any child restraint that is positioned in the center
seating position. When securing a child restraint in the center seating position, use only the vehicle's center seat belt.
ProCarManuals.com
Page 37 of 208
WARNING
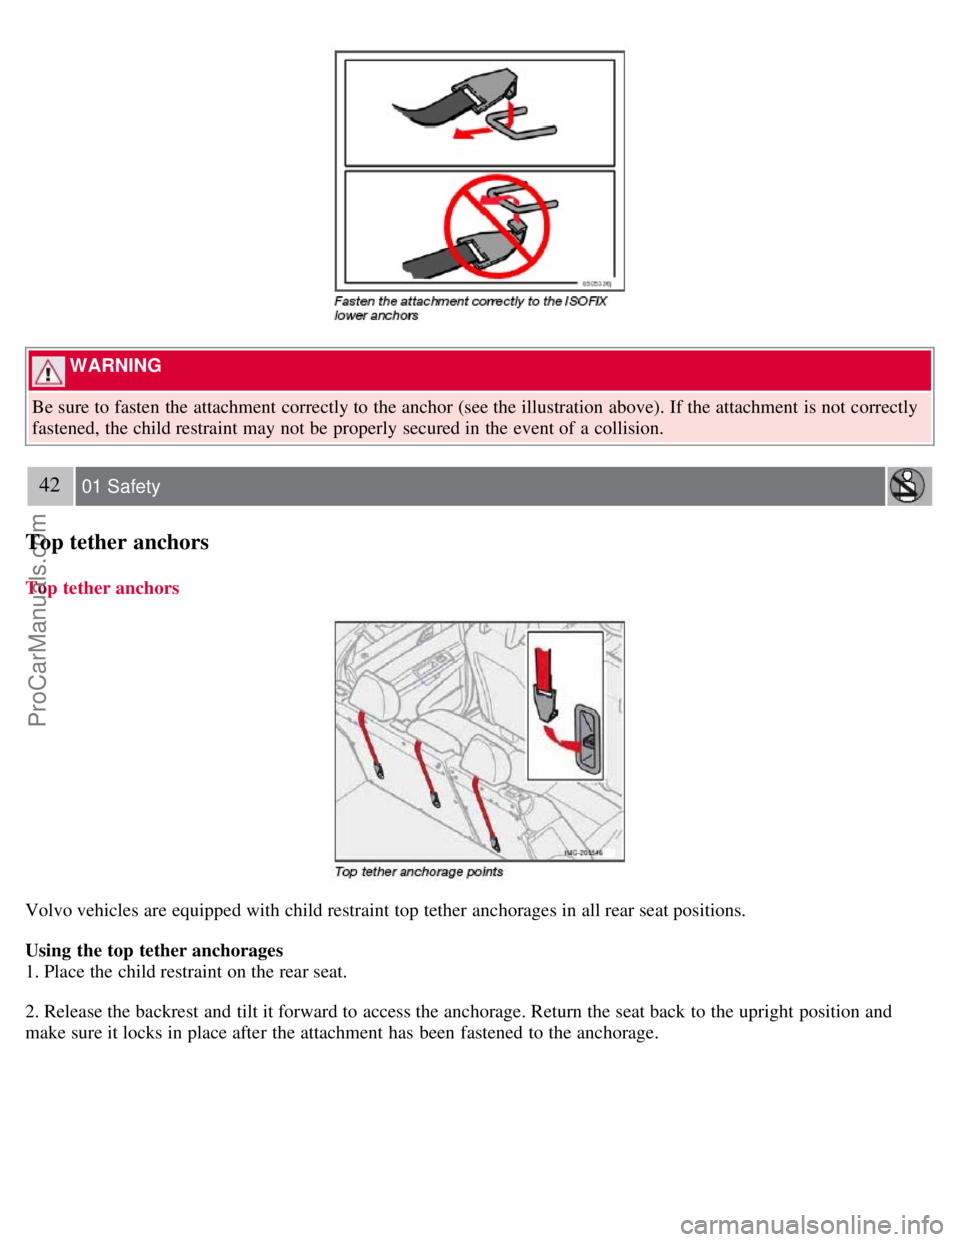
Be sure to fasten the attachment correctly to the anchor (see the illustration above). If the attachment is not correctly
fastened, the child restraint may not be properly secured in the event of a collision.
42 01 Safety
Top tether anchors
Top tether anchors
Volvo vehicles are equipped with child restraint top tether anchorages in all rear seat positions.
Using the top tether anchorages
1. Place the child restraint on the rear seat.
2. Release the backrest and tilt it forward to access the anchorage. Return the seat back to the upright position and
make sure it locks in place after the attachment has been fastened to the anchorage.
ProCarManuals.com
Page 38 of 208
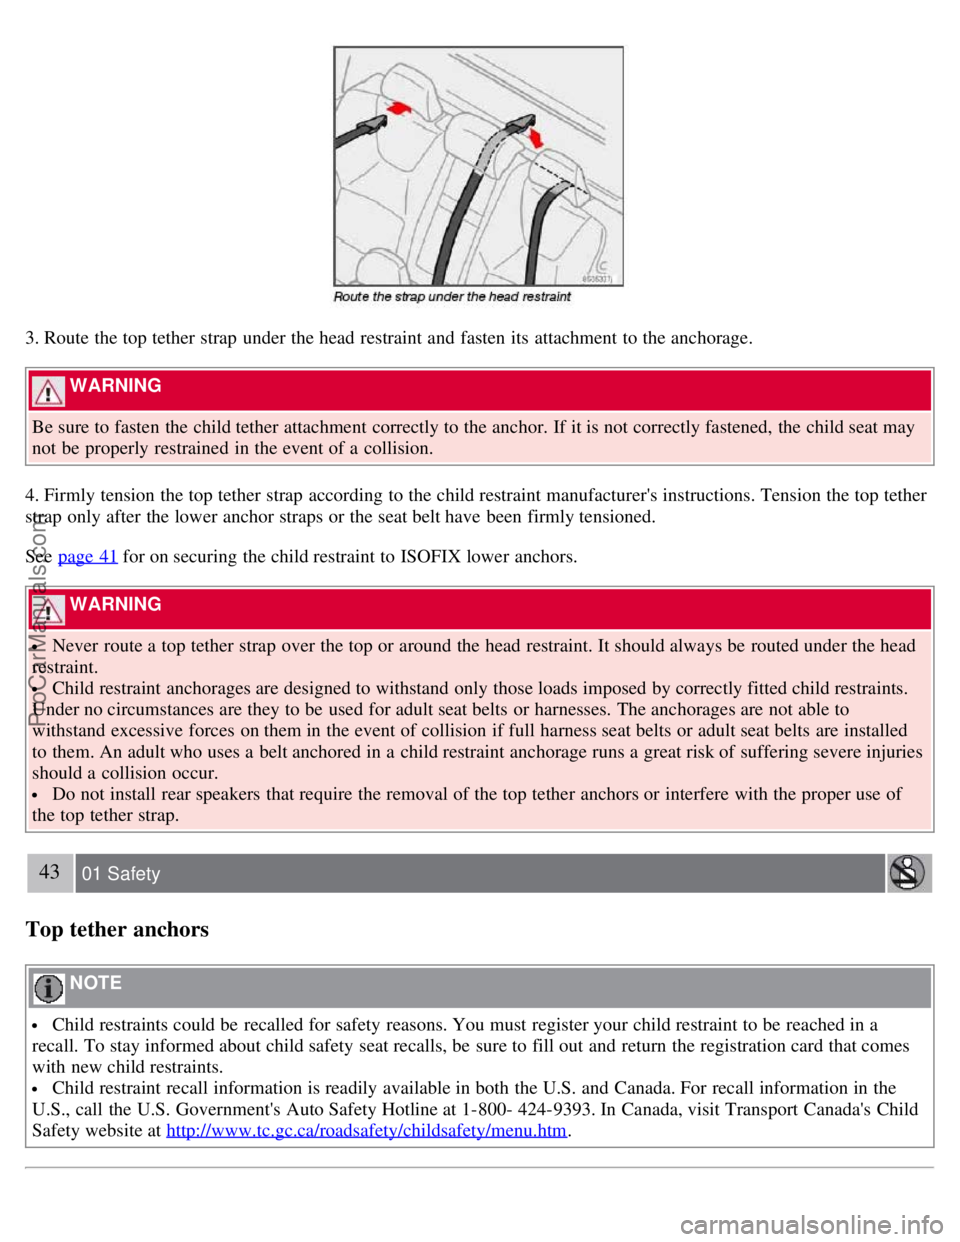
3. Route the top tether strap under the head restraint and fasten its attachment to the anchorage.
WARNING
Be sure to fasten the child tether attachment correctly to the anchor. If it is not correctly fastened, the child seat may
not be properly restrained in the event of a collision.
4. Firmly tension the top tether strap according to the child restraint manufacturer's instructions. Tension the top tether
strap only after the lower anchor straps or the seat belt have been firmly tensioned.
See page 41
for on securing the child restraint to ISOFIX lower anchors.
WARNING
Never route a top tether strap over the top or around the head restraint. It should always be routed under the head
restraint.
Child restraint anchorages are designed to withstand only those loads imposed by correctly fitted child restraints.
Under no circumstances are they to be used for adult seat belts or harnesses. The anchorages are not able to
withstand excessive forces on them in the event of collision if full harness seat belts or adult seat belts are installed
to them. An adult who uses a belt anchored in a child restraint anchorage runs a great risk of suffering severe injuries
should a collision occur.
Do not install rear speakers that require the removal of the top tether anchors or interfere with the proper use of
the top tether strap.
43 01 Safety
Top tether anchors
NOTE
Child restraints could be recalled for safety reasons. You must register your child restraint to be reached in a
recall. To stay informed about child safety seat recalls, be sure to fill out and return the registration card that comes
with new child restraints.
Child restraint recall information is readily available in both the U.S. and Canada. For recall information in the
U.S., call the U.S. Government's Auto Safety Hotline at 1-800- 424-9393. In Canada, visit Transport Canada's Child
Safety website at http://www.tc.gc.ca/roadsafety/childsafety/menu.htm
.
ProCarManuals.com
Page 72 of 208
NOTE
For your security, the HomeLink Universal Transceiver is designed to not function if you lock your car from the
outside.
Retain the original transmitter(s) for future programming procedures (for example, if you purchase a new vehicle).
For your own security, erase all programmed buttons on the HomeLink Universal Transceiver when you sell your
vehicle.
Metallic sun protection films should not be used on any windows in a vehicle equipped with HomeLink Universal
Transceiver. This could interfere with the transceivers function.
Operating the HomeLink Universal Transceiver
Once programmed, the HomeLink Universal Transceiver can be used in place of your handheld transmitters.
NOTE
The HomeLink universal transceiver will function for 30 minutes after the driver's door has been opened without
switching on the vehicle's ignition.
Press the programmed HomeLink button to activate the garage door, driveway gate, security lightning, home security
system etc.
Your original hand -held transmitters may, of course, be used at any time.
WARNING
If you use HomeLink to open a garage door or gate, be sure no one is near the gate or door while it is in motion.
Do not use the HomeLink Universal Transceiver with any garage door opener that lacks safety "stop" and
"reverse" features as required by federal safety standards. (This includes any garage door opener model manufactured
before April 1, 1982). A garage door opener that cannot "detect" an object, signalling the door to "stop" and
"reverse" does not meet current federal safety standards. Using a garage door opener without these features increases
the risk of serious injury or death. For more information on this matter, call toll-free 1-800-355-3515. (Internet:
www.HomeLink.com
).
Programming the transceiver for the first time (U.S. residents)
1. For first time training, press and hold the two outer HomeLink buttons, releasing only when the HomeLink indicator
light begins to flash after 20 seconds. (Do not perform this step when training the additional HomeLink buttons.)
2. Position the hand -held transmitter 1-3 inches away from the HomeLink surface
77 02 Instruments and controls
Home Link® Universal Transceiver (option)
(located on your sun visor), keeping the HomeLink indicator light in view.
3. Using both hands, simultaneously press and hold both the desired HomeLink button and hand held transmitter
button. DO NOT release until the HomeLink indicator light flashes slowly and then rapidly. When the indicator light
flashes rapidly, both buttons may be released. (The rapid flashing indicates successful training.)
NOTE
ProCarManuals.com
Page 86 of 208
2. Use this control to raise or lower the front edge of the seat cushion.
3. Use this control to raise or lower the rear edge of the seat cushion.
4. Turn this knob (option on some passenger's seats) to adjust the firmness of the lumbar support
1.
5. Turn this knob to adjust the backrest tilt.
6. Control panel for the optional power seat.
WARNING
Do not adjust the seat while driving.
The seat should be adjusted so that the brake pedal can be depressed fully.
Position the seat as far rearward as comfort and control allow.
1 Also applies to the optional power seat.
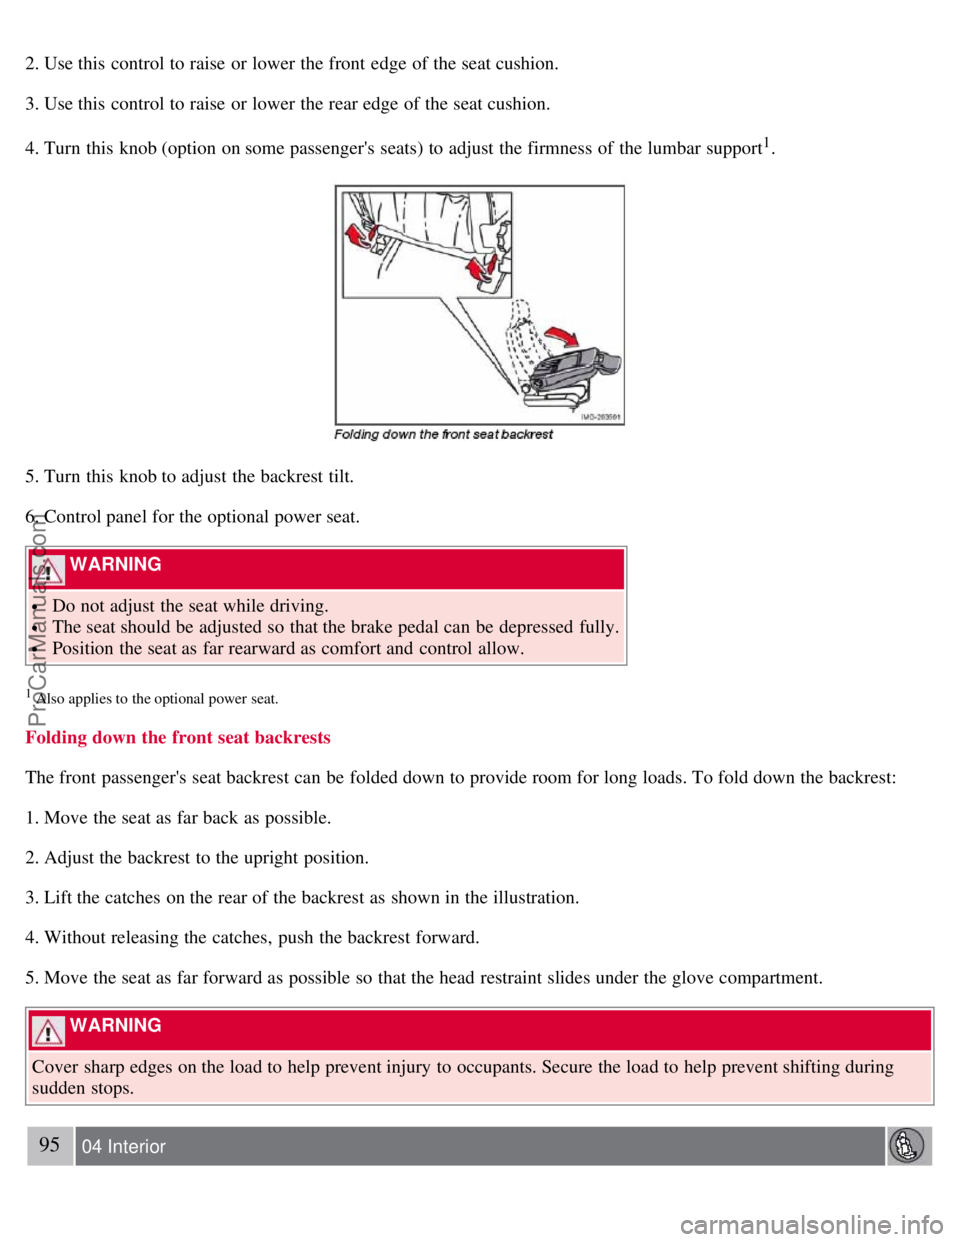
Folding down the front seat backrests
The front passenger's seat backrest can be folded down to provide room for long loads. To fold down the backrest:
1. Move the seat as far back as possible.
2. Adjust the backrest to the upright position.
3. Lift the catches on the rear of the backrest as shown in the illustration.
4. Without releasing the catches, push the backrest forward.
5. Move the seat as far forward as possible so that the head restraint slides under the glove compartment.
WARNING
Cover sharp edges on the load to help prevent injury to occupants. Secure the load to help prevent shifting during
sudden stops.
95 04 Interior
ProCarManuals.com
Page 94 of 208
4. Place the head restraints in the plastic tubes, which are now accessible on the under side of the seat cushions.
WARNING
The red lock indicator is VISIBLE when the backrest is NOT locked in position and hidden when the backrest is
correctly locked in place. When the backrest is in the upright position, it must always be correctly locked in place.
When the rear seat is folded down, do not place heavy objects against the backs of the front seats. This places a
severe strain on the folded down backrest of the rear seat. Be sure to secure cargo.
Cargo must not be stacked higher than the top of seat backs. This will reduce the possibility of luggage, etc.
becoming projectiles during sudden maneuvers, rapid braking or an accident.
103 04 Interior
Trunk
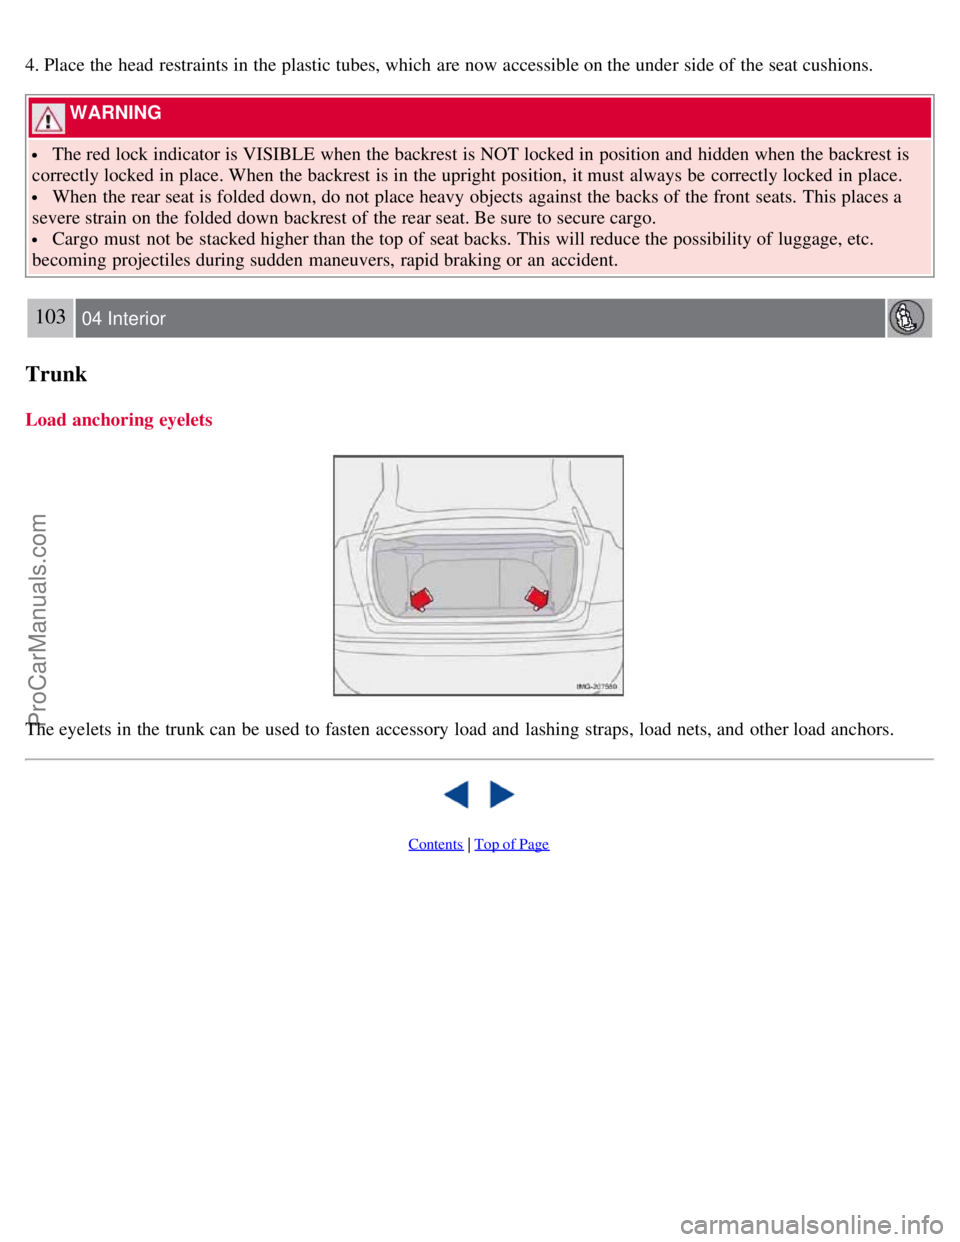
Load anchoring eyelets
The eyelets in the trunk can be used to fasten accessory load and lashing straps, load nets, and other load anchors.
Contents | Top of Page
ProCarManuals.com
Page 97 of 208

The car can also be locked if a door is open (does not apply to vehicles with the optional keyless drive.
2. Unlock - Press the Unlock button on the remote once to unlock the driver's door. The turn signals will flash twice to
confirm unlocking.
After a short pause, press the Unlock button a second time within 10 seconds to unlock the other doors and the trunk.
A long press (at least 2 seconds) opens all side windows.
NOTE
The turn signals flash to confirm that the vehicle has been correctly locked/unlocked with the remote control or
the optional keyless drive. When locking the vehicle, the turn signals will flash a confirmation only if all the doors
are securely closed and locked. Flashing confirmation for locking and unlocking may be customized in the vehicle's
Personal settings menu. See page 74
for more information.
The two-step unlocking function can be changed so that one press of the Unlock button unlocks all of the doors
and the trunk. See Personal settings on page 74
for more information.
Automatic relocking: If the doors are unlocked, the locks will automatically reengage (re-lock) and the alarm will
rearm after 2 minutes unless a door or the trunk has been opened.
Automatic locking : When the car starts to move, the doors and trunk can be locked automatically. This feature can
be turned on or off, see Personal settings on page 74
for more information.
Airbag deployment will automatically attempt to unlock the doors.
3. Approach lighting - As you approach the car:
Press the yellow button on the remote control to light the interior lighting, position/parking lamps, and license plate
lighting. These lights will switch off automatically after 30, 60 or 90 seconds. See the Personal settings on page 75
for
information about adjusting the time setting.
4. Unlock trunk - Press the button once to disarm the alarm system and unlock only the trunk. After closing, the trunk
will not automatically relock. Press Lock to relock it and rearm the alarm.
NOTE
This function will unlock, but not pop open, the trunk.
5. Panic alarm : - This button can be used to attract attention during emergency situations.
To activate the panic alarm, press and hold the red button for at least 3 seconds or press it twice within 3 seconds. The
turn signals and horn will be activated.
The panic alarm will stop automatically after 30 seconds.
108 05 Locks and alarm
Remote control and key blade
To deactivate, wait approximately 5 seconds and press the red button again.
NOTE
This button will NOT unlock the car.
Weak battery in the remote control
ProCarManuals.com