2007 VOLVO S40 fuses
[x] Cancel search: fusesPage 4 of 208

09 Maintenance and servicing
Volvo maintenance184
Maintaining your car185
Hood and engine compartment187
Engine oil189
Fluids190
Wiper blades192
Battery193
Bulbs195
Replacing front bulbs196
Replacing taillight bulbs200
Replacing interior bulbs201
Fuses202
10 Audio
Audio functions 210
Radio functions213
Sirius satellite radio (option or
retailer-installed accessory)215
CD player/CD changer (option)
219
Audio menu223
11 Specifications
Label information226
Dimensions and weights228
Engine oil231
Engine specifications233
Electrical system234
Volvo programs236
6 01 Safety
General information
Shiftlock (automatic transmission)
When your car is parked, the gear selector is locked in the Park ( P) position. To release the selector from this position,
turn the ignition key to position II (or start the engine), depress the brake pedal, press the button on the front side of the
gear selector and move the selector from Park ( P).
Keylock (automatic transmission)
When the ignition is switched off, the gear selector must be in the Park ( P) position before the key can be removed
from the ignition switch.
Anti-lock Brake System (ABS)
The ABS system in your car performs a selfdiagnostic test when the vehicle first reaches the speed of approximately
12 mph (20 km/h). The brake pedal will pulsate several times and a sound may be audible from the ABS control
module. This is normal.
Fuel filler door
Press the button on the light switch panel when the car is at a standstill to open the fuel filler door.
Fuel filler cap
After refueling, close the fuel filler cap by turning it clockwise until it clicks into place. If this cap is not closed tightly
or if the engine is running when the car is refueled, the Malfunction Indicator Lamp ("Check Engine" light) may
indicate a fault.
Points to keep in mind
Before you operate your vehicle for the first time, please familiarize yourself with the new-engine oil consumption
information on page 189
. You should also be familiar with the information found in the chapters "Instruments and
controls," and "Starting and driving."
Information contained in the balance of the manual is extremely useful and should be read after operating the
vehicle for the first time.
The manual is structured so that it can be used for reference. For this reason, it should be kept in the vehicle for
ProCarManuals.com
Page 112 of 208

Volvo recommends the use of snow tires on all four wheels for winter driving - see the chapter "Wheels and tires."
To prevent the washer fluid reservoir from freezing, add washer solvents containing antifreeze (see age 188 for the
location of the washer fluid reservoir). This is important since dirt is often splashed on the windshield during winter
driving, requiring the frequent use of the washers and wipers. Volvo Washer Solvent should be diluted as follows:
Down to 14° F (-10° C): 1 part washer solvent and 4 parts water Down to 5° F (-15° C): 1 part washer solvent and 3
parts water Down to 0° F (- 18° C): 1 part washer solvent and 2 parts water Down to -18° F (-28° C): 1 part washer
solvent and 1 part water.
Use Volvo Teflon Lock Spray in the locks.
NOTE
Avoid using de -icing sprays as they can cause damage to the locks.
Conserving electrical current
Keep the following in mind to help minimize battery drain:
When the engine is not running, avoid turning the ignition key to position II. Many electrical systems (the audio
system, the optional navigation system, power windows, etc) will function with the ignition key in position I. This
position reduces drain on the battery.
Please keep in mind that using systems, accessories, etc that consume a great deal of current when the engine is not
running could result in the battery being completely drained.
The optional 12-volt socket in the cargo area provides electrical current even with the ignition switched off, which
drains the battery.
NOTE
If the ignition is switched on, a warning message will be displayed in the text window in the instrument panel
when the battery charge is low.
An energy conserving function designed into the vehicle's electrical system will switch off certain functions or
reduce the load on the battery by, e.g., reducing the audio system's volume.
Before a long distance trip
It is always worthwhile to have your vehicle checked at a Volvo retailer before driving long distances. Your retailer
will also be able to supply you with bulbs, fuses, spark plugs and wiper blades for your use in the event that problems
occur.
As a minimum, the following items should be checked before any long trip:
Check that engine runs smoothly and that fuel consumption is normal.
Check for fuel, oil, and fluid leakage
Have the transmission oil level checked1.
Check condition of drive belts.
Check state of the battery's charge.
Examine tires carefully (the spare tire as well), and replace those that are worn. Check tire pressures.
The brakes, front wheel alignment, and steering gear should be checked by your Volvo retailer only.
Check all lights, including high beams.
Reflective warning triangles are legally required in some states/provinces.
Have a word with your Volvo retailer if you intend to drive in countries where it may be difficult to obtain the
correct fuel.
Consider your destination. If you will be driving through an area where snow or ice are likely to occur, consider
snow tires.
ProCarManuals.com
Page 160 of 208

2 0 0 7
VOLVO S40
182 09 Maintenance and servicing
Volvo maintenance 184
Maintaining your car185
Hood and engine compartment187
Engine oil189
Fluids190
Wiper blades192
Battery193
Bulbs195
Replacing front bulbs196
Replacing taillight bulbs200
Replacing interior bulbs201
Fuses202
183 09 Maintenance and servicing
184 09 Maintenance and servicing
Volvo maintenance
General
Volvo advises you to follow the maintenance program outlined in the Warranty and Service Records Information booklet.
This maintenance program contains inspections and services necessary for the proper function of your vehicle. The
maintenance services contain several checks that require special tools and training, and therefore must be performed by a
qualified technician. To keep your Volvo in top condition, specify time-tested and proven Genuine Volvo Parts and
Accessories.
The Federal Clean Air Act - U.S
The Federal Clean Air Act requires vehicle manufacturers to furnish written instructions to the ultimate purchaser to assure
the proper servicing and function of the components that control emissions. These services, which are listed in the
ProCarManuals.com
Page 179 of 208

6. Press the three lower lugs back into place.
202 09 Maintenance and servicing
Fuses
Fuse box in the engine compartment
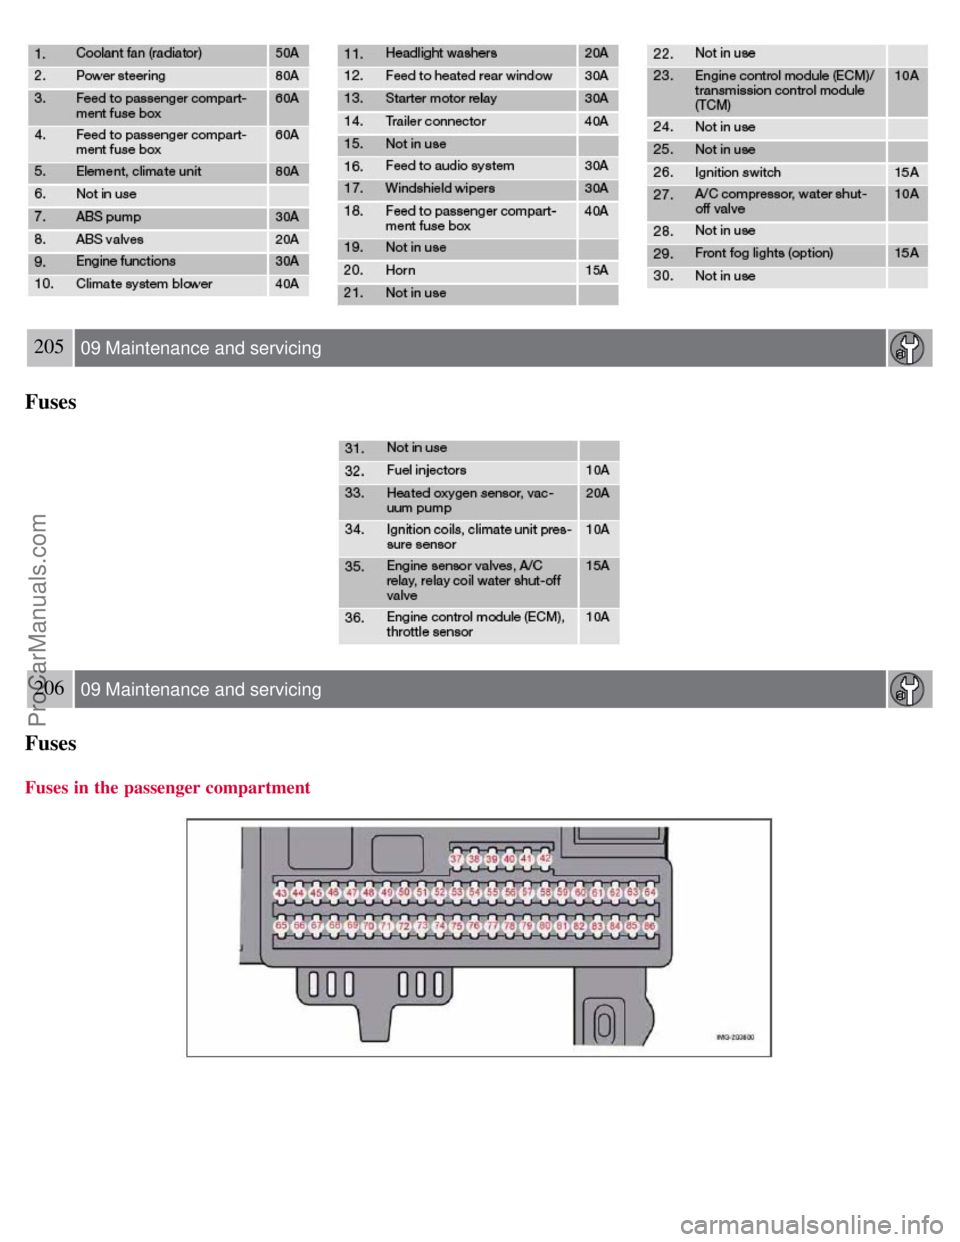
The fuse box in the engine compartment has positions for 36 fuses.
Fuses 1-18 are relays/circuit breakers and should only be removed or replaced by an authorized Volvo service
technician.
Fuses 19-36 may be changed at any time when necessary.
Several extra fuses and a fuse removal tool to assist in removing/replacing fuses can be found on the underside of the fuse
box cover in the engine compartment.
Replacing fuses
There are relay/fuse boxes located in the engine compartment and the passenger compartment.
If an electrical component fails to function, this may be due to a blown fuse. The easiest way to see if a fuse is blown is to
remove it.
To do so:
1. Pull the fuse straight out. If a fuse is difficult to remove, special fuse removal tools are located on the inside of the fuse
box covers.
2. From the side, examine the curved metal wire in the fuse to see if it is intact.
3. If the wire is broken, insert a new fuse of the same color and amperage (written on the fuse).
If fuses burn out repeatedly, have the electrical system inspected by an authorized Volvo retailer.
WARNING
Never use fuses with higher amperage than those stated in the following tables. Doing so could overload the vehicle's
electrical system.
203 09 Maintenance and servicing
ProCarManuals.com
Page 180 of 208

Fuses
Fuse box in the passenger compartment
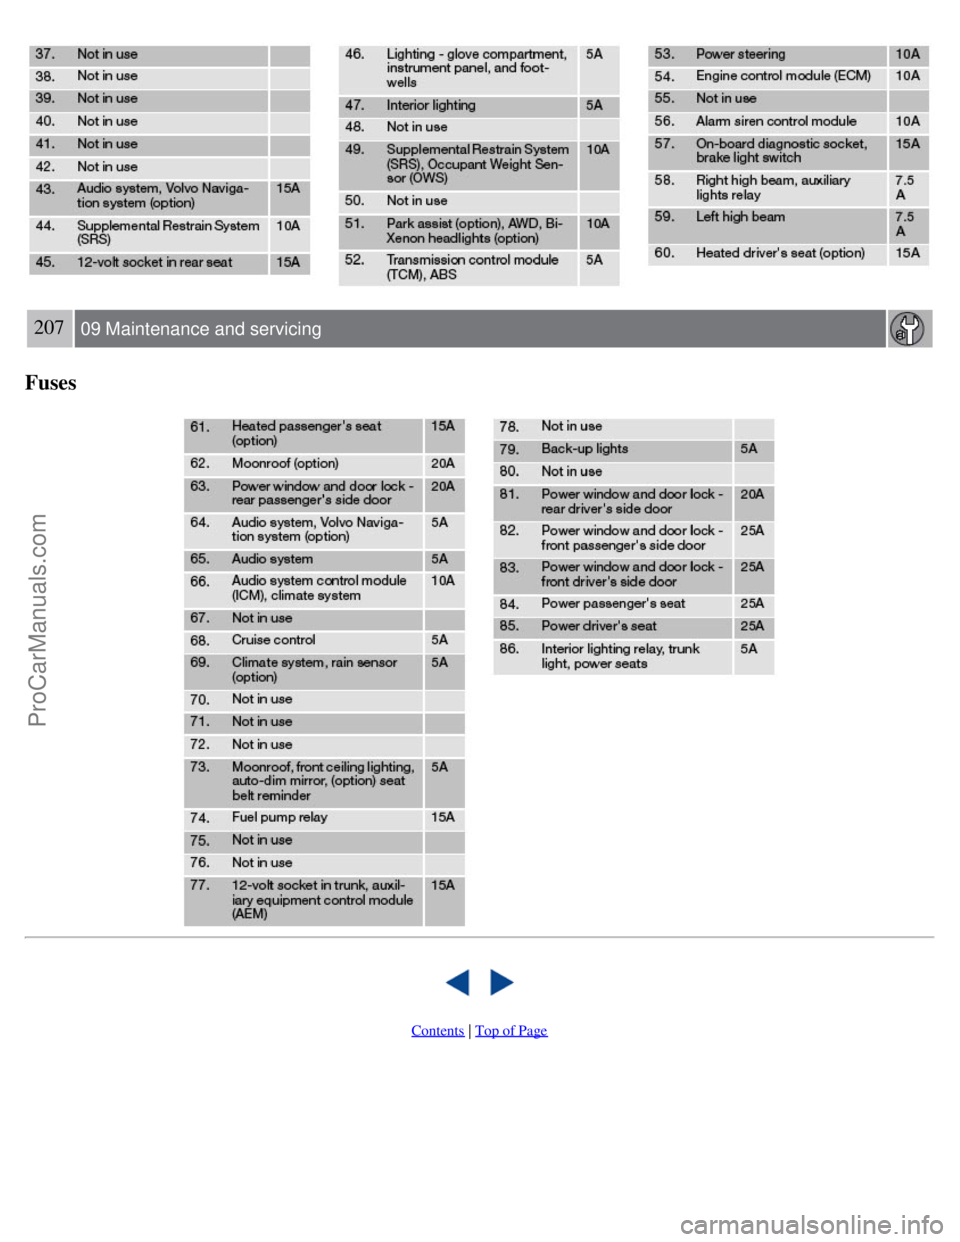
The fuse box in the passenger compartment is located under the glove compartment.
To access the fuses:
1. Remove the upholstery covering the fuse box by first pressing in the center pins in the mounting clips approximately 0.5
in (1 cm) with a small screwdriver and then pulling the pins out.
2. Turn both retaining screws (2) counterclockwise until they release.
3. Fold down the fuse box (3) half way. Pull it toward the seat until it stops. Fold it down completely. The fuse box can be
unhooked completely.
4. Replace the blown fuse.
5. Close the fuse box in reverse order.
6. Pull the center pins fully out of the mounting clips, secure the upholstery with the mounting clips and press the pins into
the mounting clips again. The mounting clips then expand, holding the upholstery in position.
204 09 Maintenance and servicing
Fuses
Fuses in the engine compartment
ProCarManuals.com
Page 181 of 208

205 09 Maintenance and servicing
Fuses
206 09 Maintenance and servicing
Fuses
Fuses in the passenger compartment
ProCarManuals.com
Page 182 of 208

207 09 Maintenance and servicing
Fuses
Contents | Top of Page
ProCarManuals.com